By: Edwin Sarmiento | Comments (5) | Related: 1 | 2 | 3 | 4 | 5 | > Language Integrated Query LINQ
Problem
In a recent tip on Language INtegrated Query (LINQ), you have described how it can be used as a query language extension to both VB.NET and C#. How can we use LINQ to SQL in .NET applications to query SQL Server databases?
Solution
LINQ to SQL is a component of .NET Framework version 3.5 that provides a run-time infrastructure for managing relational data as objects. As most developers are used to the object-oriented paradigm, accessing data from a relational database requires understanding of relational paradigm. LINQ to SQL makes querying a SQL Server database as if it was an object and eliminate the need to write very complex SQL statements whenever necessary. It is also an OR/M (object-relational mapping) implementation that allows you to model a relational database using .NET classes. You can then run queries in the database as well as perform insert, update and delete actions to it.
Model your SQL Server databases using LINQ
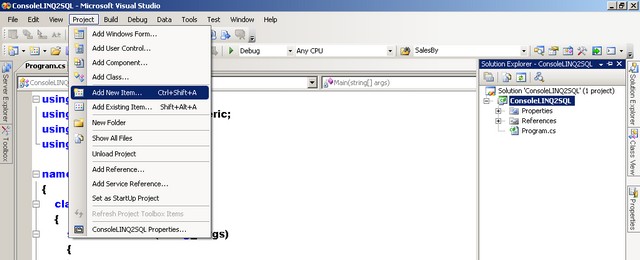
Visual Studio 2008 and the corresponding Express Editions come with a visual designer which makes it easy to model and visualize a database as a LINQ to SQL object model. Let's create a console project by following the steps outlined in the Introduction to LINQ tip. We will name our Visual Studio project ConsoleLINQ2SQL and use the C# language. Next, let's add a new item in our project. Click on the Project menu and select Add New Item... from Visual Studio.
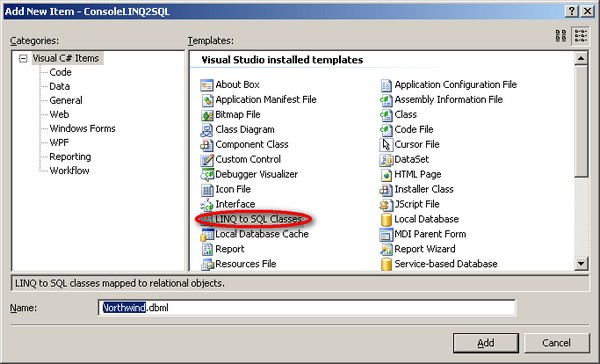
On the Add New Item window, select LINQ to SQL Classes under the Templates section and name it Northwind.dbml as we will be using the Northwind database for the sample queries
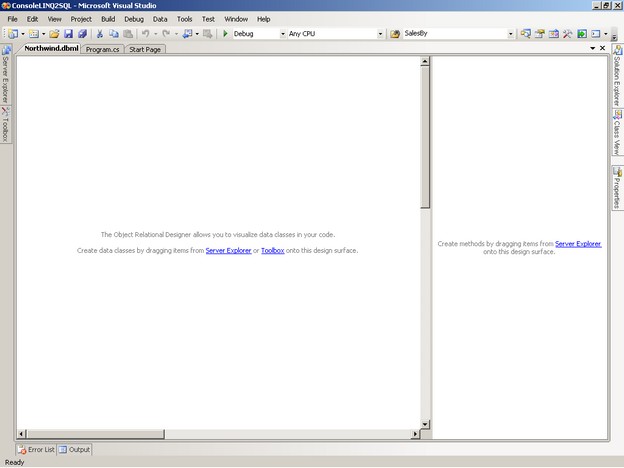
This will do a couple of things. First, it will add the System.Data.Linq namespace in the project. This assembly contains the framework implementation for LINQ to SQL and makes it easy to refer to SQL Server database objects as how developers do in object-oriented programming. Next, it gives you a object-relational designer where you can drag-and-drop database objects and it will create the corresponding. The designer will open up, displaying two separate panes, after adding the LINQ to SQL class in your project.
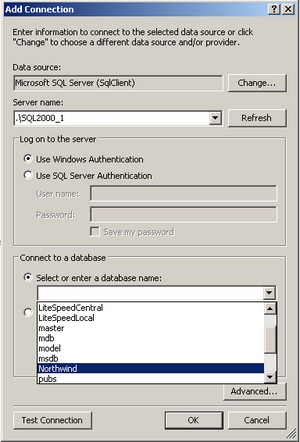
To start adding database objects in the designer surface, click on the Server Explorer link. Create a new connection to a SQL Server database by clicking on the Connect to Database icon in the Server Explorer window. The Add Connection window appears which will ask you to specify the SQL Server instance name, database name and your login credentials. I've selected the Northwind database for the samples
Once the database connection has been created, you can start dragging and dropping database objects in the designer surface. Expand the Server Explorer window and select the Instancename.Northwind.dbo data connection. Expand the Tables folder to see all of the tables inside the Northwind database. Start by selecting the Customers, Order Details, Orders, Products, Shippers and Suppliers tables and dragging them on the designer surface.

The designer will create the corresponding classes necessary to translate your database into objects. Each table dragged into the designer surface will have a corresponding entity class. Each instance of the entity class represents a row within the table. The arrows represent the relationships between the entity classes as defined by the primary key/foreign key constraints in the database. The direction of the arrows indicate whether the associations are one-to-one or one-to-many.
Introducing the DataContext class
The designer will create a corresponding DataContext class together with all of the entity classes that correspond to the tables in the database. This is done immediately after clicking the Save button within the designer surface. The DataContext class represents the main entry point for the LINQ to SQL framework and is the most important class. I refer to it as a proxy class responsible for representing how the database should look like from an object-oriented perspective. We will be using this proxy class to query entities from the database as well as perform changes. The properties and methods of this proxy class correspond to the tables and stored procedures we have added, respectively. We will look at using stored procedures with LINQ to SQL in a future tip.
Querying tables using LINQ
Let's start writing some code inside the static void Main(string[] args).
var dbNorthwind =new NorthwindDataContext() ;
// Create the query
var query = from c in dbNorthwind.Customers
select c;
// Execute the query
foreach (var c in query)
{
Console.WriteLine(c.CompanyName);
} //Pause the application
Console.ReadLine();
As you would have figured out, there isn't much difference in the query from the Introduction to LINQ tip except for the part where the output needs to be written to the console window. Since c is an instance of the dbNorthwind.Customers class. Since we are returning an instance of the class, it would make sense to simply display the properties rather than the entire object which, in this case, the CompanyName property of the dbNorthwind.Customers class. As previously mentioned, the properties of the class represent the columns in the associated table. LINQ to SQL also makes sure that the properties are strongly-typed to avoid data type conflicts between the class and the columns in the associated table. You can also apply filtering and sorting in the queries as you would do using T-SQL.
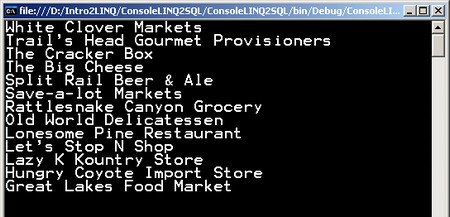
where c.Country == "USA"
orderby c.CompanyName descending
Your output will look like this when you run your project in Visual Studio. You can press F5 or click on Debug - Start Debugging in Visual Studio
We can see what is happening under the covers by logging the activity to the console. Insert the following code after the var dbNorthwind =new NorthwindDataContext(); line and run the application.
var dbNorthwind = new NorthwindDataContext();
dbNorthwind.Log = Console.Out;
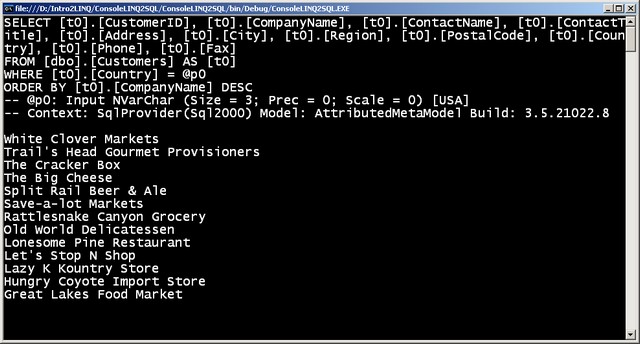
The first few lines of the output display the T-SQL query that LINQ generated and the provider used for the backend SQL Server database. Mine displays SqlProvider( Sql2000) as I am using a SQL Server 2000 instance. You can also use SQL Profiler to capture the generated T-SQL queries. Notice the use of parameters in the query because of the existence of a where clause. LINQ to SQL generates parameterized queries in order to prevent SQL injection attacks thru the application.
Query Across Relationships
Since the O/R model has generated the corresponding relationships for your classes, you can write queries that refer to those relationship properties. Let's say you wanted to retrieve all the OrderIDs and ContactName of all Customers based in Italy. You can write your query as shown below
var dbNorthwind = new NorthwindDataContext() ;
// Create the query
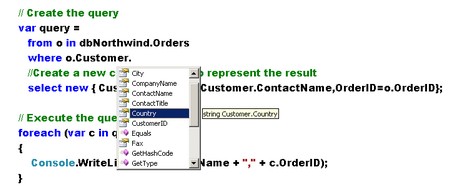
var query = from O in dbNorthwind.Orders
where O.Customer.Country=="Italy"
//Create a new class instance to represent the result
select new {CustomerName=O.Customer.ContactName,OrderID=O.OrderID};
// Execute the query
foreach (var c in query)
{
Console.WriteLine(c.CustomerName + "," + c.OrderID);
}
//Pause the application
Console.ReadLine();
You will notice that the IntelliSense feature in Visual Studio will pick up the corresponding relationships between the class instances using the dot (.) notation.
Next Steps
You have seen how you can use LINQ to SQL to query SQL Server databases. LINQ to SQL is only for SQL Server and not for any other relational databases out there so we still need to wait for LINQ to SQL implementations for Oracle or IBM DB2. In future tips, we will look at data manipulation and using stored procedures in LINQ to SQL.
- Give this example a try and change the query parameters so you can have a feel of how LINQ to SQL works.
- Learn more about LINQ to SQL


About the author
 Edwin M Sarmiento is a Microsoft SQL Server MVP and Microsoft Certified Master from Ottawa, Canada specializing in high availability, disaster recovery and system infrastructures.
This author pledges the content of this article is based on professional experience and not AI generated.
View all my tips
