By: Scott Murray | Comments | Related: > Integration Services Best Practices
Problem
What methods can be used to document and sequence SSIS packages, connections, and tasks "inline" just as we do our SQL Code?
Solution
Time and time again, you will always hear SQL Server DBA's express the need to document your SQL queries, views, stored procedures, and functions within the text of the statements. Doing the same with your SSIS projects and packages is also equally important although the methodology may not be exactly the same. Utilizing text box like annotations, coloring schemes, descriptions, and containers, much documentation can be delivered to other users of these same packages. Certainly there are some commercial tools from a few vendors which do some of this work, however those tools incur a cost; we can achieve much by just using the methods and properties currently available in SQL Server Data Tools or SSDT (formerly know as BIDS).
Using Default Names Creates Ambiguity
How often do you open up a SSIS package and see a package that looks exactly like the below screen prints? Then when you double click on the data flow or the data flow tab, you see the picture in the second illustration. The default names are used everywhere. This situation is analogous to writing a whole set of SQL code and putting no comments, spacing, or tabs within the SQL code. Does it work? Yes! However it would be very difficult for someone coming behind you to troubleshoot the package if an issue arises.

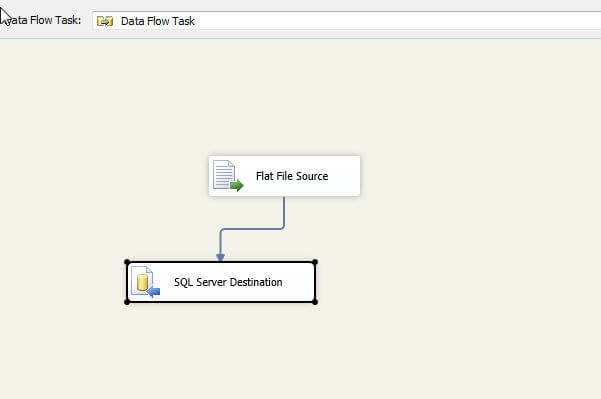
This package, in its current state, gives little if no information about the data flow, its source, its use, its destination, or its connections. Of all the items in the above screen print, probably the SQL Server Connection in the Connection Manager (lower left corner of the first illustration) provides the most detail. All of the various data flows and tasks contain very generic names; also the package name has not been changed and is just called package.dtsx which again gives no indication about the purpose of the package.
Use Meaningful Names for Package, Tasks, Connections, etc...
Thus, our first documentation adjustment is change / update the package file name and the package name to reflect the package's purpose as noted in the below illustration.
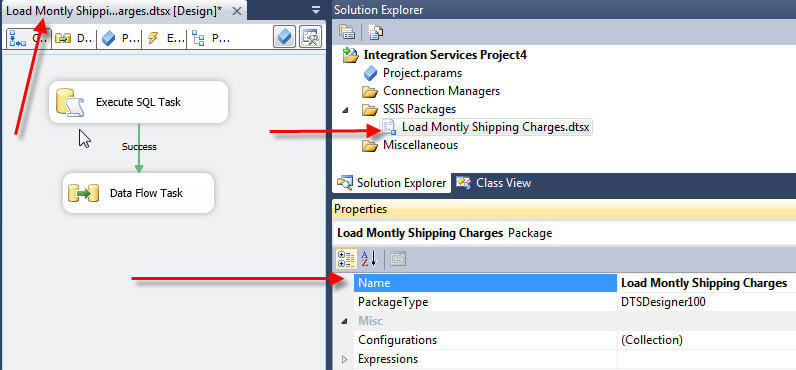
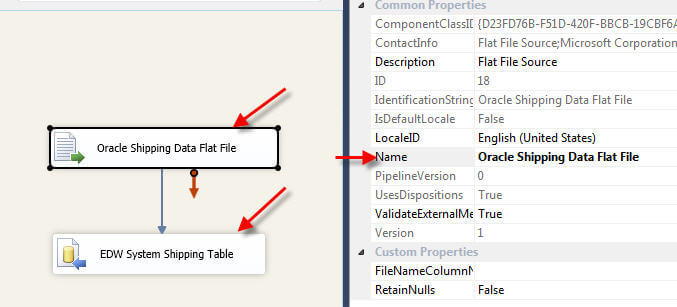
Now that we have a valid and descriptive package name, we need to work on the individual task items. Each task and connection on the design grid should contain a useful and valid name description which denotes the task to be performed or describes the connection to be made. Outwardly the name property is what displays on the task in the design grid, so a descriptive name is extremely helpful in conveying that object's job to do. In the below screen print, I changed both the title and description of the task. The name field can include most characters.
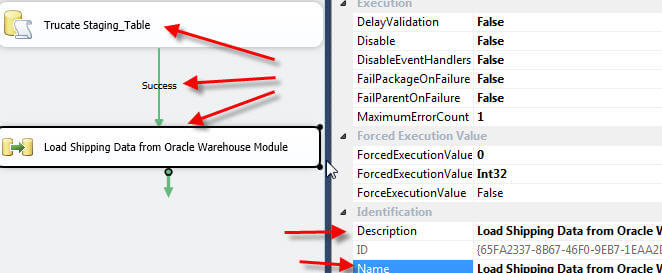
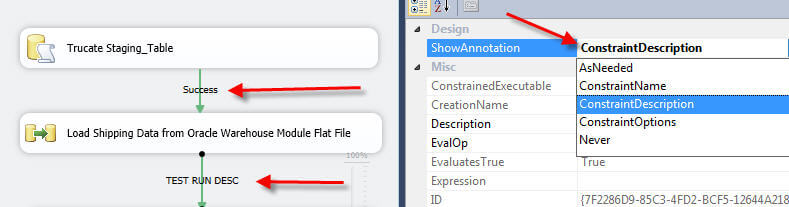
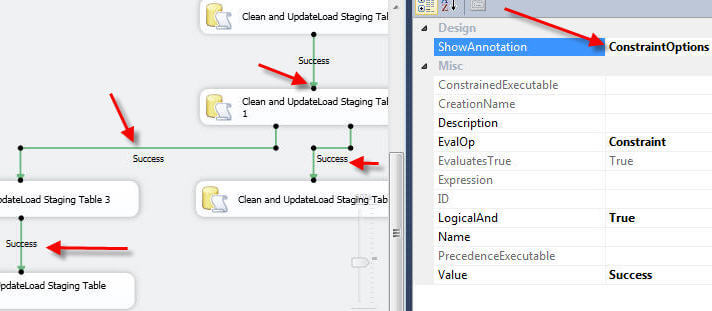
It is often helpful to adjust the description used for the Precedence Constraint lines (the arrows that go between tasks). Most folks do not realize that in addition to the lines themselves, you can add either the ConstraintName, ConstraintDescription, or ConstraintOptions to the constraint line as noted in the below screen print. The ConstaintName selection naturally displays the ConstraintName, while ConstraintDescription displays the description property (shown below). The third selection items, ConstraintOptions, shows the text for whether the constraint is a Success Constraint, a Fail Constraint, or a Completion Constraint. Of course, for someone who is color blind, these annotations are quite useful ( many folks are green and red color blind).
The actual process of changing the field can accomplished by updating the Name field in the properties window or by selecting the task to be updated and then hitting F2. You can also do what I call a slow double click on the name in task itself which allow the name to be changed right in the taskbox. Continuing with the name updates you should also adjust the names of any data flow sources, destinations and transformation as noted in the below screen print.
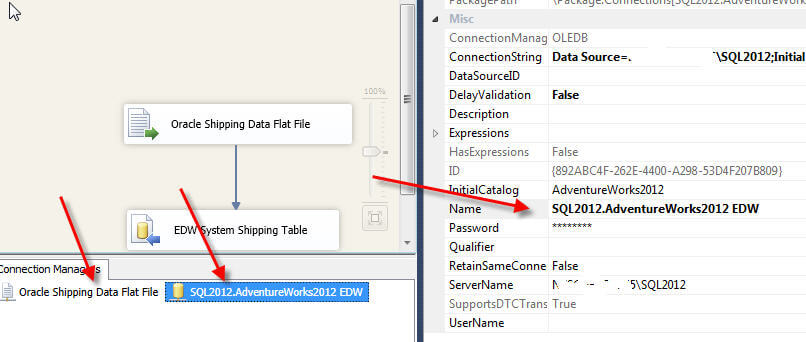
Finishing off the naming process is to update the names for the connection strings.
Ok, I know what you are thinking, why is it so important to make all these name changes. First and foremost, when you execute a package and say you have many data flows, having a good name points you immediately to where a problem is when a problem occurs. Otherwise, you will have multiple data flows and tasks all with basically the same name outside of the last number. Additionally, if you are utilizing any logging or error raising, passing a descriptive name to the log or error system allows for quick identification of errors.
Sequencing, Formatting, and Annotation
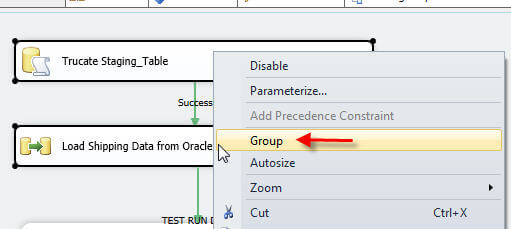
Now that the naming for our package is all set, our next method of documentation actually serves a secondary purpose of grouping and potentially sequencing our tasks. We actually have two options for grouping our individual tasks: 1) using a Group or 2) using a Sequence Container. Using the group functions does not provide the same level of control as a sequence container, but it is an easy way to cluster a set of tasks together without breaking the precedence constraints (success, fail, complete lines) between those tasks. In order to create a group, you select the tasks requested for the group and then right mouse click and select group as noted below.
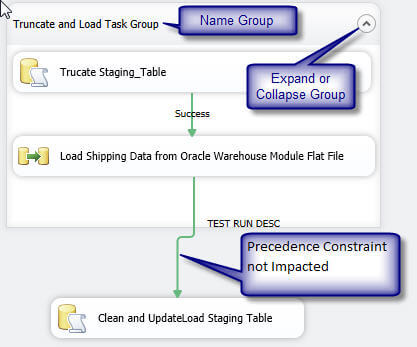
Notice several items in the below screen print. First, the default name for the group is Group; of course, in we need to rename the "Group" to "Truncate and Load Task Group". Second, the group allows you to expand or collapse the group container which is handy when you have a large number of groups and tasks. Third, the precedence constraint is not impacted by the grouping.
A few other side notes about these groups, you can easily ungroup the entire listing by selecting the group (not an individual task) and then right mouse clicking and choosing ungroup. You can remove a task from a group by just dragging it outside the boundary lines of the group. Furthermore, you can actually layer groups by selecting one group and then either another group or a separate task, right mouse clicking and then selecting the Group options. Also, if you delete the group, the tasks within the group are also deleted ( you will need to ungroup if you want to remove the grouping but keep the tasks). There are a few disadvantages with groups. First, you cannot execute all the tasks in the group at once. Second, the group has no concept of a precedence constraint for the entire group; you must execute tasks individually. These disadvantages, though, are what a sequence container does well. To add a sequence container, you will need to drag and drop it from the toolbox onto the design grid as show below.
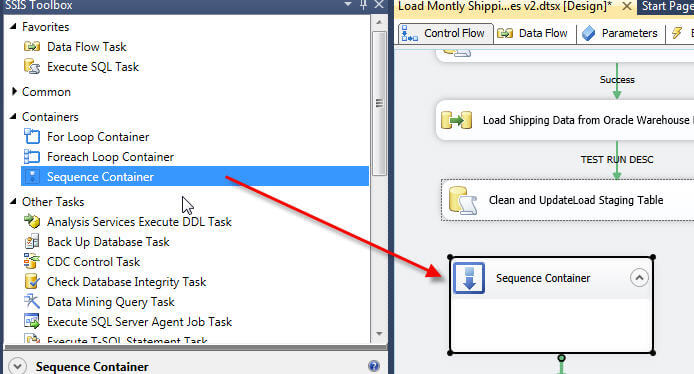
Once the sequence container is on the design grid, we can now add the tasks to the sequence container by dragging them to into the Sequence Container box. However, if you attempt to add tasks which already are connected with a precedence constraint, the below error will result.
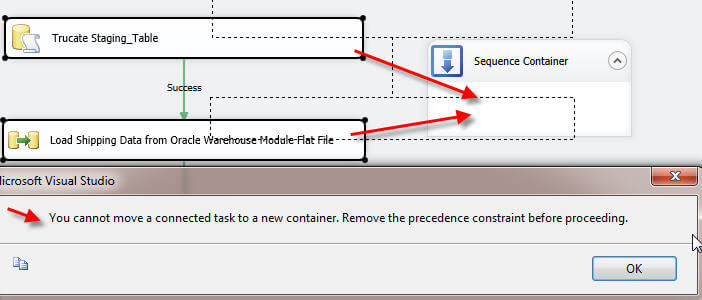
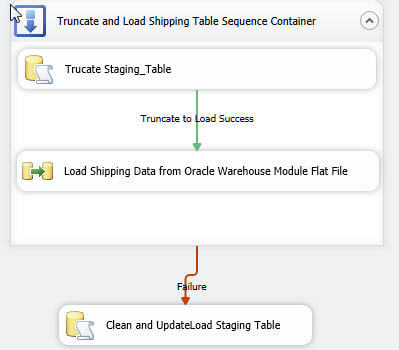
To get around this issue, we must first delete our constraints, and then we can drag the tasks into the sequence container. Again be sure to name your container with an informative and descriptive name. At this point we have much of the same functionality as a group. Tasks can be dragged into the sequence container (as long as they have no precedence constraints connected); the container can be expanded and collapsed, and the entire container can be deleted (along with the tasks inside the container). However, you will notice that as compared to the group illustrations above, the precedence constraint comes out of the container and not the individual tasks. Thus the entire container must complete before being evaluated by the precedence constraint. This situation is typical if you have multiple data flows within a sequence container that are running in parallel (at the same time) as opposed to running sequentially.
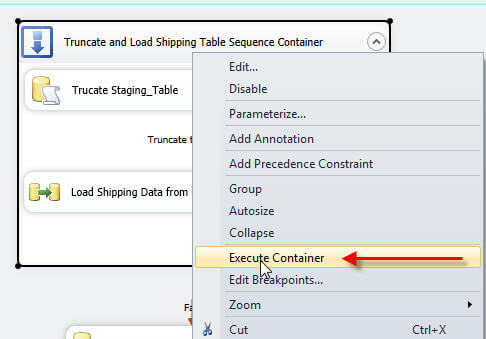
Additionally, with a Sequence Container, the entire container can be executed by right clicking on the container (and not on a task), as illustrated below.
Sequence containers along with their cousin containers, For Each Loop and For Loop, are great ways to document and segment your processes by areas of development, and of course allow for easy documentation of those groups of tasks. Even with this documentation, the formatting and alignment of tasks inside of a SSIS package display much information about the package.
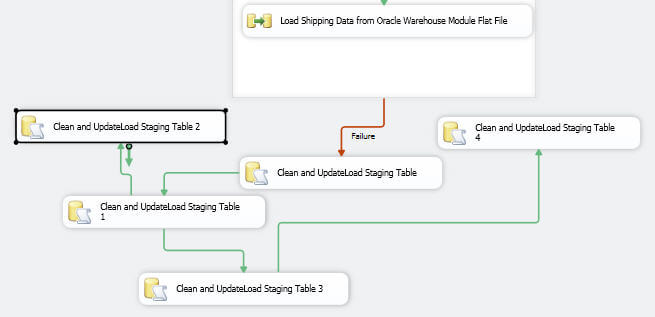
Take a look at the below screen print. Even though all the tasks are documented, the mess of lines makes trying to follow flow of tasks very difficult ( and this package is a simple package).
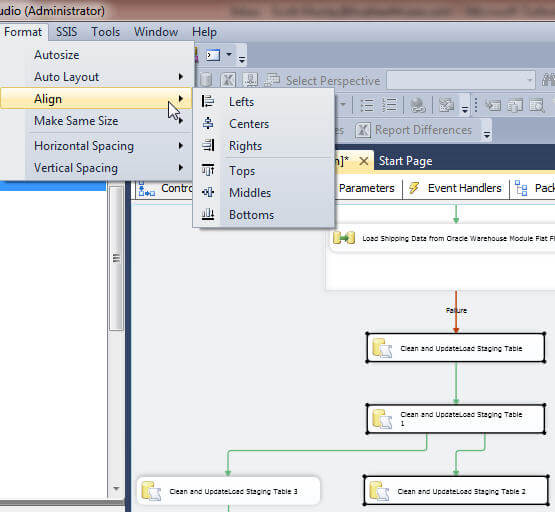
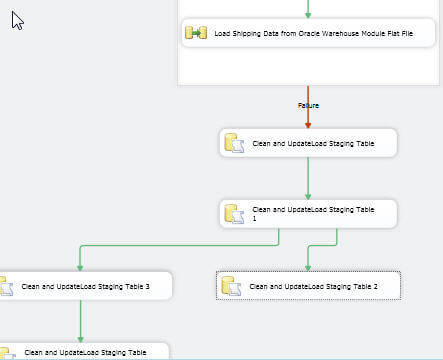
The mess of lines and tasks can be very easily realigned and displayed by using format options within SSIS. Making use of the Align options, the below screen prints show a much easier flow of tasks to follow. The Auto Layout option can also be used to do a quick realignment of all the tasks.
It is funny how much a "good picture" documents your process flow. Of course, with all those lines, we would like to add annotation to all the precedence constraints. You can actually select all the lines at once and then change the ShowAnnotation at one time.
Annotations can also be added directly onto the design grid or to a group or container. These annotations provide an excellent way to detail and document the entire package or individual items on the grid. To add an annotation, right mouse on any open area within the design grid, and select Add Annotation.
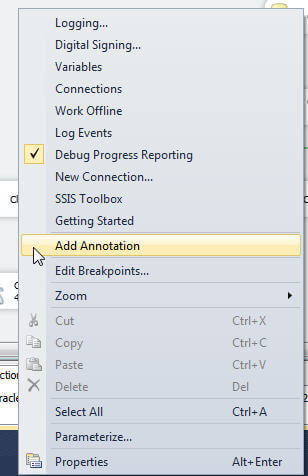
I should mention a few caveats about annotations: 1) you have limited formatting options and without doing some binary coding, you cannot change the background color nor change the font on individual words 2) Word wrapping works (it did not in previous editions) 3) No borders can be added (see workaround below) 4) the only way to adjust the available / changeable font properties is by right mouse clicking on the annotation and selecting Set Text Annotation Font as displayed in the second screen print below.
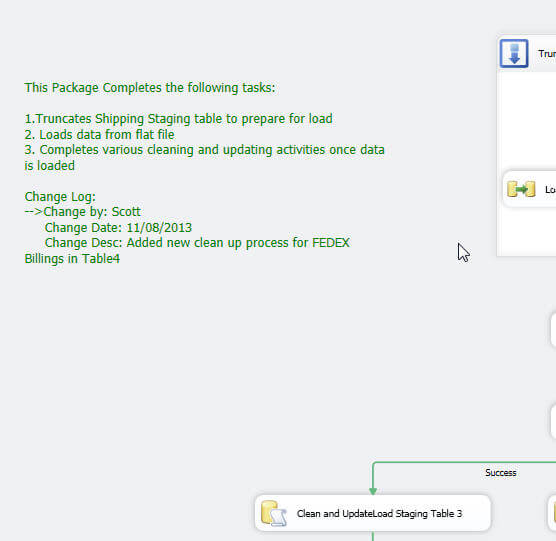

In the above example I set the Font color to green to catch the reader's attention. In addition to adding a whole package annotation, you can also add annotations to a sequence container or group. The process is exactly the same as adding a package annotation and is displayed below. Unfortunately, annotations cannot be added to individual tasks (although a work around can be used which will be described below), but they can be added to data flows screens and to groups within the data flows tab.
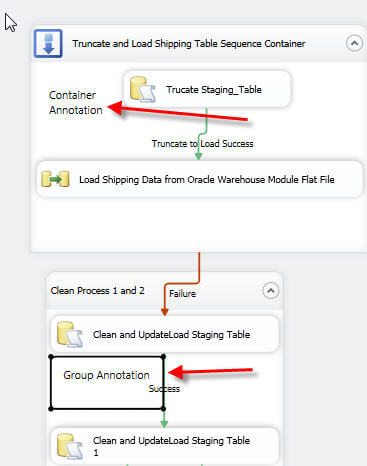
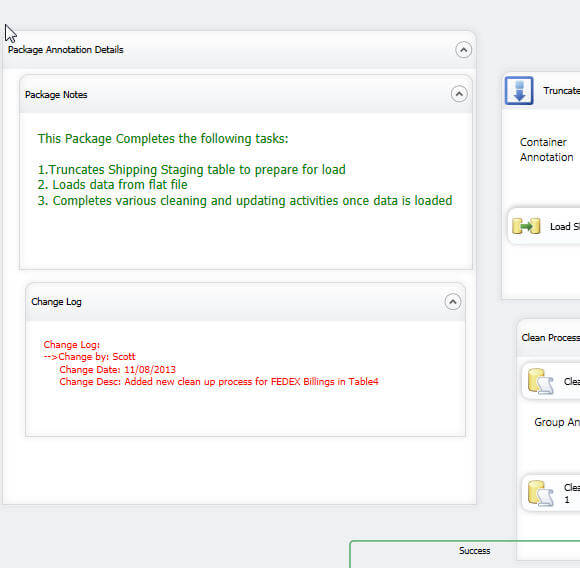
I mentioned earlier that a workaround exists to add a border around a package annotation. It is simple as making the annotation text box part of a group. Once you make it part of a group, the group encircles the annotation within its area and encloses the package within a border. In the below example, two annotations were added; one for package notes and one for the change log. Each of the annotations were put into its own group, and then the two "annotation groups" were put into a third group which contains all the package details. You could use this same method to add a single task to a group, and then add an annotation to that group; this method gives you the ability to annotate a single task.
Annotations add an easy and nice looking method of providing details about your package. Without these annotations, the package reader (often a trouble shooter) is left just guessing about the package's functions and processes.
Conclusion
In many of my other tips, I gloss over the importance of documenting the process
I am describing. However, I recently attempted to diagnose a package that looked
like a spaghetti mess. None of the tasks or data flows were named nor were
there any annotations. The precedence lines were going every which way with no easy
way to follow the entire process. It took me a few hours to make heads or tails
of just the process flow; thus I thought it would be wise "to document" your SSIS
packages. First and foremost, each task, precedence, and data flow should be appropriately
named and described. Next, groups and containers should be used to help document
the flow of tasks and again should be properly named. Furthermore, the alignment
of the tasks and precedence constraint flows should be clear and not intertwined.
The constraints should move from top to bottom and left to right if possible. Finally
judicious use of annotations finishes off the documentation process within a package.
Next Steps
- Groups: http://technet.microsoft.com/en-us/library/ms137981.aspx
- Sequence Container: http://technet.microsoft.com/en-us/library/ms139855.aspx
- Change Background Color of Annotation and More: http://www.sqlservercentral.com/articles/Integration+Services+(SSIS)/71516/


About the author
 Scott Murray has a passion for crafting BI Solutions with SharePoint, SSAS, OLAP and SSRS.
This author pledges the content of this article is based on professional experience and not AI generated.
View all my tips
