By: Koen Verbeeck | Comments (3) | Related: More > Integration Services Development
Problem
In my previous tip, Introduction to Business Intelligence Markup Language (BIML) for SSIS, we looked at a simple example of how to use BIML. In this tip, we look at a real world example of importing data into a database using BIML.
Solution
In the previous tip - Introduction to Business Intelligence Markup Language (BIML) for SSIS - BIML was introduced as the solution for the lack of easy code reuse in SSIS. The tip provided an easy HelloWorld type of example, but in reality we deal of course with more complex patterns in our SSIS packages. This tip will introduce you to a more complex example, highlighting multiple capabilities of BIML. If you haven't read the previous tip about BIML yet, please do so, as it lays the foundation for our journey in the BIML world.
Setting the stage
I will show you how to generate an SSIS pattern which is used a lot in production systems: importing a flat file into SQL Server. In this particular case, the filename of the flat file can change over time (for example, a timestamp can be added to the end of the filename) so we need to use a For Each Loop container with a wildcard specification for the filename. The tip Loop through Flat Files in SQL Server Integration Services explains the concept rather well if you're looking for more details.
In our test case, we will use a flat file containing customer information which looks like this:

The flat file has a header, it uses the pipe symbol as delimiter and the end of the row is marked by a typical carriage return/line feed.
Creating the BIML script
The first thing we need to do, even before configuring a connection manager, is specifying the flat file format. The flat file format contains everything BIML and SSIS needs to know about the flat file: header information, row delimiter, encoding, column information and so on. In an SSIS package you would typically specify this information in the flat file connection manager. The script starts with the BIML root node and the FileFormat node. This node has the child element FlatFileFormat.
<Biml xmlns="http://schemas.varigence.com/biml.xsd">
  <FileFormats>
    <FlatFileFormat  Name="FlatFileFormatCustomer"
   RowDelimiter="CRLF"
   ColumnNamesInFirstDataRow="true"
   IsUnicode="false">
We specify the name, the row delimiter, if there is a header or not and the encoding of the file. Since the flat file is ANSI encode, we set IsUnicode to false. Now we have to declare every individual column: its name, its data type, the length, the delimiter and if necessary, the code page. The delimiter should be the same for every column, except the last one. The last column has to specify the row delimiter as the column delimiter. The resulting code looks like this:
<Columns>
 <Column Name="CustomerAlternateKey" DataType="AnsiString" Length="100" Delimiter="|" CodePage="1252"/>
 <Column Name="Title" DataType="AnsiString" Length="100" Delimiter="|" CodePage="1252"/>
 <Column Name="FirstName" DataType="AnsiString" Length="100" Delimiter="|" CodePage="1252"/>
 <Column Name="MiddleName" DataType="AnsiString" Length="100" Delimiter="|" CodePage="1252"/>
 <Column Name="LastName" DataType="AnsiString" Length="100" Delimiter="|" CodePage="1252"/>
 <Column Name="BirthDate" DataType="AnsiString" Length="100" Delimiter="|" CodePage="1252"/>
 <Column Name="MaritalStatus" DataType="AnsiString" Length="100" Delimiter="|" CodePage="1252"/>
 <Column Name="Suffix" DataType="AnsiString" Length="100" Delimiter="|" CodePage="1252"/>
 <Column Name="Gender" DataType="AnsiString" Length="100" Delimiter="|" CodePage="1252"/>
 <Column Name="EmailAddress" DataType="AnsiString" Length="100" Delimiter="|" CodePage="1252"/>
 <Column Name="YearlyIncome" DataType="AnsiString" Length="100" Delimiter="|" CodePage="1252"/>
 <Column Name="TotalChildren" DataType="AnsiString" Length="100" Delimiter="|" CodePage="1252"/>
 <Column Name="NumberChildrenAtHome" DataType="AnsiString" Length="100" Delimiter="|" CodePage="1252"/>
 <Column Name="EnglishEducation" DataType="AnsiString" Length="100" Delimiter="|" CodePage="1252"/>
 <Column Name="EnglishOccupation" DataType="AnsiString" Length="100" Delimiter="|" CodePage="1252"/>
 <Column Name="HouseOwnerFlag" DataType="AnsiString" Length="100" Delimiter="|" CodePage="1252"/>
 <Column Name="AddressLine1" DataType="AnsiString" Length="100" Delimiter="|" CodePage="1252"/>
 <Column Name="AddressLine2" DataType="AnsiString" Length="100" Delimiter="|" CodePage="1252"/>
 <Column Name="Phone" DataType="AnsiString" Length="100" Delimiter="|" CodePage="1252"/>
 <Column Name="DateFirstPurchase" DataType="AnsiString" Length="100" Delimiter="|" CodePage="1252"/>
 <Column Name="CommuteDistance" DataType="AnsiString" Length="100" Delimiter="CRLF" CodePage="1252"/>
</Columns>
If you are using ANSI encoded flat files, you have to choose the data type AnsiString for the strings. The regular String data type is reserved for Unicode strings.
Don't forget to close the tags!
    </FlatFileFormat>
  </FileFormats>
Now that we have specified how our flat file looks, we can define the connection managers. The first one is a simple OLE DB connection, which is exactly the same as in the previous tip.
  <Connections >
    <Connection Name ="OLE_BIML"
  ConnectionString="Data Source=.;Initial Catalog=BIML;Provider=SQLNCLI11.1;Integrated Security=SSPI;Auto Translate=False;"/>
The second one is the flat file connection manager. In this connection manager we link to the file format specified earlier in the script. Since we will change between flat files by using the For Each loop, we add an expression on the connection string. The connection string of a flat file is the full path: directory + file name + extension. This is done by adding the Expression child element.
    <FlatFileConnection  Name="FF_Customer"
   FilePath="E:\myFlatFiles\invalid.txt"
   FileFormat="FlatFileFormatCustomer">
      <Expressions>
        <Expression PropertyName="ConnectionString">
          @[User::sFullFilePath]
        </Expression>
    </FlatFileConnection>
  </Connections>
The expression uses the variable @sFullFilePath, which is defined later on in the package. This variable will be populated by the For Each loop. The value for the attribute FilePath needs to be specified, but the actual value doesn't matter, as it will be overwritten by the expression.
Now it is time to construct the package.
  <Packages>
    <Package Name="ImportCustomerDynamic"
      ConstraintMode="Linear">
We first add two variables: @sFullFilePath, which will be used to configure the flat file connection manager as we saw earlier and @sSourceFolder, which will be used to configure the directory in which the flat files are located.
<Variables>
 <Variable Name="sFullFilePath"
     DataType="String">E:\myFlatFiles\invalid
 </Variable>
 <Variable Name="sSourceFolder"
     DataType="String">E:\myFlatFiles
 </Variable>
</Variables>
The value for the variable @sFullFilePath doesn't need to be exactly correct, as it will be overwritten by the For Each loop. You could also specify package parameters instead of variables if you are using the SSIS 2012 project deployment model. Project parameters however are not supported by the current release of BIDS Helper by the time of writing (version 1.6.4).
Now we can start with the actual tasks of the package. First up is the For Each loop container:
<Tasks>
<!-- The for each loop is a container, so you can also specify a constraint mode. It also has its own Tasks child node. -->
 <ForEachFileLoop Name="(FELC) Loop over Files"
   Folder=" E:\myFlatFiles"
   FileSpecification="DimCustomer_*.txt"
   ConstraintMode="Parallel"
   RetrieveFileNameFormat="FullyQualified">
  <VariableMappings>
   <VariableMapping Name="Mapping" VariableName="User.sFullFilePath"/>
  </VariableMappings>
  <Expressions>
   <Expression PropertyName="Directory">@[User::sSourceFolder]</Expression>
  </Expressions>
In the FileSpecification attribute, we configure the wildcard in the flat file name. The file name retrieved of the current flat file is fully qualified and will be stored in the variable @sFullFilePath, as declared in the VariableMappings node. We also add an expression on the source directory for the flat files. Since the For Each loop can contain its own tasks, you need to specify a separate ConstraintMode, which can be different from the package setting.
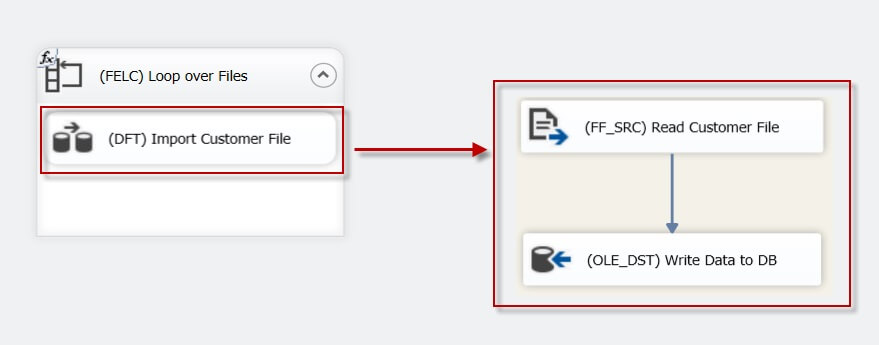
Inside the For Each loop, we specify a very basic data flow with a flat file source and an OLE DB destination which are pretty self-explanatory. If you do not specify any column mappings, BIML will take the column names of the flat file header and try to map them against the columns of the destination table. Furthermore, if you do not specify any precedence constraints, BIML will link transformations to each other in the order specified. Finally we close every tag that is still open.
          <Tasks>
            <Dataflow Name="(DFT) Import Customer File">
              <Transformations>
                <FlatFileSource Name="(FF_SRC) Read Customer File"
     ConnectionName="FF_Customer"
     RetainNulls="true"/>
                <OleDbDestination Name="(OLE_DST) Write Data to DB"
     ConnectionName="OLE_BIML"
     UseFastLoadIfAvailable="true">
                  <ExternalTableOutput Table="Import.CustomerImport"/>
                </OleDbDestination>
              </Transformations>
            </Dataflow>
          </Tasks>
        </ForEachFileLoop>
      </Tasks>
    </Package>
  </Packages>
</Biml>
The BIML script is now finished and we can generate the package. The result looks like this:
Conclusion
This tip showed more advanced BIML to create a common import pattern in SSIS. It seems a bit inefficient to use BIML to generate such a package. After all, it is quicker and easier to just design it using the SSIS user interface. But in the next tip, I'll show you how you can leverage metadata to generate hundreds of these packages in just a few seconds. It will surely outperform the user interface.
Next Steps
- Read the introductory article if you haven't already: Introduction to Business Intelligence Markup Language (BIML) for SSIS
- Download the script and the flat files here and try it out yourself!
- Reverse engineer one of your own SSIS import packages to a BIML script.
- Check out the BIMLScript website for more samples.


About the author
 Koen Verbeeck is a seasoned business intelligence consultant at AE. He has over a decade of experience with the Microsoft Data Platform in numerous industries. He holds several certifications and is a prolific writer contributing content about SSIS, ADF, SSAS, SSRS, MDS, Power BI, Snowflake and Azure services. He has spoken at PASS, SQLBits, dataMinds Connect and delivers webinars on MSSQLTips.com. Koen has been awarded the Microsoft MVP data platform award for many years.
This author pledges the content of this article is based on professional experience and not AI generated.
View all my tips
