By: Sadequl Hussain | Comments (11) | Related: 1 | 2 | 3 | 4 | > Amazon AWS RDS
Problem
I have heard about the Amazon Web Service cloud and I know we can run SQL Server databases there in something called RDS. I would like to know how it all works. I need to tell my manager if we can use it for any of our systems. Does it offer any security? What limitations are there? What about pricing?
Solution
In a previous tip on MSSQLTips.com, author Tim Cullen introduced readers to the Amazon Web Service (AWS) cloud platform's Relational Database Service (RDS). In this tip, we will outline what's involved in rolling out a SQL Server instance in RDS. In subsequent tips we will explore what features it offers and what shortcomings it has.
Before we begin, let's talk about the two ways we can run a SQL Server
instance in the Amazon cloud and what does a managed database
service mean.
Amazon RDS as a "Managed Service" for SQL Server
There are two ways you can run SQL Server in the Amazon cloud. The first choice is to run it in Amazon's compute platform called the Elastic Compute Cloud (EC2 for short). Each EC2 instance is basically a virtual server, much like the VMWare servers running in your enterprise network. With EC2 service, you can spin up a Windows Server in the AWS cloud in a matter of minutes, copy the SQL Server installers there and start the installation, just like you would when your server ops team has delivered a VM for you.
The second option is to use the Relational Database Service (RDS) which is "managed" by AWS. When we say "manage" it means you don't have to install SQL Server yourself, it's installed for you. You just specify a few parameters in a wizard and the server instance is created behind the scene. With the managed service, AWS takes care of the underlying storage, patching and maintenance, failover, backups, etc. However, you will not have remote desktop access to the SQL Server box. You can only access the SQL Server instance through Management Studio or other client apps.
Assumptions for SQL Server Running on Amazon RDS
Before we dive into this tip, I assume a few things about Amazon's RDS Platform, SQL Server and you:
- Sign-up - You are already signed up for Amazon Web Service (AWS) or have access to an AWS account. If you don't have an account, you can create one easily with a valid credit card. Follow the instructions from Tim's tip to see how you can sign up. Don't worry, it's free to sign up and as long as you are not using any service, your card won't be charged. You can even play around with the AWS services for free in the first year if you stay within the so called "free usage" tier. Amazon specifies the conditions of "free usage" on its web site. For the examples in this tip and any subsequent tips, you will incur a small fee, but you can delete the SQL Server instances when you are done. If you are using your company's AWS account, make sure you have appropriate access rights for creating RDS instances.
- AWS Management Console - You have a basic familiarity with AWS Management Console and can navigate through different pages, choose your Region etc. We will talk about some AWS services relevant to RDS later. It would be good if you have a basic familiarity with core AWS services like Simple Storage Service (S3), Elastic Compute Cloud (EC2), Virtual Private Cloud (VPC) and Identity and Access Management (IAM). But for now, I would assume you have spent some time navigating the links in the AWS Management Console.
- Basic SQL Server Knowledge - You have a basic understanding of a SQL Server database instances. This may sound trivial to a reader of MSSQLTips.com, but if you are a developer looking for a platform to host your database or a server op who needs to know what's involved in running a database in the cloud, I can say you don't have to be a full blown DBA to use the Amazon platform, but it does not hurt.
Some Basic Concepts for RDS
Here are some basic concepts you need to be familiar with on Amazon RDS.
Regions and Availability Zones
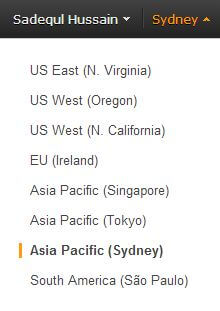
AWS services are offered in different parts of the world in a decentralized fashion. The service map is divided into what's known as AWS "Regions". Each Region is completely separate from other Regions. For example, you have a Region in South America to service customers in that part of the world, there is one Region in Europe, three Regions in the US and so on. Depending on where you are located, you can create your AWS applications and services in your nearest Region. When you log into the AWS Management Console, you have an option to change your Region. For example, the image below shows my current Region as Sydney (ap-southeast-2):
Within Regions, we have what's known as AZs or Availability Zones. Like any
cloud service provider, Amazon hosts its servers, networking,
connectivity, storage and all necessary infrastructures in
dedicated data center facilities. These data centers are known
as
Availability Zones. Each AZ is a self-contained facility with its
own power supply and backup service and is connected to other AZs in
the
same Region with a dedicated low latency network. There can be two or
more AZs in any Region. The idea behind AZs is that of fault
tolerance. You have the option to design your systems so that
if applications and servers in one data center fail, they can start running from
another AZ.
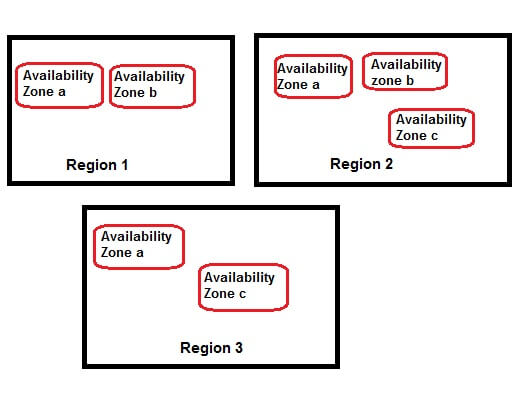
The concept of Regions and Availability Zones are shown below:
Virtual Private Cloud and EC2-Classic Platform
There are two
types of networks your servers can run within
AWS. The first
one is called EC2-Classic. With EC2-Classic, you have a flat,
all-encompassing network within AWS. Every server or database instance
you run in EC2-Classic shares a common network space with other
customers' systems. Don't be fooled to think it doesn't offer any
security
for you though. EC2-Classic offers the same principles of security
groups like the newer VPC platform.
If you have recently
signed up for AWS, you would be creating systems in what's known
as a Virtual Private Cloud or VPC. A VPC is basically a separate,
private network that you create within AWS. What this means is
that you are essentially ring fencing your compute resources in the
cloud as you would do in your corporate network. With a
VPC, you can:
- Define your network's IP address range
- Define subnets within that network
- Choose IP address ranges for hosts within the subnets
- Define routing
- Specify connectivity to the Internet
- Specify access control at the network and host level
- and more
What's
more, you can connect your on-premises network to the VPC via Virtual
Private Networking or VPN, meaning your resources within AWS becomes
part of your on-premises network. You can choose to keep your VPC
completely private or open parts of it to the Internet, much
like a DMZ.
Amazon now promotes the VPC platform
as EC2 will be gradually deprecated. In fact when you sign up for a new
account, you would find that AWS already provides you with a default
VPC for every Region in the cloud. You can rollout your servers in this
default VPC without knowing much about VPCs or networking.
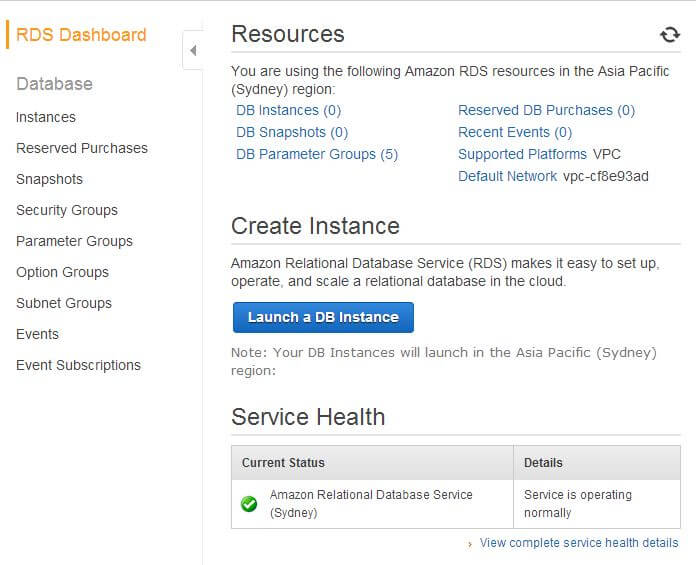
You
can check whether your AWS account supports the VPC platform by looking
at the RDS Dashboard page in AWS Management Console. In the image
below, I can see that my account only supports the VPC networking
platform in the current Region. It also specifies the ID of the default
VPC:
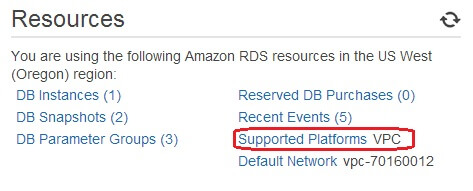
If your account in the current Region supports EC2 platform, the
Supported Platforms entry would show EC2, VPC.
In this tip, we will create our RDS instance in a default VPC to keep
things simple.
Security Groups on Amazon EC2 Platform
Security groups are basically firewalls within your RDS database instance. The idea of security groups come from Amazon's Elastic Compute Cloud (EC2) service. With EC2, you can specify firewall rules at a server level that control what service ports are open for connection. For example, you could open ports 80 (HTTP) and 443 (HTTPS) in a Web Server and leave all other ports closed. Any connection coming to other ports would be refused. Similarly, if you are running SQL Server in an EC2 instance, you could specify that only port 1433 and 3389 (for Remote Desktop) are open.
The allowing and denying of access to ports is specified in what's known as rules. A security group is just a list of those rules. Each rule specifies what protocol is used for incoming connection, what port is used for that protocol, what's the source of the connection and if the connection is allowed. If you think about it, this is a very strong security mechanism. Amazon does not maintain these rules at the operating system level (Windows Firewall or Linux IPTable), it's maintained in the virtual machine level.
The concept of security groups extends to RDS database instances as well. With an RDS instance, you can also specify what connections are allowed for your database instance. However, the type of security group you create for RDS will depend on whether you are using EC2-Classic or EC2-VPC.
Security groups can be created in both EC2-Classic and EC2-VPC networking platforms, but they are different in their capacities and one can't be used for the other. What this means is that if you have created an EC2-Classic security group, it can't be used in a VPC and vice versa.
Since the VPC is preferred and the default networking platform for AWS going forward, we have assumed that you would be creating your RDS instances in the VPC.
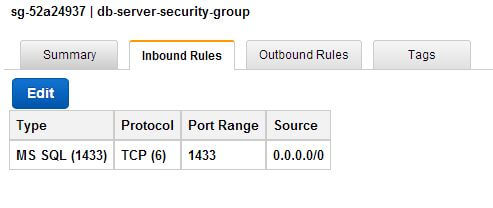
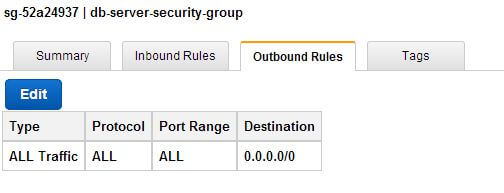
To make it all clear, see the image below. I have created a security group in the default VPC for the current Region. The security group is called "db-server-security-group". It has both inbound (ingress) and outbound (egress) rules. The source field says "0.0.0.0/0", which is the CIDR (Class-less Inter Domain Routing) address for the whole (outside) world or Internet. This means the security group would accept connections ONLY on TCP port 1433 (default for SQL Server) from anywhere. Now you wouldn't want this for your production system (or even non-production system), but this is for demonstration purposes. In practical cases, the source or the destination field would contain the public IP address block of your corporate network, or the ID of another security group. The second SG could be your application server, so in effect you would be granting your application server access to your database server only.
Parameter Groups for SQL Server in Amazon RDS
For SQL Server in RDS, a Parameter Group is basically the collection of SQL Server configuration values. These are the same configuration values you would find from server properties dialogue box or by running the sp_configure command. RDS comes with a default set of Parameter Group values for different SQL Server versions and editions. Some of the parameters you can change, others can't be modified.
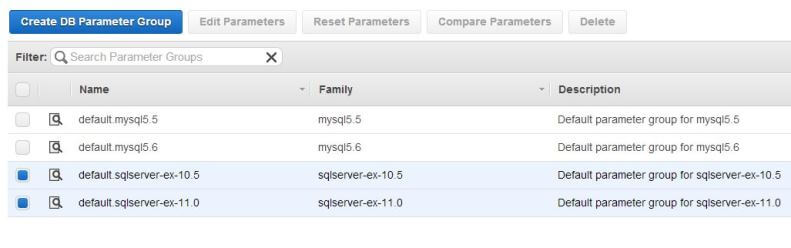
The following image shows the parameter groups defined in my AWS account:
If you want to create your own, custom parameter group, you can do so by clicking on the "Create DB Parameter Group" button and then providing a name for it. The parameter group would start with a default set of parameters. You can then edit some of the parameters (not all). The following image shows the process:
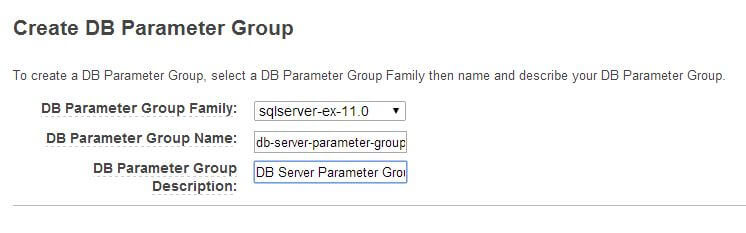
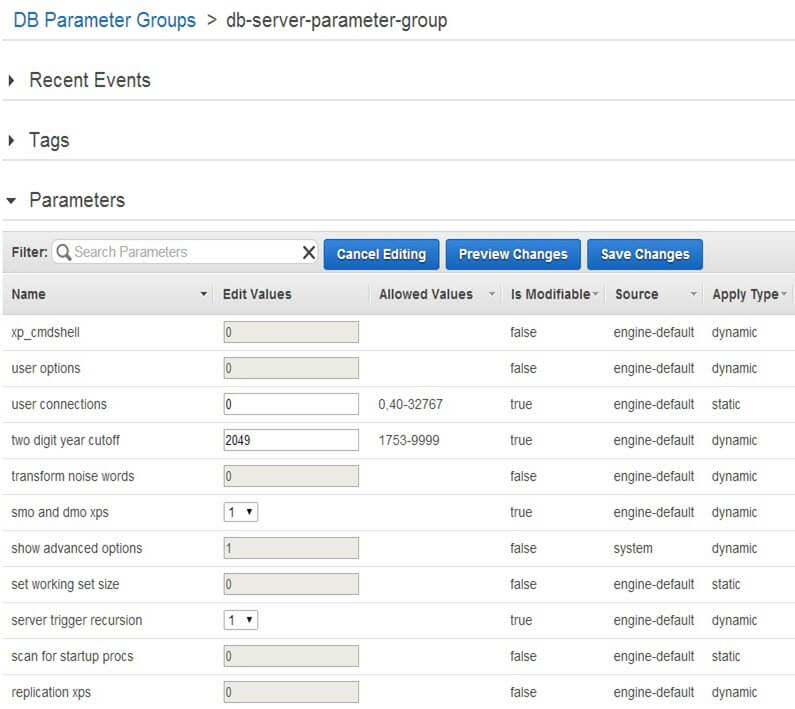
Here, I have created a parameter group for SQL Server 2012 Express Edition (shown as sqlserver-ex-11.0). Some of the parameters, like xp_cmdshell or "show advanced options" can't be changed.
Option Groups in Amazon RDS for a Database Instance
Option Groups are used to specify further features and options for an RDS database instance. At the time of this writing (May 2014), AWS can host four types of database engines in RDS: Oracle, Microsoft SQL Server, MySQL and PostgreSQL. Option groups don't have much use for SQL Server instances unless you want to use Transparent Data Encryption (TDE). Despite any performance penalty for implementing TDE, this could be one requirement from your management team if you roll out a SQL Server "out there in the cloud". TDE is the only option you can specify for a SQL Server option group. You define the option group the same way you define a parameter group (as shown above).
Storage Options for SQL Server on Amazon RDS
A major bottleneck for most SQL Server database performance is the underlying storage: whether you are running it in a physical box, a SAN or Direct Attached Storage. AWS addresses this problem by offering two types of storage: Standard and Provisioned IOPS.
Standard storage is what you would find with traditional Network Attached Storage. RDS uses these storage volumes as virtual hard drives in the network. When you work with standalone servers in AWS (EC2 instances), you can attach and detach these standard storage volumes to your machines much like your storage engineers would provision them from a SAN and carve out a volume for your server. With standard storage if you have no control over the I/O performance of the disk subsystem.
The second class of storage is called Provisioned IOPS (Input Output per Second). With this type of storage, you define the number of IOPS rate and storage size when you create your SQL Server instance and AWS will provision the appropriate storage behind the scenes to meet the requirements. This is all possible due to the nature of the cloud itself. The whole concept of cloud computing is to run your computing, storage and networking components in a virtualized world where the complexity of the physical infrastructure is largely hidden from you.
With provisioned IOPS, each read or write activity is considered a single I/O operation and the I/O size for AWS Provisioned IOPS is 16 KB. That means AWS considers each 16 KB request as one IO. With SQL Server, the database page size is 8 KB, which is half the size of the AWS IO.
Provisioned IOPS storage obviously costs more, but AWS recommends you use it for RDS database instances to deliver fast, predictable performance. Even with that, storage performance can still be less than optimal if the underlying instance class is not sufficiently powerful. We will talk about instance classes in the next section.
Instance Classes Explained on Amazon RDS for SQL Server
When you
rollout servers (whether physical or virtual) in your on-premises
network, you are more-or-less in control: you can specify the number of
CPU cores and processor model, number of drives and their sizes and
ask for sufficient amount of
memory, connect the server to high speed network switch and so on.
With Amazon Web Service much of that physicality is gone: you are no longer in charge of asking for what you need. Instead, you are given the option of choosing from a range of "instance classes", each class with different types of characteristics. For example, you can roll out a t1.micro instance: one with only half gig of RAM and very low network speed. Or you can specify an m2.4xlarge instance: one with extra CPU power, 68 GB RAM and 1000Mbps network connectivity.
Why is it so? Why have they taken away your rights as a DBA? Well, that's because the underlying hosts, virtual machines, networks and storage that powers your DB instance are not always fixed. It could be running in a different network, have storage allocated from a different storage pool and hosted in a different virtual machine every time it starts up. How do you standardize the performance of a machine in such case? One way is to benchmark the overall computing power of a machine and classifying it. That's exactly why you have different pre-configured instance classes. It doesn't matter where your VM is running: it could be running in one physical host with one type of processor in its "on" state. You stop and restart the instance and the VM could be running in a completely different host with a different CPU power. With the instance class model the VM will always start with the same CPU and memory capacity it was rolled out with - no matter what difference lies in the underlying infrastructure.
With AWS RDS, different types of instance classes are available for different versions and editions of SQL Server. Some instance classes come with high network speed while others have dedicated IO channels for storage. Amazon recommends using the latter class of instances with provisioned IOPS storage.
Let's Create a New RDS for SQL Server
Now we have covered some of the basic concepts, it's time for the exciting stuff: roll out our brand new RDS instance and connect to it.
You access the RDS dashboard page from the AWS main menu, as shown below. Make sure you have chosen the Region where you want your database instance to reside. You can choose the Region from the upper right corner of the Management Console.
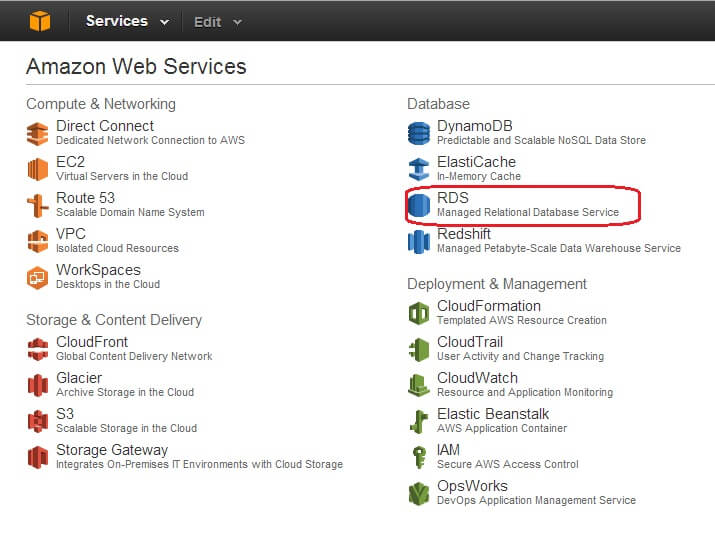
Clicking on the RDS link takes you to the RDS Dashboard page:
Next, let's click on the "Launch a DB Instance" button. This will start the wizard.
In the first screen, choose a database server platform. As you can see from the image below, there are a number of SQL Server options available. At this moment, RDS supports:
- SQL Server 2008 R2 (Express, Web, Standard and Enterprise Edition)
- SQL Server 2012 (Express, Web, Standard and Enterprise Edition)
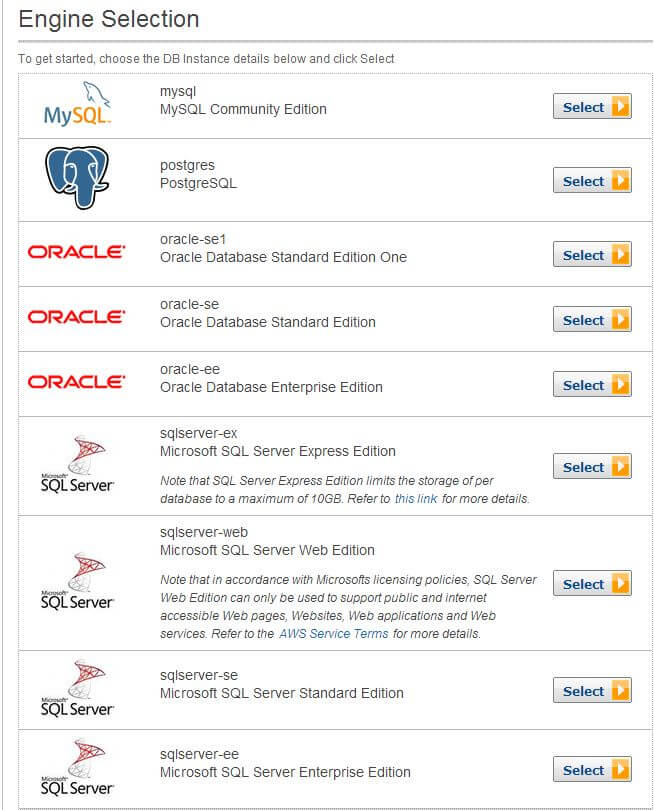
In this example, we chose to use sqlserver-se (Standard Edition).
Please note that it's not eligible for free tier usage and you will incur a charge per hour of instance usage. I am choosing this so all other options can be viewed in subsequent screens. Once you have followed all the steps and can connect to your new database instance from client application, you can delete the instance to minimize costs. Don't keep it running unless you have to.
What you see in the next screen will depend on which Region you have chosen for the RDS instance. RDS offers a feature called the Multi-AZ deployment. This used to be an option for other database engines like MySQL, Oracle or PostgreSQL, but Amazon has recently announced the Multi-AZ support for SQL Server.
What Multi-AZ does is that when you roll out your SQL Server database instance, another instance is provisioned for you in another Availability Zone in the same Region. That instance acts as the "standby replica" of your primary database instance. All database transactions against your primary DB instance are synchronously applied to the standby replica, effectively storing a secondary copy of your data. You can't access the standby replica as it's used for disaster recovery purpose only. In the event your database server crashes or an Availability Zone fails, AWS will promote the standby replica as the primary DB instance and start servicing database traffic from there. It all happens transparently behind the scenes; you don't have to do anything as a DBA. Multi-AZ deployment can be useful in certain cases: for example, if you choose to upgrade your DB instance version, AWS will failover to the standby replica during the process. AWS RDS offers Multi-AZ support for SQL Server through Database Mirroring.
At the time of this writing, the only Regions that offer Multi-AZ deployment support for SQL Server is EU and US West (Oregon). This will obviously change in the future, so if you are creating your database instances in any of these Regions, you would see the following screen:
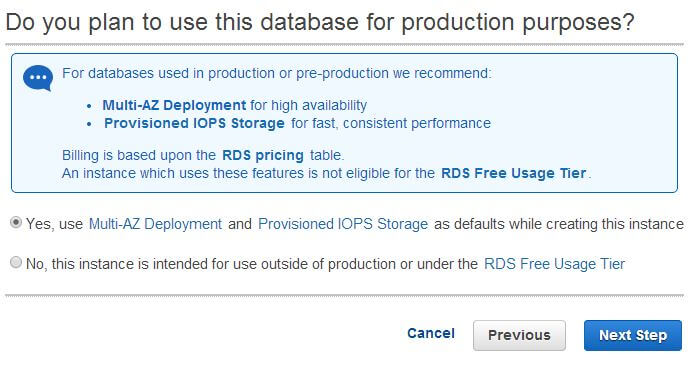
Note the suggestion made by Amazon. They suggest you use Multi-AZ deployment and provisioned IOPS storage for production systems. Also, they don't come free. Configuring Multi-AZ deployment requires additional configuration in your VPC network, one which needs to be done before you run the wizard. Fortunately this configuration is already done for the default VPC.
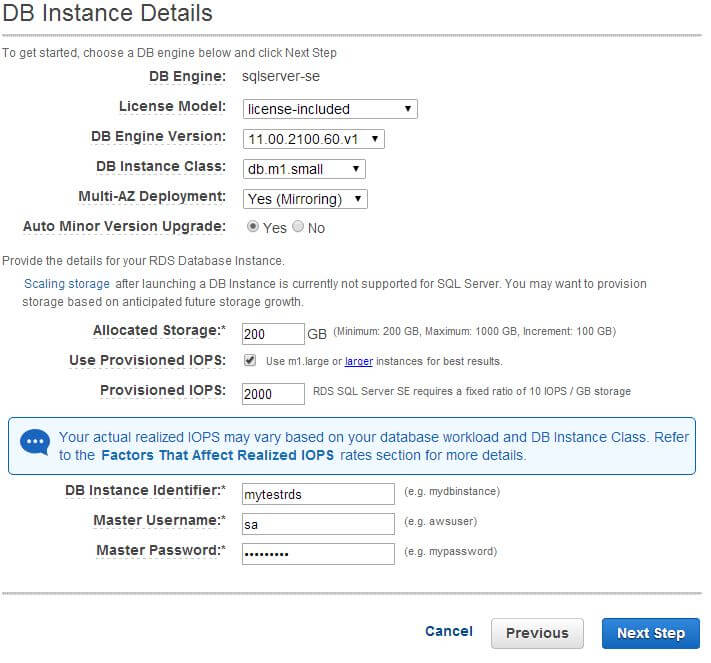
Clicking on the Next Step button will take you to the DB Instance Details page. There are quite a few options you can choose here:
First of all, you can choose your licensing model. There are two licensing models available for SQL Server in RDS. One is "license included" and the other one is "bring your own license (BYOL)". In the first model, Amazon holds the SQL Server license for the RDS instance. Its cost is included in your RDS pricing. This is a good choice if you don't want to get into the hassle of purchasing licenses and so on. You pay extra, but you know you don't have to worry about licensing.
With the second option, you are eligible to use the license of the existing on-premises SQL Server being migrated to RDS. This is applicable to volume licensing customers with appropriate software assurance coverage. I am by no means a software licensing expert, but this is what Amazon states. You may wish to check with your own software licensing team when you roll out.
Also, as an AWS customer, you are restricted to 40 SQL Server DB instances in RDS. Of these, only 10 can be used in the license-included model. The existence of a stand-by replica will also count in those licenses. Also, license included model is not available for Enterprise Editions of SQL.

Next, you have the option of choosing between SQL Server 2008 R2 and 2012 as your SQL Server version. I am sure with time SQL Server 2014 will also be made available. In this example, I have chosen to install a SQL Server 2012 standard edition instance.

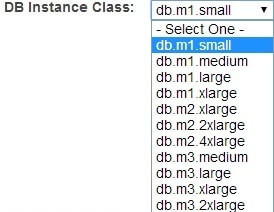
Next comes the instance class. What you see in this section depends on the version and edition of SQL Server you have chosen. To keep costs to a minimum, I have chosen an m1.small instance class. According to the RDS documentation, this instance class translates to 1 CPU and 1.8 GB of RAM.
Next, we choose Multi-AZ Deployment: Yes (Mirroring).

The option button for auto minor version upgrade is enabled by default. This tells us that AWS will automatically apply security patches, cumulative updates and service packs for this instance as they become available. Some of these "upgrades" require a downtime and that's another reason to use Multi-AZ deployment. In Multi-AZ deployment, AWS RDS will apply the patches to the standby replica first, failover to the patched replica, promote it as the primary instance and then apply the patch to the original instance (which becomes the new standby).

In the next field, RDS asks how big your database instance should be. For m1.small instance class, it lists the minimum size as 200 GB. The maximum total size of an RDS SQL Server instance can be 1 TB. The instance can host up to 30 databases. This may sound like a limitation and in my opinion it is and we will discuss this in the next tip. But for now, let's accept the default size.

The checkbox for provisioned IOPS is turned off at the moment, so we turn it on, and another field becomes visible asking about the IOPS rate. Note the two messages from RDS:

The first one tells us that the ratio between IOPS and storage size is 10. This means that if we have chosen our database instance size (total size of all databases to be hosted in this instance) as 200 GB, the minimum IOPS we need to specify is 2000. And also if we need to increase the IOPS, the next value should be 3000, 4000 and so on. So in this case we choose the following values:

One thing you need to be aware of - and again we will discuss it in the next tip - is the allocated storage for SQL Server RDS instance can be specified only once during setup and can't be modified later. You can change the instance class and go higher (vertical scaling), but that will only increase CPU and RAM capacity not the storage size. This means you need to allocate the maximum amount of storage you think your instance will ever need. And as mentioned before, this can be specified up to 1 TB. Personally, I think it's a major drawback, but AWS says this is due to the extensibility limitations of striped storage attached to Windows Server.
Next, we are asked for a database instance identifier, a master user name and master user password. The database instance identifier is not what your named SQL Server instance would represent: this is just an identifier for AWS. In our example, we have given it a name and specified sa as the master user:

At the end of the first phase, we have the first page of the wizard looking like this:
Clicking the Next Step button takes us to the section where we specify additional parameters. This is about where we want to place our RDS instance, what port we would use, what parameter group and security group need to be assigned, etc. The image below shows these fields:
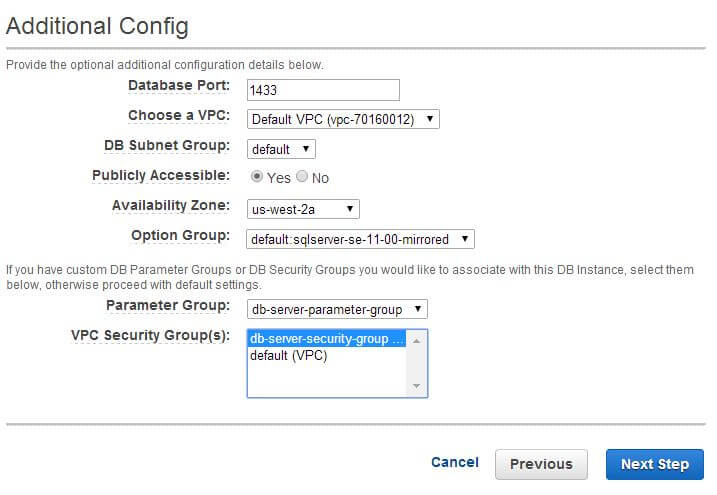
The choices we have made in this screen are simple:
- We have left the default port for SQL Server as 1433.
- The database instance will be created under the default network (VPC) AWS has created for our account. We could have chosen our own, custom VPC as well.
- A subnet group is basically a collection of two or more subnets within a VPC network where group members are associated with at least two Availability Zones in the Region. Subnet groups allow you to choose the VPC and Availability Zone you want your RDS instance to run in. In this case we are leaving it to the default subnet group of our default VPC. If you want to create your RDS instance within a custom VPC, you need to create a DB subnet group first.
- We are also specifying the database instance should be accessible from the Internet, and it should be located in the us-west-2a Availability Zone which is an AZ within the Oregon (us-west-2) Region.
- The option group is kept to the default value (we don't want to enable TDE here).
- We have selected the custom parameter
group and security group that we created before. The security group
gives access to port 1433 from anywhere in the Internet.
We are almost there; before it's all wrapped up, we need to tell RDS whether we need to have our databases backed up. When you click the Next Step button, the Management Options screen is shown.
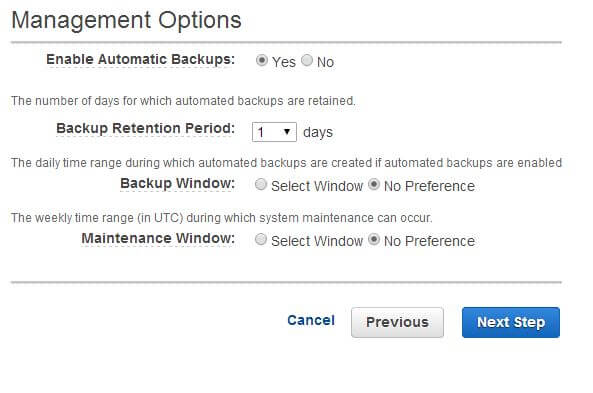
The fields in this screen are fairly self-explanatory. We have chosen to enable automatic backup of the database instance. With automatic backup enabled, RDS will make a full backup of the databases every day. Transaction log backups are enabled also. The backups are held for a duration you can specify. It's called the retention period. With RDS, retention period can be up to 35 days. With full database and transaction log backups enabled, you can use RDS to restore the instance up to last five minutes within the specified retention period.
You can choose when your instance gets backed up. You can specify the time in UTC format or leave it to its default value ("No Preference"). With the "No Preference" the backup window will be chosen by AWS and it will assign a random 30 minute backup window within an 8 hour block of time allocated for your Region. What this means is that AWS will initiate the backup anytime during an 8 hour period that's been pre-allocated for your AWS Region.
The same concept holds for the maintenance window. Maintenance happens weekly and again you can either specify your own time slot or leave it to AWS. Bear in mind that this "maintenance" is not the regular DBCC checks and index reorganizations you would have scheduled for an on-premises database server. AWS applies changes to an instance during maintenance window; this includes applying patches, upgrading instance classes, etc. For individual database maintenance, you will still need to run your jobs and scripts.
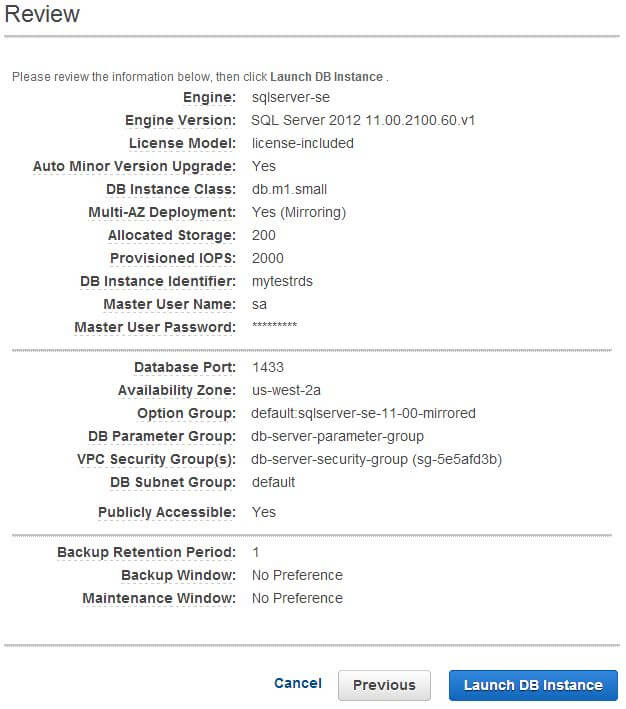
Clicking on the Next Step button will show the final screen of the
wizard. This gives you a chance to review the options you have chosen so
you can go back and modify them if necessary.
Click on the "Launch DB Instance Page" and RDS will start the process of rolling out the server for you. You will be presented with an information page like the following:
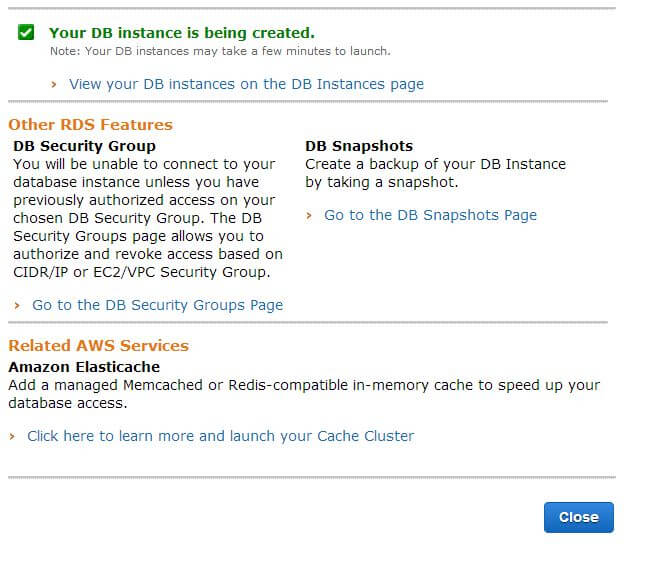
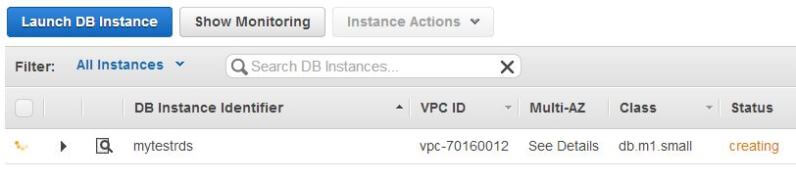
Click on the "Close" button and we are transferred back to the RDS Instances page in the Management Console. The initial status of the RDS instance is shown as "creating"
We will wait till the status changes to "available". This can take a
while though (as two instances are created). Once the instance status
is "available", expanding the arrow on the left side gives us
more information.
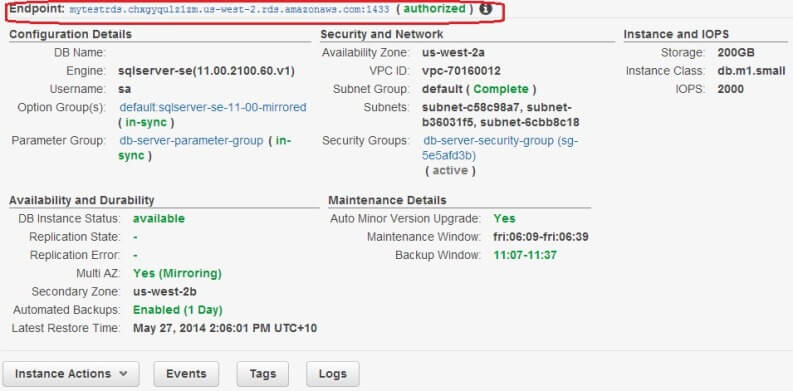
The most important part of this screen is the Endpoint. That's the address of the SQL Server instance you have just installed. It's not an IP address, nor a simple host name like you would see in your on-premises network, rather a DNS CNAME. That's because the IP address of the DB instance can change behind the scenes when it fails over to the standby replica. Amazon does not want you to manually reconfigure your client application to point to the failover instance. As long as the CNAME (Canonical Name) is used, AWS will translate it to the correct IP address of the running database instance.
Also, the string ends with the port number of the SQL Server instance (1433) separated by a colon (:). When you use Management Studio to connect to the instance, you need to replace that colon with a comma (,).
Another thing to remember: if you are accessing the instance from within your corporate network, talk to your network administrators to allow egress traffic through the firewall. You are connecting to a SQL Server instance in the Internet on port 1433: you need to tell them about the port and you need to give them the endpoint CNAME. You have already configured the DB instance's firewall traffic rules through security group; the same type of configuration needs to happen at your end.
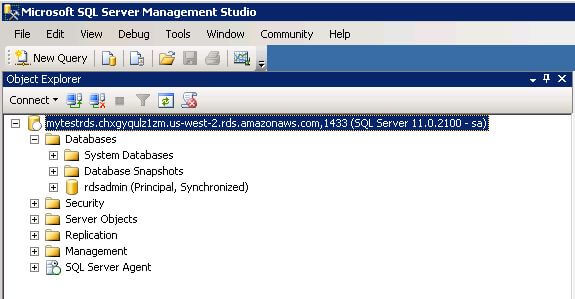
The following image shows my SQL Server Management Studio connected to
the instance. As a side note, the database rdsadmin is created by default by RDS and I
recommend you don't delete it.
If you have been able to follow up to this point, you should explore the instance, see what options are available for SQL Server, what configuration values you can change or what commands you can run.
Conclusion
In this tip you have seen how you can create an Amazon Web Service RDS SQL Server instance and connect to it from your local workstation. However, RDS is not the "all-size-fits-all" answer to your applications' answer to all your application's database needs. It has its limitations and in our next tip we will talk about those limitations.
Next Steps
- Learn about AWS RDS Concepts and Terminology here.
- Learn about SQL Server on AWS RDS here.
- Learn about AWS RDS pricing, the difference between on-demand, spot and reserved DB instances here.
- Check out more SQL Server Cloud related tips.


About the author
 Sadequl Hussain has been working with SQL Server since version 6.5 and his life as a DBA has seen him managing mission critical systems.
This author pledges the content of this article is based on professional experience and not AI generated.
View all my tips
