By: Edwin Sarmiento | Comments | Related: > Azure
Problem
Our organization is starting to deploy more virtual machines on Azure for both testing and DR environments. I would like to create and administer Azure virtual machines using Windows PowerShell. How do I get started?
Solution
In a previous tip on Introduction to Azure PowerShell Modules for the SQL Server DBA Part 1, we looked at how you can use the Azure PowerShell modules to get started with Microsoft Azure, specifically for SQL Server related tasks. In this tip, we'll start exploring how to create Azure virtual machines that run SQL Server instances. There are different ways to create virtual machines in Azure. One of them is to create a Windows Server virtual machine and install your own licensed copy of SQL Server. We can start by exploring the different Azure virtual machine images that run the Windows Server operating system. Let's use the Get-AzureVMImage cmdlet, filtering the results that we want by using the Where-Object cmdlet.
PS C:\> Get-AzureVMImage | Where-Object {$_.Label -like "Windows Server*"} | Select-Object Label
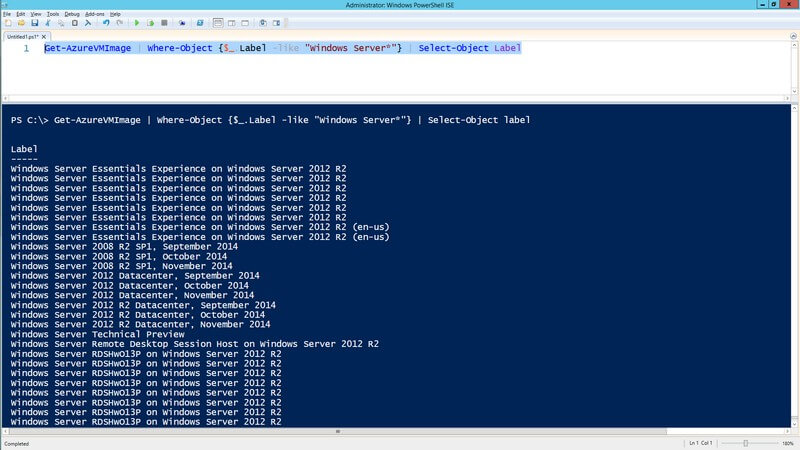
Now, you might be wondering, "Where did that Label property come from?" Refer back to a previous tip on how to retrieve the different properties, methods and events of an object using Windows PowerShell. Because I do not memorize (besides, I hate memorizing and can only fit so much in my limited amount of memory) all of the different object properties when I use Windows PowerShell, I use the Get-Member cmdlet to explore them as I go.
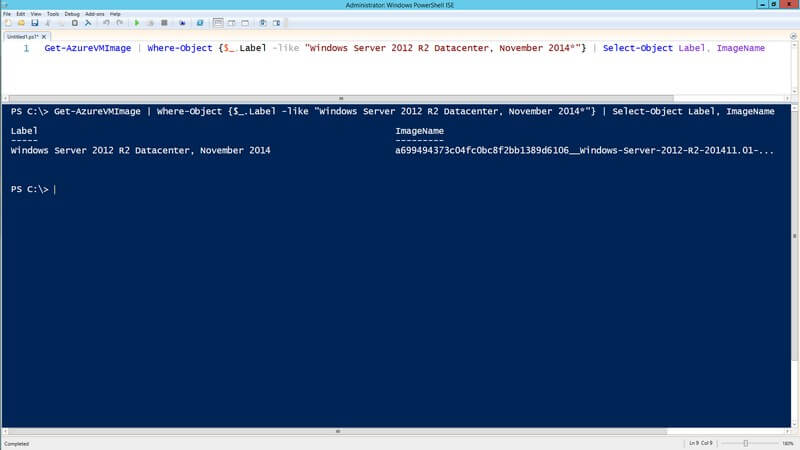
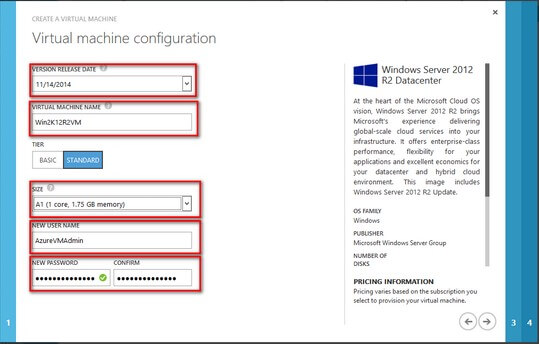
Now, based on the results, you can decide if you want to create a Windows Server 2008 R2, a Windows Server 2012 or a Windows Server 2012 R2 image. If the virtual machine that you are planning to create will be for DR purposes, make sure that the image that you will choose is the same as what you have on-premise. Let's say, you want to create a Windows Server 2012 R2 Datacenter virtual machine based on the November 2014 image. We need to retrieve the ImageName property as we will need this to create a new Windows Server 2012 R2 virtual machine image.
PS C:\> Get-AzureVMImage | Where-Object {$_.Label -like "Windows Server 2012 R2 Datacenter, November 2014*"} | Select-Object Label, ImageName
Once we've identified the virtual machine image that we want to create, we can then use the New-AzureVM cmdlet to create it on Azure. But before we can do so, we need to understand the different parameters that we need to pass to this cmdlet. I will reference the parameter values in relation to the different options that you have when creating a new virtual machine from the virtual machine gallery.
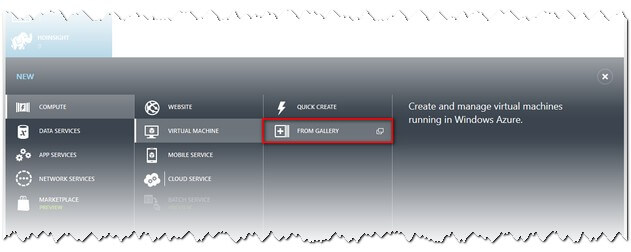
The ImageName property value that we got from the Get-AzureVMImage cmdlet refers to the image that you choose in the Choose an Image dialog box.
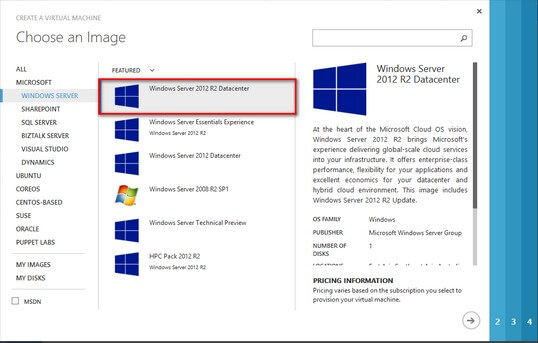
From the Windows Server 2012 R2 images available, there are multiple version release dates. Since the ImageName property already specifies the version release date that we chose - in this case, November 2014, - we no longer need a parameter value for that. The other property values that you need are the following:
- Virtual Machine Name
- Size (this will depend on your Azure subscription)
- User name of the virtual machine local Administrator
- Password of the virtual machine local Administrator
The virtual machine size value is a bit challenging as there is no one single source of what the values are. I had been playing around with the different values of the virtual machine size that I get from different sources and validate the results by reviewing it from the Microsoft Azure portal. Christian Rodriguez, a software engineer from a company in Spain called Softeng, blogged about a list of Azure virtual machine sizes that you can use. Play around with the values, test them out and see what you get. From my experience, these sizes change over time depending on the different features that Microsoft will be introducing in the future. For example, the D-Series Azure virtual machines were introduced back in September 2014. Let's move on.
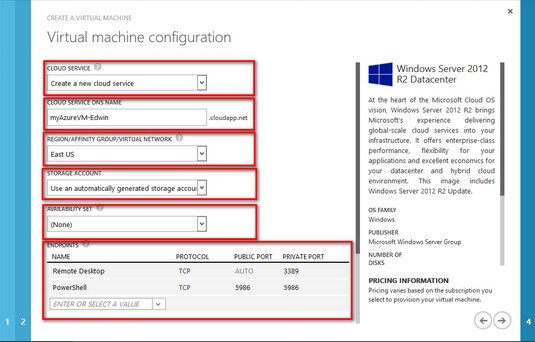
In the Virtual machine configuration dialog box, you can specify the following:
- Cloud Service - This is the name of the group/container where you may want to assign your virtual machines. If you don't have one already, it will be automatically created for you.
- Cloud Service DNS Name - This is the public DNS of your Azure cloud service. You can access your Azure services - Remote Desktop, SQL Server, PowerShell Remoting, etc. - using this public DNS.
- Region/Affinity Group/Virtual Network - This is the geographical location where you want your Azure virtual machine deployed.
- Storage account - This is the Azure storage account that you've defined from this previous tip.
- Availability Set - This is the name of the group that you may want to create for redundancy and availability.
- Endpoints - These are the ports that you may want to open as part of creating the Azure virtual machine. This allows you to access your Azure services using a combination of the public DNS and port number. By default, Remote Desktop and PowerShell Remoting are enabled.
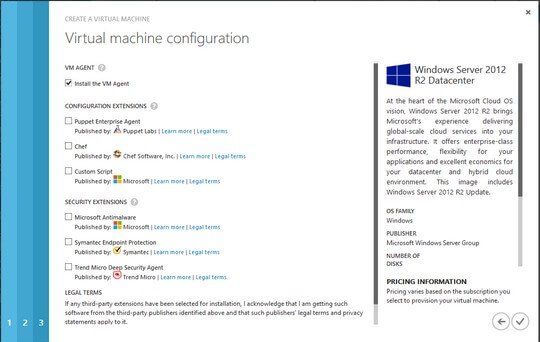
In the final Virtual machine configuration dialog box, you can specify whether or not to install additional components like the VM Agent, Configuration Extensions and Security Extensions.
Let's use some of the parameters provided in the Microsoft Azure portal to create our Windows Server 2012 R2 virtual machine image using Windows PowerShell. I'll use the New-AzureVMConfig cmdlet to create a new Azure virtual machine configuration object, the Add-AzureProvisioningConfig cmdlet to add the Azure virtual machine configuration object and use it with the new one that I'm creating.
PS C:\> $pwd = "my$ecr3tpAssw0rdth@tevery0n3Kn0w$"
PS C:\> $user = "AzureVMAdmin"
PS C:\> $vmname="Win2K12R2VM"
PS C:\> $cloudSvcName="myAzureVM-Edwin"
PS C:\> $VMSize = "Small"
PS C:\> $region= "East US"
PS C:\> $image = Get-AzureVMImage | Where-Object {$_.Label -like "Windows Server 2012 R2 Datacenter, November 2014*"} | Select-Object ImageName
PS C:\> Set-AzureSubscription -SubscriptionName "My Azure Subscription" -CurrentStorageAccountName "sqldbbackups4azure" #This is just to set the Azure storage account that was created in the previous tip.

PS C:\> New-AzureVMConfig -Name $vmname -InstanceSize $VMSize -Image $image.ImageName | Add-AzureProvisioningConfig -Windows -AdminUserName $user -Password $pwd | New-AzureVM -ServiceName $cloudSvcName -Location $Region
Make sure that you name your virtual machines, storage accounts, cloud services, affinity groups, etc. appropriately to adhere to your standard naming convention. Note that I had to set the Azure storage account name based on my Azure subscription so that the new Azure virtual machine will use that storage account. I also did not include the parameter values for the Availability Set (I will not be using an Availability Set for this virtual machine,) agents and extensions.
Let's use the same PowerShell commands to create an Azure virtual machine with SQL Server 2014 using the latest image in the Azure portal. This is the other option to create a virtual machine in Azure. But this one already has a default SQL Server instance installed so you don't have to worry about installing it yourself. The SQL Server license is provided for you and is on a per-use basis that is included with the virtual machine. Now, this time, I'll use the version number together with the edition of SQL Server to retrieve the ImageName property value. Note that this will be a standalone default SQL Server 2014 instance running on a non-domain-joined Windows Server 2012 R2 virtual machine.
PS C:\> $pwd = "my$ecr3tpAssw0rdth@tevery0n3Kn0w$"
PS C:\> $user = "AzureVMAdmin"
PS C:\> $vmname="SQL2K14VM"
PS C:\> $VMSize = "Small"
PS C:\> $cloudSvcName="myAzureVM-Edwin"
PS C:\> $image = Get-AzureVMImage | Where-Object {$_.ImageName -like "*SQL*12.0.2430*Ent*"} | Select-Object ImageName

PS C:\> New-AzureVMConfig -Name $vmname -InstanceSize $VMSize -Image $image.ImageName | Add-AzureProvisioningConfig -Windows -AdminUserName $user -Password $pwd | New-AzureVM -ServiceName $cloudSvcName
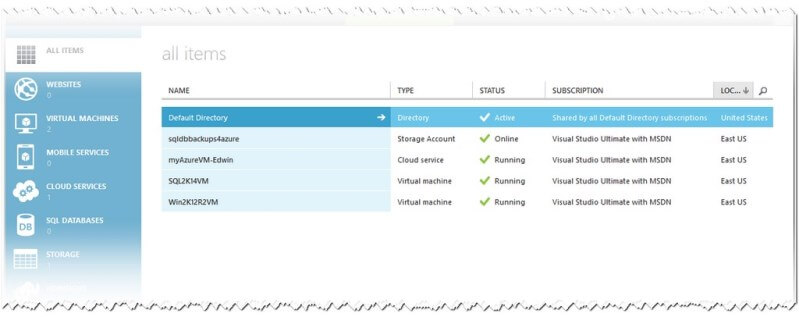
Note that since I already have a cloud service name from the previous creation of a Windows Server 2012 R2 virtual machine, I omitted the -Location parameter and just used the -ServiceName parameter instead. This will create the SQL Server Azure virtual machine in the same group and geographical location as the Windows Server 2012 R2 virtual machine. You can verify the creation of the virtual machines using the Microsoft Azure Portal.
Once the Azure virtual machines have been created, you can test accessing them by using Remote Desktop or PowerShell Remoting. Note that since the virtual machines are not joined to the domain, you cannot simply launch SQL Server Management Studio to connect to the SQL Server instance. You need to enable the endpoint first, switch SQL Server authentication to mixed mode and/or use the runas command with the /netonly parameter to open SQL Server Management Studio using the virtual machine's local Administrator account that you created using the PowerShell commands.
Next Steps
Check out the following resources:- Introduction to Azure PowerShell Modules for the SQL Server DBA Part 1
- SQL Azure Tips
- Windows PowerShell Tips


About the author
 Edwin M Sarmiento is a Microsoft SQL Server MVP and Microsoft Certified Master from Ottawa, Canada specializing in high availability, disaster recovery and system infrastructures.
This author pledges the content of this article is based on professional experience and not AI generated.
View all my tips
