By: Jeremy Kadlec | Comments | Related: > Integration Services Upgrade
Problem
In SQL Server 7.0 and 2000 DTS was one of those freebies that did not catch on immediately, but when it did, the industry flooded to use the technology. As SQL Server 2005 was rolled out, one of the first items many SQL Server Professionals checked out was SSIS due to the reliance on DTS Packages in their SQL Server 2000 environment. Once their eyes rolled back into their heads from seeing Management Studio as a replacement for Enterprise Manager and Query Analyzer, they popped back out when reviewing the Business Intelligence Development Studio to build SSIS Packages among other sets of solutions (i.e. Reporting Services, Analysis Services, etc.) based on the rich feature set. With the many interface and development differences between DTS and SSIS, do not be surprised by the deployment differences either. In this tip we will outline the steps used to migrate DTS Packages and the steps necessary to migrate SSIS Packages.
Solution
SQL Server 2000 - DTS Deployment
The process to develop and deploy DTS Packages for the most part is handled within Enterprise Manager as the steps below outline.
| ID | Directions | Screen Shot |
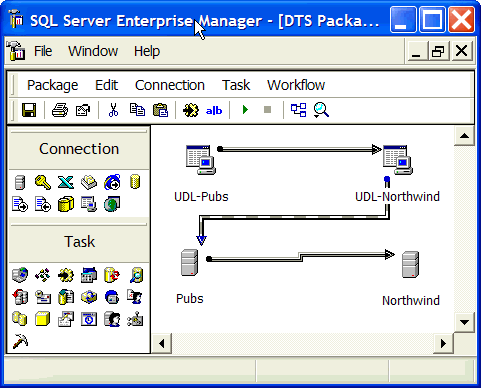
| 1 | Development - Develop your application in Enterprise Manager's DTS Designer. In this interface the connection and task objects can be dragged and dropped from the tool bar to the design space. Then the objects can be double clicked on for applying the code and configurations.
|
|
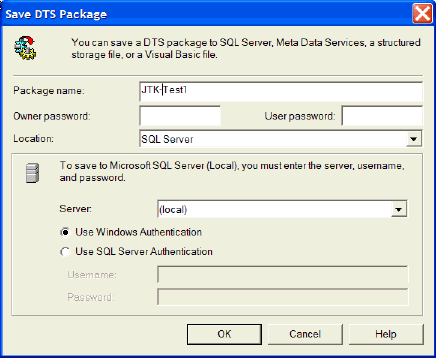
| 2 | Save - If you want to save the DTS Package locally it is possible to do so by using the File menu 'Save' or 'Save As' option. In this interface the following configurations can be made:
|
|
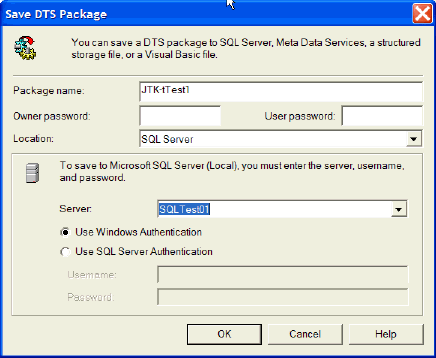
| 3 | Deployment - To deploy the DTS Package to another location, the 'Save As' option is available on the File menu with the same three format options listed above. This option will enable you to save the files to another SQL Server or file system for future execution.
In this example, the same DTS Package is being saved to the SQLTest01 SQL Server for testing purposes. Once the testing is completed, the same process can be followed to deploy the DTS Package to the production environment.
|
|
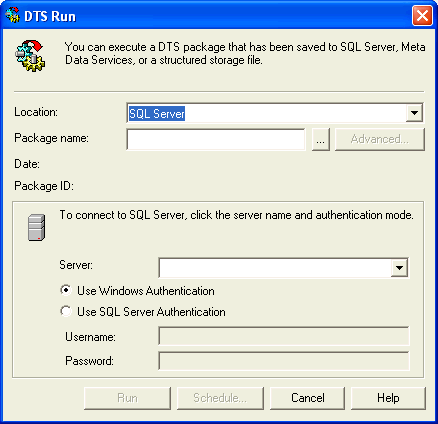
| 4 | Execution - DTS Packages can be executed interactively or on a regularly scheduled basis. Below are the options to execute a DTS Package interactively:
Below are the options to execute the DTS Package in an automated manner:
|
|
SQL Server 2005 - SSIS Deployment
With SSIS functionally the same general steps are followed, but the detailed process is much different. For example, development is completed in a separate tool from the deployment.
| ID | Directions | Screen Shot |
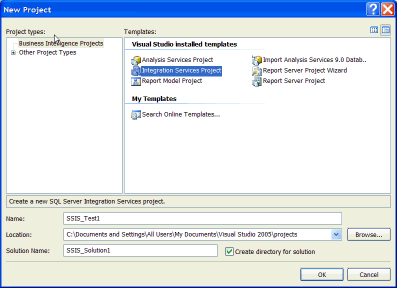
| 1 | Creation- Develop your application in the Business Intelligence Management Studio (BIDS). Create a SQL Server Integration Services Project to build 1 or many SSIS packages for the Solution.
|
|
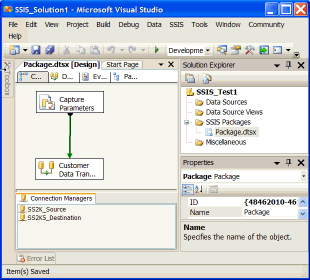
| 2 | Development - Develop the SSIS Package with the BIDS tool set to implement the business and error handling logic. |
|
| 3 | Save - In BIDS, all of the files supporting the Solution should be saved to the local file system when the Project was setup.
Notice - With SSIS during the development save process that the code cannot reside in SQL Server as was the case with DTS. |
|
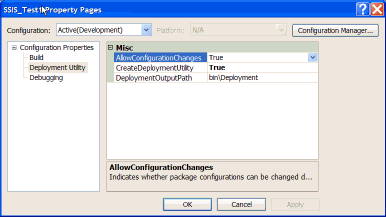
| 4a | Deployment - In the Solution Explorer, right click on the name of the solution (i.e. SSIS_Test1) and select the 'Properties' option. Once the 'Properties Pages' loads, select the 'Deployment Utility' option in the left pane. Change the following options:
Press the 'OK' button to proceed. |
|
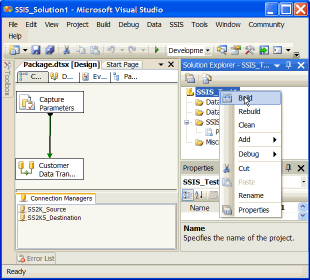
| 4b | Deployment - In the Solution Window, right click on the name of the solution and select the 'Build' option.
Once this process is completed, BIDS will indicate 'Build succeeded' in the bottom left portion of the screen. |
|
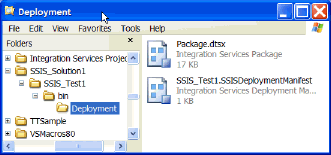
| 4c | Deployment - Now the SSIS Package will reside in the parameter specified for the DeploymentOutputPath in step 4a (i.e. bin\Deployment directory) as a *.dtsx file with a *.SSIS_Test1DeploymentManifest file. |
|
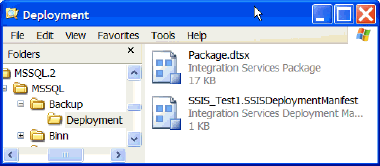
| 4d | Deployment - Copy the 'deployment' directory and the files to a location on server where you would like to deploy the files (i.e. C:\Program Files\ Microsoft SQL Server\MSSQL.2\MSSQL\Backup.) |
|
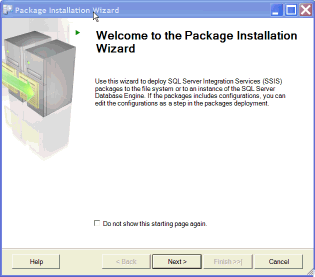
| 4e | Welcome Screen - Double click on the *.SSIS_Test1DeploymentManifest to start the Package Installation Wizard which deploys the SSIS Package. Click the 'Next' button to proceed in the wizard. |
|
| 4f | Deploy SSIS Packages - Select the file system or SQL Server deployment option which indicates where the SSIS Package is stored.
In this example, we are selecting the file system deployment. Click the 'Next' button to proceed in the wizard. |
 |
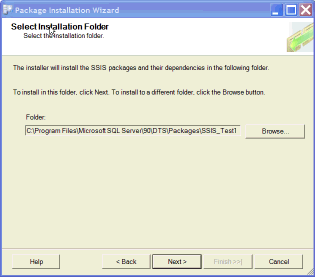
| 4g | Select Installation Folder - Select the directory where you want to save the SSIS Package in the file system.
Click the 'Next' button to proceed in the wizard. |
 |
| 4h | Confirm Installation - Click the 'Next' button to proceed in the wizard. |  |
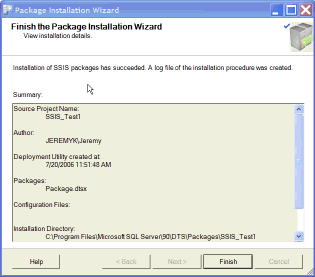
| 4i | Finish the Package Installation Wizard - Click the 'Finish' button to complete the wizard. |
|
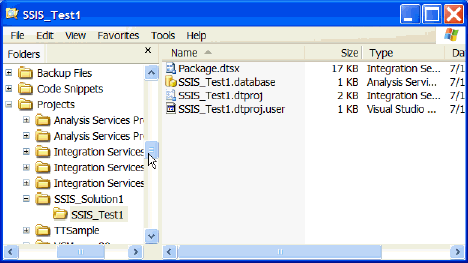
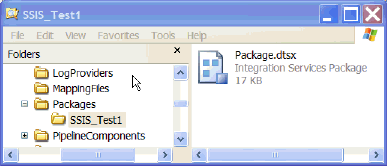
| 4j | Deployment Verification - To verify that the SSIS Package was deployed, navigate to the directory selected in step 4g. |
|
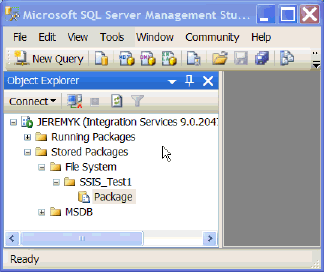
| 4k | Deployment - In Management Studio, login to the Integration Services instance where the SSIS Package was deployed. Then navigate to the root | Stored Packages | File System folder to verify the package is available to Integration Services. |
|
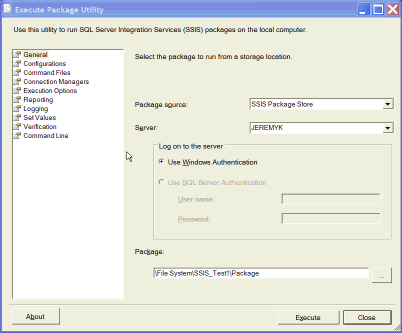
| 5 | Execution - SSIS Packages can be executed interactively or on a regularly scheduled basis. Below are the options to execute a SSIS Package interactively:
Below are the options to execute the SSIS Package in an automated manner
|
|
Next Steps
- Since SSIS (SQL Server 2005) is able to access SQL Server 2000 instances and SSIS has an expanded set of functionality, consider fulfilling new ETL requirements with SSIS as a means to begin to learn about SQL Server 2005, if you have the licensing. This gradually will expose you to SQL Server 2005, offer you a more robust feature set and avoid the need to have to upgrade DTS Packages to SSIS Packages.
- As you begin to transition ETL code from SQL Server 2000 to 2005, keep in mind the differences in the code migration process.


About the author
 Jeremy Kadlec is a Co-Founder, Editor and Author at MSSQLTips.com with more than 300 contributions. He is also the CTO @ Edgewood Solutions and a six-time SQL Server MVP. Jeremy brings 20+ years of SQL Server DBA and Developer experience to the community after earning a bachelor's degree from SSU and master's from UMBC.
This author pledges the content of this article is based on professional experience and not AI generated.
View all my tips
