By: Edwin Sarmiento | Comments (3) | Related: 1 | 2 | 3 | > PowerShell
Problem
I have been hearing about Microsoft's scripting language called Windows PowerShell which is extensively used nowadays for administering and managing Windows servers and workstations. Exchange Server 2007 and Windows Server 2008 are just two of the Microsoft server products that have included this as part of their administrative tools. I want to know how Windows PowerShell can help me as a SQL Server DBA.
Solution
To continue this series on Introduction to Windows PowerShell for the SQL Server DBA, this tip will look at the pipeline and output processing. In Part 1, we have introduced Windows PowerShell, the use of cmdlets and aliases and how we can take full advantage of the help available from the environment. We will build on what we have learned from the previous tip as we go along.
So, pipes are not just for plumbers
Pipes and piping are very common terms in any scripting language and it's no different in PowerShell. Think of it as a way to combine different commands (or in this case cmdlets) to do more complex operations. It works by directly connecting the output of the previous cmdlet to the input of the cmdlet that follows after it. As the output-input stream flows thru the pipe, they come in the form of objects and everything is being handled by the shell. As your operations become more complex, you can increase the number of pipes as necessary. To demonstrate, we will build on a few of the examples we have in part 1.
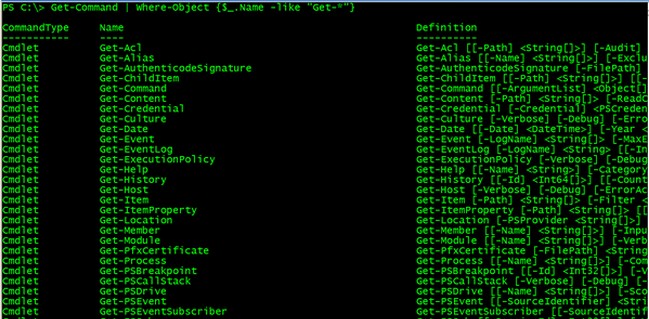
Let's use the Get-Command cmdlet to list all of the cmdlets available in Windows PowerShell that begin with the verb Get-. Since the Get-Command will list all of the cmdlets, we need to filter that list to only display what we need - cmdlets that start with the verb Get-. We will use the pipeline to connect this output to another cmdlet, Where-Object. The Where-Object cmdlet will act as our filter to display only those cmdlets we need. The syntax for this will be Get-Command | Where-Object {$_.Name -like "Get-*"}
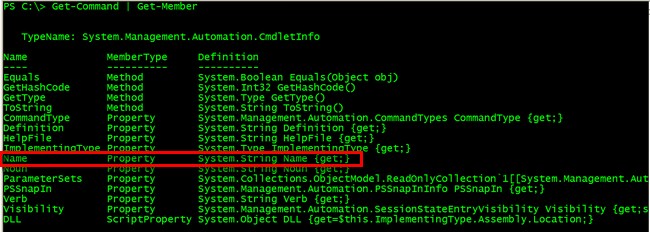
Now, don't be intimidated by the $_ you saw inside the curly brackets. Let me explain the contents of the script. You already know both the Get-Command and the Where-Object cmdlets so let me start with the $_. Basically, it is just a notation to represent the default object as it is being passed to the pipeline. Since we are passing a list of objects to the next cmdlet using the pipeline, the value of the $_ changes from one object being passed to another. The Name is an attribute/property of the object that we can access and query (or change depending on how the class was designed) as part of our processing. This could be anything depending on the objects that are being returned by the cmdlet but since we are dealing with the objects returned by the Get-Command cmdlet, we know there is a Name property. Now, I know you're starting to ask, "How do I remember all of the properties and methods of any objects that I will be using within PowerShell?" The answer is, you simply don't. You use the available help system we have talked about in part 1 and introduce a new cmdlet, Get-Member. The Get-Member cmdlet retrieves the properties and methods of objects passed to it. To use this cmdlet, just pipe the results of a cmdlet to Get-Member, like this:
Get-Command | Get-Member
The -like keyword is an example of a comparison operator in Windows PowerShell. A list of these comparison operators is shown below
- -lt: Less than
- -le : Less than or equal to
- -gt: Greater than
- -ge : Greater than or equal to
- -eq : Equal to
- -ne : Not equal to
- -like : Like; uses wildcards for pattern matching
You can mix and match these comparison operators and piping to come up with more complex tasks. Sorting and grouping are also available using the Sort-Object and Group-Object cmdlets, respectively. In one particular case as a SQL Server DBA, you may want to restart all SQL Server services in a machine after maintenance. You might be thinking of manually restarting all of them but think about having like 10 or more instances in a server. Even a NET START/NET STOP wouldn't be that helpful especially if you don't know the instance names of the SQL Server instances. You can use Windows PowerShell to do the trick, where the -Force parameter simply does the same thing for dependent services.
Get-Service | Where-Object {$_.Name -like "MSSQL$*"} | ReStart-Service -Force
Getting more aesthetic results
Whether we like it or not, having any output formatted is one of the most common things we do in our daily tasks, especially when whatever you will be doing will be read or validated by somebody else. By default, PowerShell takes care of the formatting for us. We can, however, decide which formatting to use with our output results. To get a list of the available formatting options in PowerShell, you can run
Get-Command Format-*

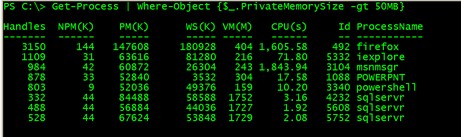
These available cmdlets allow us to format the results of our scripts depending on our needs. To illustrate, let's use the Format-List cmdlet to display all the processes running in the local computer that are consuming more than 50MB of memory. Without formatting, this is how the results would look like running
Get-Process | Where-Object {$_.PrivateMemorySize -gt 50MB}
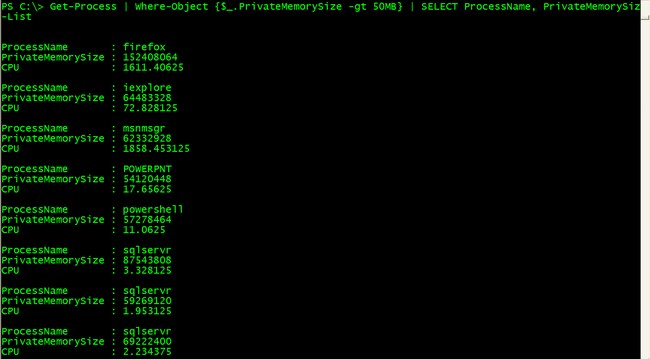
Using the Format-List cmdlet, we can just display the ProcessName and PM(K) and probably the CPU(s) columns in the output running
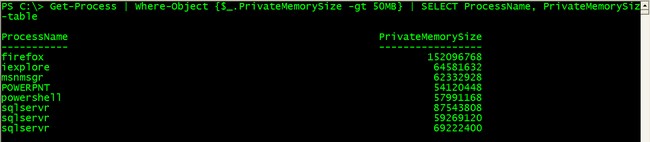
Get-Process | Where-Object {$_.PrivateMemorySize -gt 50MB} | SELECT ProcessName, PrivateMemorySize, CPU | Format-List
This is how the results would look like using the Format-Table cmdlet,
You can try playing around with the other formatting options available in Windows PowerShell to suit your needs. Now, there might be cases where you need to store these results in a file. I normally export results in a CSV format so I can open the file in Microsoft Excel and present it as a report to management. Windows PowerShell has the Export-CSV cmdlet that allow you to create a CSV file representation of the outputs of the script. You just have to pipe the results to the Export-CSV cmdlet and pass a filename as a parameter
Get-Process | Where-Object {$_.PrivateMemorySize -gt 50MB} | SELECT ProcessName, PrivateMemorySize, CPU | Export-CSV c:\process.csv
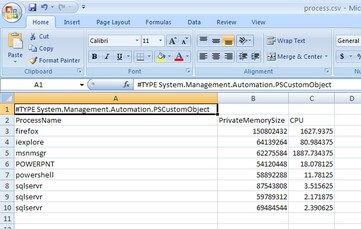
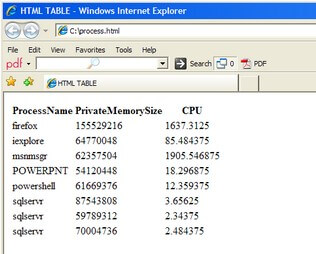
If you don't like to see the .NET object type in the first line, simply add the -notype parameter in the Export-CSV cmdlet. While others may say that CSV files are a thing of the past, you can easily save them as Excel files and generate graphs and charts which most management prefer. You can also output the results in HTML format by using the ConvertTo-HTML cmdlet. Like the Export-CSV cmdlet, it would make sense to output the results to an HTML file and pass the filename as a parameter in the Out-File cmdlet
Get-Process | Where-Object {$_.PrivateMemorySize -gt 50MB} | SELECT ProcessName, PrivateMemorySize, CPU | ConvertTo-HTML | Out-File C:\process.htm
Next Steps
You've managed to build a complex script in just a single line in Windows PowerShell using the pipeline, comparison operators and formatting the results.
- Download and install Windows PowerShell
- Check out the Windows PowerShell Owner's Manual from Microsoft TechNet
- Explore the other ways you can use Windows PowerShell in managing your Windows infrastructure


About the author
 Edwin M Sarmiento is a Microsoft SQL Server MVP and Microsoft Certified Master from Ottawa, Canada specializing in high availability, disaster recovery and system infrastructures.
This author pledges the content of this article is based on professional experience and not AI generated.
View all my tips
