By: Edwin Sarmiento | Comments (3) | Related: 1 | 2 | 3 | > SQL Server Configurations
Problem
Windows Server Core has been around since Windows Server 2008. I have been wanting to install SQL Server 2008 on Windows Server Core but could not do so because it wasn't officially supported. However, SQL Server 2012 now is. How do I install SQL Server 2012 on Windows Server Core?
Solution
When Windows Server 2008 was launched a few years ago, there was a lot of hype about the features introduced in the new operating system. It boasts of a lean, mean operating system that you can spin up with very little overhead. You're probably aware of the marketing campaign that Microsoft came up with for the launch back in 2008: the crouching server. With Windows Server 2008 comes a variation of installation called Server Core.
What is Windows Server Core?
Windows Server Core is a stripped-down, minimal configuration installation option of Windows Server 2008. When it first came out, I called it the Linux version of Windows just because you don't have the fancy GUI and Windows Explorer shell that all Windows administrators have gotten used to. Managing the server means going back to the good-old-days of MS DOS, ramping up on Windows PowerShell or managing it remotely using the Remote Server Administration Tools (RSAT). You do have minimal GUI available such as Task Manager, Notepad and Registry Editor. Having a stripped-down version of the operating system provides several benefits:
- More secure. Because of the limited features, you have reduced surface area for any potential attacks, especially for servers that are constantly connected to the Internet.
- Relatively perform better. One of the things I do with my test Windows servers is to disable all of the unnecessary services running on the machine - Windows Audio, Print Spooler, etc. I also do this on my Windows workstation. I want to maximize all the resources available on the server so that my other applications can utilize those resources when necessary. With Windows Server Core, I no longer have to do this since the only services available are those that you turn on.
- Reduced management. With fewer components come less patches to install. And less patches to install mean reduced downtime. I have dealt with server downtime in the past that was caused by a .NET Framework security patch causing web applications to become inaccessible.
When Windows Server 2008 was released, Server Core did not include the .NET Framework, thus, limiting its ability to run managed code, including SQL Server 2005 and higher. Server Core on Windows Server 2008 R2, however, included both the .NET Framework 2.0 and 3.5, neither of which are enabled by default. In keeping with the vision of minimal configuration of the Server Core components, the .NET Framework did not include some components such as those pertaining to graphical user interface (Windows Presentation Foundation and Windows Forms elements.) However, even with the support for .NET Framework on Server Core, SQL Server 2008 R2 was still not supported. While others have attempted to install SQL Server 2008 on Server Core, Microsoft does not officially support it - until now. SQL Server 2012 is the first version of SQL Server officially supported on Windows Server Core.
Configuring Windows Server Core
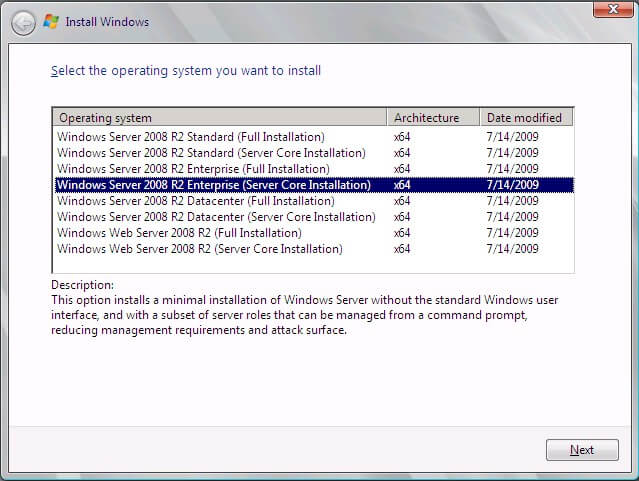
Installing Windows Server Core is pretty straight-forward. During the installation process, in the Select the operating system you want to install dialog box, make sure you select those with the (Server Core Installation) option, depending of course on your license. Once installed, there's no turning back because you can't convert a Server Core installation to a full blown installation without having to reinstall. And since you have minimal configuration with Server Core, the installation will be relatively fast as compared to the full blown version. On my virtual machine running with 1GB of memory, the installation took less than 15 minutes.
After logging in, you will be presented with a command-line interface for you to start configuring the server. This is where you take those rusty old MS DOS commands from your toolkit and start pounding away. The first thing you need to do after the installation is to activate Windows. This can be done via the slmgr.vbs script. You can use the /ipk switch to provide the Product Key and the /ato switch to activate Windows. Activation will be a bit more challenging when the Server Core machine is not connected to the Internet. A workaround for this is to temporarily request access to the Internet just for the purpose of activation.
NOTE: SQL Server 2012 requires Windows Server 2008 R2 Service Pack 1 so make sure you download and install it on all server operating systems that you intend to use.
For configuring the server, you have the option to use the following:
- sconfig.cmd
- Native MS DOS commands
- Windows PowerShell
- CoreConfigurator, an open source tool available from CodePlex that makes managing Windows Server via GUI
I am including command-line options such as native MS DOS commands and Windows PowerShell for configuring Windows Server Core so you can choose depending on your preference. This tip will focus more on the native MS DOS commands so you can leverage your previous knowledge.
Since sconfig.cmd is very intuitive and user-response driven, I'll skip that as well. I will slightly talk about CoreConfigurator since it's a GUI-based utility which we are all very familiar with.
You can launch sconfig.cmd by typing in sconfig from the command prompt.
C:\Users\Administrator> sconfig
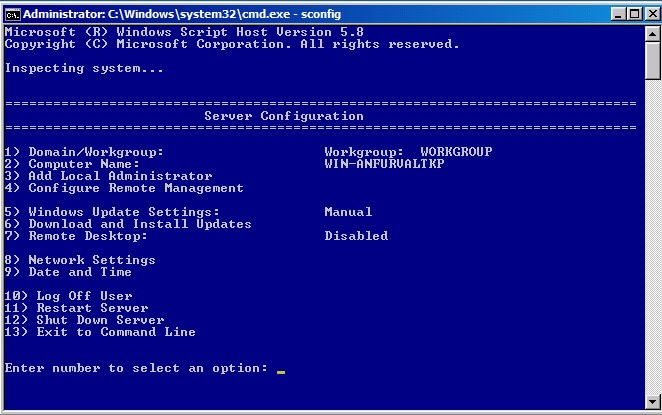
Notice that you have everything you need to start configuring the server - change server hostname, configure network settings, etc. However, since it is driven by the user response, you still have to manually type everything. If you use native MS DOS commands and Windows PowerShell, you can easily write up a script to perform all of the tasks and run the script once, eliminating the need to manually type and potentially make mistakes in the process. Windows PowerShell has to be enabled first before you can even use it.
Change the Time Zone Settings (MS DOS)
To change the time zone on the Server Core machine, you can use the tzutil.exe command below, replacing the time zone value as appropriate.
C:\> tzutil /s "Eastern Standard Time"
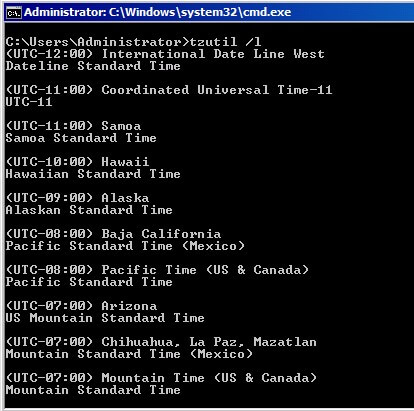
To display the list of time zones that you can select from, you can use the /l switch.
Configure Network Settings (MS DOS)
Before we can even join the server to the domain, we need to configure the network settings - specify static IP address, subnet mask, gateway and DNS servers. For this server, I will use the following network configuration.
- IP Address: 172.16.0.51
- Subnet Mask: 255.255.0.0
- Default Gateway: 172.16.0.5
- Preferred DNS server: 172.16.0.100
- Alternate DNS server: 192.168.0.100
For standardization purposes, I will first rename my network adapter. This will be helpful especially when you have multiple network adapters, as in the case of a Failover Cluster. We need to display the name and properties of the network interface that we need to configure. For all network-related configuration tasks, we will use the netsh.exe command.
C:\> netsh interface ip show config
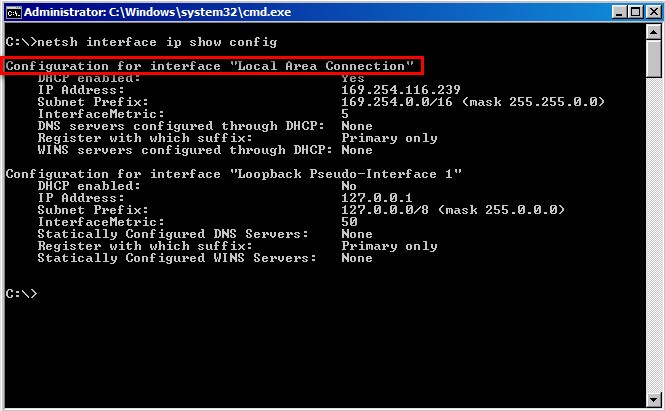
In my environment, the network adapter named "Local Area Connection" is the one that I will configure. To rename the network adapter to LAN, type the following netsh command below.
C:\> netsh interface set interface name="Local Area Connection" newname="LAN"
Next, we will change the IP address, subnet mask and default gateway values
C:\> netsh interface ip set address "LAN" static 172.16.0.51 255.255.0.0 172.16.0.5 1
Finally, we will assign the primary and alternate DNS servers. I used the validate=no parameter on my netsh command because even if the IP address of the DNS servers have been successfully assigned, you will still get the error message "The configured DNS server is incorrect or does not exist."
C:\> netsh interface ip set dnsservers "LAN" 172.16.0.100 index=1 validate=no
C:\> netsh interface ip set dnsservers "LAN" 192.168.0.100 index=2 validate=no

Rename the Server and Join it to the Domain
We need to rename the server and provide a meaningful name to the machine prior to joining it to the domain. In order for us to rename the server, we need to first identify the current server name that was assigned during the installation. The command hostname can be used for this purpose.
C:\> hostname
Once we have the current server hostname, we will use it with the netdom command. In my environment, the current server hostname is WIN-ANFURVALTKP. Alternatively, we can just pass the %COMPUTERNAME% variable in the netdom command so we don't have to worry about the current server hostname.
C:\> netdom renamecomputer %COMPUTERNAME% /newname:SQL-SERVERCORE
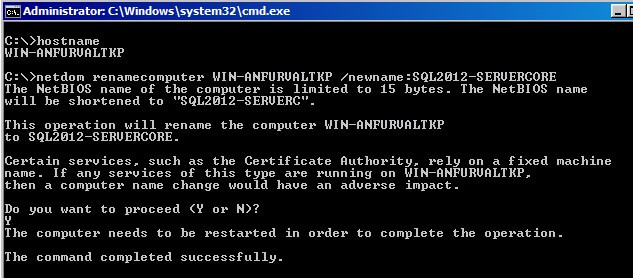
This will prompt you to reboot the machine. Use the shutdown command with the /r switch to reboot the machine.
C:\> shutdown /r
After rebooting the machine, we are now ready to join it to the domain. We will use the netdom command to accomplish this task.
C:\> netdom join SQL-SERVERCORE /domain:TESTDOMAIN.local /userD:administrator
/passwordD:yourPassword
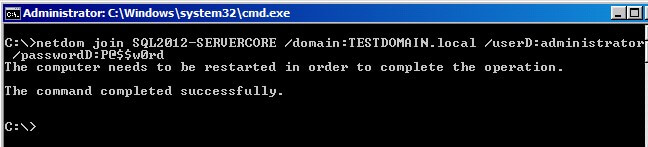
This will again prompt you to reboot the machine. Use the shutdown command with the /r switch to reboot the machine.
Enable Remote Administration
While we can log in directly to the Windows Server Core machine, we probably won't do so since most of our servers are in the data center. We need to enable the server to allow remote management via Remote Desktop, Windows Remote Shell or MMC.
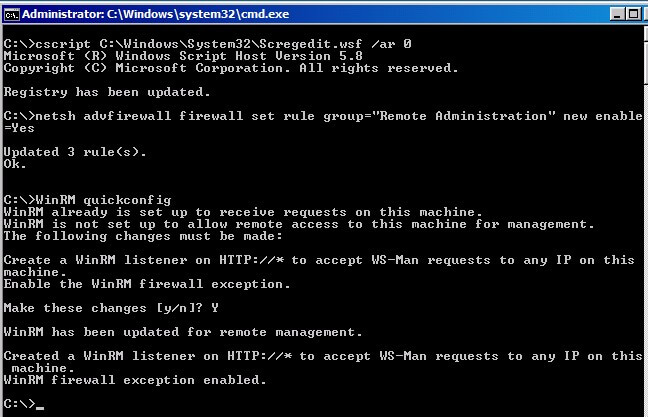
- To enable Remote Desktop access on the machine, type the following command.
C:\> cscript C:\Windows\System32\Scregedit.wsf /ar 0
You can verify this by connecting to your Windows Server Core machine from another workstation using Remote Desktop.
- To allow Remote Administration from the Windows Firewall, type the following command
C:\>netsh advfirewall firewall set rule group="Remote Administration" new enable=Yes
You can also disable the Windows Firewall altogether if you have internal firewalls that are managed by your network team. Be sure to check with your security policies before doing so.
- To enable Windows Remote Shell, type the following command
C:\>WinRM quickconfig
Add the .NET Framework 2.0 and 3.5
Both the .NET Framework 2.0 and 3.5 are prerequisites for installing Windows PowerShell 2.0 and SQL Server 2012. As both are disabled by default, we need to add both of them as features in Windows Server Core. To do so, we will be using the Deployment Image Servicing and Management tool, or the dism.exe command.
C:\>DISM.exe /online /enable-feature /featurename:NetFx2-ServerCore
C:\>DISM.exe /online /enable-feature /featurename:NetFx3-ServerCore
C:\>DISM.exe /online /enable-feature /featurename:NetFx2-ServerCore-WOW64
C:\>DISM.exe /online /enable-feature /featurename:NetFx3-ServerCore-WOW64

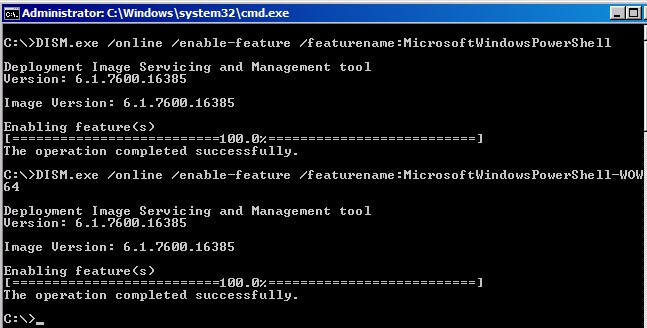
Enable Windows PowerShell
Now that the .NET Framework has been enabled on Windows Server Core, we can now enable Windows PowerShell. We will perform this task using the dism.exe command
C:\>DISM.exe /online /enable-feature /featurename:MicrosoftWindowsPowerShell
C:\>DISM.exe /online /enable-feature /featurename:MicrosoftWindowsPowerShell-WOW64
So far, we've prepared the Windows Server Core machine for the SQL Server 2012 installation using mostly MS DOS commands available in Windows Server 2008 R2. In the next tip in this series, we will look at performing some of these steps using Windows PowerShell so that you can compare between the two approaches and see which one you prefer. This will also give you some insights on how you can create scripted installation and configuration of your base operating system prior to installing SQL Server 2012.
Next Steps
- Install and configure a Windows Server 2008 R2 Server Core using MS DOS commands
- Review the prerequisites for installing SQL Server 2012 on Windows Server Core


About the author
 Edwin M Sarmiento is a Microsoft SQL Server MVP and Microsoft Certified Master from Ottawa, Canada specializing in high availability, disaster recovery and system infrastructures.
This author pledges the content of this article is based on professional experience and not AI generated.
View all my tips
