By: Arshad Ali | Comments (5) | Related: > Master Data Services
Problem
SQL Server 2008 R2 introduced Master Data Services (MDS) as Master Data Management (MDM) platform for managing enterprise master data centrally in a consistent, clean and up-to-date manner. There were three ways to manage master data in MDS. First, was the Master Data Manager which is a web based User Interface. Second, was loading data through the staging process. Third, was to use the MDS WCF services to programmatically manage master data. These were fine options, but there were many users who wanted to manage data in Microsoft Excel in bulk than managing each single record/member at a time in Master Data Manager UI. The SQL Server team heard this requirement and introduced a brand new Excel add-in for SQL Server 2012 for MDS to manage master data. In my last tip I talked about how to get started with MS Excel MDS add-in to manage master data stored in Master Data Services database in Excel. In this tip, I am going to talk more about editing, creating, combining master data, creating entities and how it can be used in conjunction with Data Quality Services for data matching.
Solution
In my last tip, I briefly talked about Master Data Management and Master Data Services and then I demonstrated, how to get started with the Microsoft Excel MDS add-in to manage master data stored in Master Data Services database in familiar Excel application. In this tip, I am going to talk more about editing, creating, combining master data from different Excel worksheets, creating and modifying entities and how it can be used in conjunction with Data Quality Services for data matching.
Managing master data with Microsoft Excel add-in for Master Data Services
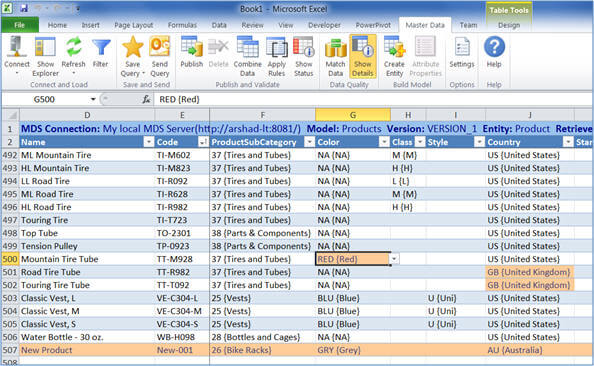
Once you have brought the master data into an Excel sheet (by connecting to MDS Server, selecting model, then version and by clicking on the entity; I talked in detail about bringing data from MDS Server to an Excel worksheet in my last tip), you have full flexibility to use all Excel features. You can now modify existing members and can add new members. Whatever changes that you will be doing, after bringing data from MDS Server, will be highlighted as shown below. For example as you can see in the image below as highlighted, I have changed the value for the Color attribute for code TT-M928, changed the values for Country for codes TT-R982 and TT-T092 and added a new member with code New-001:
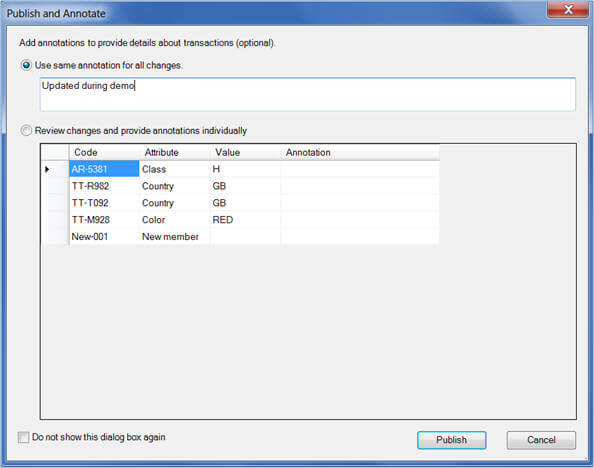
Once you are done with making changes to the master data you need to publish it to MDS Server. To do that, click on the Publish icon on the add-in ribbon, by default (though this default behavior can be changed by clicking on the Settings icon and then un-checking "Show Publish and Annotate dialog box when publishing" ) this will bring up a dialog box where you can optionally provide annotation for the changes you have done. You can choose to provide single annotation for all the changes or provide multiple annotation for each change separately as shown below:
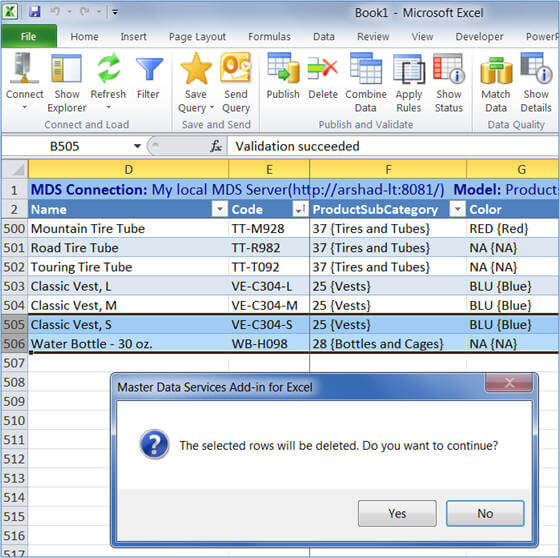
The process for deleting members is little different. Simply deleting a member/row from the Excel worksheet will not delete it from the MDS Server. To delete one or more members/rows of an entity from the MDS Server you need to select the intended row(s) and then click the Delete icon on the add-in ribbon as shown below. NOTE - Once a record is deleted from the MDS Server, it cannot be undone, so be careful when deleting records.
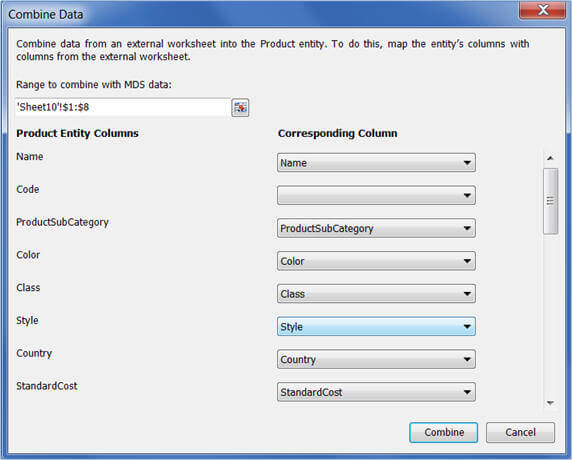
If you have data in multiple Excel worksheets you can use the Combine feature of the add-in to combine data from two worksheets into one and publish it all at once. In order to combine data from multiple Excel worksheets you need to click on the Combine Data icon on the add-in ribbon, then specify the cell range of data from the other worksheet, from where you want to combine the data. Then map the columns from main/MDS Excel wok sheet to another Excel worksheet as shown below. This feature will try to match/map the columns from both of the worksheets by using the fuzzy logic. Once you define the mapping correctly you can click on the Combine button. Once combined, the new rows from the other worksheet will be added as new rows in the main worksheet and another column, called Source, is added to indicate the source of the data whether MDS or external. Now you can publish the complete set of master data at one time to the MDS Server.
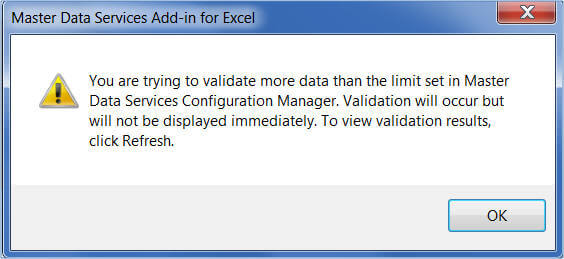
Even though you cannot create new business rules for data validation in Excel, with the MDS add-in you can validate your data with the existing business rules. To apply business rules for the selected entity just click on the Apply Rule icon on the add-in ribbon. You will see two additional columns (ValidationStatus and InputStatus) appear in the beginning of the rows to indicate data validation status against the business rule. You can show or hide these status columns by clicking on the Show Status icon on the add-in ribbon. Sometimes the number of rows/members are more than the configured value for the business rule validation add-in. In that case you will not see the result immediately, though the business rule validation process runs on the server. You will need to refresh the Excel worksheet to see the data.
Creating an MDS entity from the Microsoft Excel add-in of Master Data Services
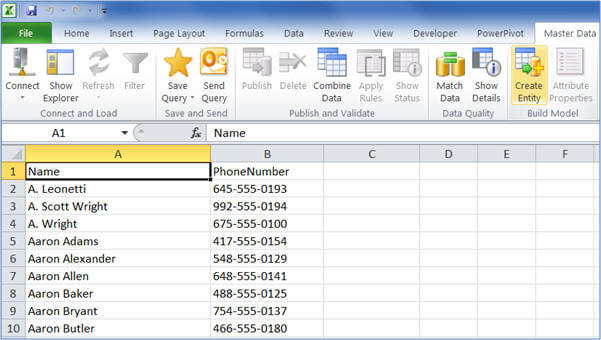
Creating an entity on the MDS Server is quite easy. For example, I have customer phone data in an Excel worksheet and I want to create an entity with this data. For this, I just need to click the Create Entity icon on the add-in ribbon and specify the column for Code and Name as shown below:
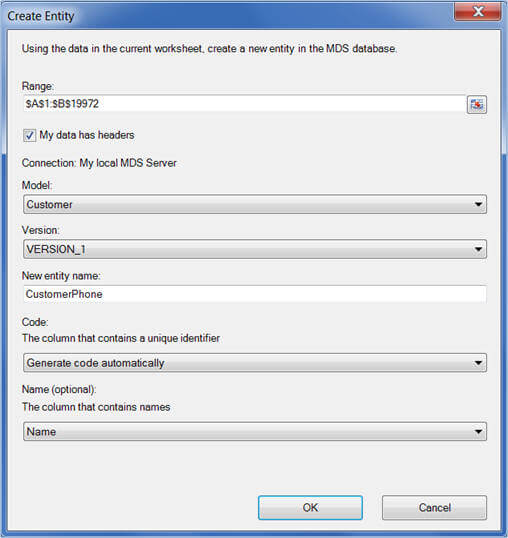
When you click on the Create Entity icon as shown above, a dialog box will appear as shown below. You need to specify the range of data in the Excel worksheet which you want to be considered for the entity, specify the model and version under which the entity will be created, specify the name of the new entity and columns which will be used as Code (since I do not have column a which can be considered a code, I let MDS generate it for me) and Name. Then click the OK button to create the entity. It is much simpler than creating the entity using Master Data Manager UI and then adding each member individually or by using a staging batch load.
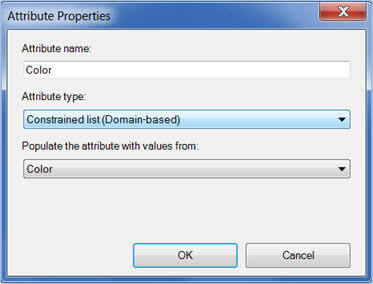
Not only is the process of creating an entity simplified in MDS with the Excel add-in, but also the process of changing the attribute properties for the existing entity is quite simple. To do this, just select the column and then click on the Attribute Properties icon in the add-in ribbon followed by the Attribute Properties dialog box, as shown below. Change the properties values as appropriate. You can specify the value for the selected attribute to be Text, Number, DateTime, Link or domain values coming from another entity.
Integration of the Microsoft Excel add-in of Master Data Services with Data Quality Services
Data Quality Services (DQS) is a new feature in SQL Server 2012 which provides data quality solutions i.e. data cleansing for data accuracy and data matching for de-duplication to data stewards, which is someone who ensures the quality of the data to ensure the data useful for the business or IT Professionals. DQS is a knowledge based solution that provides both interactive or automated/batch mode ways to manage the integrity and quality of the data. I have written about DQS in greater detail, so for more information click here.
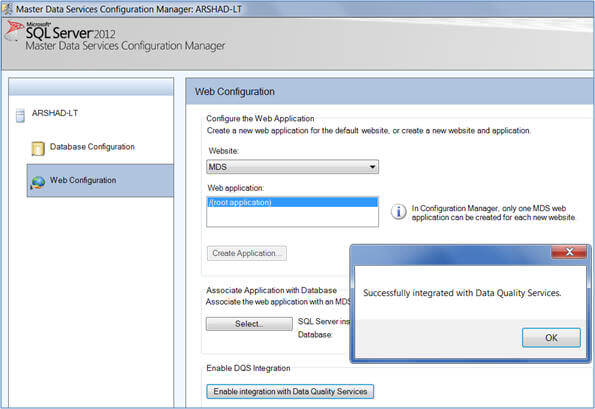
MDS integrates well with DQS to ensure you store accurate master data on MDS Server. In order to use DQS with the MDS Excel add-in you need to first enable the MDS integration with DQS by going to Master Data Services Configuration Manager, then Web Configuration and finally clicking on the "Enable Integration with Data Quality Services" button as shown below. Please note, DQS must be installed on the same SQL Server instance as MDS.
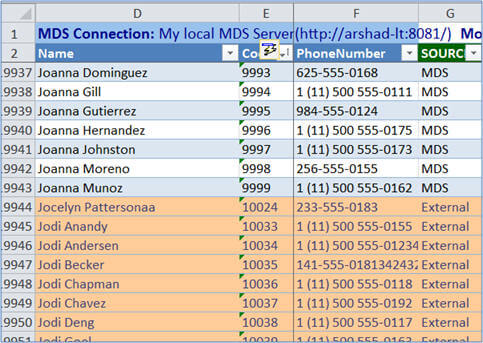
Once you have enabled the MDS integration with DQS, you can now use DQS when managing master data in the MDS Excel add-in. For example, I have some customer contact information on the MDS Server and now I have another set of records to publish to MDS, but before publishing the data I want to use the DQS matching feature to identify duplicate records between what I have already in MDS and what I have received. In order to do that I have to first combine the data from MDS and what I have received in one Excel worksheet, for the process of combining data from two different worksheets, please refer to the above section in this tip. As you can notice in the image below, the source column indicates the source of data. 'MDS' means the data is available at the MDS Server and 'External' means data is yet to be published to the MDS Server:
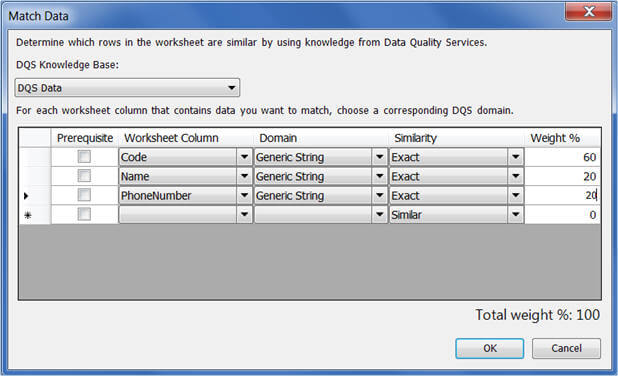
Once you have combined the data in one worksheet, click on the Match Data icon in the MDS Excel add-in ribbon and specify the knowledge base that you want to use for data matching. Please note, specifying the knowledge base is optional and you can also directly do the data matching with the data in an Excel worksheet. Next, you need to specify the columns which will be used for comparison, the domain, similarity and weight as shown below.
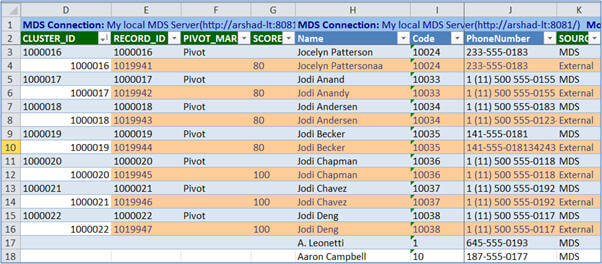
Now click on the 'OK' button to start the matching operation by the DQS Server, keep in mind the add-in sends the data for data matching to the DQS Server. Once the operation is completed the resultant data will be shown with four different meta columns. If these are not visible then click on Show Detail icon on the add-in ribbon, which will give you information on the matching result and score as shown below. The duplicate records with a matching score will appear in the beginning of the worksheet as shown below and new records will be shown at the end of the worksheet. The duplicate records will be identified based on the matching score and you can choose which records to keep or ignore. Once you are done with this, you can click on the Publish icon on the add-in ribbon to save the data to the MDS Server.
Next Steps
- Review Data Quality Services tip.
- Review Master Data Services tips.
- Review Introduction to Master Data Services in SQL Server 2008 tip.


About the author
 Arshad Ali is a SQL and BI Developer focusing on Data Warehousing projects for Microsoft.
This author pledges the content of this article is based on professional experience and not AI generated.
View all my tips
