Problem
There are numerous solutions out there in the web to create a Slideshow web part. But finding one with jQuery was a tough job for me when I started working on this. JQuery was chosen based on the requirement given.
Solution
By using jQuery we get a nicer look and more user friendly features for the web part. When I say user-friendly, it means that you can control the number of images you want to scroll, link to the related article through those images, select the announcements to display, select the effect of the movement of Images (e.g.: fade, fold, slice down), change the speed of the sliding action, control the visibility of navigation numbers.
All of the Image Slider’s settings can be changed in the Master Page, and reside in an Announcement list where you store all the information you want to show in this image slider web part.
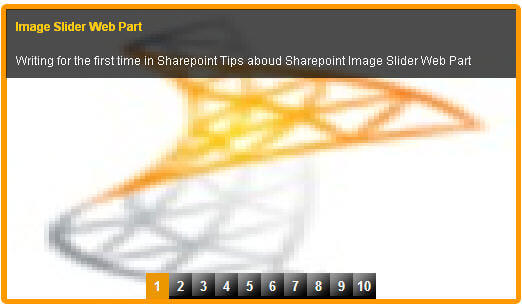
Usually, the Image Slider WebParts will be used in a company’s intranet portal, where information needs to be published in a sliding window to all users of the website.
There are few steps that you need to do to achieve a good looking Image Slider Web Part. I have used Nivo Slider’s jQuery plugin file along with the latest Jquery Plugin file.
Step 1:
You need to create a list with the name of “AnnouncementSlider” with the following columns
a. Title – Single line of text
b. Notes – Multi line of text (Plain)
c. ArticleLink – Single Line of text
d. ArticleThumbnail – Single Line of text
e. PublishDate – Date/Time
f. Display – Yes/No
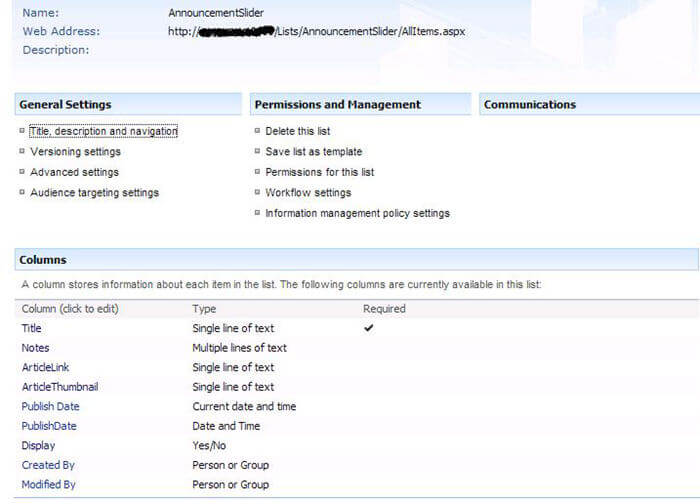
Include some 10 lines of sample data into the list. Please do make sure all the thumbnail links you specify are with Images and the dimensions of the images should be as follows:
- Height: 290px
- Width: 510px
- Publishdate has to be today’s date or greater than today’s date.
Step 2:
You need to register jQuery in the master page of the SharePoint site. Get the latest jQuery file (jquery-1.6.2.min.js) from jQuery website and store it in a separate folder in the 12 hive. I have done it here “/_layouts/1033/Styles/jQuery”.
Nivo Slider needs its own jQuery plug-in to do the sliding function. You can download the Nivoslider Jquery file from here. Add the jQuery file to the same folder and register it along with the JQuery Plug-in. Add the lines below in the masterpage in the <Head> portion to get it registered successfully.
<script type="text/javascript" src="/_layouts/1033/Styles/jQuery/jquery-1.6.2.min.js"></script>
<script type="text/javascript" src="/_layouts/1033/Styles/jQuery/jquery.nivo.slider.pack.js"></script>
Step 3:
Include the function call below in the Masterpage just before the </Body> tag. Below is a screen shot of the master page:
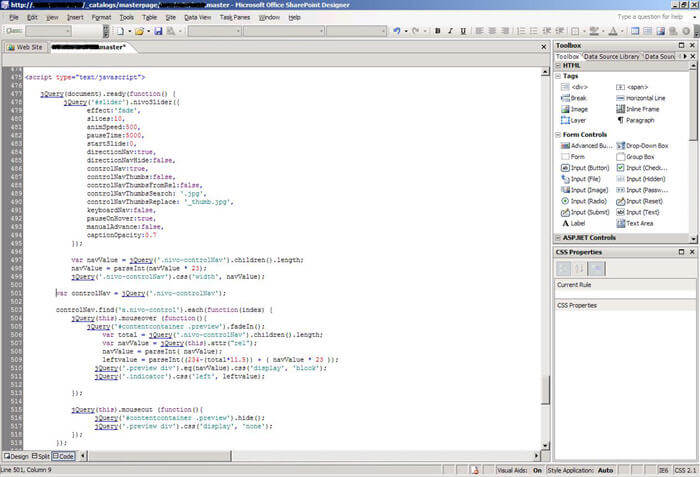
<script type="text/javascript">
    jQuery(document).ready(function() {
        jQuery('#slider').nivoSlider({
                effect:'fade', //Specify sets like: 'fold,fade,sliceDown'
                slices:10,  //slice effect not used
                animSpeed:500, //Slide transition speed (500 equals 0.5 second)
                pauseTime:5000, //Set time between transition for Main Banners (5000 equals five seconds)
                startSlide:0, //Set starting Slide (0 index)
                directionNav:false, //Next and Prev
                directionNavHide:false, //Only show on hover
                controlNav:true, //1,2,3...
                controlNavThumbs:false, //Use thumbnails for Control Nav
                controlNavThumbsFromRel:false, //Use image rel for thumbs
                controlNavThumbsSearch: '.jpg', //Replace this with...
                controlNavThumbsReplace: '_thumb.jpg', //...this in thumb Image src
                keyboardNav:false, //Use left and right arrows
                pauseOnHover:true, //Stop animation while hovering
                manualAdvance:false, //Force manual transitions
                captionOpacity:0.7 //Universal caption opacity
            });
            var navValue = jQuery('.nivo-controlNav').children().length;
            navValue = parseInt(navValue * 23);
            jQuery('.nivo-controlNav').css('width', navValue);

        var controlNav = jQuery('.nivo-controlNav');
        controlNav.find('a.nivo-control').each(function(index) {
            jQuery(this).mouseover (function(){
                jQuery('#contentcontainer .preview').fadeIn();
                    var total = jQuery('.nivo-controlNav').children().length;
                    var navValue = jQuery(this).attr("rel");
                    navValue = parseInt( navValue);
                    leftvalue = parseInt((234-(total*11.5)) + ( navValue * 23 ));
                  jQuery('.preview div').eq(navValue).css('display', 'block');
  jQuery('.indicator').css('left', leftvalue);
            });
            jQuery(this).mouseout (function(){
                  jQuery('#contentcontainer .preview').hide();
                  jQuery('.preview div').css('display', 'none');
            });
        });
</script>
Step 4:
The CSS file is the next most important part that runs the show exactly as it should. Copy and paste the given CSS file below to your existing css file that you have been using all along for your SharePoint site.
#contentcontainer
{
width:520px;
font-size:13px;
font-weight:bold;
margin-left:10px;
float: left;
}

.banner_shadow
{
margin-left:-20px;
margin-top:5px;
position:relative;
}
#slider-wrapper
{
background:url('../wp-content/images-tips/New_bannerbg.jpg') no-repeat;
    width:510px;
    height:290px;
padding:5px 5px;
margin-bottom:25px;
}
#contentcontainer .preview
{
    margin-left:30px;
margin-top:-150px;
position:absolute;
z-index:999;
width:460px;
background:#FFF;
display:none;
}

#contentcontainer .preview img
{
float:left;
width:123px;
padding:5px 10px 5px 5px;
}
#contentcontainer .preview p
{
padding:10px;
color:#666;
font-size:11px;
font-weight:normal;
line-height:14px;
}
#contentcontainer .preview p strong
{
color:#000000;
font-size:12px;
}
div.nivo-caption h4
{
color:#ffcc00;
font-size:14px;
margin-bottom:5px;
}
.nivo-caption
{
padding:8px 10px;
width:490px;
}
#description
{
    font-size:12px;
font-weight:normal;
line-height:14px;
}
#slider
{
    width:510px;
    height:290px;
overflow:hidden;
background:url('../wp-content/images-tips/loading.gif') no-repeat 50% 50%;
}
#slider a
 {
border:0;
}
.indicator
{
display:block;
width:60px;
height:30px;
z-index:999;
position:absolute;
margin-top:2px;
}
.first
{
  left:170px;
}
.nivo-controlNav
{
color:#FFF;
font-size:12px;
margin:0 auto;
margin-top:267px;
position:relative;
z-index:100;
}
.nivo-controlNav a
{
display:block;
width:23px;
height:23px;
background:url('../wp-content/images-tips/new_glossbar.jpg') no-repeat;
color:#FFF;
text-align:center;
line-height:22px;
float:left;
}
.nivo-controlNav a.active
{
color:#FFF;
background:#ee9a03;
}
.nivo-caption
{
    text-shadow:none;
}
.nivo-caption a
{
    color:#efe9d1;
    text-decoration:underline;
}
Step 5:
Develop your HTML rendering web part with a VB file and a .dwp file. This method of developing the web part is pretty old and I don’t think I should be including its detail here. It comes in handy for this image slider web part as we get good results when it is rendered in HTML.
You can first try this with some sample images in an html file storing the style sheet and the scripts in the same place as the HTML file before working on your web part. In that way, you can always change, test and change before you get your final HTML piece of code. I have my vb file with the name of AnnouncementSlider.vb. The code is below:
Imports System
Imports System.Collections.Generic
Imports System.ComponentModel
Imports System.Text
Imports System.Web
Imports System.Web.UI
Imports System.Web.UI.WebControls
Imports System.Xml.Serialization
Imports Microsoft.SharePoint.WebPartPages
Imports Microsoft.SharePoint
Imports Microsoft.SharePoint.Utilities
Imports System.Web.HttpRequest
Imports System.Security.Principal
<DefaultProperty("Text"), _
ToolboxData("<{0}:AnnouncementImageSlider runat=server></{0}:AnnouncementImageSlider>"), _
XmlRoot(Namespace:="Announcementslider")> _
Public Class AnnouncementImageSlider
Inherits Microsoft.SharePoint.WebPartPages.WebPart
#Region "WebPart Properties"
Protected MaxNo As String = "10" ' The maximum number of items to
display
Protected ListName As String = "AnnouncementSlider"
Private MaxNoDisplayName = "MaxItems"
Private IDValue As String = "ID"
Private Title As String
Private Synopsis As String
Private ImageURL As String
Private ArticleURL As String
Private CSSLink As String = "/_layouts/1033/Styles/Style.css"
'Binding Column with List AnnouncementSlider
Private TitleValue As String = "Title"
Private SynopsisValue As String = "Notes"
Private ImageURLValue As String = "ArticleThumbnail"
Private ArticleURLValue As String = "ArticleLink"
Private CoverflowDisplay As Boolean = True
# End Region
#Region "ToolBox Settings"
' You can get the list name from edit--webpartproperties--toolbox
<Bindable(True), _
Category("Display Settings"), _
FriendlyName("Name of List"), _
DefaultValue(""), _
Localizable(True), _
Description("Enter the list name containing the items to display")> _
Property ListName() As String
Get
Dim Name As String = CStr(ViewState("ListName"))
If Name Is Nothing Then
Return Me.ListName
Else
Return Name
End If
End Get
Set(ByVal Value As String)
Me.strListName = Value
End Set
End Property
'Get the maximum number of items to display in the image slider
<Bindable(True), _
Category("Display Settings"), _
FriendlyName("Maximum Number Of Items To Display"), _
DefaultValue(""), _
Localizable(True), _
Description("Enter the number of items to display")> _
Property MaxItems() As String
Get
Dim MaxCount As String = CStr(ViewState("MaxItems"))
If MaxCount Is Nothing Then
Return Me.MaxNo
Else
Return MaxCount
End If
End Get
Set(ByVal Value As String)
Try
' Check if it's a valid no, if not, default to 10.
Dim intTmp As Integer = CInt(Value)
Me.MaxNo = Value
Catch ex As Exception
Me.MaxNo = 10 ' Default to 10.
Err.Clear()
End Try
End Set
End Property
Protected Overrides Sub RenderWebPart(ByVal output As
System.Web.UI.HtmlTextWriter)
Dim myWeb As SPWeb = SPContext.Current.Web
myWeb.AllowUnsafeUpdates = True
Dim strSite As String ' The relative path to
the current site
Dim intLoop As Integer = 0 ' There must be at list
1 record to be displayed.
Dim objWeb As SPWeb ' Object connecting to
the SharePoint Site
Dim objList As SPList ' List object that store
the records
Dim objQuery As New SPQuery ' Query object to filter
the records to be displayed
Dim objArchiveQuery As New SPQuery ' Query object to
filter the records to be displayed
Dim objItemCol As SPListItemCollection ' List item collection
object containning the records
Dim objItemColArchive As SPListItemCollection ' List item
collection object containning the records
Dim objItem As SPListItem ' Each list item
Dim objItemArchive As SPListItem
Dim NowString As String = System.DateTime.Now.ToString("yyyy-MM-
dd")
Dim HTMLstring As String = "" ' HTML string to be
written
'Get user name before doing impersonation
Dim objUser As SPUser = SPContext.Current.Web.AllUsers
(WindowsIdentity.GetCurrent.Name)
Try
Using New Unimpersonator()
' Connect to the site collection.
If SourceURL = "" Or SourceURL = String.Empty Then
objWeb = SPContext.Current.Web ' User did not
specify the site path, assume current site.
While objWeb.IsRootWeb <> True
objWeb = objWeb.ParentWeb
End While
strSite = GetRelativePath(objWeb.Url)
Else
' User specified a site path, use the path instead.
objWeb = New SPSite(SourceURL).OpenWeb
strSite = GetRelativePath(CStr(SourceURL))
End If
' Using application pool account
Dim objUser1 As SPUser = SPContext.Current.Web.AllUsers
(WindowsIdentity.GetCurrent.Name)
Dim objSPToken As SPUserToken = objUser1.UserToken
Dim objSite1 As New SPSite(objWeb.Url, objSPToken)
Dim objWeb1 As SPWeb = objSite1.OpenWeb
objWeb1.AllowUnsafeUpdates = True
'Connect to the list object.
objList = objWeb1.Lists(ListName)
'Try to get Max Number of Items From "MaxItems" Item in Menu
List
For Each objItem In objList.Items
If objItem("Title") = TotalItemsToDisplayName Then
Me.MaxItems = objItem("ArticleThumbnail").ToString()
End If
Next
'Place your CAML Query here and create it using U2U editor
objQuery.Query = "<Where><And><Leq><FieldRef
Name='Publish_x0020_Date' /><Value Type='CustomDateTimeField'>" + NowString
+ "</Value>"
objQuery.Query += "</Leq><Eq><FieldRef
Name='CoverFlowDisplay' /><Value
Type='Boolean'>1</Value></Eq></And></Where><OrderBy>"
objQuery.Query += "<FieldRef Name='Publish_x0020_Date'
Ascending='False' /></OrderBy>"
objItemCol = objList.GetItems(objQuery)
'Now comes the HTML part
HTMLString = "<link rel=""stylesheet"" type=""text/css""
media=""all"" href=""" + CSSLink + """>"
HTMLString += "<div id=""contentcontainer"">"
HTMLString += "<div id=""slider-wrapper"">"
HTMLString += "<div id=""slider"" class=""nivoSlider"">"
'Loop through items in the collection
'need to write separate loops for each image
For Each objItem In objItemCol
' Do not show anything/message if there are no active
records.
If objItemCol.Count >= 1 Then
' Exit if the no. of records displayed exceeds the
max specified as MaxItems.
intLoop += 1
If intLoop > CInt(Me.MaxItems) Then
Exit For
End If
'Read value from 'Subject' Field
If objItem.Fields.ContainsField(BindingColumnTitle)
Then
If Not (IsNothing(objItem.Item
(BindingColumnTitle))) Then
Dim Link As String
If objItem.Fields.ContainsField
(ArticleURLValue) Then
If Not (IsNothing(objItem.Item
(ArticleURLValue))) Then
Link = objItem
(ArticleURLValue).ToString()
Link = objItem
("ArticleThumbnail").ToString()
Else
Link = "LinkNotFound.aspx"
End If
Else
Link = "LinkNotFound.aspx"
End If
If objItem.Fields.ContainsField
(ImageURLValue) Then
If Not (IsNothing(objItem.Item
(ImageURLValue))) Then
ImageURL = objItem
(ImageURLValue).ToString()
End If
End If
If objItem.Fields.ContainsField
(SynopsisValue) Then
If Not (IsNothing(objItem.Item
(SynopsisValue))) Then
Synopsis = objItem
(SynopsisValue).ToString()
End If
End If
If objItem.Fields.ContainsField
(ThumbnailValue) Then
If Not (IsNothing(objItem.Item
(ThumbnailValue))) Then
Thumbnail = objItem
(ThumbnailValue).ToString()
End If
End If
Dim ID As String
Dim HTMLString As String
If objItem.Fields.ContainsField(IDValue)
Then
If Not (IsNothing(objItem.Item
(IDValue))) Then
ID = objItem(IDValue).ToString()
HTMLString = "#htmlcaption" + ID +
""
End If
End If
If objItem.Fields.ContainsField(TitleValue)
Then
If Not (IsNothing(objItem.Item
(TitleValue))) Then
Title = objItem
(TitleValue).ToString()
End If
End If
' actual image div
HTMLString += "<a href=""" + Link + """
target = ""_blank"">"
HTMLString += "<img src=""" + ImageURL + """
width=""510px"" height=""210px"" alt="""" title=""#htmlcaption" + ID + """
/></a>"
End If
End If
End If
Next
HTMLString += "</div>"
intLoop = 0
For Each objItem In objItemCol
' Do not show anything/message if there are no active
records.
If objItemCol.Count >= 1 Then
' Exit if the no. of records displayed exceeds the
max allowed.
intLoop += 1
If intLoop > CInt(Me.MaxItems) Then
Exit For
End If
'Read value from 'Subject' Field
If objItem.Fields.ContainsField(BindingColumnTitle)
Then
If Not (IsNothing(objItem.Item
(BindingColumnTitle))) Then
Dim Link As String
If objItem.Fields.ContainsField
(ArticleURLValue) Then
If Not (IsNothing(objItem.Item
(ArticleURLValue))) Then
Link = objItem
(ArticleURLValue).ToString()
Else
Link = "LinkNotFound.aspx"
End If
Else
Link = "LinkNotFound.aspx"
End If
If objItem.Fields.ContainsField
(ImageURLValue) Then
If Not (IsNothing(objItem.Item
(ImageURLValue))) Then
ImageURL = objItem
(ImageURLValue).ToString()
End If
End If
If objItem.Fields.ContainsField
(SynopsisValue) Then
If Not (IsNothing(objItem.Item
(SynopsisValue))) Then
Synopsis = objItem
(SynopsisValue).ToString()
End If
End If
If objItem.Fields.ContainsField
(ThumbnailValue) Then
If Not (IsNothing(objItem.Item
(ThumbnailValue))) Then
Thumbnail = objItem
(ThumbnailValue).ToString()
End If
End If
Dim ID As String
Dim HTMLString As String
If objItem.Fields.ContainsField(IDValue)
Then
If Not (IsNothing(objItem.Item
(IDValue))) Then
ID = objItem(IDValue).ToString()
HTMLString = "#htmlcaption" + ID +
""
End If
End If
If objItem.Fields.ContainsField(TitleValue)
Then
If Not (IsNothing(objItem.Item
(TitleValue))) Then
Title = objItem
(TitleValue).ToString()
End If
End If
'caption div
HTMLString += "<div id=""htmlcaption" + ID + """ class=""nivo-html-caption"">"
HTMLString += "<h4>" + Title + "</h4>"
HTMLString += "<div id=""description"">" +
Synopsis + "</div>"
HTMLString += "</div>"
End If
End If
End If
Next
HTMLString += "</div>"
HTMLString += "</div>" 'content container div closing
'Write HTML to WebPart
If HTMLString <> "" And HTMLString <> String.Empty Then
output.Write(HTMLString)
End Using
Catch ex As Exception
'Write to Event Log
' This error log can be written anywhere you specify
for your future checks
WriteLog("ERROR: " & ex.Message & vbCrLf & ex.StackTrace)
End Try
End Sub
Last and Final Step:
Compile the dll, and add it into your SharePoint site. Do all the steps as you would do to add in a webpart, and you should see a announcement image slider on your page with a great look and feel.
If the Nivo slider is not preferred, you can always find numerous other Jquery Image Slider plugins. You may need to work on changing your css and html accordingly and follow the steps above to achieve the Image Slider in a SharePoint web part.
Next Steps
- Check out these other tips:
