By: Knox Cameron | Comments | Related: > SharePoint Document Management
Problem
In parts 1 to 3, we looked at getting documents into SharePoint, adding metadata, using that metadata to create attractive and useful views of the documents, and using that metadata within documents. We also looked at a couple of techniques for leveraging information from other SharePoint lists.
So now your users can quickly and easily find their documents, and use information from SharePoint in their documents. But still, they complain... ;-) How do I find the right template I'm meant to use for this kind of document? How can I quickly see all these kinds of documents in all our sites?
Solution
I don't think we'll ever stop them complaining... but we can certainly address these issues with some of the fantastic capabilities in SharePoint 2010.
Content types are the way we can define a standard document type in SharePoint, including metadata columns and a template. The user just selects to create a new "bill of materials" for example, and SharePoint will download the template and open the correct application. Content types can also be used in conjunction with the Content Query web part to display summaries of documents across multiple sites.
Content types are a core component of SharePoint Foundation. However, content query web parts are only available in SharePoint Server.
Scenario
The best way to understand SharePoint is often to work through an example scenario. Here, we will configure a solution for a team who work on product proposals for an organisation. Each proposal involves development of a number of documents, such as concept designs, bills of materials, sales forecasts, competitive analysis documents, and board presentations.
Content types overview
A content type defines a set of columns that will be associated with the content, in other words the metadata (see Document Management with SharePoint 2010 - Part 1). The columns it uses are "site columns". Both content types and site columns are defined at the site level, and will be available in that site and all its sub-sites. It's good practice to define them at the top level site of a site collection to make them available and consistent across the whole site collection.
Once you have defined a content type, you can assign it to a library. SharePoint will then add the site columns defined in the content type as columns in the library (if they're not already there). If you later add columns to the content type, these will automatically be added to all libraries where it's used. This is a great way of keeping metadata consistent across multiple sites and libraries.
Content types in SharePoint are always based on a "parent" content type. They inherit many characteristics from their parent, such as a base set of columns. This gives you a very powerful mechanism for organising content types and their metadata. For example, related content types can be defined based on a common parent content type. You can define the metadata they all use as columns on the parent content type, and just add unique columns to the individual content types.
To see a list of your content types, go into Site Actions > Site Settings. Under the Galleries heading, select Site content types.
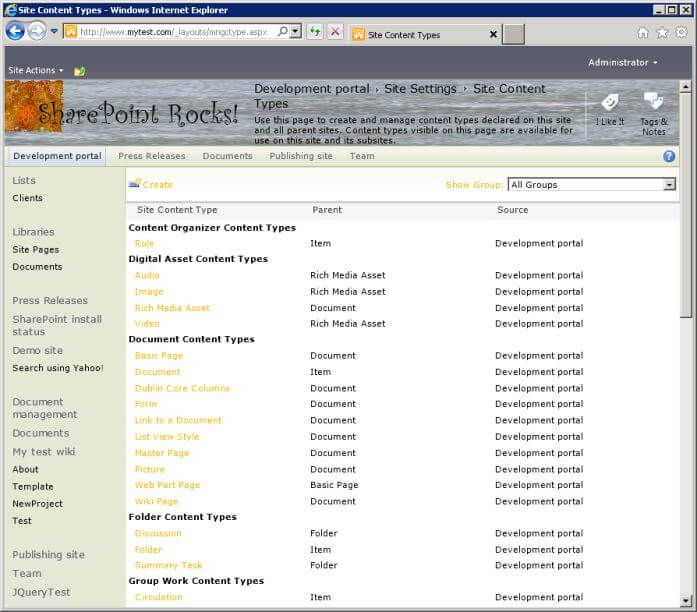
You can trace the hierarchy of the built-in content types. For example, "Document" is based on "Item". In turn, "Basic Page" is based on "Document", and "Web Part Page" is based on "Basic Page". Although this series of articles is about document management, note that content types are used, and useful, in all types of SharePoint items and lists, such as calendars, discussion boards, contacts lists and so on.
For document content types, you can associate a template that will be used when someone creates a new item of that content type. This could be a Word document, PowerPoint presentation or just about anything else that can be stored in SharePoint, although Office files work best because of the inherent SharePoint integration.
As well as defining metadata, content types are useful for organising content so that it can be found across multiple libraries and sites. The content query web part allows you to list items of a particular content type from multiple sites in a site collection, or even of that content type and its child content types. You can also use search to find items based on their content type across multiple site collections.
All of the above capabilities exist in SharePoint 2007. SharePoint 2010 adds the ability to define a content type "hub" where you can define site columns and content types that can be used in multiple site collections, or even multiple SharePoint farms. This is part of the new managed metadata service.
Creating a parent content type
Once we have an inventory of the documents used in the product proposal, and the templates used to create them, we can define content types for them in SharePoint. We will create them under a "parent" content type, to take advantage of SharePoint's metadata management and content query capabilities.
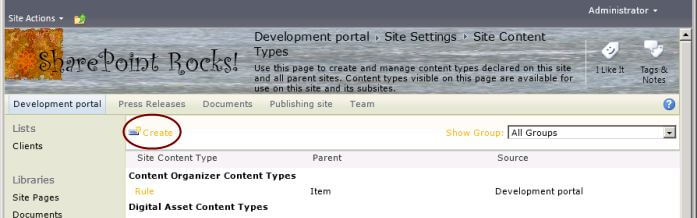
We will create the parent content type based from the built-in "document" type, so it can be used in document libraries. To do this, select Create from the toolbar in the content types gallery.
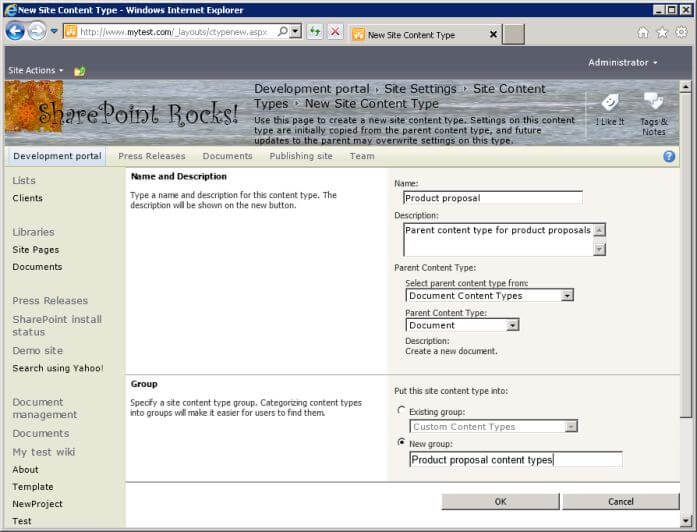
Enter a name for the parent content type (in this case "Product proposal") and an appropriate description. Users will not be creating items of this content type, so the description is not so important. However, when we create the child content types, users will see the description on the new item menu in document libraries.
For the parent content type, select the Document content type from the Document Content Types group. For easy administration, create a new group for the content type, called "Product proposal content types".
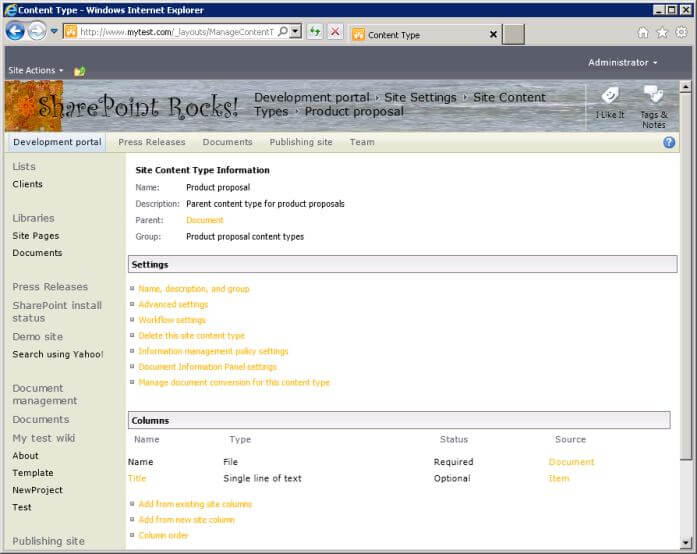
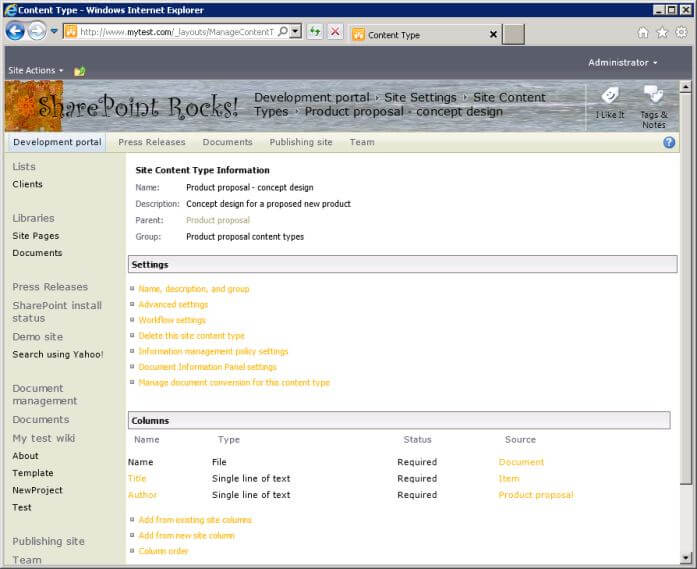
SharePoint creates the new content type, and shows you a summary screen for it. Here you can see that it has inherited two columns from its parent content types: (file) Name from Document, and Title from Document's parent content type Item. You can also see links to edit various settings associated with the content type, such as workflows, information management policies, Document Information Panel (the metadata summary panel that appears in Office) and document conversion.
In this case, we will be assigning general metadata about the product proposal to the document set later. Here, we only want metadata specific to the individual item. In this case, we want to be able to show the responsible author for each document, since different people will work on documents for a single product proposal. So, let's add an author field. Let's also make both author and title required so that we can use them in views. (The number of required fields should always be kept to a minimum, but these ones are very important!)
To make Title required, click on its name in the Columns list. SharePoint will show you some information about the column, and allow you to change it to required, optional or hidden for this content type. To make any other changes to the column you would need to use the link to edit the column itself. Select the Required radio button.
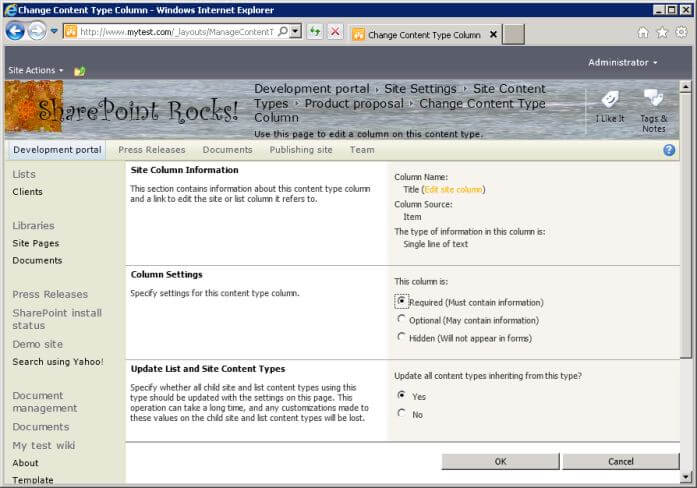
Note that you also have the option whether or not to apply this setting to child content types. In this case, we haven't created any yet. Select OK to apply the setting and return to the content type summary.
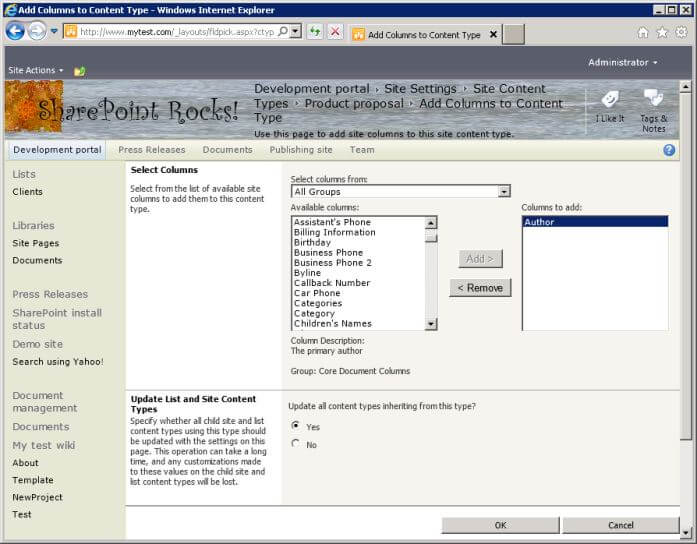
Note that Title is now shown as required. Author is also a built-in column, so select the link to Add from existing site columns. Select Author from the list of available columns and click Add. Note that you can add multiple columns in one go here.
Again, we have the option to update child content types. Select OK to apply the change.
By default, the new column is added as optional. To make it required, click the link for the Author column and make it required, as we did with Title.
Both the Title and Author site columns are linked to the Office document properties of the same name. Changes to their values in the document properties in a document will be reflected in the document library, and vice versa.
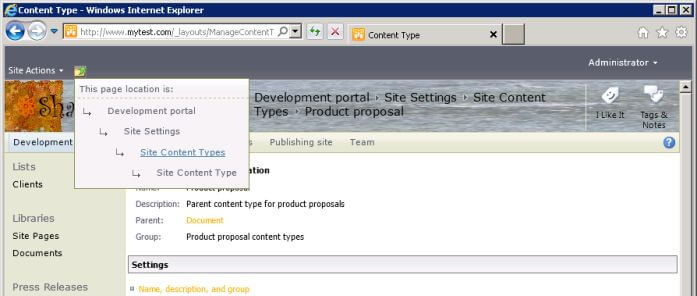
Now we will return to the site content type gallery to create a child content type for the first proposal element. The quickest way to do this is to click on the breadcrumb control and select Site Content Types.
Creating child content types
Now let's create the content types for the individual documents that form part of a product proposal. We'll start with the concept design, which we will assume is normally a Visio diagram.
Select Create in the content type gallery. Name the content type "Product proposal - concept design". I am going to name all the child content types consistently like this, with "Product proposal" at the start of the name. This gives me the ability to construct a search that would find all documents in this set of content types, by searching for "product proposal" contained in the content type field.
Give the content type an appropriate description, remembering that this is what users will see in the New menu of document libraries. Select our custom parent content type, and place the new content type into the same group.
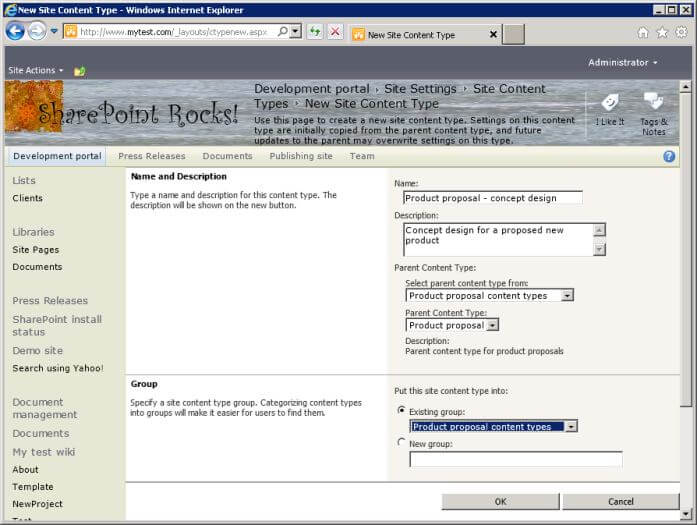
Select OK to create the new content type.
Note how it has inherited the columns we configured in the parent content type.
Now, we need to give SharePoint the template to use when users create a new concept design.. To do this, select the Advanced settings link. Use the option to upload a template from your desktop, or point to an existing one in the system.
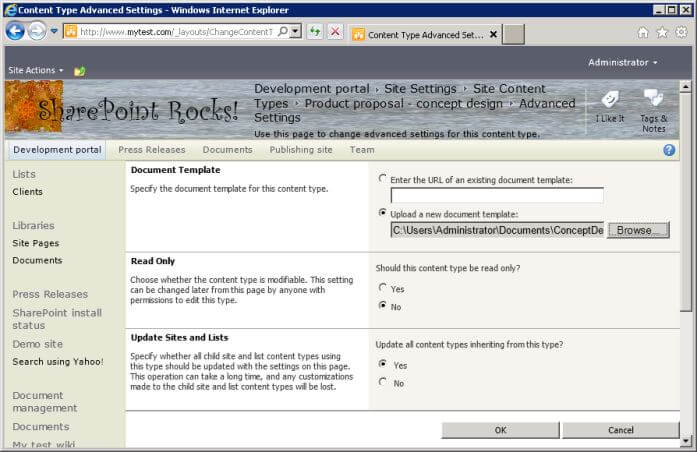
Note that you can use any document as a template - it does not have to be saved as a template format file (e.g. .dotx or .xltx) from Office. It's also a good idea to remove any existing information from the Author and Title fields in the document properties of your template document, otherwise lazy users will not bother entering that information when they create new documents from the template, and your name will appear as the author of almost every document in the system (don't laugh, this has happened to me!).
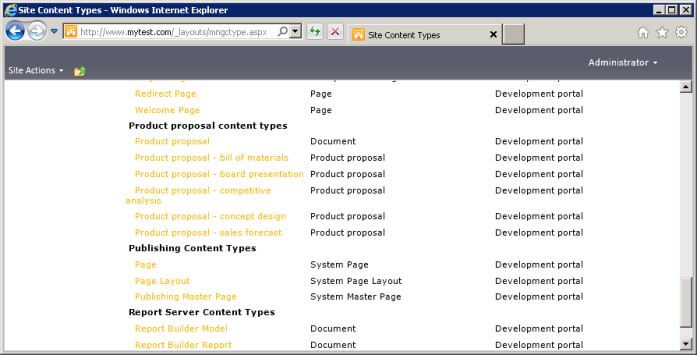
Select OK to save the changes. Again, we can use the breadcrumb to return to the content type gallery. In the same way, create content types for bills of materials and sales forecasts (both Excel), competitive analysis documents (Word), and board presentations (PowerPoint). You will end up with something like this in the gallery:
Assigning content types to a library
Now we have the content types, you can just use them as they are by assigning them to one or more document libraries in your site or one of its subsites. The process to assign content types to a library is:
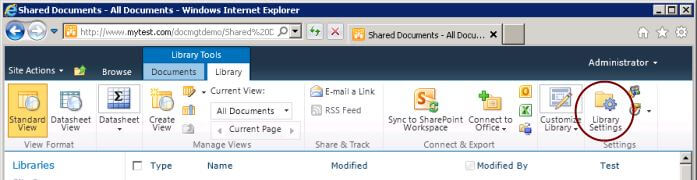
Go to a view of the library. Select the Library Settings button on the Library tab of the ribbon.
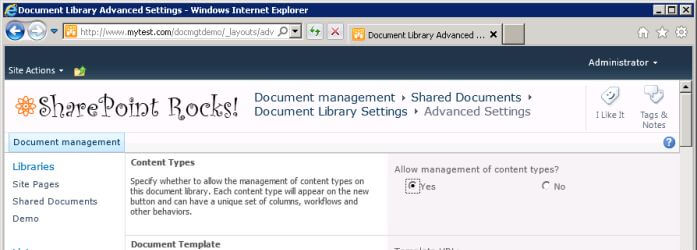
Select the Advanced settings link under the General Settings heading.
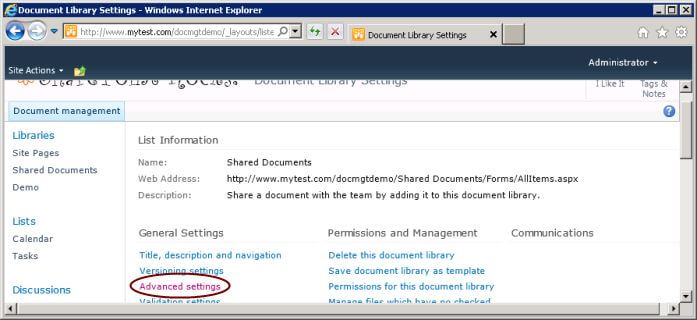
Set Allow management of content types? to Yes, then select OK.
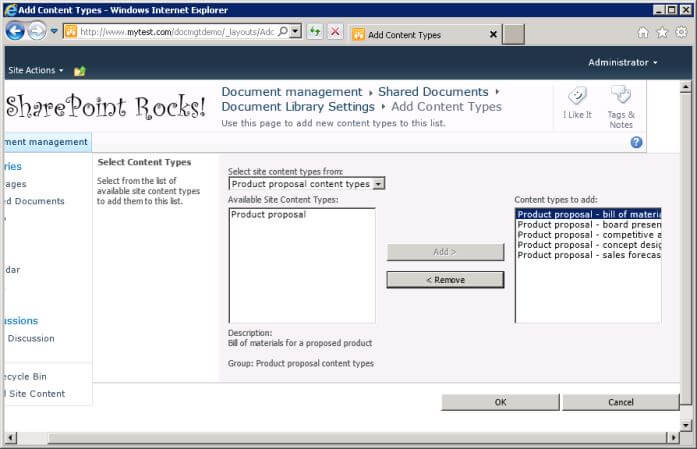
Back on the library settings page, under the (newly appeared) Content Types heading, select the link to Add from existing site content types.
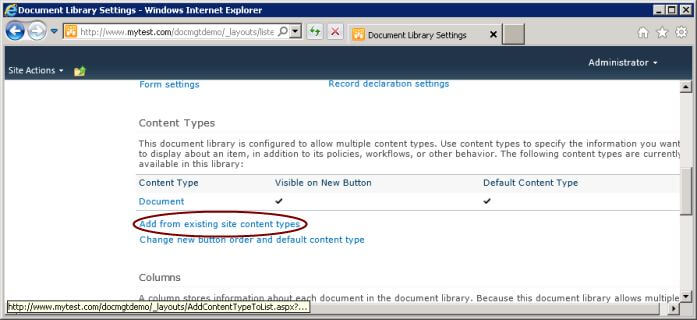
Select the custom group where the content types were created, and select all the child content types to add to the library, then select OK.
The new content types are now shown on the library settings page.

Note that Document is still the default content type. It will appear at the top of the list under the New button in the library, and will be used if the user just clicks the New button itself. To remove Document and force users to use one of the new custom types, you first need to make one of the other content types the default.
Select the link under the Content Types heading Change new button order and default content type. Set "Position from Top" so that one of your custom content types is number 1. De-select Visible for the Document content type.
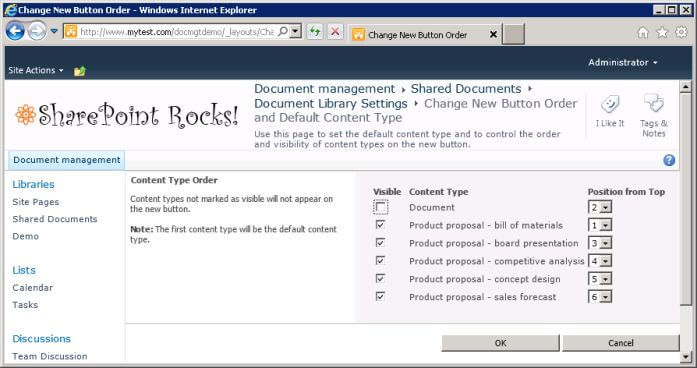
Select OK to apply the change. Document will no longer be an option for users creating items in that library. If you have no items of content type Document in the library, you could completely remove that content type from the library by clicking the link for that content type in library settings and then clicking the link Delete this content type. However, it is generally not necessary to do this.
- Note that, despite the use of the word "delete", this option will actually only remove that content type from the library. It does not delete the content type from the site content type gallery, or other lists where it is used!
Using content types
Now users can go to that document library, select the Documents tab in the ribbon, then click the drop-down next to New Document to see the custom document types available, complete with an appropriate icon to show the application.
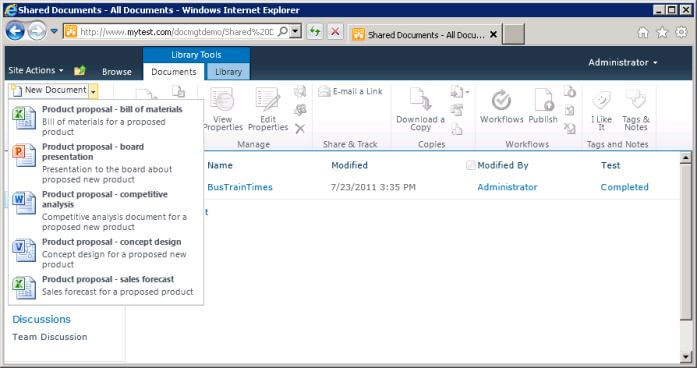
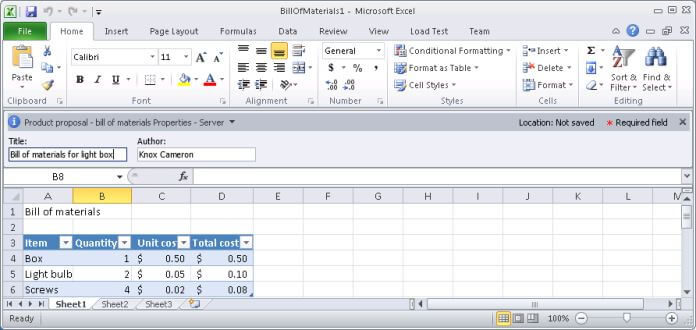
When a user selects one of the options, the appropriate template will be downloaded automatically to his or her machine, and opened with the appropriate application. For example, the bill of materials will open as a new spreadsheet in Excel. (Depending on your configuration, you may be prompted for credentials, you may be prompted whether you trust the site, and you may be prompted to enable editing of the file.) The user can fill in the required information, and also complete the title and author metadata.
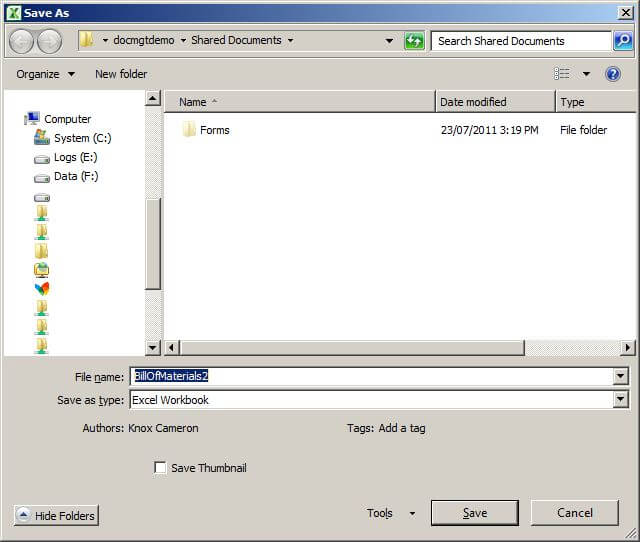
Once the user is ready, when he or she clicks save, Office will automatically offer to save the document back to the document library.
You can then create custom views using the metadata, as discussed in Document management with SharePoint - Part 2, for example:

You can create options for more views by creating more metadata columns, as discussed in that article. The only difference now is that you will assign the columns as site columns to content types instead of just creating them in the library itself. By doing this, the columns will automatically be added to all document libraries where the content types are used.
You can assign one or more of the existing site columns, or you can create new site columns. Assign site columns to particular child content types as appropriate, or if you want to use the column across all the content types, assign it to the parent content type and use the option to apply the change to all inheriting content types.
- Unfortunately, although you can show content type as a column in a view, you can't group by it, or filter by it using contains or begins with, or refer to it in a calculated column.
- Although assigning site columns to content types automatically adds the columns to all libraries, you will still need to edit the views in individual libraries to show the columns.
Using Content Query to show a list of documents across sites
When you have consistently used content types, you can then easily use the Content Query web part to show a summary of items across multiple sites. For example, here is how we can show a summary of our product proposal documents from all sites in the site collection on the home page.
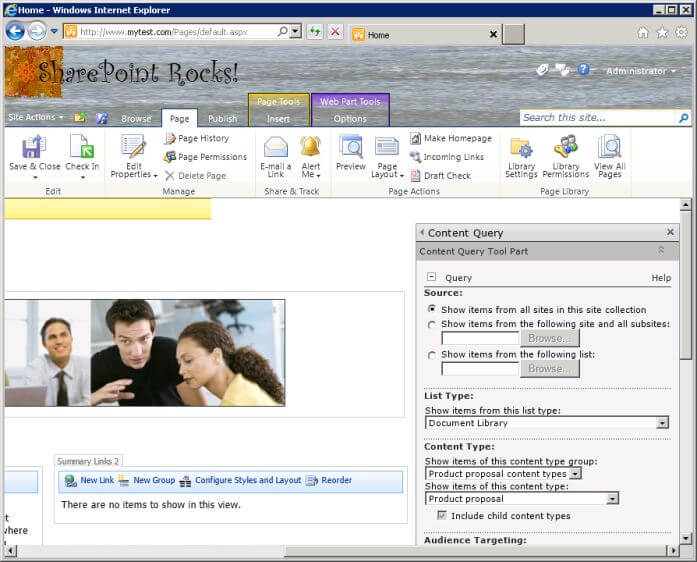
Edit the home page (Site Actions > Edit Page). In one of the web part zones, select the link to Add a Web Part. From the Content Rollup category, select the Content Query web part, then click Add.
Within the new web part, click the link to open the tool pane. In the tool pane, expand the Query heading.
Note that you have the option to show items from all sites in the site collection, or from a specific site and its subsites, or from a specific list. For the purpose of this demonstration, we will show items from all sites in the site collection.
- For production use, use the most specific option you can - either a specific list or specific site and subsites. Performing a query across the whole site collection can significantly slow down display of the page, so avoid using that option for a large site collection.
Under list type, select Document Library. Under content type, select the Product proposal content types group and Product proposal content type. Note that this will include child content types.
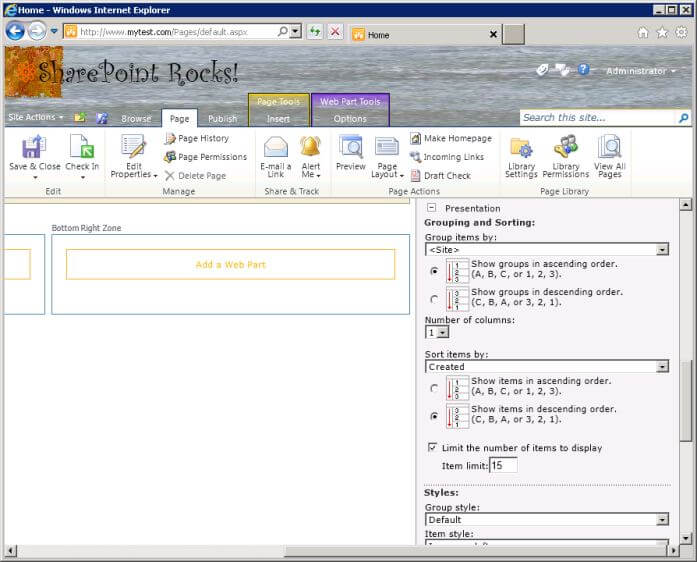
Scroll down and open the Presentation heading. Select the option to group items by site. Note the other options to display multiple columns, sort the results, limit the number of items displayed and use different grouping styles. By default, the web part will show the newest 15 documents.
Scroll down further and open the Appearance heading. Set the web part title to something meaningful like "Latest product proposal documents". At the very bottom, select OK to apply the settings to the web part.
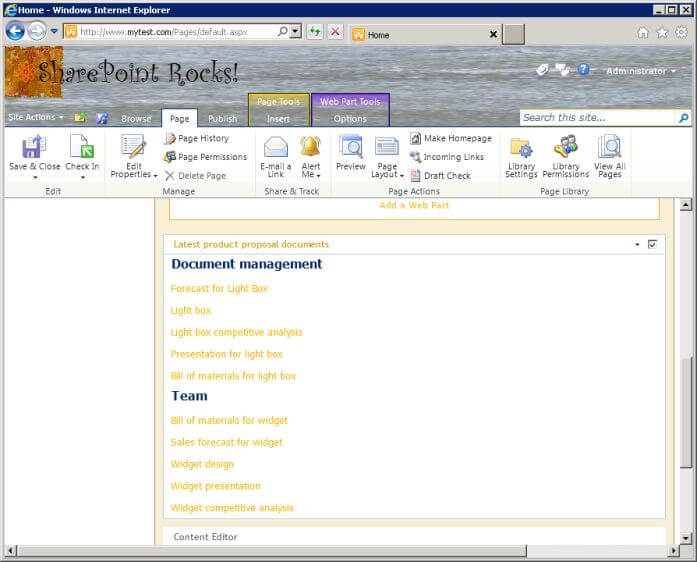
The web part is now showing documents from document libraries in two different sites, both using the same content types. Note that content query automatically uses the document title rather than the file name.
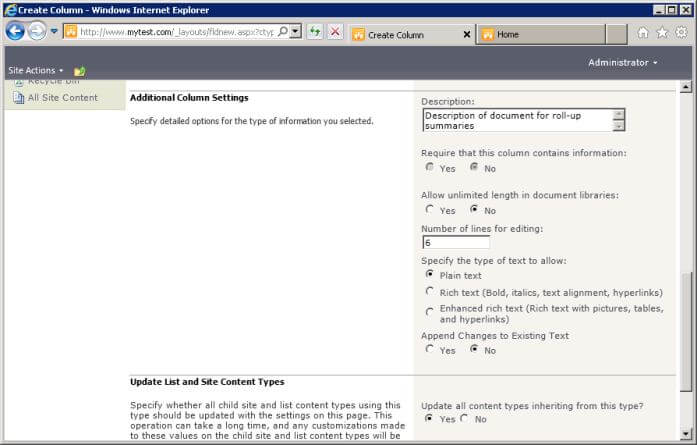
The content query web part can also show a description for each item. In theory, you should be able to use the built-in Comments site column for this purpose, but unfortunately there is an issue with the content query web part so this column doesn't work (see Inconvenient Content Query Web Part slots for the technical background). Instead, open the parent content type and select the option under columns to add from new site column. Call it "Proposal Doc Description" and select the Multiple lines of text option.

Further down, enter an appropriate description. Select the type of text as plain text (rich text can be problematic).
Select OK. If you go to any of the libraries where the content types are used, you will find that the new column has been added to the library, but not to any views. Add the column to appropriate views, and use the datasheet option to quickly enter information into it for the documents (see Document Management with SharePoint 2010 - Part 1 (page 2) for more details).
Once you have done this, edit the home page again. We need to tell the content query web part to use our new custom column as the description. Select Edit Web Part from the content query web part's menu.
Open the presentation heading. Change the number of columns to 2. Change the item style to Title and description. Under Fields to display, add Proposal Doc Description to the Description field.
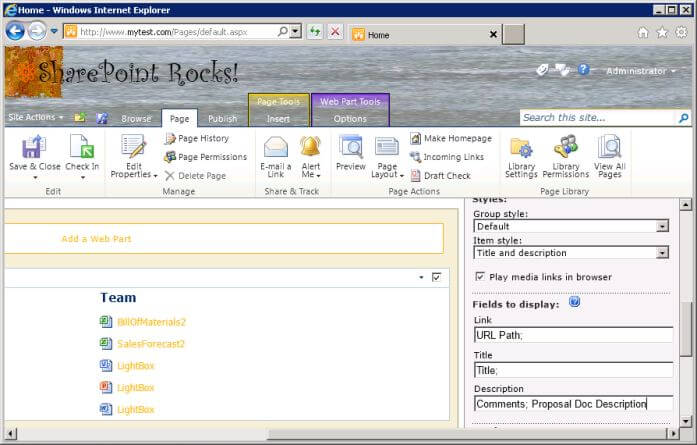
Select OK and save and check in the page. Now we have a nice 2-column summary of the latest product proposal documents, with titles and descriptions, grouped by site.

Next Steps
- Conduct an inventory of the types of documents you use, and try to construct some logical content type hierarchies.
- Assemble some templates, and create a parent and some child content types. Assign them to libraries, and try them out.
- Build a content query to show your documents. Show the results to your colleagues and see how impressed they are!
- For information about publishing InfoPath forms as a content type, see Reusing InfoPath forms as Content Types - Part 1
- For information on how to share content types across site collections using the managed metadata service, see Publish Content Types with the Managed Metadata Service
- Look at part 1, part 2 and part 3 of this series for information about using metadata in views, customizing views in the browser and SharePoint Designer, and making use of metadata inside documents.
- Return to MSSharepointTips to read about other topics and ideas.
- Check out MSSQLTips.com for great information about Microsoft SQL Server.


About the author
 Knox Cameron
This author pledges the content of this article is based on professional experience and not AI generated.
View all my tips
