By: Haroon Ashraf | Comments (1) | Related: 1 | 2 | > Azure
Problem
As a SQL Server Business Intelligence (BI) developer I have been tasked to create an Azure SQL Database followed by creating a Tabular Data Model (by deploying the database) on Azure Analysis Services while my development machine is limited to using Azure resources only which means I cannot use any of the on-premises development tools such as SQL Server Data Tools (SSDT) or SQL Server Management Tools (SSMS).
Solution
The solution is to perform all the development steps starting from creating the database on Azure (as Azure SQL Database) to deploying it (as Tabular Data Model) on Azure Analysis Services by using Azure Resources including Azure Analysis Services Web Designer which is in preview mode at the time of writing this tip.
Web Designer Part-1 Review
Before we move further, it would be good to have a quick recap of part 1 of this tip.
In the first part of this tip we discussed the following things:
Database and Data Mode Development Environments
We discussed different development scenarios including the one which is applicable to this tip where the business intelligence (BI) developer’s development environment is limited in such a way that the developer can only use the Azure based tools to develop a SQL Database and a Tabular Data Model based on the database along with managing the data model.
Pre-Requisites
The pre-requisites were also mentioned which also apply to this tip.
In the pre-requisites it was mentioned to best understand the tip, the reader must have basic know how of a data warehouse and tabular analysis modeling concepts plus a valid Azure subscription which can be obtained free, but there are terms and conditions that apply.
You can create a free Azure account if you don’t have an Azure Subscription and would like to follow this tip.
Azure SQL Database Development through Azure Portal
The Azure SQL Database was totally developed using Azure Portal as follows:
- Signed up for Azure Subscription (Pre-requisite)
- Sign into Azure Portal (Pre-requisite)
- Created SQL Server Resource Group (Pre-requisite)
- Created Azure SQL Database (Resource) OfficeSuppliesSampleV4
- Setup Azure SQL Database Objects
- Populated Azure SQL Database
- A quick data check was done by querying the populated Azure SQL Database
Azure Analysis Service Web Designer Overview
Next, we mentioned that Azure Analysis Services Web Designer is available in preview mode (at the time of writing this tip) to create a BI Semantic Model as fast as possible.
Azure Analysis Services Web Designer is available as service to manage the data model by creating relationships, measures and so on without leaving the Azure Portal.
Please refer to the first part of this tip to see detailed information about the things mentioned in this section.
Web Designer Next Steps Summary
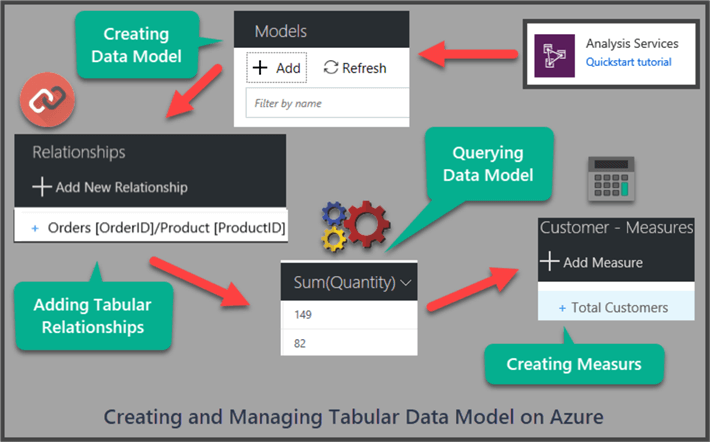
In this tip we are going to do the following:
- Creating (Azure) Analysis Services server resource
- Creating data model based on Azure SQL Database
- Creating Relationships between tables of the Data Model
- Querying the Data Model to get desired results
- Adding Business Logic by Creating Measure in the Data Model
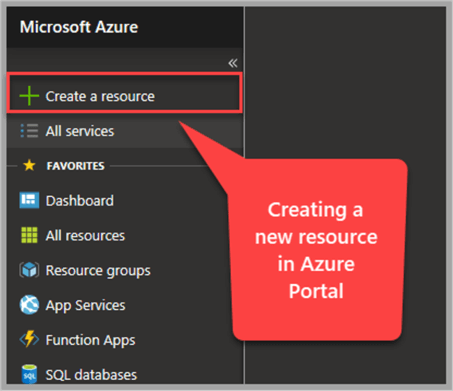
Create Azure Analysis Server Resource
The first thing we need to do after the Azure SQL Database is created (in the previous part of this tip) is to create an Azure Analysis Services server resource so that we can deploy (add) the Data Model to it the same way we deploy a data model in tabular analysis services project for an on-premises Azure Analysis Services.
Launch Azure Portal and click + Create a resource from left bar.
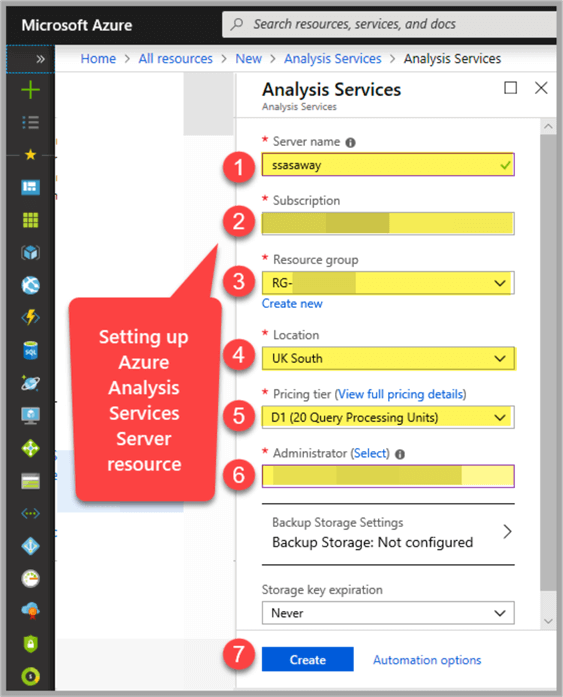
Choose Analytics under Azure Marketplace and select Analysis Services as shown below:

Create the Analysis Services Server resource as shown below and click Create:
- Server: ssasaway
- Subscription: Please select your subscription from drop down list
- Resource Group: Please select your resource group
- Location: UK South (Please select your location originally setup with the resource group by you)
- Pricing Tier: D1 (20 Query Processing Units)
Click Notifications (right corner of the top bar) to check for a successful deployment message and click Pin to dashboard and Go to resource:
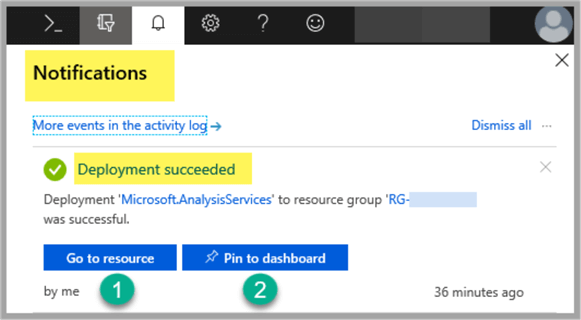
The Azure Analysis Services resource has been successfully configured so we are good to add the Data Model to it.
Create Data Model Based on Azure SQL Database
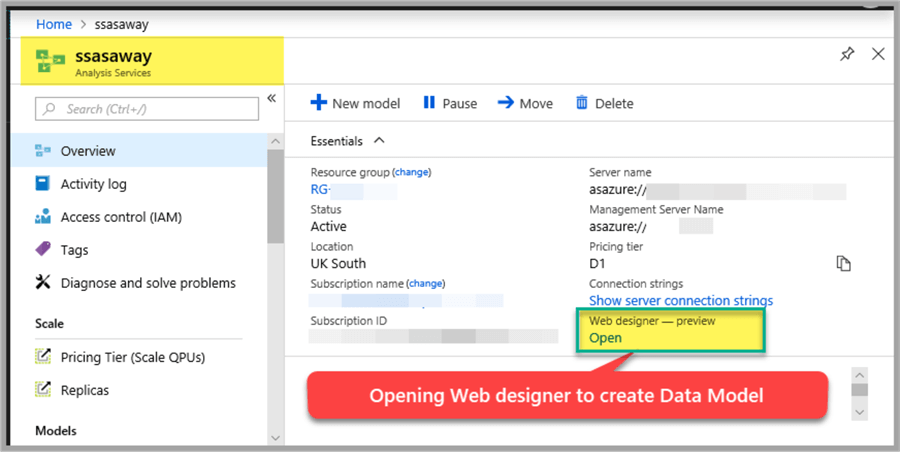
Go to the newly created Analysis Services Server resource and click Open under Web designer - preview:
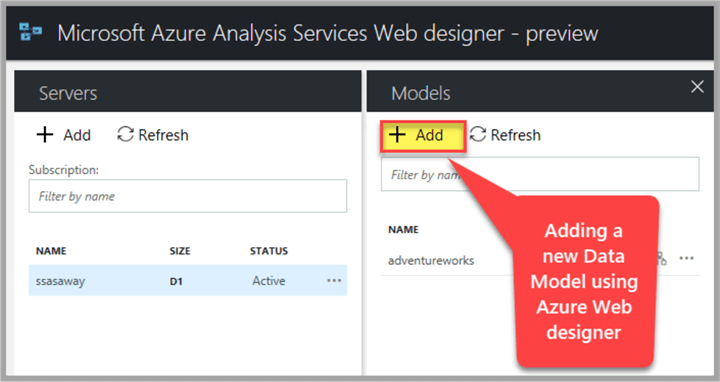
In Microsoft Azure Analysis Web designer - preview click + Add under Models:
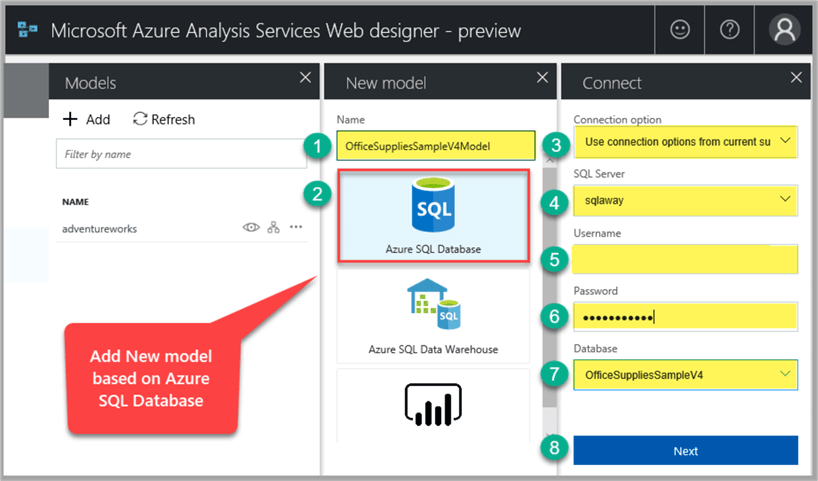
Type in the New model name as OfficeSuppliesSampleV4Model and fill in the required fields to connect to the OfficeSuppliesSampleV4 Azure SQL database and click Next:
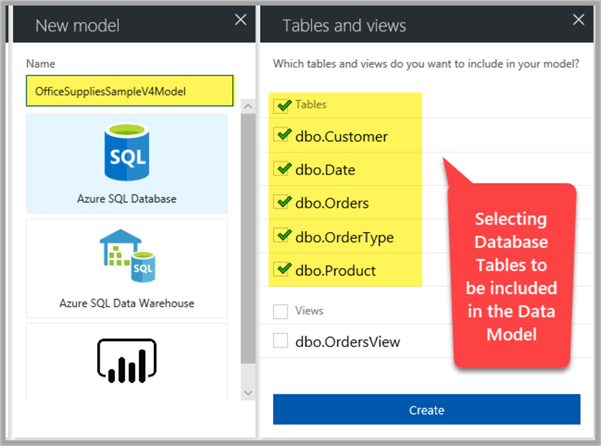
Select all the tables to be included in the Tabular Data Model and click Create:
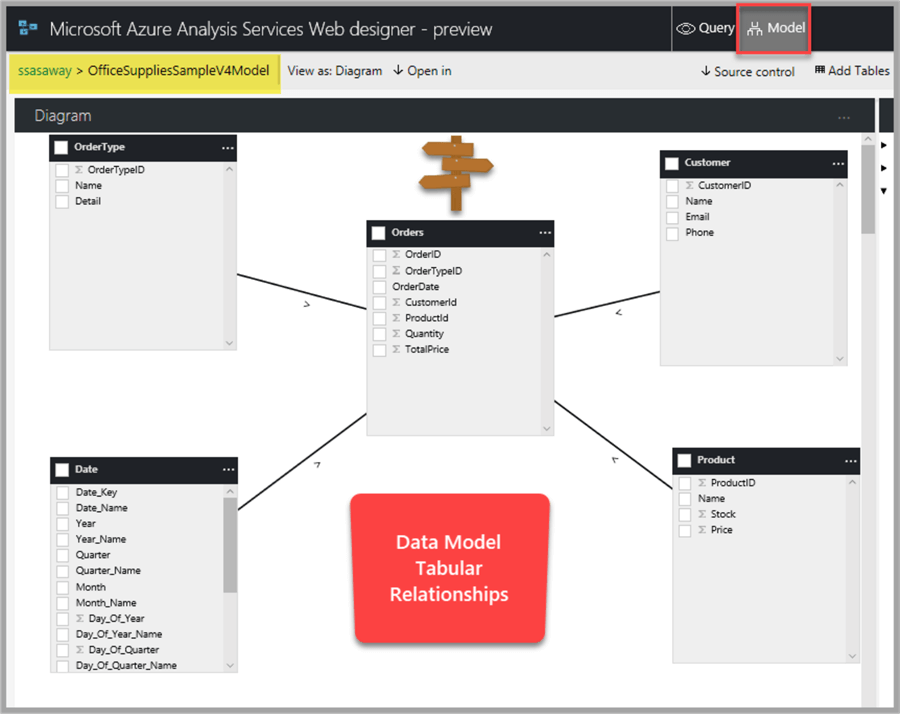
Creating Relationships Between Tables of the Data Model
Next, we are going to create relationships between the Tabular Data Model tables.
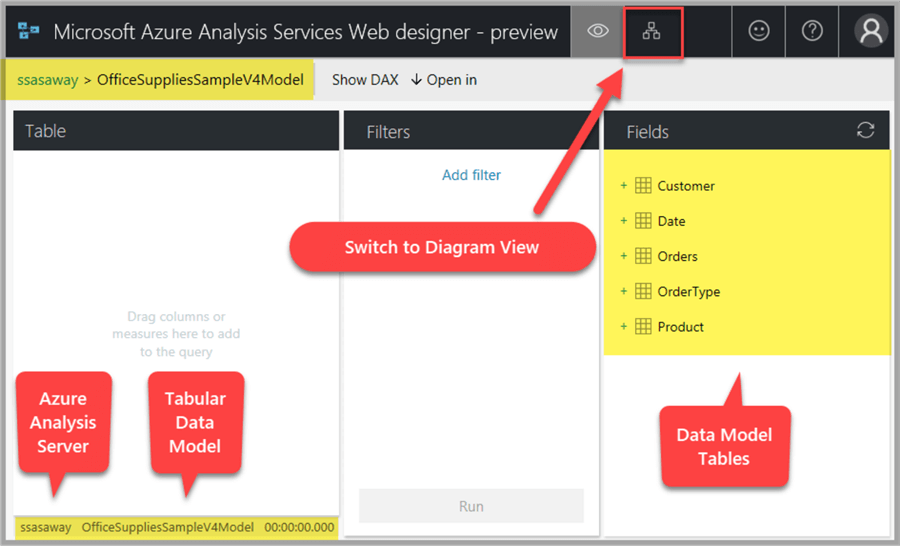
Switch to Diagram View to create tabular relationships by clicking on the Diagram icon at the top:
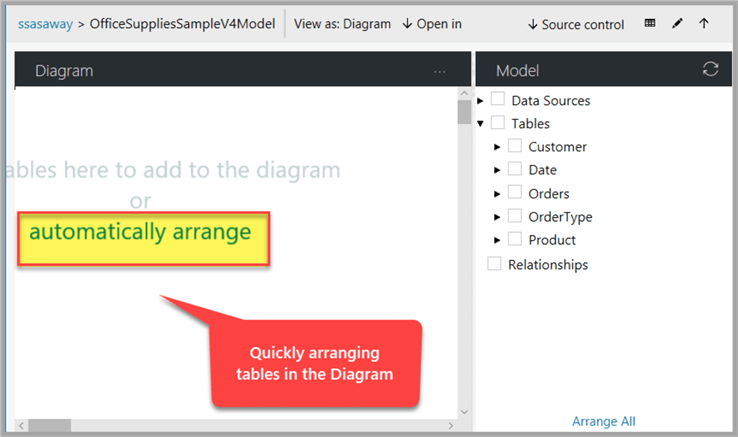
Click automatically arrange once the diagram view is active:
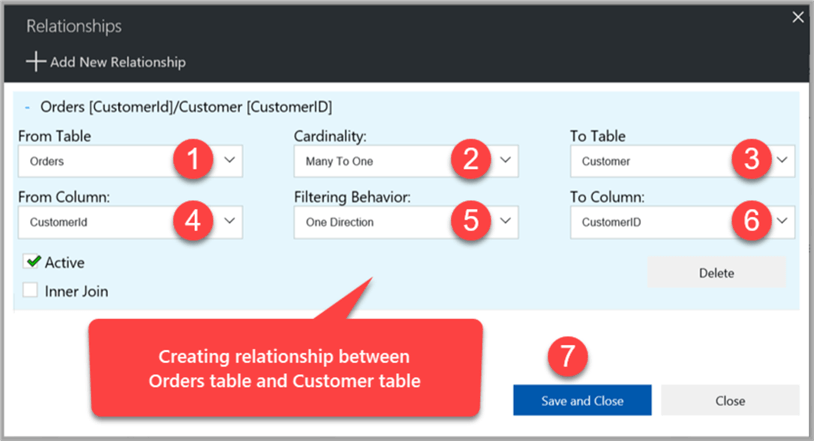
Create relationships by joining the Customer table CustomerID with the Orders table CustomerID using the drag and drop method and finally click Save and Close:
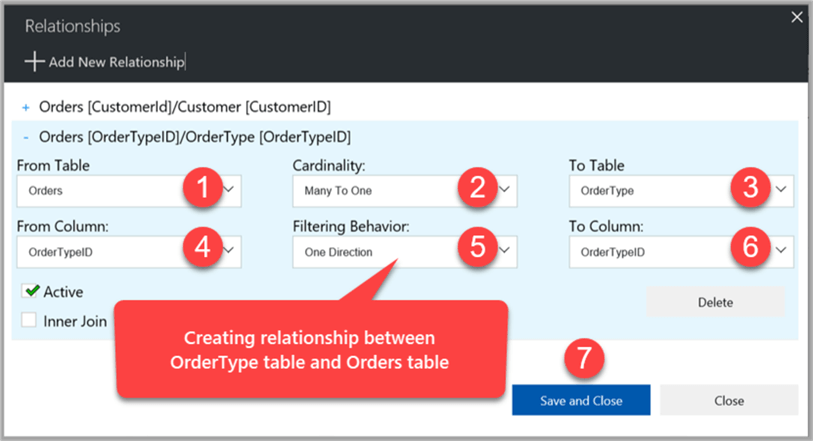
Next join the OrderType table with the Orders table through using OrderTypeID as follows:
Similarly create tabular relationships between the Product table and the Orders table using ProductID followed by joining the Date tables Date_Key with the Order tables OrderDate and click Save Layout:

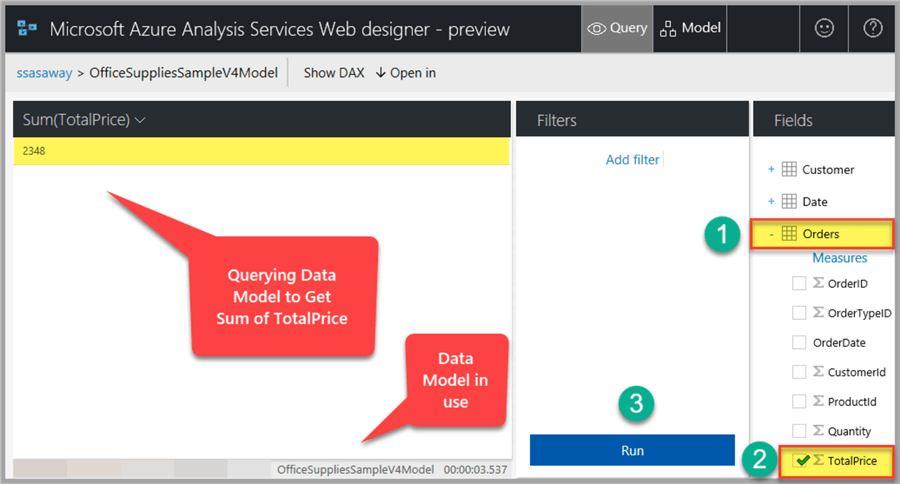
Querying the Data Model to Get Desired Results
Now that we have added the data model for the Azure SQL Database and created relationships between the Data Model tables, we can query the Data Model the same way we query a SQL Database using the DAX (Data Analysis Expressions) formula language or the drag and drop method:
Switch to Query mode, expand the Orders table and select TotalPrice (the sale price) field under Orders and click Run:
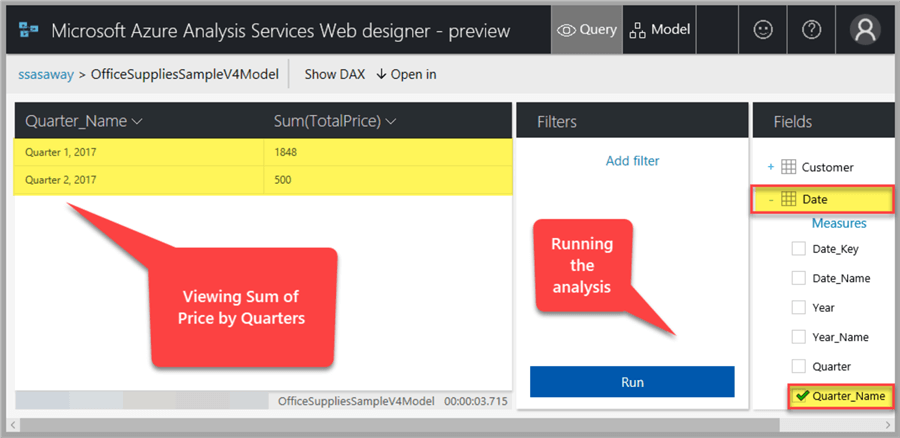
Getting Sum of Sale Price by Quarter_Name
Let’s analyze the further by adding the Quarter_Name field from the Date table to see the Sum of Price by Quarters (running the query):
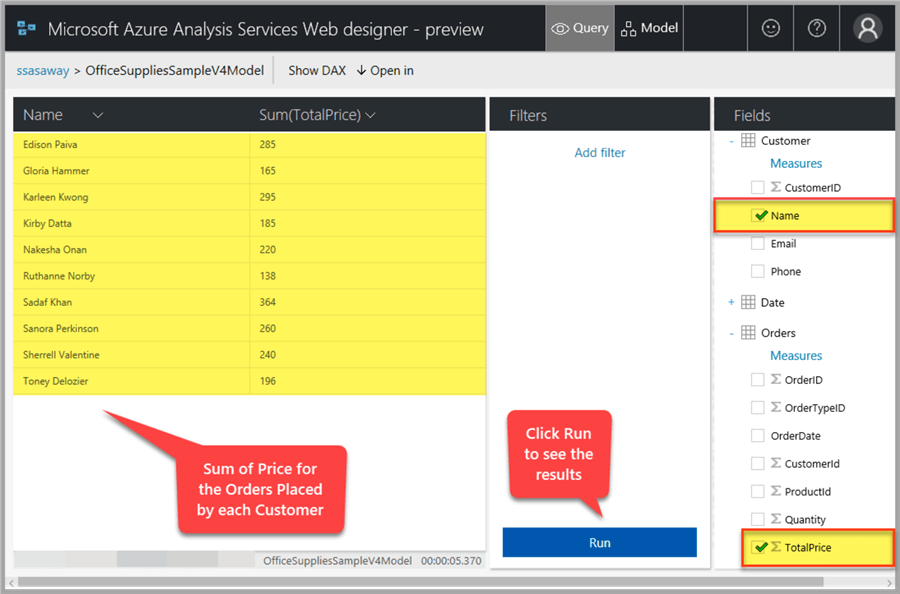
Getting Sum of Sale Price by Customer
Now uncheck the Quarter_Name field and add the Name field from the Customer table to see the sum of (sale) price per customer as follows:
Creating Measures
Let's add some business logic by creating a measure.
Create measure TotalCustomers by expanding the Customer table and clicking Measures in the Query Tab:

Click Add Measure and type the measure name as "Total Customers" and add the DAX formula for the measure as follows and click Save:
COUNT('Customer'[CustomerID]))

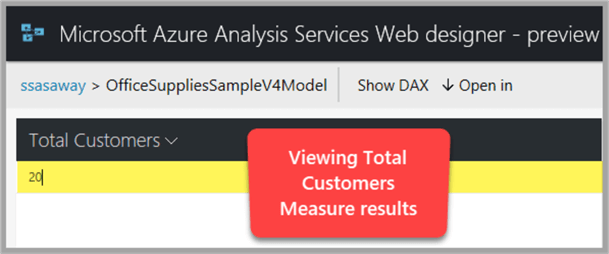
Check the Total Customers measure that was just created and click Run to see it working:
Congratulations, you have successfully created and analyzed a Tabular Data Model based on an Azure SQL Database without even leaving the Azure Portal.
We have used the Azure Analysis Services Web Designer to create a Tabular Data Model from an Azure SQL Database along with creating tabular relationships, a measure and querying the model while staying in the Azure Portal.
Please note that since Azure Analysis Services Web Designer is in preview mode at the time of writing this tip, it is not recommended to use for Production Environments yet, but please feel free to explore and use for development and testing.
Please don’t forget to free up resources by deleting the Azure SQL database, the Tabular Data Model and the Azure Analysis Services server resource after you are done testing with them.
Part-1 and Part-2 Summary
The overall steps mentioned in part 1 and part 2 are summarized as follows:
- Create a new Azure Subscription (Pre-requisite)
- Sign into Azure Portal (Pre-requisite)
- Create SQL Server Resource Group (Pre-requisite)
- Create Azure SQL Database (Resource) OfficeSuppliesSampleV4
- Setup Azure SQL Database Objects
- Populate Azure SQL Database
- Do a quick data check by querying the populated Azure SQL Database
- Create Azure Analysis Server resource
- Create data model based on Azure SQL Database
- Create Relationships between tables of the Data Model
- Querying the Data Model to get desired results
- Adding Business Logic by Creating Measure in the Data Model
Next Steps
- Please try creating the University sample database mentioned in my tip Adding a Primary Key to a Prepopulated Table using SQL Server Object Explorer in SSDT as an Azure SQL Database using the Azure Portal and then creating an Azure Analysis Services resource and importing the University Azure SQL Database into it and querying the model.
- Please refer to my previous tip Developing Similar Structured Multi-Customer Databases with SQL Server Data Tools (SSDT) and try to create Client, Service and ServiceOrder tables in an Azure SQL Database called MultiCustomerDatabase followed by importing the database into a Data Model in the Azure Analysis Services and then creating relationships between tables and also creating measures and querying the model.


About the author
 Haroon Ashraf's interests are Database-Centric Architectures and his expertise includes development, testing, implementation and migration along with Database Life Cycle Management (DLM).
This author pledges the content of this article is based on professional experience and not AI generated.
View all my tips
