By: John Martin | Comments | Related: More > Database Administration
Problem
We are using Azure IaaS VMs and we want to ensure that useful tools and utilities are in place on our servers. We want to make sure there is consistency for what we deploy and make sure that nothing gets missed. We have a need to store and update configuration scripts in one place and track history. How do we achieve this while minimizing our administrative overhead and need to perform additional tasks during the build process?
Solution
Azure VMs have an extension framework that has a wide array of pre-configured options that we can leverage when defining the deployment of a VM. In addition to these there is the Custom Script Extension which allows us to run PowerShell to perform whatever tasks we need. There are several different ways to make use of Custom Script extensions. By using PowerShell to automate the creation of VM resources it is possible to make more use of more advanced options for script location. By storing scripts in Azure storage, it means that they are on-hand for inclusion in the build automation process. Combined with the fact that Azure storage has strong security options means that even sensitive information can be stored there if needed.
I am a firm believer that as part of any server deployment where SQL Server is in use that DBATools should be installed by default. Whether it is the SQL Server, Application Server, or Jump Box having DBATools available for management and troubleshooting is a must.
DBATools Installation Script
Here we will be using the same script that I created in my previous post Install DBATools with Azure VM Custom Script Extension – Azure Portal. This will install the DBATools PowerShell module and NuGet (needed to install DBATools from the PowerShell Gallery).
Just a reminder, any script that is going to be used with the Custom Script Extension needs to meet several requirements including:
- Ensure that the script is Idempotent.
- Must execute within 90 minutes.
- Must not require user input when running.
Here is the PowerShell that we will be using to install the components.
# Check to see if NuGet is present, if not install, if incorrect version then upgrade.
$MinNuGetVersion = [Version]"2.8.5.201"
$NuGet = Get-PackageProvider -ListAvailable | Where-Object Name -EQ "NuGet"
$DBATools = Get-InstalledModule | Where-Object Name -EQ "DBATools"

if(!$NuGet) {

    Write-Host "NuGet not installed, installing."
    Install-PackageProvider -Name NuGet -MinimumVersion $MinNuGetVersion -Force
}
elseif ($NuGet.Version -LT $MinNuGetVersion) {

    Write-Host "Nuget installed, incorrect version, upgrading."
    Install-PackageProvider -Name NuGet -MinimumVersion $MinNuGetVersion -Force
}

# Now install DBATools PowerShell Module.
if(!$DBATools) {
    Write-Host "Installing DBATools."
    Install-Module -Name DBATools -Scope AllUsers -Force
}
A copy of this script can be downloaded here.
Once we have created our script, I have called mine Install-DBATools.ps1, we need to upload it to Azure Blob Storage.
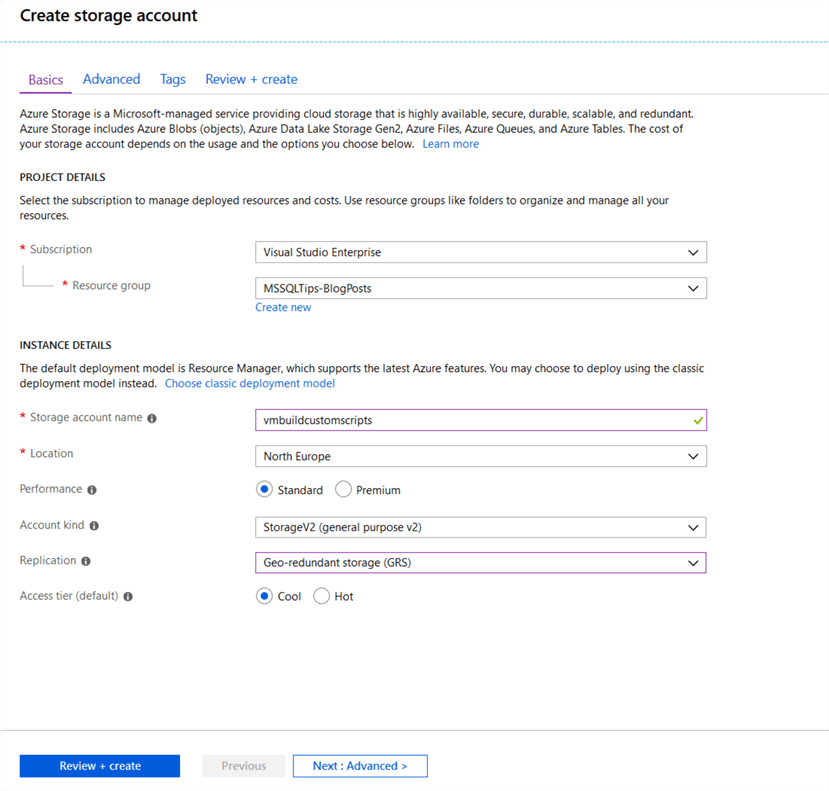
Because when I am going to be storing important information in the storage account, I have elected to use Geo-redundant storage replication. If the scripts will be stored elsewhere such as a repository in Azure DevOps, then it might be possible to use a lower level of resiliency. I would however suggest that the storage container is in the region that you will be creating resources.
I am also selecting the default access tier for the storage to be cool, this is because the type of activity does not need high performance.
Once the account has been created then we need to create a container that we can upload our scripts to.
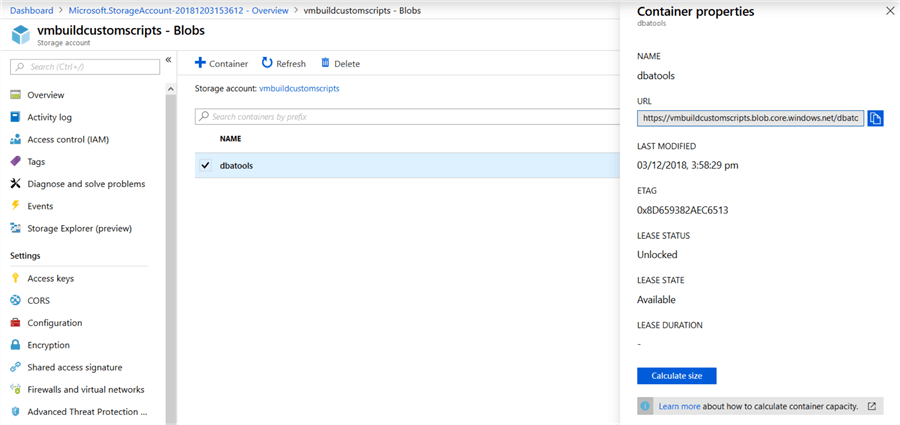
Once the container had been created then the script can be uploaded.
In order to be able to access the script in its container we need to get the account name and the access key. This information can be obtained by going to "Access Keys" on the Storage Account.
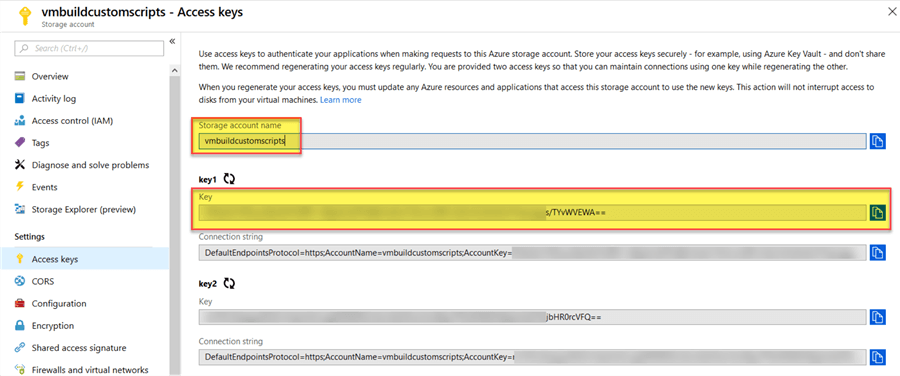
Here we can use either of the keys, if the key is compromised then it is possible to rotate it which will invalidate the original and prevent subsequent access. More information on Azure Storage security can be found here. The mechanism we are using here, and is supported by the Custom Script Extension, is Shared Key.
Deploying a VM and Script Extension
With the script created and in place we can now look at deploying a VM and calling this script to complete the installation. In this example we will be using PowerShell to define the script extension as well as deploying the VM. Scripting the deployment is the only way to perform this action as it is not available, at time of writing, to use the Portal.
Script Extension Definition
For us to deploy the Script extension I will be using the Set-AzureRmVMCustomScriptExtension PowerShell cmdlet. This will be run after the VM has been created as it needs to be in place in order to run the component.
$ResourceGroupName = "MSSQLTips-BlogPosts"
$Location = "NorthEurope"
$StorageAccountName = "vmbuildcustomscripts"
$ContainerName = "dbatools"
$StorageKey = "PbNzth21NfCju2Qb-------------------REDACTED-----------------------qoaggs/TYvWVEWA=="
$ScriptFileName = "Install-DBATools.ps1"

$CustomScriptExtensionProperties = @{
    VMName = $VmName
    Name = "InstallDBATools-BlobStore"
    ResourceGroupName = $ResourceGroupName
    Location = $Location
    StorageAccountName = $StorageAccountName
    StorageAccountKey = $StorageKey
    ContainerName = $ContainerName
    FileName = $ScriptFileName
    Run = "Install-DBATools.ps1"
}
Set-AzureRmVMCustomScriptExtension @CustomScriptExtensionProperties
As you can see what I have done here is defined two variables to hold information about the Resource Group and Location for the deployment. These are then passed into the main body of the script to define and create extension on the VM we have created.
Note: The parameter assignment format that I am using here in the PowerShell script is referred to as splatting. It makes the code a lot more readable and subsequently easier to maintain.
Putting it Into Action
Now that we have the PowerShell, we need to deploy the extension we need to put it all together as part of our deployment.
The scripts below are for illustrative purposes to show the workflow. Production deployments should follow your standards with regards to sizing and availability requirements.
Step 1 – Set Variables
$ResourceGroupName = "MSSQLTips-BlogPosts"
$Location = "NorthEurope"
$VNetName = "MSSQLTips-BlogPosts-vNet"
$VmName = "vm-win16-01"
$StorageAccountName = "vmbuildcustomscripts"
$ContainerName = "dbatools"
$StorageKey = "PbNzth21NfCju2Qb-------------------REDACTED-----------------------qoaggs/TYvWVEWA=="
$ScriptFileName = "Install-DBATools.ps1"

$VnetProperties = @{
    Name = $VNetName
    ResourceGroupName = $ResourceGroupName
}
$VNet = Get-AzureRmVirtualNetwork @VnetProperties
Here I am defining the variables that I need, in the case of the VNet I am going to be adding my server to one that I created earlier which is why I am performing the get.
The use of Get-Credential is to get the username and password that will be used for the VM when we create it. In a fully automated scenario this would not typically be a user input.
Step 2 – Create NIC & Public IP Address
$PublicIPProperties = @{
    Name = "$VmName-PubIP"
    ResourceGroupName = $ResourceGroupName
    Location = $Location
    AllocationMethod = "Dynamic"
}
$PublicIP = New-AzureRmPublicIpAddress @PublicIPProperties

$NicProperties = @{
    Name = "$VmName-NIC"
    ResourceGroupName = $ResourceGroupName
    Location = $Location
    SubnetID = $VNet.Subnets[0].Id
    PublicIPAddressID = $PublicIP.Id
}
$Nic = New-AzureRmNetworkInterface @NicProperties
In this scenario I am going to be creating a VM in an isolated network, so I will need a public IP Address to access it via RDP later. Typically, there would be either a VPN or Express Route in place to secure communication between enterprise on-premises systems and Azure. If the Azure based system is in isolation, then it is possible to look at using a VPN Gateway on the VNet and using Point-to-Site VPN to secure connection and remove the need for a public IP.
Step 3 – Define the VM Configuration
$vmConfigProperties = @{
    VMName = $VmName
    VMSize = "Standard_D2s_v3"
}
$VmConfig = New-AzureRmVMConfig @vmConfigProperties

$VmConfigOS = @{
    VM = $VmConfig
    Windows = $true
    ComputerName = $VmName
    Credential = $Credential
    ProvisionVMAgent = $true
    EnableAutoUpdate = $false
}
$VmConfig = Set-AzureRmVMOperatingSystem @VmConfigOS

$VmNicProperties = @{
    VM = $VmConfig
    Id = $Nic.Id
}
$VmConfig = Add-AzureRmVMNetworkInterface @VmNicProperties

$SourceImageProperties = @{
    VM = $VmConfig
    PublisherName = "MicrosoftWindowsServer"
    Offer = "WindowsServer"
    Skus = "2016-Datacenter"
    Version = "Latest"
}
$VmConfig = Set-AzureRmVMSourceImage @SourceImageProperties

$BootDiagnosticsProperties = @{
    VM = $VmConfig
    Disable = $true
}
$VmConfig = Set-AzureRmVMBootDiagnostics @BootDiagnosticsProperties
Here we are defining the Virtual Machine object which we will then pass into the New-AzureRMVM cmdlet. At this stage the VM is just a configuration object in our PowerShell session. Here is where we define if this is a marketplace or custom image as well as all the connectivity settings.
Step 4 – Create Virtual Machine
$VmProperties = @{
    ResourceGroupName = $ResourceGroupName
    Location = $Location
    VM = $VmConfig
    Verbose = $true
}
New-AzureRmVm @VmProperties
Once we have defined all the elements needed for our VM we can create it. Here we are passing in the VM object that we built in step 3. This will result in the VM being deployed into the specified resource group and location.
Step 5 – Deploy Custom Script Extension
$CustomScriptExtensionProperties = @{
    VMName = $VmName
    Name = "InstallDBATools-BlobStore"
    ResourceGroupName = $ResourceGroupName
    Location = $Location
    StorageAccountName = $StorageAccountName
    StorageAccountKey = $StorageKey
    ContainerName = $ContainerName
    FileName = $ScriptFileName
    Run = "Install-DBATools.ps1"
}
Set-AzureRmVMCustomScriptExtension @CustomScriptExtensionProperties
Once the Virtual Machine has been deployed successfully, we can now deploy the Custom Script Extension that will install DBATools for us. This will download the script from Azure blob storage and then run the script to complete the installation.
A complete copy of the script can be downloaded here.
After the deployment it is then possible to delete the Custom Script Extension as part of a clean-up or leave it there. It will depend on whether you need to perform more actions, as there can only be one Custom Script Extension deployed at any one time to a VM.
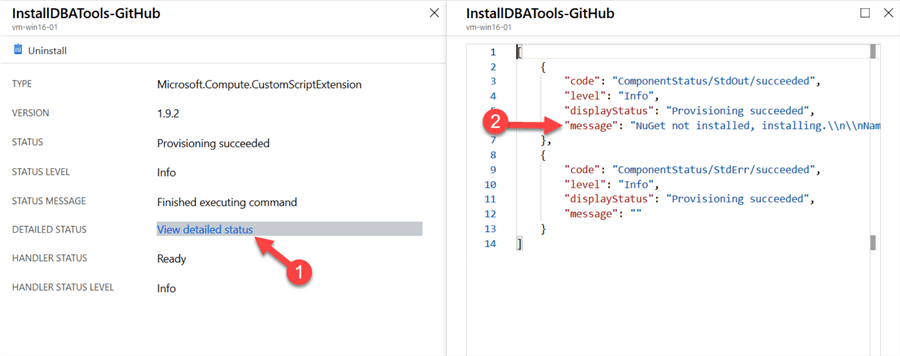
Once the extension has completed, we can check that the install worked in one of two ways. First of all, we can check the detailed status of the extension via the portal. This is viewed by going to Extension in the VM blade and then clicking on the InstallDBATools-BlobStore extension.
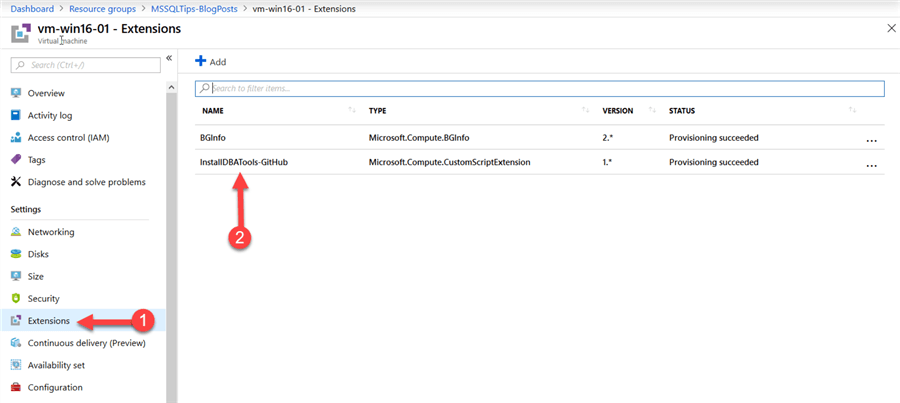
Once in the extension select "View detailed status" and then review the JSON in the righthand pane.
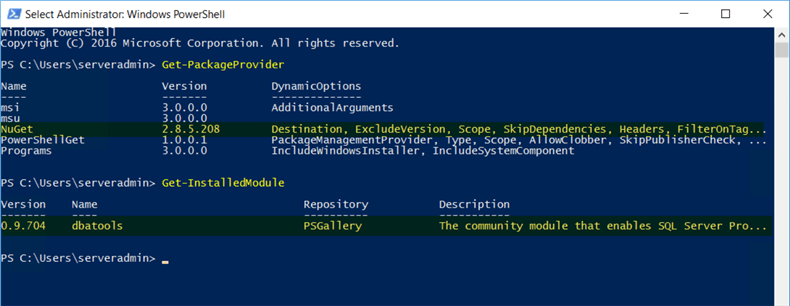
Alternatively, we can simply login and check using PowerShell that the components are installed as we wanted.
Summary
By making use of PowerShell, Azure CLI, or ARM templates to deploy our Azure VMs we can easily now make use of Custom Script Extensions to deploy useful tools as part of our automation process. This helps in repeatability and consistency of deployments for virtual machines, making life simpler for those managing these data platform estates.
Next Steps
- Choosing a SQL Server Upgrade Method - Part 1
- SQL Server Upgrade Methods In-Place Upgrades and Differential Restore Upgrades
- Side by Side SQL Server Upgrade with Log Shipping
- Minimizing Downtime for SQL Server Upgrades - Part 4
- SQL Server Backups and Restores Directly with Windows Azure Blob Storage Service
- Data Migration Assistant (DMA) to Check for SQL Server Compatibility Issues when Migrating to Azure


About the author
 John Martin is a Data Platform Engineer working in the financial sector as well as Director-at-Large for the PASS organisation and currently a Microsoft Data Platform MVP.
This author pledges the content of this article is based on professional experience and not AI generated.
View all my tips
