By: John Miner | Comments (1) | Related: > Database Design
Problem
Many companies are switching over from the waterfall model to the agile software development process with the hopes of bringing quality software quicker to market. Under this process, requirements and solutions evolve through the collaborative effort of cross-functional teams and their customer(s) or user(s). Some principle ideas of this process are adaptive planning, early delivery, continuous improvement, and flexible response to change.
Azure DevOps is the next generation of Visual Studio Team Services. This product combines sprint planning, task assignment, version control, testing, continuous deployment and continuous integration into one service. The first requirement of this software is to have your schema in a Visual Studio database project.
How can we transform an existing SQL Server database into a Visual Studio 2017 project?
Solution
The Visual Studio tool contains an import feature that allows the existing schema to be converted into a database project. In short, this feature uses reverse engineering to create T-SQL files for each object in the database. Visual Studio will work with both a Microsoft SQL Server database and an Azure SQL database.
Business Problem
Our boss has asked us to investigate how Azure DevOps can play an important role in the software development life cycle. The first step is to create a sample database than can easily exist on premise or in the cloud. The second step is to create both a development and a production environment for our database. Last but not least, we want to be able to create a portable database project this is deployable to both environments.
Microsoft Samples
Many of the code samples from Microsoft used to reside on a website called "CodePlex". This site has been retired and its archive can be seen here. It was decided by Microsoft that all projects including documentation would reside in "GitHub" going forward. This product choice decision might be the reason why Microsoft purchased the company in June of 2018.
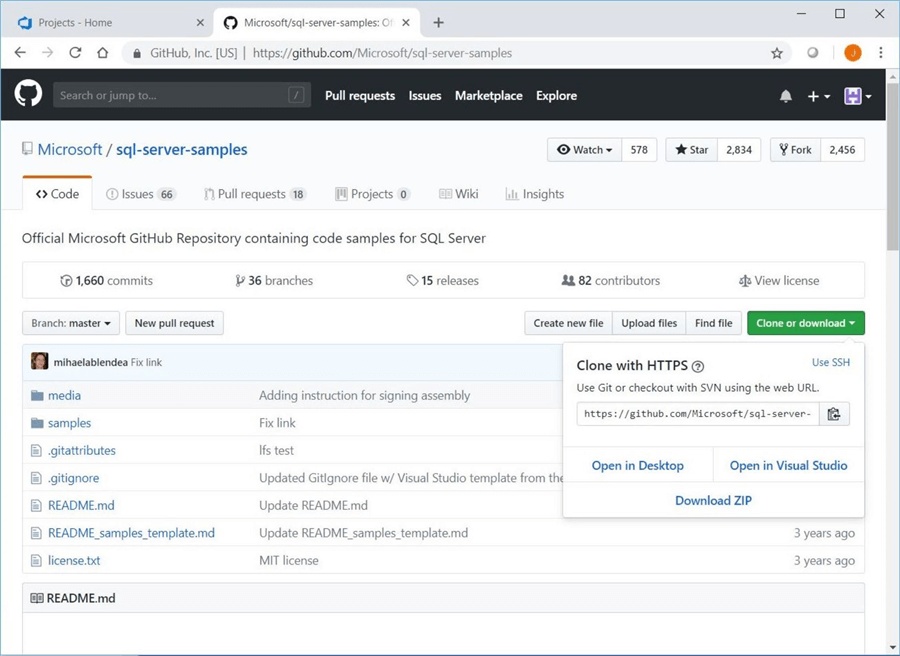
The image below shows the new location of the SQL Server Sample code. I choose to save all the samples as a zip file on my local hard drive.
I decided to extract the data-warehouse-install-script directory from the sql-server-samples-master.zip file. This is the old fashion Adventure Works Database in which the T-SQL script creates the schema and the *.CSV files contain the data.

This database is an excellent choice since it uses the core version of ANSI SQL. There are no Microsoft specific technologies like common runtime library (CRL), filestream or in-memory tables that will make migration to the cloud complicated by requiring a code change.
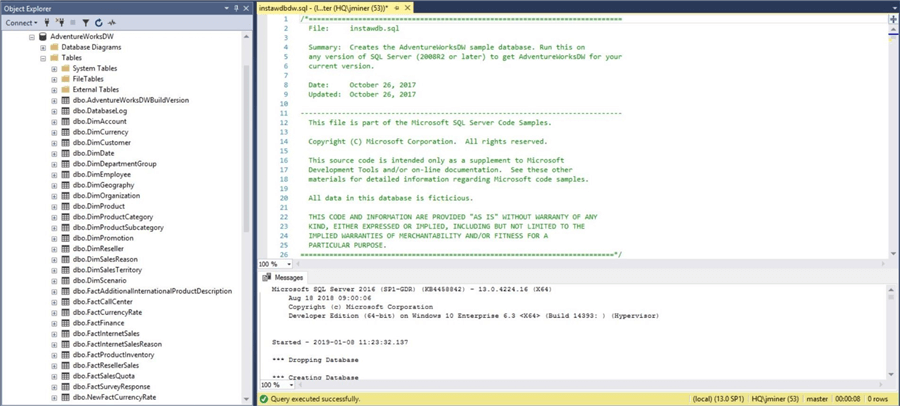
I decided to execute the script on my local version of SQL Server 2016. Make sure you open the script using SQL Server Management Studio (SSMS) and enable the SQLCMD mode for the window. Make sure the SqlSamplesSourceDataPath variable points to the location of the data files. You should end up with a star schema with tables prefixed with the words DIM and FACT.
The next step in our journey is to create a development and a production environment in our Azure Subscription.
Azure Environments
It is very important to separate the development and production environments. We do not want a developer to make a change that has not been tested and this change causes havoc with the production environment that the end users look at. Therefore, I will be using the Azure Portal to create a resource group, logical SQL server, and SQL database. Use the create a resource and new database options to get to the correct dialog box to show.
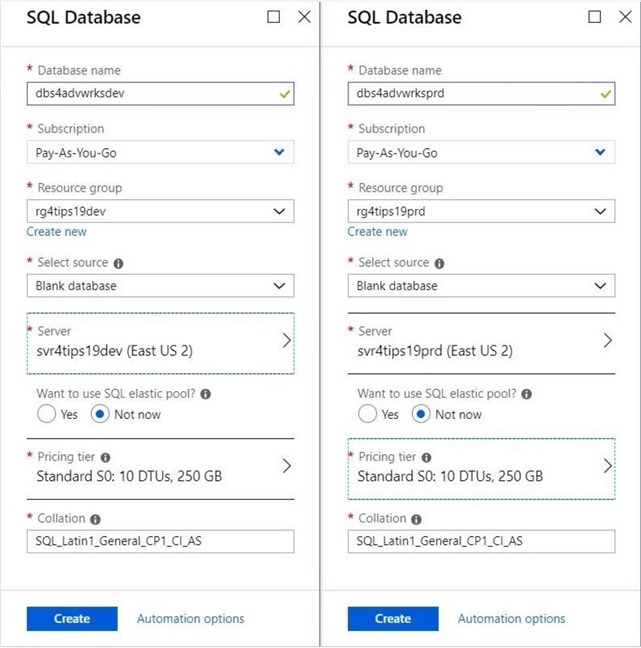
The images below show the choices that were made for both the development and production environment. I used Microsoft Paint to stitch them together to reduce the total spaced used by this article.
For the development environment, we are going to create a new resource group named rg4tips19dev. The logical Azure SQL server is named svr4tips19dev and a blank database is called dbs4advwrksdev. The database tier is the default, Standard S0. Repeat the same steps replacing the acronym dev with prd.
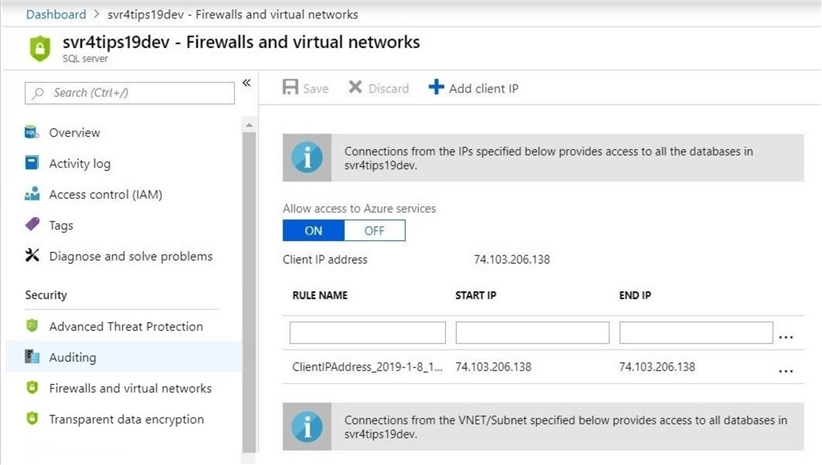
The Azure SQL Database is a public end point that is exposed to the world. That is why the firewall is enabled by default blocking all traffic. For us to use Visual Studio to connect to the database, we need to add the client IP of our laptop to the white list. The screen shot below shows the development server having the correct firewall rule. Please repeat this task for the production server.
To recap our work so far, we now have a local Adventure Works DW database, two Azure SQL Server environments in the cloud and two empty Azure SQL Databases.
Deployment Wizard
In a prior article, I talked about how to Import and Export database to and from the cloud using SQL Server Management Studio and/or PowerShell. There is a third option that I did not talk about. The "Deploy Database To Microsoft Azure SQL Database" task executes the steps to move a database from on premise to the cloud. This includes both the schema and data. Right click the database in the in Object Explorer and choose the correct task.
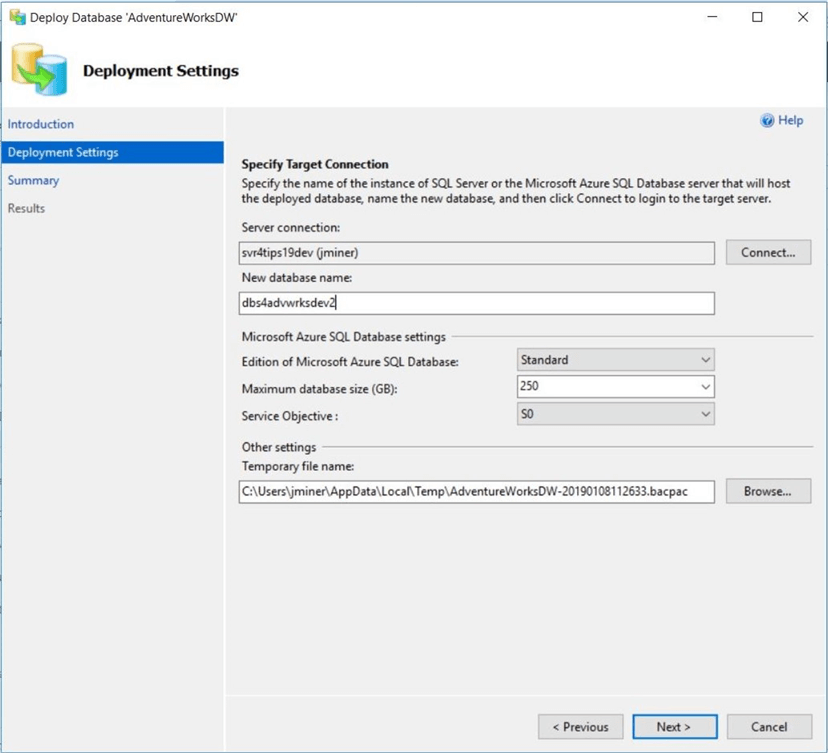
There are three fill-in-the-blank questions that we need to answer in the deploy settings dialog box.
First, we need to enter a server connection string. This includes the fully qualified name of the logical Azure SQL Server, the user name and the password. Second, we need to choose the name of the database. Unfortunately, this task does not have an overwrite existing database checkbox. Therefore, I am going to create a temporary database named dbs4advwrksdev2. Third, we need to use some local disk space to create a bacpac file.
See the image below for deployment settings. Click the next button to skip to the summary screen.
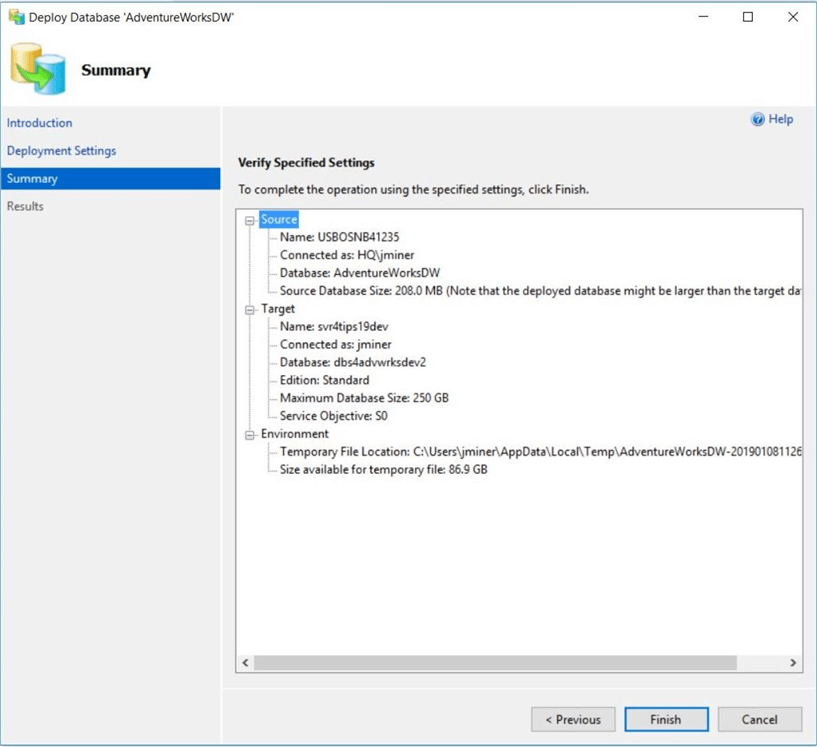
The summary dialog box is used to validate the settings that were chosen. If you like the choices, click the finish button to start the deployment. If you do not like the choices, click the previous button to make changes.
Since I am all set with the choices, I am choosing to deploy the database right now. See the image below for summary information.
The results dialog box keeps the user informed of each step in the process. The steps include saving both the schema and data to a bacpac file. Creating the schema of the database in Azure SQL Server. Loading each table with data so that the cloud database matches the on premises database.
See the image below for results of executing each step. It is important to create a bacpac file from a static database since the process for dumping data is iterative for each table. If transactions occur during the creation of the bacpac file, an inconsistent piece of data might be saved.

We now have a new database named dbs4advwrksdev2. The next step is to reverse engineer the database into a Visual Studio 2017 database project.
Visual Studio
I am assuming you know how to get a licensed copy of Visual Studio and install it on your computer. Newer versions of Microsoft products require you to log into the application using a user name and password. See top right section of image that shows me logged in as [email protected].
Make sure you select the Data Tools features during the install process. From the image below, you can see I have been working with data related projects. In fact, this week I have been working with the Adventure Works (AdwWrks) project which is shown in the recent files section on the start page.

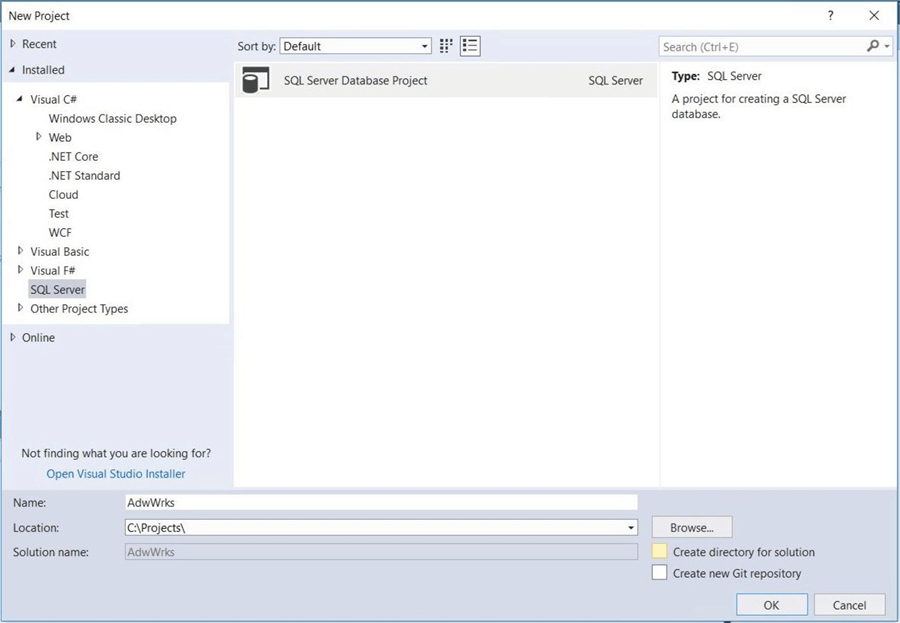
Obviously, the screen shot of the start page was done after the database project was made. We can use the hyperlink on the page to create a new project. Choose the project type, file name and file location.
The solution explorer shown below contains an empty project with no files. To add files to the solution, we can right click the project name and choose the import database feature. This feature will reverse engineer the Azure SQL database. Execute the import by clicking the start button.
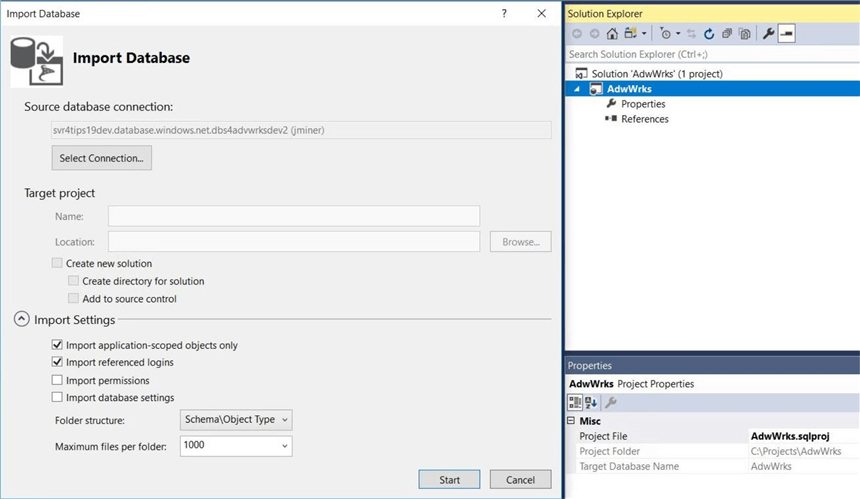
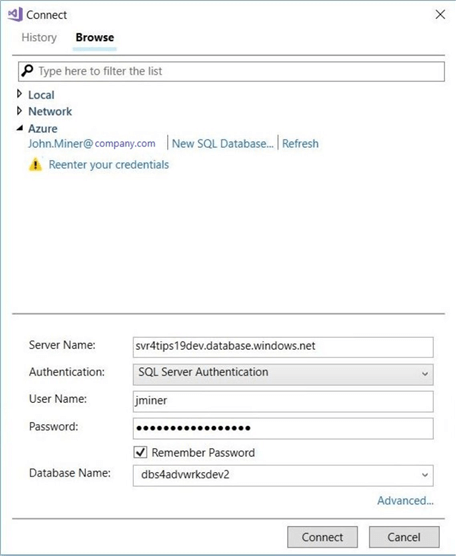
Entering connection information is the hardest part of this task. There is a dialog box that we can use to simplify the process. We are using SQL Server Authentication as the protocol to connect to the Azure database. Enter the server name, database name, user name and user password.
Pick the connect button to validate and save the connection. This saved connection will show up as a string in the import dialog box.
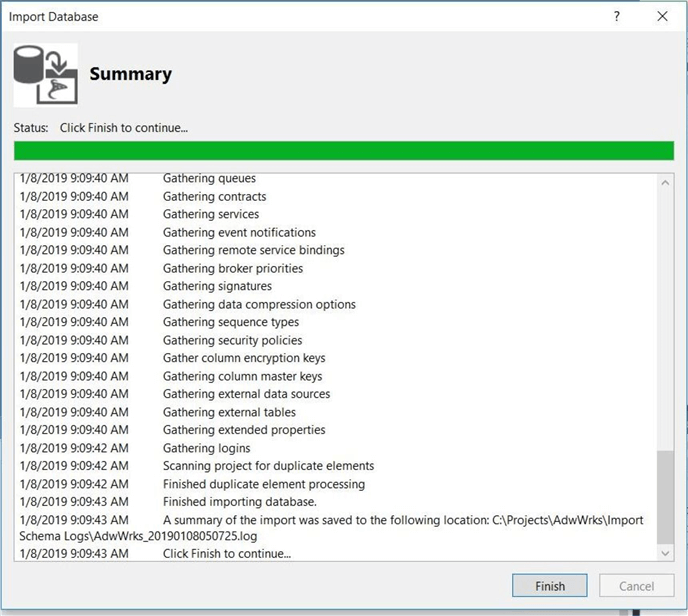
Clicking the start button from the import dialog box kicks off the import task. I will not elaborate the sub-tasks that are executed. However, details of the execution can be found in the Import Schema Logs sub-directory underneath the project directory.
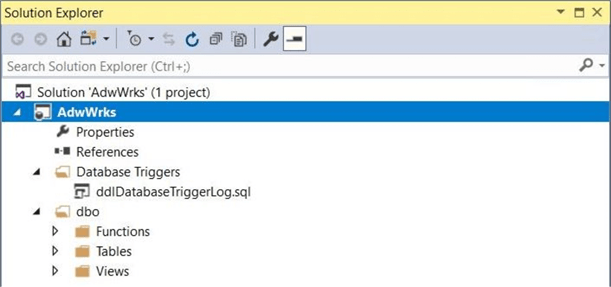
If we refresh the solution, can see that a new folder for the dbo schema has been created. Sub folders for each function, table and/or view have been also created.
How does the folder structure in Visual Studio relate to the file system in Windows?
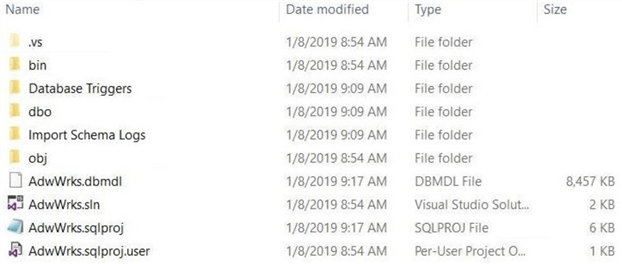
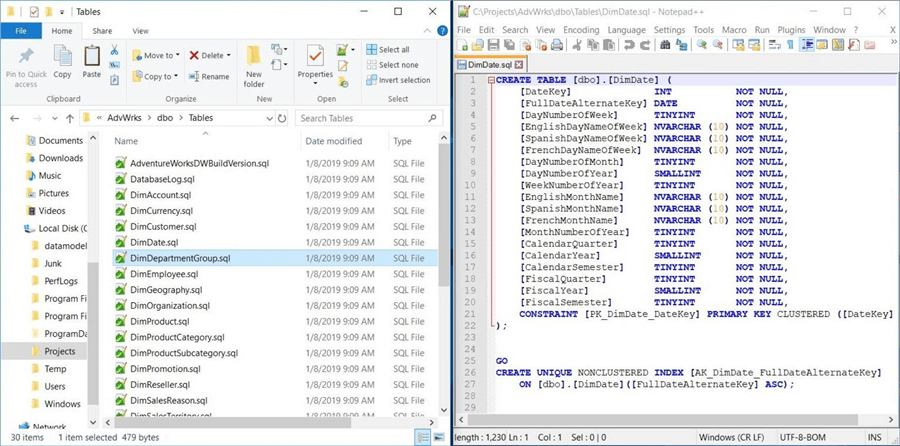
We can use Windows Explorer to look at the files in the c:\projects\advwrks directory. We can see that a directory has been created for each folder.
If we look at the files in the dbo\tables directory, we can see a Transaction SQL (T-SQL) file for each table in the database schema. The image below shows windows explorer on the left hand side and the date dimension table definition loaded in notepad++.
It is interesting to note that only CREATE statements exist in the code files generated by the import feature. That is a key observation to make. It is how continuous delivery works within Visual Studio. You modify your project to represent the desired state of the database. The publishing process compares an existing database to the desired state and generates a T-SQL code to make the transformation.
In a nutshell, the import feature reverse engineers a database schema into a bunch of create statements. There exists a T-SQL file for each database object. If we want to load data into the schema after publishing, we need to create a post deployment script.
Publishing Projects
The development environment currently contains two databases: dbs4advwrksdev2 is a database that contains both the schema and data from the on premises database and dbs4advwrksdev is an empty database. The image below shows the empty database in the development environment.
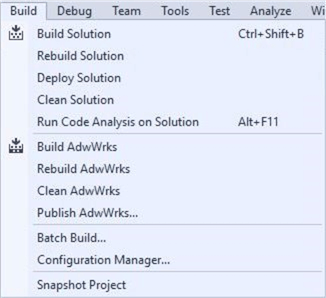
One goal of this proof on concept (POC) is the ability to deploy the database project at any time to a different target platform and target database. The build menu is where you find the commands to accomplish this task.
The build menu has four main choices that we can choose: Build, Rebuild, Clean and Publish. Please see image below.
The Build command checks the project for syntax errors and creates the intermediate files needed for deployment. The Clean command removes any existing files from the bin\debug and obj\debug directories. The Rebuild command is an execution of the Clean and Build commands in sequence. Last but not least, the Publish command figures out the required changes to make the target database look like the desired state in the project.
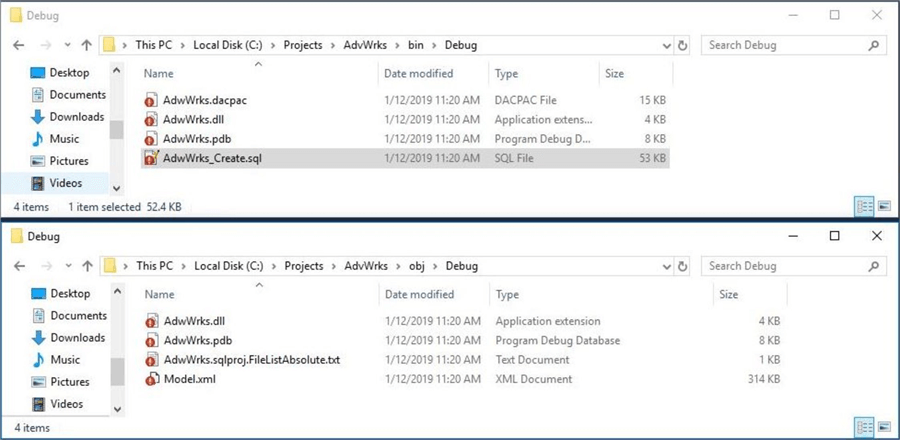
The explorer windows below show the typical files that might be seen after a build action.
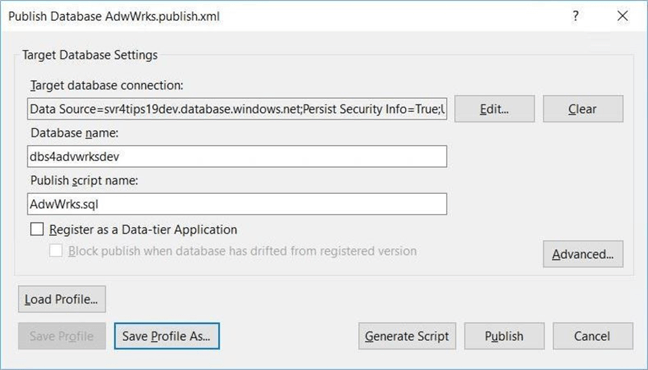
It is always good practice to Build your solution first, then Publish the solution to the target environment. If we choose the Publish database command, we need to enter the details for a target database connection. This is the same information that we entered during the import task. We will need to change the database name to dbs4advwrksdev.
Unlike the deploy database task in SSMS, Visual Studio will create a script to make the empty database look like the desired state. The Save Profile button generates an xml inside the project. Double-clicking this file prepopulates this dialog box in the future. The Generate Script button creates a T-SQL file that can be executed manually by a DBA on the target platform. The Publish button generates the T-SQL file and executes it against the target database.
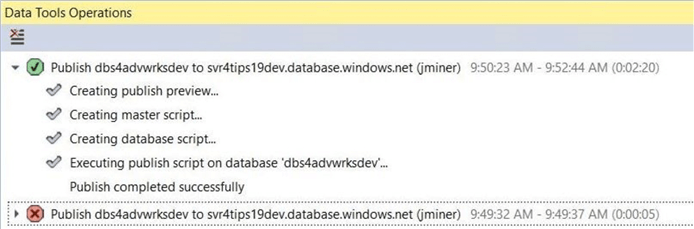
During the publication of the database, the data tools operations box appears with either successful (green) messages or failure (red) messages.
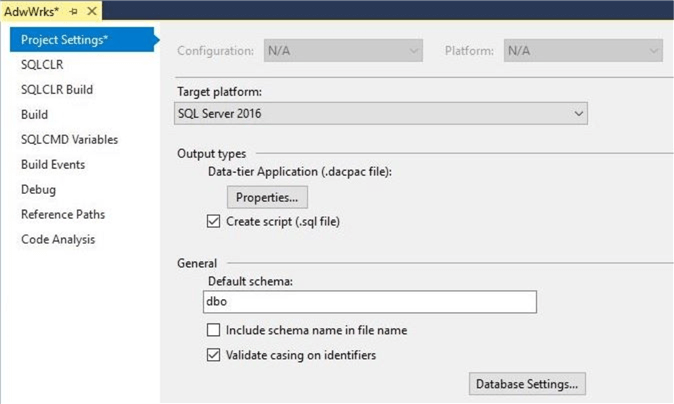
The image below depicts the two times I published the project. During the first try, the project settings defaulted to a SQL Server 2016 target platform. This property caused a failure in the deployment process. After changing the project settings, I was able to publish successfully to the dbs4advwrksdev database.
The project settings can be accessed by selecting the project name in the solution explorer, right clicking and choosing the properties menu option. As you can see, the target platform is SQL Server 2016. To eliminate this issue, change the target platform to Azure SQL Database V12.
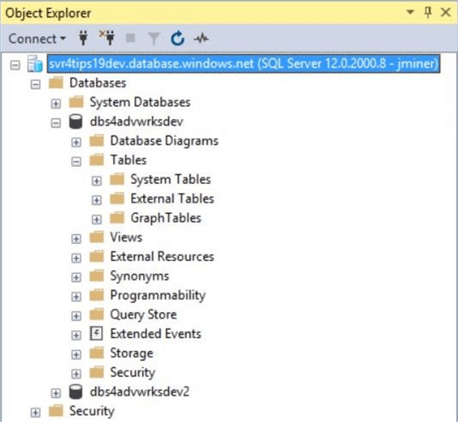
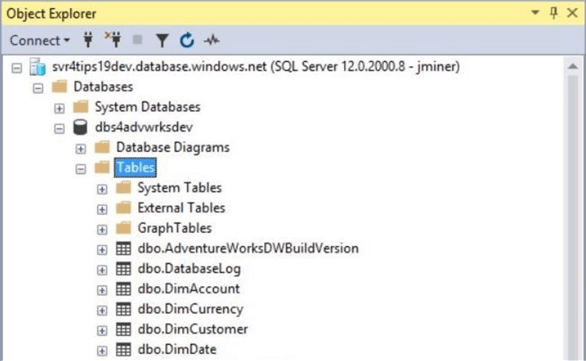
If we refresh the object explorer in SSMS, we can see that the database is no longer empty.
To make sure we completely covered all the deployment options, let us investigate how the generate script button works with a schema change in our database project. First, add a description field to the DimCurrency table and save this change. Second, make a database copy of dbs4advwrksdev named foo and change the target database in the publish menu. Third, examine the script that was generated for publishing.
The image below shows each task in a window stacked vertically in Visual Studio.
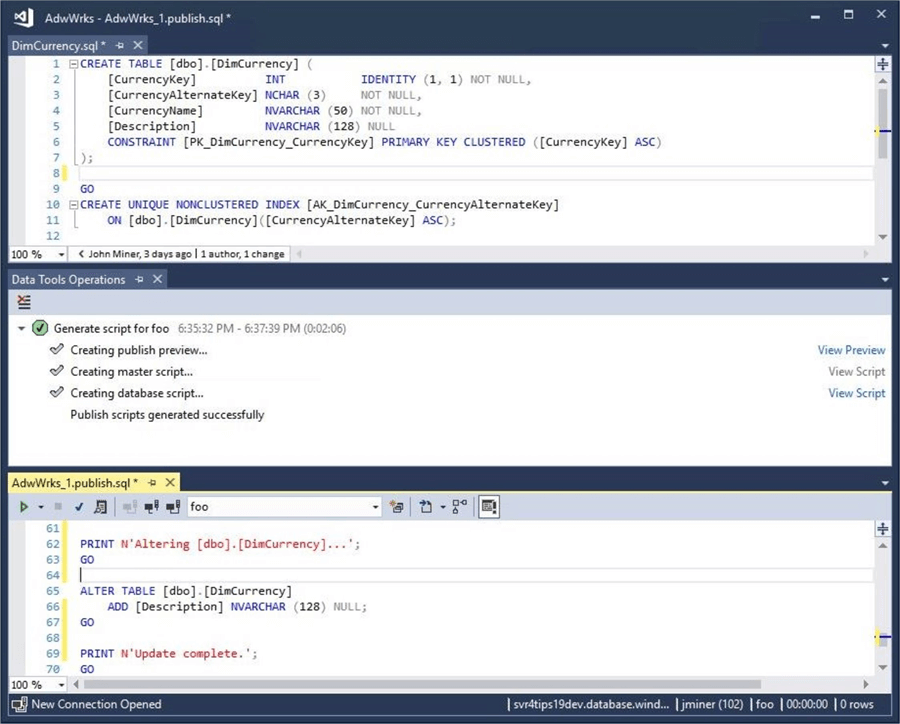
The Visual Studio database project publishing process determines that the only difference between the Azure SQL database and the desired state is one column in one table. It generates a script that alters the table and adds the column.
Summary
Visual Studio is a modern-day development tool that can be easily integrated with Azure DevOps. The first step in this process is to have a valid database project. All the code samples from Microsoft are now installed on GitHub. There are still a bunch of on-premise, Microsoft specific, features that are not compatible with Azure SQL Database. Make sure that any database that you reverse engineer has compatible features with the target platform. I decided to use the Adventure Work Data Warehouse sample database today since it uses core ANSI SQL features.
The clean, build and publish actions are common commands executed by the SQL developer. During a build process, temporary files are generated and staged for the publish action. The clean process just removes these files from the file system. Last but not least, the publish action allows for script generation and automatic deployment. For larger companies that assign the development tasks to one group and the deployment tasks to another, generating a script allows for the manual publishing of the changes by the correct group.
Visual Studio database projects, formerly known as SQL Server Data Tools or Business Intelligence Development studio, have many different features to build, test, debug, maintain, and refactor databases. I only scratched the surface of this topic. Please see Microsoft’s online documentation for more details.
In my next article, we will talk about how to integrate Visual Studio with Azure DevOps to provide Continuous Integration for team development. The code repository (repos) is key to this concept. We can even link sprint tasks in our agile process to code commits.
Next Steps
- Leveraging pre-deployment and post deployment scripts
- Continuous Database Integration with Azure DevOps
- Plan, track and execute work using Azure Boards
- Continuous Database Deployment with Azure DevOps


About the author
 John Miner is a Data Architect at Insight Digital Innovation helping corporations solve their business needs with various data platform solutions.
This author pledges the content of this article is based on professional experience and not AI generated.
View all my tips
