By: Ron L'Esteve | Comments | Related: More > Artificial Intelligence
Problem
Computer vision is the science and technology of machines that see. Azure's Computer Vision service provides developers with access to advanced algorithms that process images and return information. To analyze an image, you can either upload an image or specify an image URL. The images processing algorithms can analyze content in several different ways, depending on the visual features you're interested in. Similarly, the Azure Face API is a cognitive service that provides algorithms for detecting, recognizing, and analyzing human faces in images. While all of this sounds quite exciting, from a practical standpoint, I'm interested in exploring a real-world example of Azure's Face and Vision cognitive API service.
Solution
This article aims to provide a real-world example of analyzing Images with Microsoft Azure's Face and Vision API by writing python scripts in Jupyter notebook. For my sample real-world images, I will attempt to keep things exciting by making use of the theme "Game of Thrones”, an American fantasy drama television series created by David Benioff and D. B. Weiss.
Microsoft Azure Computer Vision
The Computer Vision API uses a machine learning model that has been trained with millions of images. It can extract features from images and return a suggested description, as well as details about the image file and a suggested list of "tags" that apply to it.
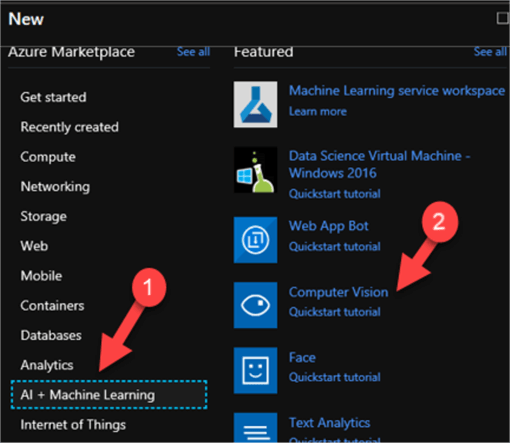
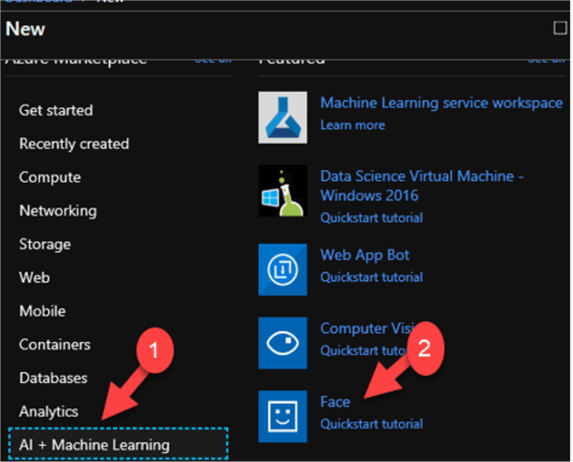
I will begin by navigating to the Azure Portal and then create a new Computer Vision resource under AI + Machine Learning.
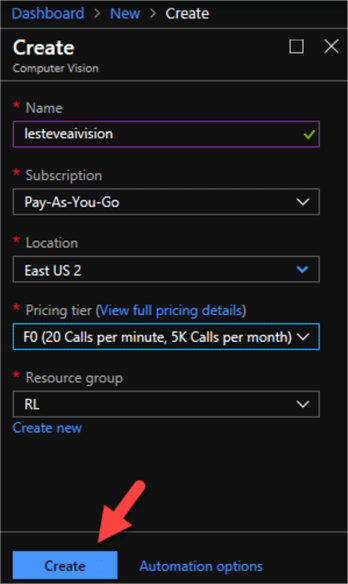
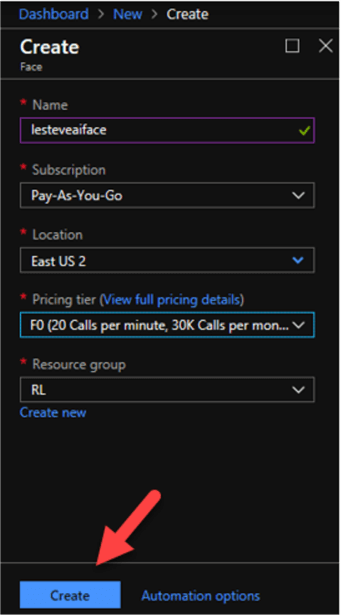
Next, I will configure some additional details in the 'Create' blade. I made sure to select the F0 pricing tier, which is limited to 20 calls per minute and 5K calls per month. This is the lowest tier and works well for low volume calls.
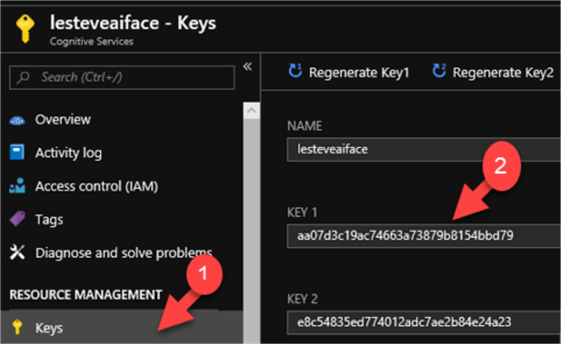
Once my Vision API is ready, I will navigate to Key and copy my Key 1.

I will then navigate to https://notebooks.azure.com/ where I will sign in using my Azure credentials.

I'll then create a new project and call it lestevenotebook.

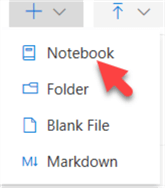
Once the New Project opens, I'll click the + icon to the right and select Notebook.
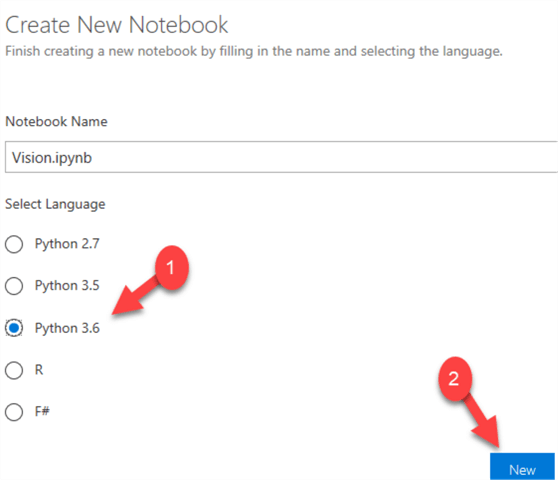
After I click Notebook, I will be prompted to fill in the name of my notebook and the language. I will go ahead and choose Python 3.6 and then click New.
Now that my notebook is created, I will open it and I can begin to write Python code to analyze my images. I'll start by writing some python to read my Vision API URI and Key.
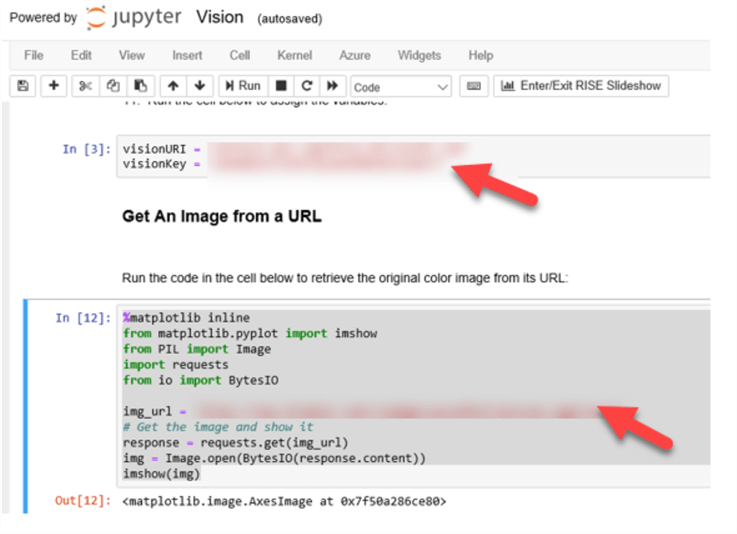
I will also add the following code which will get the original color image from its URL:
%matplotlib inline
from matplotlib.pyplot import imshow
from PIL import Image
import requests
from io import BytesIO

img_url = 'ENTER IMAGE URL HERE'
# Get the image and show it
response = requests.get(img_url)
img = Image.open(BytesIO(response.content))
imshow(img)
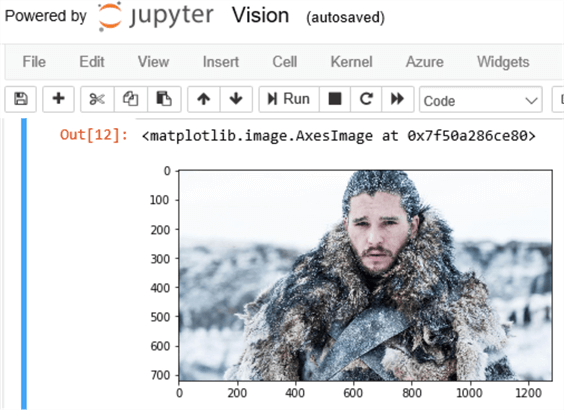
Once I run this python script, I will see a familiar face if I happen to be a 'Game of Thrones' enthusiast. Yes, it's the infamous John Snow, the honorable Lord of Winterfell. My goal from uploading this image is to try to get the Vision API to tell me who this is a picture of.
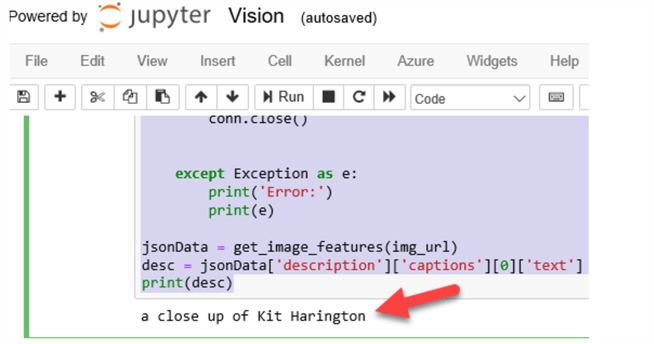
Next, I will run the following python code to see what caption the Computer Vision API suggests for the image above.
def get_image_features(img_url):
    import http.client, urllib.request, urllib.parse, urllib.error, base64, json
    headers = {
        # Request headers.
        'Content-Type': 'application/json',
        'Ocp-Apim-Subscription-Key': visionKey,
    }

    params = urllib.parse.urlencode({
        # Request parameters. All of them are optional.
        'visualFeatures': 'Categories,Description,Color',
        'language': 'en',
    })

    body = "{'url':'" + img_url + "'}"

    try:
        # Execute the REST API call and get the response.
        conn = http.client.HTTPSConnection(visionURI)
        conn.request("POST", "/vision/v1.0/analyze?%s" % params, body, headers)
        response = conn.getresponse()
        data = response.read()

        # 'data' contains the JSON response.
        parsed = json.loads(data.decode("UTF-8"))
        if response is not None:
            return parsed
        conn.close()

    except Exception as e:
        print('Error:')
        print(e)

jsonData = get_image_features(img_url)
desc = jsonData['description']['captions'][0]['text']
print(desc)
After running the code, I can see that the description is 'a close up of Kit Harington'. Has my Vision API failed me? Well the answer is that this algorithm is so accurate that is classified the character 'John Snow' as the actual actor "Kit Harrington", hence the Vision API is 100% accurate so far.
Now that I have a description of the image, I can run the following python code to retrieve additional details.
import json

# View the full details returned
print (json.dumps(jsonData, sort_keys=True, indent=2))
The result of those details is presented below.
print (json.dumps(jsonData, sort_keys=True, indent=2))
{
   "categories":[
      {
         "name":"others_",
         "score":0.00390625
      },
      {
         "detail":{
            "celebrities":[
               {
                  "confidence":0.9357492923736572,
                  "faceRectangle":{
                     "height":213,
                     "left":568,
                     "top":128,
                     "width":213
                  },
                  "name":"Kit Harington"
               }
            ]
         },
         "name":"people_portrait",
         "score":0.54296875
      }
   ],
   "color":{
      "accentColor":"50677B",
      "dominantColorBackground":"White",
      "dominantColorForeground":"Grey",
      "dominantColors":[
         "White",
         "Grey"
      ],
      "isBWImg":false,
      "isBwImg":false
   },
   "description":{
      "captions":[
         {
            "confidence":0.9200226360523968,
            "text":"a close up of Kit Harington"
         }
      ],
      "tags":[
         "outdoor",
         "man",
         "wearing",
         "snow",
         "suit",
         "sitting",
         "gray",
         "close",
         "standing",
         "covered",
         "black",
         "large",
         "grey",
         "riding",
         "blue",
         "white",
         "hat"
      ]
   },
   "metadata":{
      "format":"Jpeg",
      "height":720,
      "width":1280
   },
   "requestId":"10f34efe-f3fa-4dc4-861f-c8e78c9f9cd2"
}
In the subsequent examples, I will use the following python script to test a few more images. Note that I'll need to Enter my Image URL before running the script.
img_url = 'ENTER IMAGE'

# Get the image and show it
response = requests.get(img_url)
img = Image.open(BytesIO(response.content))
imshow(img)
jsonData = get_image_features(img_url)
desc = jsonData['description']['captions'][0]['text']
print(desc)
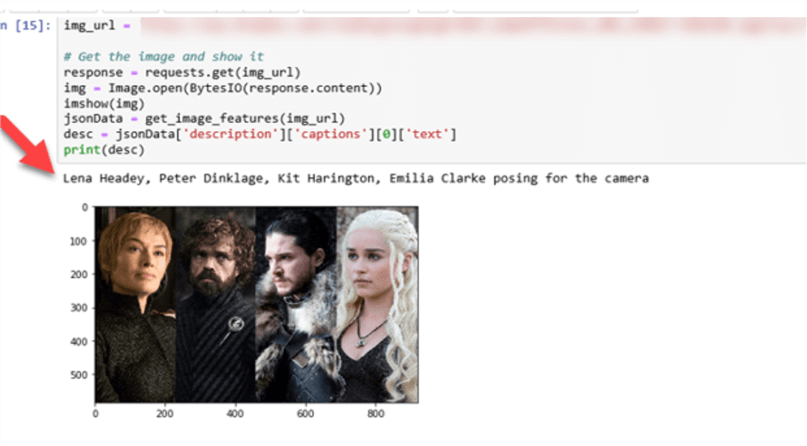
For my next test, I will upload an image with of Cersei Lannister, Tyrion Lannister, John Snow, and Daenerys Targaryen. My goal is to see if the Vision API can recognize each character in the correct order.
Sure enough, when I run the code, I notice that the actors' names are displayed in the correct order with the following caption: Lena Headey, Peter Dinklage, Kit Harington, Emilia Clarke posing for the camera.
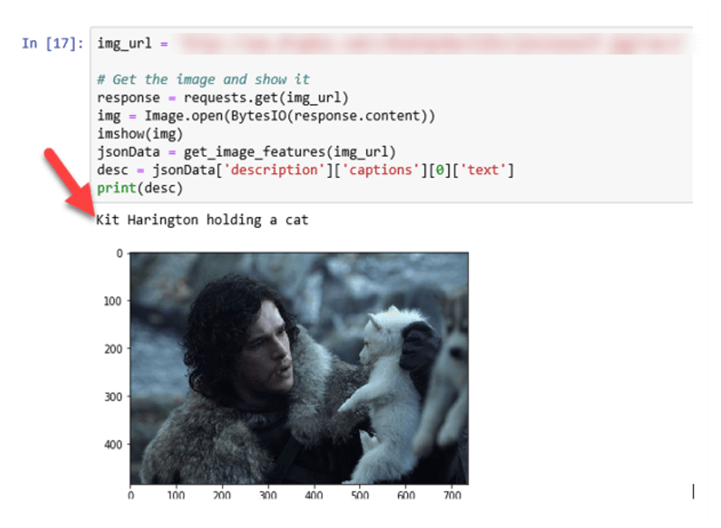
Next, I will try uploading a picture of Game of Thrones character John Snow holding a wolf cub. The description of 'Kit Harington holding a cat' is still very impressive. This demonstrates that images other than people are also detectable by this Vision service.
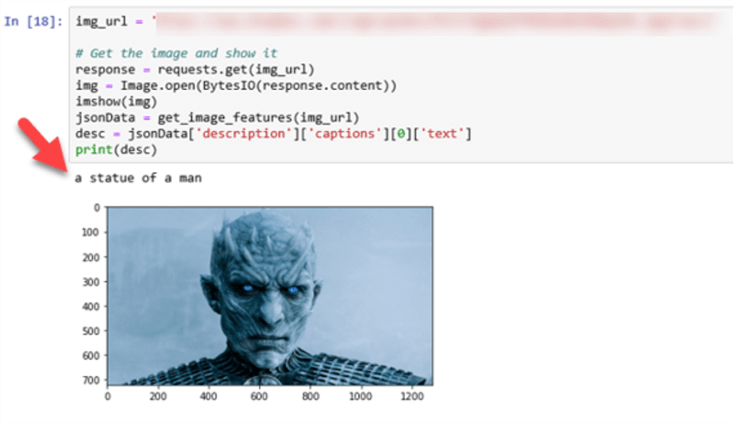
Now that I'm on a roll, I want to give this brilliant AI a query that I've been pondering for a while, as I tirelessly watched all episodes of Game of Thrones. I want to see if I can get any insight into the infamous Night King, supreme leader and the first of the White Walkers, having existed since the age of the First Men.
I see that the description returned is 'a statue of a man'. Oh well, no major insights or spoiler alerts for the Season 8 Finale.
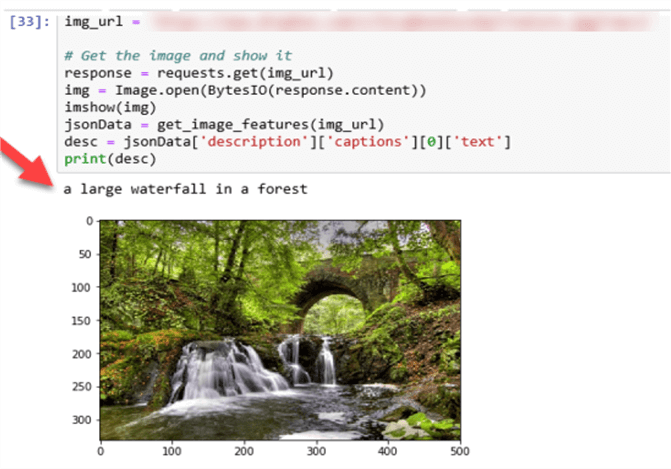
To demonstrate that this Vision API works on more than just faces, I will upload the following image and once again run my python script and sure enough, I can see that the description is accurately depicted as 'a large waterfall in a forest'.
I'll try one more Vision API Image. King's Landing is the capital of the Seven Kingdoms, located in the Crownlands on the East Coast of Westeros. Let's see if I can get an accurate description of this image.
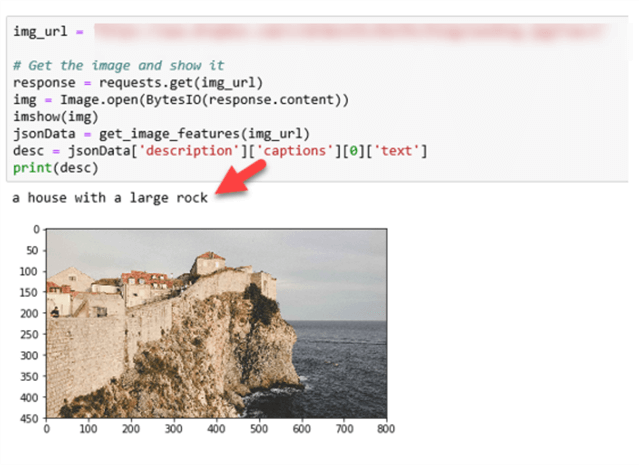
The Vision API tells me that this image is 'a house with a large rock'. Well I think that's quite accurate once again, since that is pretty much what the Castle at King's Landing is.
Microsoft Azure Face API
Now that I've seen a working example of various images being analyzed in Microsoft Azure's Vision API, I want to better understand Face API and how it can be used.
The Face API can detect human faces in an image and return the rectangle coordinates of their locations. It is also great for comparing two faces for verification purposes.
I'll get started with Face API by once again navigating to the Azure Portal and creating a new AI and Machine Learning resource called Face API.
Next, I will enter details related to my Face API. Like the Vision API, I will select F0 as the pricing tier since it gives me enough calls that I can work with for testing sample images.
Once my Face API is created, I will navigate to Keys and then copy Key 1.
I'll then navigate back to me Jupyter notebook and enter the faceURI and faceKey and run it in a cell.
faceURI = "https://eastus2.api.cognitive.microsoft.com/face/v1.0/"
faceKey = "aa07d3c19ac74663a73879b8154ererer9"
I'll also install the Face API SDK and pillow package.
!pip install cognitive_face
!pip install pillow
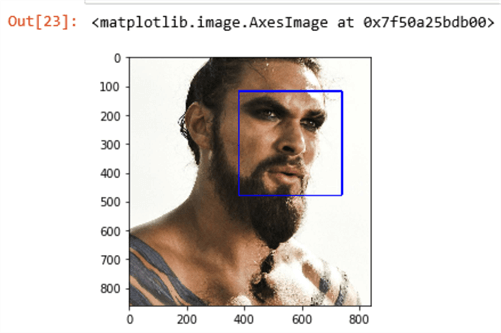
Next, I'll upload my initial image that I want to use as a base for comparing other images to verify if it is the same person or not. To follow my Game of Thrones theme, I will upload an image of Khal Drogo, chieftain of a Dothraki Khalasar. I will demonstrate how this technology would work great to build a face recognition system for security purposes. I'm sure the Dothraki could have tremendously benefitted from this modern technology.
import cognitive_face as CF

# Set URI and Key
CF.BaseUrl.set(faceURI)
CF.Key.set(faceKey)

# Detect faces in an image
img_url = 'ENTER URL HERE'
result = CF.face.detect(img_url)
print (result)
The Face API has detected one face, and assigned it an ID. It also returns the coordinates for the top left corner and the width and height for the rectangle within which the face is detected.

Next, I will run the following python code to add a blue rectangle for each face that is found.
%matplotlib inline
import requests
from io import BytesIO
from matplotlib.pyplot import imshow
from PIL import Image, ImageDraw

# Get the image
response = requests.get(img_url)
img = Image.open(BytesIO(response.content))

# Add rectangles for each face found
color="blue"
if result is not None:
    draw = ImageDraw.Draw(img)
    for currFace in result:
        faceRectangle = currFace['faceRectangle']
        left = faceRectangle['left']
        top = faceRectangle['top']
        width = faceRectangle['width']
        height = faceRectangle['height']
        draw.line([(left,top),(left+width,top)],fill=color, width=5)
        draw.line([(left+width,top),(left+width,top+height)],fill=color , width=5)
        draw.line([(left+width,top+height),(left, top+height)],fill=color , width=5)
        draw.line([(left,top+height),(left, top)],fill=color , width=5)

# show the image
imshow(img)
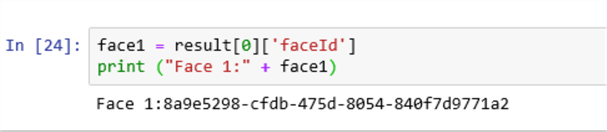
As expected, Khal Drogo's face has a blue rectangle around it. I'll run the following python code to get the face ID.
I can run this Python script to verify the face Id that was assigned to my Face 1.
face1 = result[0]['faceId']
print ("Face 1:" + face1)
As a next step, I'll want to compare my original face against other faces to verify if it is the same face or not. I'll do this by running the following python script.
# Get the image to compare
img2_url = 'ENTER IMAGE URL'
response2 = requests.get(img2_url)
img2 = Image.open(BytesIO(response2.content))
# Detect faces in a comparison image
result2 = CF.face.detect(img2_url)
# Assume the first face is the one we want to compare
if result2 is not None:
face2 = result2[0]['faceId']
print ("Face 2:" + face2)
def verify_face(face1, face2):
# By default, assume the match is unverified
verified = "Not Verified"
color="red"
# compare the comparison face to the original one we retrieved previously
verify = CF.face.verify(face1, face2)
# if there's a match, set verified and change color to green
if verify['isIdentical'] == True:
verified = "Verified"
color="lightgreen"
# Display the second face with a red rectange if unverified, or green if verified
draw = ImageDraw.Draw(img2)
for currFace in result2:
faceRectangle = currFace['faceRectangle']
left = faceRectangle['left']
top = faceRectangle['top']
width = faceRectangle['width']
height = faceRectangle['height']
draw.line([(left,top),(left+width,top)] , fill=color, width=5)
draw.line([(left+width,top),(left+width,top+height)] , fill=color, width=5)
draw.line([(left+width,top+height),(left, top+height)] , fill=color, width=5)
draw.line([(left,top+height),(left, top)] , fill=color, width=5)
# show the image
imshow(img2)
# Display verification status and confidence level
print(verified)
print ("Confidence Level: " + str(verify['confidence']))
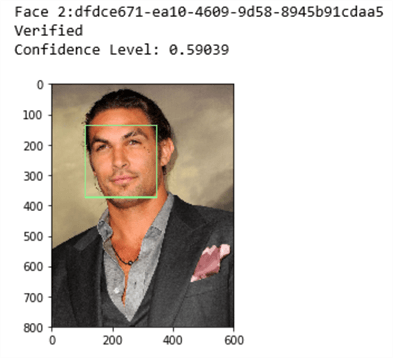
verify_face(face1, face2)
Interestingly, the face was verified with a confidence level of 0.59. This image is of Jason Momoa, the actor playing Khal Drogo. Notice that even without the beard, the image was verified and matched.
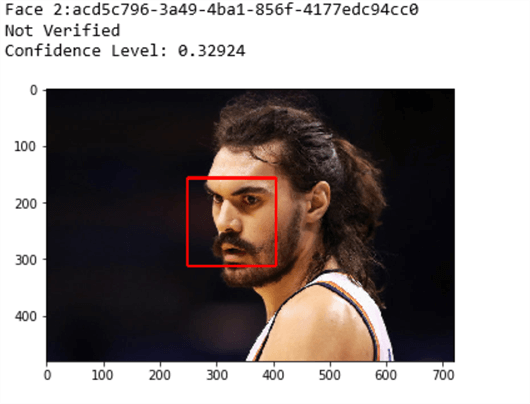
Next, I'll run the following comparison script again to this time compare Khal Drogo with basketball player Steven Adams.
# Get the image to compare
img2_url = 'ENTER IMAGE URL HERE'
response2 = requests.get(img2_url)
img2 = Image.open(BytesIO(response2.content))

# Detect faces in a comparison image
result2 = CF.face.detect(img2_url)

# Assume the first face is the one we want to compare
face2 = result2[0]['faceId']
print ("Face 2:" + face2)

verify_face(face1, face2)
Its evident that this Face API is not easily tricked, since it tells me that the face did not match the original face with a low confidence level of 0.33.
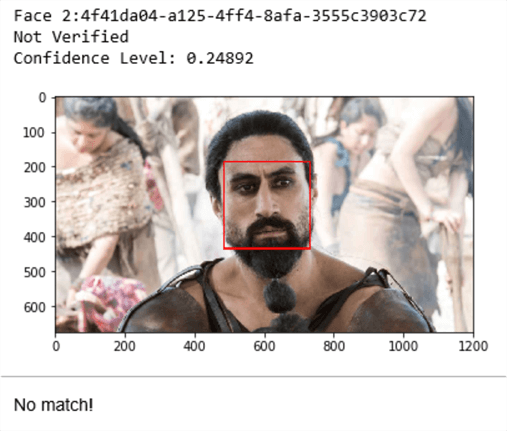
I am going to try one more time. This time I will upload a picture of Khal Moro from Season 6.
And once again the face was not matched with a confidence level of only 0.24, thus continuing to demonstrate the power of Microsoft Azure's Face API.
Next Steps
- Check out Microsoft's Face API Documentation and Vision API Documentation for more information
- Explore Microsoft Azure's additional Cognitive Services related to Speech, Language, Knowledge and Search.


About the author
 Ron L'Esteve is a trusted information technology thought leader and professional Author residing in Illinois. He brings over 20 years of IT experience and is well-known for his impactful books and article publications on Data & AI Architecture, Engineering, and Cloud Leadership. Ron completed his Master’s in Business Administration and Finance from Loyola University in Chicago. Ron brings deep tec
This author pledges the content of this article is based on professional experience and not AI generated.
View all my tips
