By: Ron L'Esteve | Comments (3) | Related: > DevOps
Problem
Infrastructure differences and inconsistencies between a Dev/Test environment that an application was developed and tested in versus the production environment are common scenarios that IT professionals and Software Developers might encounter. Despite an application initially being deployed the right way, configuration changes made to the production environment might cause discrepancies. Customers often ask if there is a seamless way of automating the creation of Azure resources while ensuring consistency across multiple environments.
Solution
Infrastructure As Code is the process of creating a template that defines and then deploys the environment along with the application to ensure consistency.
Azure Resource Manager (ARM) is the deployment and management service for Azure. It provides a consistent management layer that enables you to create, update, and delete resources in your Azure subscription. You can use its access control, auditing, and tagging features to secure and organize your resources after deployment.
By using ARM Templates, you can manage your infrastructure through declarative templates rather than scripts; deploy, manage, and monitor all the resources for your solution as a group, rather than handling these resources individually. Additionally, you can repeatedly deploy your solution throughout the development lifecycle and have confidence your resources are deployed in a consistent state.
In this article, I will demonstrate how to deploy a SQL Database using an ARM template and a DACPAC file, and I will be using Azure DevOps to deploy my resources.
Create a Visual Studio ARM Template Project
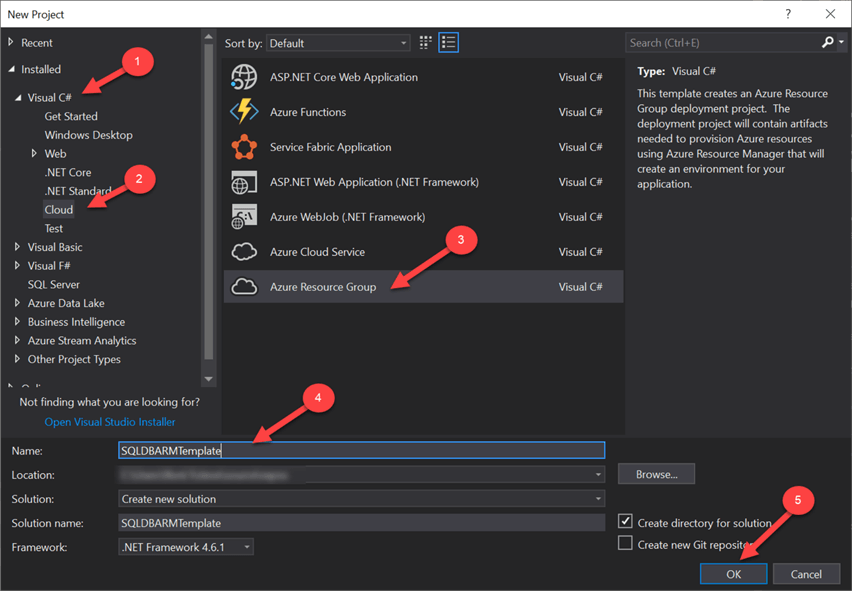
I'll begin the process by creating a new Visual Studio project in which I can create my ARM Template and then check it in to Azure DevOps with either Git or TFS. For my scenario, I will be utilizing Git for source control.
To create a new project, click New and then Project.

Then following five steps will create the new project.
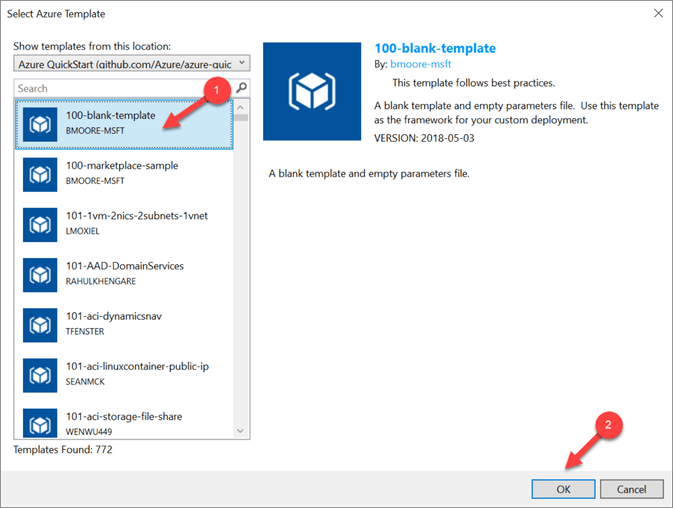
After clicking OK, an Azure template selection GUI will appear. Clicking the first template will create a blank ARM template which I can customize for my needs.
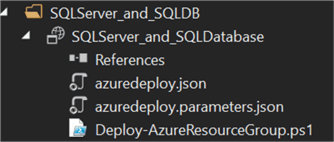
When the new project is created, I will make sure that it contains the following two json files and a PowerShell script:
I will then click azuredeploy.json and replace the json with the following JSON code, which creates a logical SQL Server:
{
    "$schema": "https://schema.management.azure.com/schemas/2015-01-01/deploymentTemplate.json#",
    "contentVersion": "1.0.0.0",
    "parameters": {
    "configuration": {
      "type": "object",
      "metadata": {
        "description": "Configuration for this resource"
      }
    },
    "sqlServerName": {
      "type": "string"
    },
    "administratorLogin": {
      "type": "string"
    },
    "administratorLoginPassword": {
      "type": "securestring"
    },
    "sqldbName": {
      "type": "string",
      "minLength": 1
    },
    "sqldbCollation": {
      "type": "string",
      "minLength": 1,
      "defaultValue": "SQL_Latin1_General_CP1_CI_AS"
    },
    "sqldbEdition": {
      "type": "string",
      "defaultValue": "Basic",
      "allowedValues": [
        "Basic",
        "Standard",
        "Premium"
      ]
    },
    "sqldbRequestedServiceObjectiveName": {
      "type": "string",
      "defaultValue": "Basic",
      "allowedValues": [
        "Basic",
        "S0",
        "S1",
        "S2",
        "P1",
        "P2",
        "P3"
      ],
      "metadata": {
        "description": "Describes the performance level for Edition"
      }
    }
  },
    "variables": {
      "sqlservernameName": "[concat('sqlservername', uniqueString(resourceGroup().id))]"},
    "resources": [
      {
        "name": "[parameters('sqlServerName')]",
        "type": "Microsoft.Sql/servers",
        "location": "[resourceGroup().location]",
        "apiVersion": "2015-05-01-preview",
        "dependsOn": [],
        "tags": {
          "displayname": "[parameters('configuration').displayName]",
          "department": "[parameters('configuration').department]",
          "environment": "[parameters('configuration').environment]",
          "primaryOwner": "[parameters('configuration').primaryOwner]",
          "secondaryOwner": "[parameters('configuration').secondaryOwner]",
          "version": "[parameters('configuration').version]"
        },
        "properties": {
          "administratorLogin": "[parameters('administratorLogin')]",
          "administratorLoginPassword": "[parameters('administratorLoginPassword')]",
          "version": "12.0"
        },
        "resources": [
          {
            "name": "AllowAllWindowsAzureIps",
            "type": "firewallrules",
            "location": "[resourceGroup().location]",
            "apiVersion": "2014-04-01-preview",
            "dependsOn": [
              "[resourceId('Microsoft.Sql/servers', parameters('sqlServerName'))]"
            ],
            "properties": {
              "startIpAddress": "0.0.0.0",
              "endIpAddress": "0.0.0.0"
            }
          },
          {
            "name": "[concat(parameters('sqlServerName'), '/', parameters('sqldbName'))]",
            "type": "Microsoft.Sql/servers/databases",
            "location": "[resourceGroup().location]",
            "apiVersion": "2014-04-01-preview",
            "dependsOn": [],
            "tags": {
              "displayname": "[parameters('configuration').displayName]",
              "department": "[parameters('configuration').department]",
              "environment": "[parameters('configuration').environment]",
              "primaryOwner": "[parameters('configuration').primaryOwner]",
              "secondaryOwner": "[parameters('configuration').secondaryOwner]",
              "version": "[parameters('configuration').version]"
            },
            "properties": {
              "collation": "[parameters('sqldbCollation')]",
              "edition": "[parameters('sqldbEdition')]",
              "maxSizeBytes": "1073741824",
              "requestedServiceObjectiveName": "[parameters('sqldbRequestedServiceObjectiveName')]"
            }
          }
        ]
      }
    ]
}
Next, I will replace azuredeploy.parameters.json with the following JSON code:
{
  "$schema": "https://schema.management.azure.com/schemas/2015-01-01/deploymentParameters.json#",
  "contentVersion": "1.0.0.0",
  "parameters": {
    "configuration": {
      "value": {
        "displayName": "Azure SQL Server (logical)",
        "department": "IT",
        "environment": "dev",
        "primaryOwner": "[email protected]",
        "secondaryOwner": "[email protected]",
        "version": "1.0"
      }
    },
    "sqlServerName": {
      "value": "sql01ezcdeus2"
    },
    "administratorLogin": {
      "value": "SQLAdmin"
    },
    "administratorLoginPassword": {
      "value": "PW"
    }
  }
}
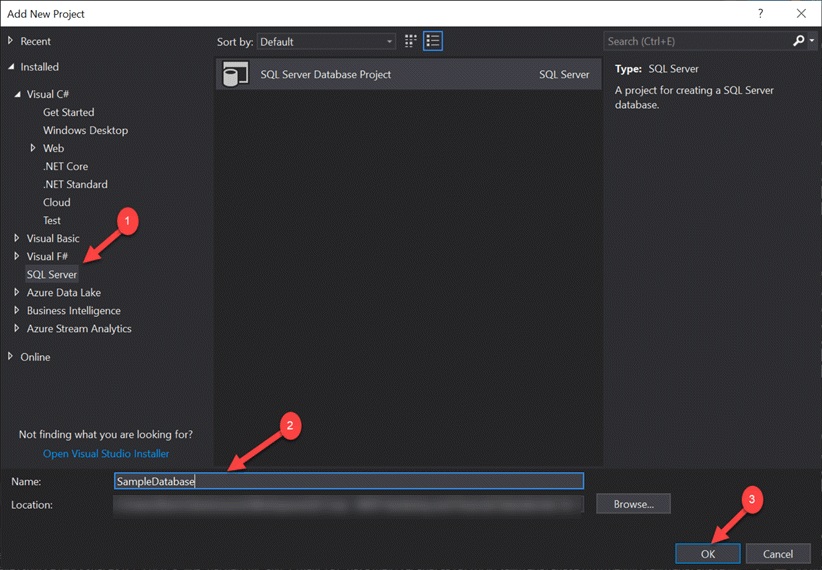
Create a SQL Server Database Project
I will need to create my Schemas, Tables, Views and Functions that are specifically customized for my deployment.
I'll do this by adding a New Database project:
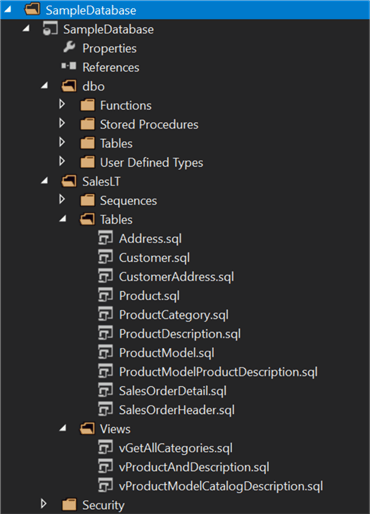
Once my database project is created, I will add SQL scripts for tables, schemas, views, etc.
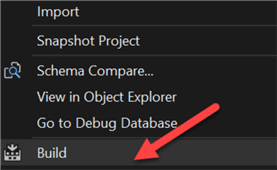
Once all the database level objects are created, I right click the SampleDatabase DB project and click build.
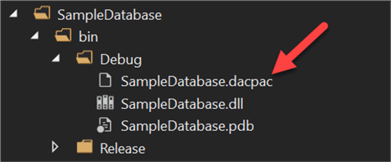
By clicking Build, the project will create a DACPAC file which we can use later in our deployment process. I'll click the Solution Explorer folder view to verify that the dacpac file has been created.
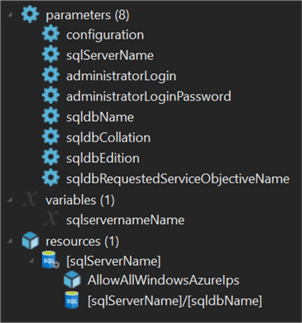
Next, I will quickly verify the parameters, variables, and resources that I will be deploying by navigating to JSON Outline of the azuredeploy.json file:
I now have all the necessary components to begin my ARM Template Deployment through AzureDevOps, I will check in my code to the Azure DevOps Repo using my Git source control.
Deploy the ARM Template & DACPAC with AzureDevOps
DevOps automates and speeds software delivery. It makes your process and your products more reliable. When you implement DevOps technologies and practice, you'll provide value to your customers faster in the form of new and innovative products, or enhancements to existing ones.
AzureDevOps offers an end-to-end, automated solution for DevOps that includes integrated security and monitoring. Take a simple path to developing and operating your apps in the cloud.
Now that my code has been checked into my AzureDevOps Repo, I can begin the deployment of my ARM Template and DACPAC file.
I will start by logging into my AzureDevOps Account at https://dev.azure.com/ and then navigating to my Project. For more information related to AzureDevOps and its service offerings, check out AzureDevOps.
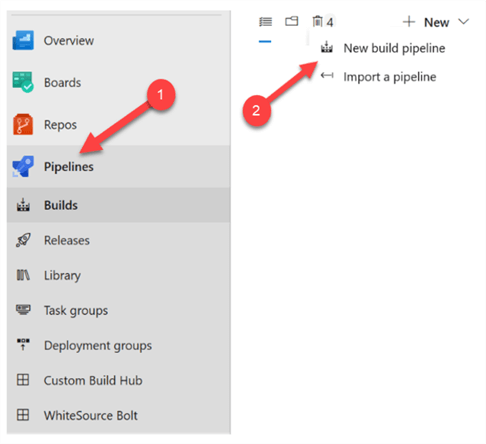
Once I navigate to my project, I will click Pipelines, and select 'New Build Pipeline':
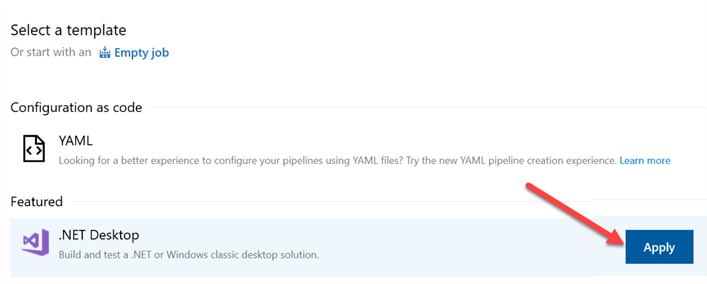
I'll then select .NET Desktop and click 'Apply':
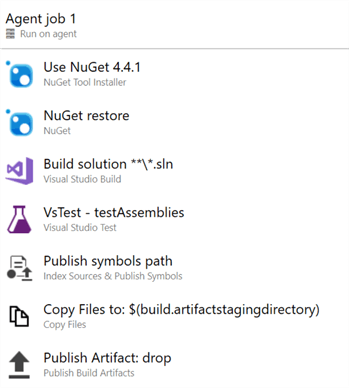
This will build my job with the appropriate steps to then build my solution:
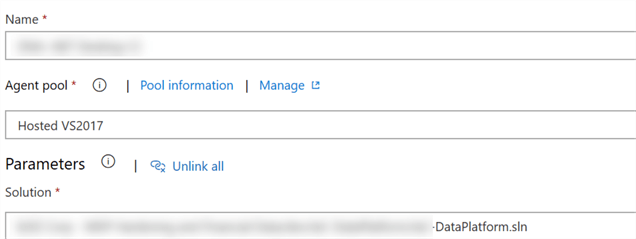
I'll then configure the solution by selecting my solution file and will 'Save and Queue' the job.
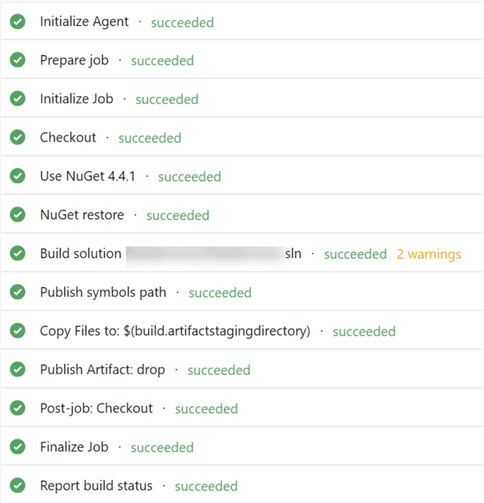
This will Build my solution file and build my necessary artifacts. When the job completes, I'll see the following completion status log report:
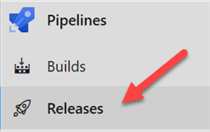
Next, I will click releases to create my ARM and DACPAC deployment process:

I'll then click 'add' within Artifacts to add my Build Pipeline artifacts.

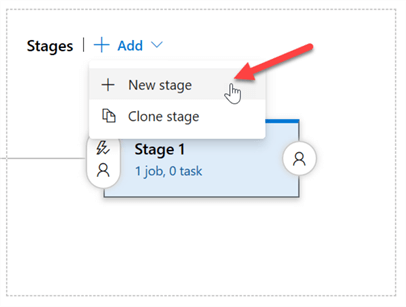
After that, I'll click Add New Stage and will name it Stage 1. Since I have zero tasks, I will create the ARM Template and DACPAC Tasks:
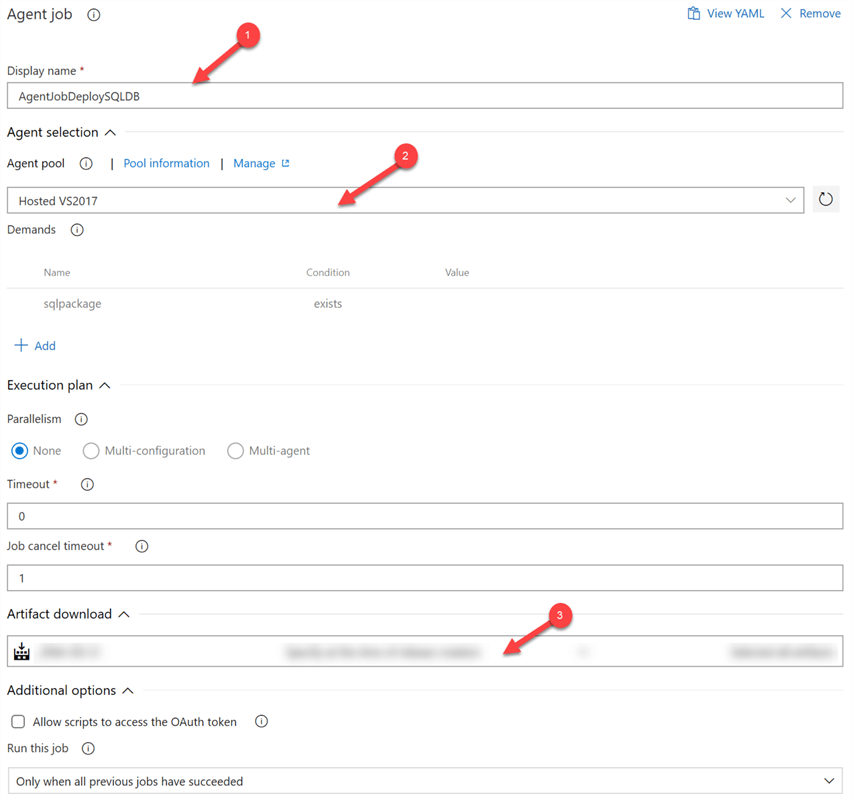
Next, I will confirm that the details of my Agent job are configured correctly. When you queue a build, it executes on an agent from the selected Agent pool. You can select a Microsoft-hosted pool, or a self-hosted pool that you manage. Check out Agent Pools, for more information on this topic:
Now that my agent job is configured, I will begin adding resources to the job:

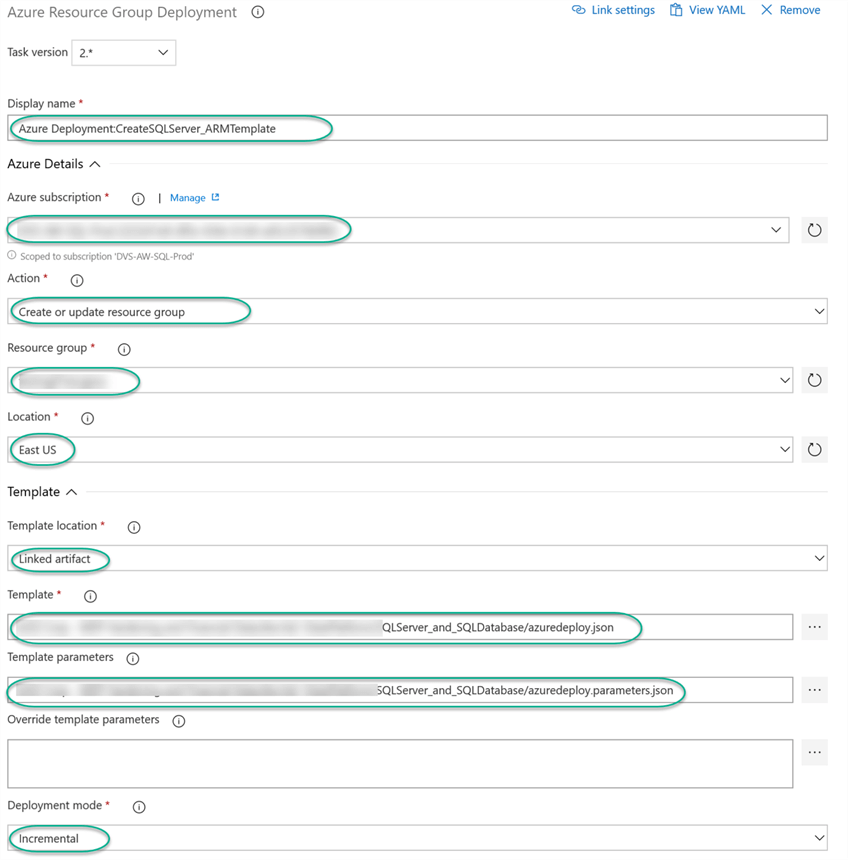
First, I will need the Azure Resource Group Deployment resource which will allow me to deploy my ARM Template:

Within Azure Resource Group Deployment resource, I will configure the following details. Also, I will select the Template and parameter JSON files for deploying my SQL Server:
I will also add an Azure SQL Database Deployment resource, which will allow me to deploy my Azure SQL DB using the DACPAC file that I created in Visual Studio. Note that I will need to add this resource after the SQL server resource is created.

I'll then ensure that I configure the following details for the deployment. Note that I'll need to provide the name of the SQL Server, Database, and Login/Password credentials which I specified in the parameters file of the ARM Template.
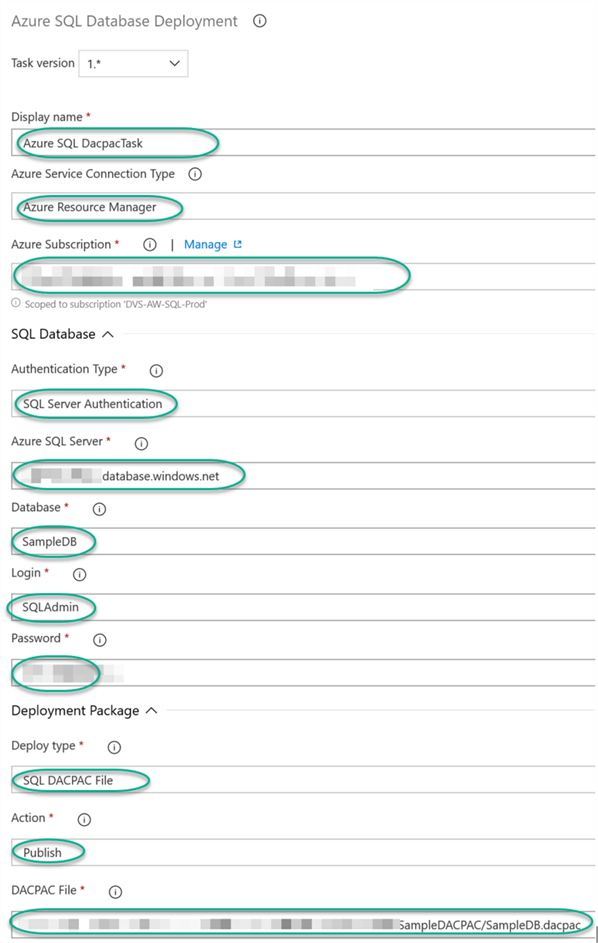
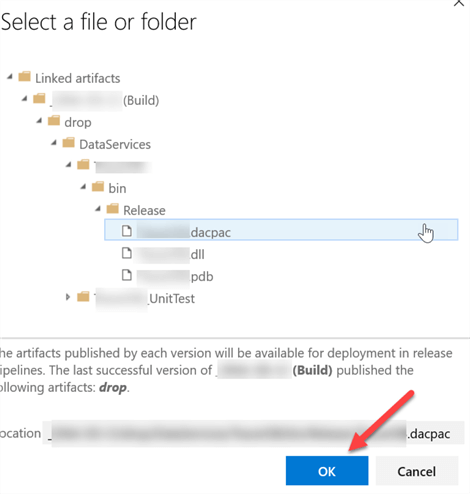
I'll also need to select my DACPAC file which I created in Visual Studio.
Note that within Azure DevOps, pipeline and variable groups can be created to introduce variables rather than hard coded values.
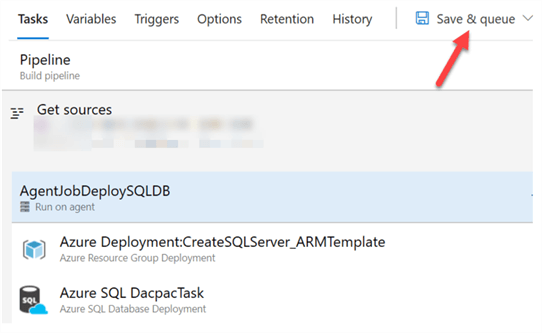
After I configure both my ARM and DACPAC deployment tasks, the completed configuration of the Agent job will contain two items.
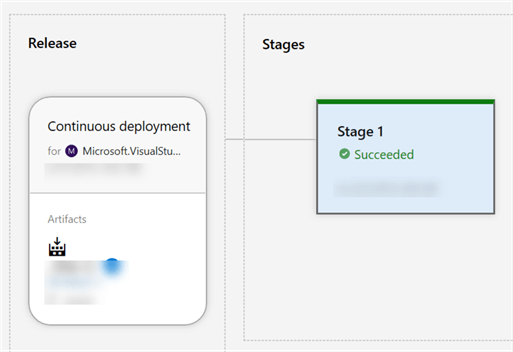
Once I click 'Save and queue', the agent job will begin its deployment process.
Once Complete, I will see that Stage 1 Succeeded:
Verify the Deployment
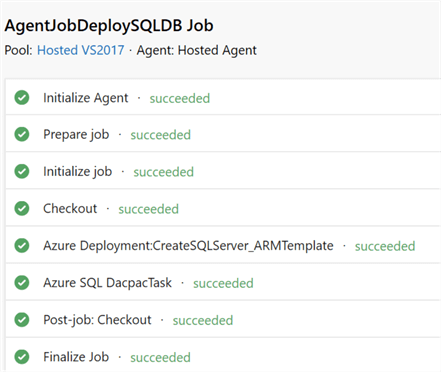
There are a few ways of verifying that the ARM Templates have deployed my SQL Server and SQL Database.
I can confirm that the job has successfully completed the deployment process since all tasks and jobs have succeeded within my Agent Job.
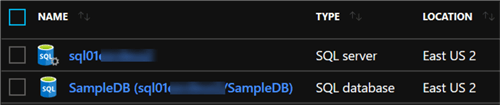
I can also verify the deployment succeeded by logging in to my Azure Portal subscription and then navigating to my resource group where I deployed my ARM Template.
Sure enough, I can see that my resource group now has a SQL Server along with a SQL Database called 'SampleDB':
Additionally, with some AzureDevOps configurations, I can receive an email from AzureDevOps indicating that the Build Succeeded.
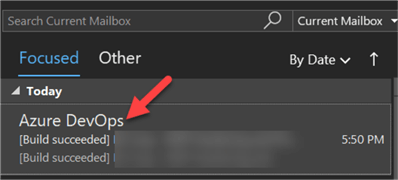
The email will also list summary and detail related to the successful deployment:

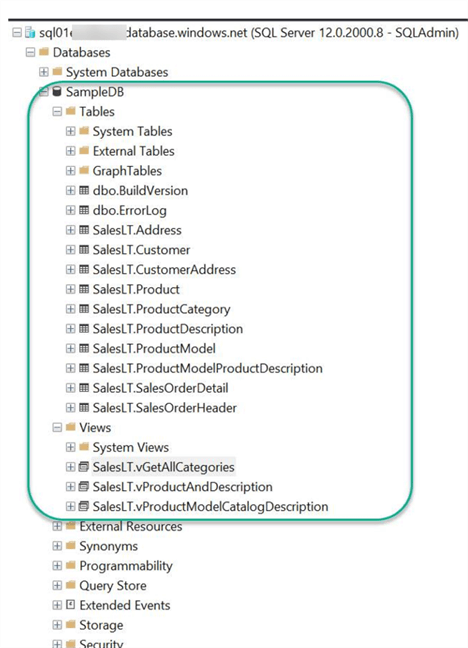
Lastly, I will log into my SQL Server and verify that my SampleDB exists and that the schemas, tables, views, etc. are created.
Seeing that my defined tables, schemas, and views were created confirms that my ARM Template has deployed successfully.
Conclusion
In this tip, I demonstrated how to create ARM Templates and DACPAC files and deploy them with AzureDevOps. For an AzureDevOps best practices scenario, remember to Unit test your code and deploy it locally before checking in your code to source control. Pester unittest build task is a great build extension which enables you to run PowerShell unit tests in your build and release pipelines. It uses the Pester PowerShell test framework. Additionally, remember to apply best architectural practices while designing a CI/CD pipeline using Azure DevOps.
Next Steps
- For more descriptive detail related to the structure of an ARM Template, check out Microsoft's document - Understand the structure and syntax of Azure Resource Manager templates.
- Microsoft's article - Quickstart: Create and deploy Azure Resource Manager templates by using the Azure portal, describes an alternative method of generating an ARM Template using the Azure portal.
- Check out all of the Azure Tips.


About the author
 Ron L'Esteve is a trusted information technology thought leader and professional Author residing in Illinois. He brings over 20 years of IT experience and is well-known for his impactful books and article publications on Data & AI Architecture, Engineering, and Cloud Leadership. Ron completed his Master’s in Business Administration and Finance from Loyola University in Chicago. Ron brings deep tec
This author pledges the content of this article is based on professional experience and not AI generated.
View all my tips
