By: Semjon Terehhov | Comments | Related: > Azure Data Factory
Problem
Microsoft is further developing Azure Data Factory (ADF) and now has added data flow components to the product list. Although, many ETL developers are familiar with data flow in SQL Server Integration Services (SSIS), there are some differences between Azure Data Factory and SSIS. The purpose of this article is to show the configuration process of ADF data flow and explain some of the background processes and optimizations.
Solution
Before we start with data flow, we need an Azure Data Factory V2 resource in our subscription and an empty pipeline. (Excellent tip by Fikrat Azizov - Create Azure Data Factory Pipeline). Once the pipeline is in place, we can start by configuring sources and sinks.
Sources and Sinks
For this tip I will be using a sample Azure SQL Database AdvWorks (Adventure Works). If you do not already have one in your subscription you can create database by following this tip.
Sources
For the data flow, we will be using tables from the Adventure Works database. The first source will be the customer table:
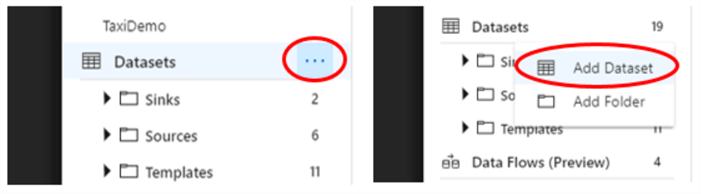
Figure 1: Add dataset
Left click Datasets to select the Add Dataset menu:
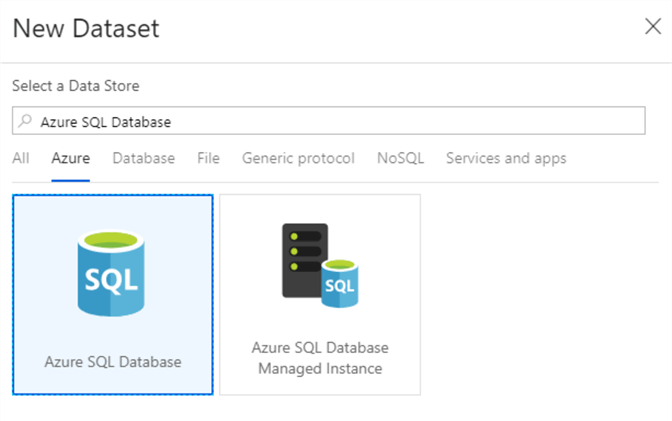
Figure 2: Select Azure SQL Database as source
Select Azure SQL Database and click finish in the bottom left corner of the screen. Link the connection to the Adventure Works database table [SalesLT].[Customers] and name your dataset as Source_Customers. This will be important later as we will use it in our data flow. If you need a more detailed description on the configuration of Azure Data Factory datasets you can find it here. At the time of writing this article, the data flows have limited support for authentication and I had to use a SQL login.
Repeat this for a second data set linked to the same database to the [SalesLT].[SalesOrderHeader] table, we will later use data from these tables in a data flow join operation. Name the second dataset Source_OrderHeaders.
Sinks
For the sink (or destination) let's use a SQL Server table with the following definition:
CREATE TABLE dbo.CustomerOrders
(
CustomerId int not null PRIMARY KEY,
NumberOfOrders int
)
This table may be created in any database of your choice. Just remember to configure the sink to your correct database. Name it Sink_CustomerOrders.
The Data Flow in Azure Data Factory
We will start by creating the data flow and afterwards adding it to the pipeline.
You will be presented with an empty dataflow1 that I have chosen to rename to df_mssqltip_001:
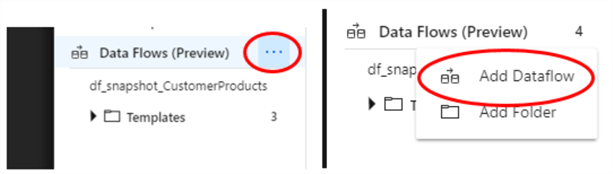
Figure 3: Add Dataflow
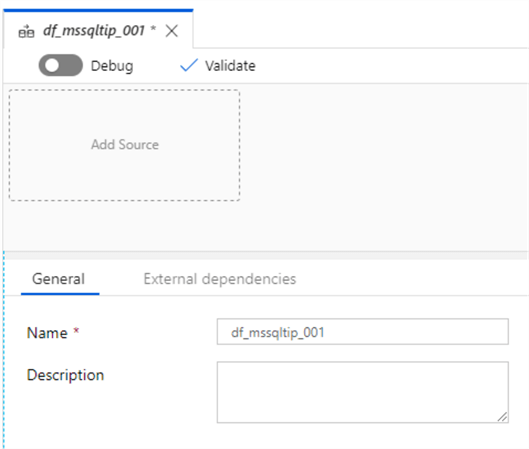
Figure 4: Name Dataflow
It is useful to mention at this point that the data flow uses Databricks for debug and runtime. In our project, Databricks is not yet configured and that means trying to debug or run the dataflow will result in an error. Later in the tip we will link our dataflow with the Databrick service.
Add Customers source to data flow
- Click on the "Add Source" box in the data flow to add the first source.
- In the source dataset select Source_Customers Azure SQL Database table.
- Name the output stream "Customers".
- We are not expecting any schema drift from this source, therefore untick this option.

Figure 5: Add Customers Source to Dataflow
The "Allow schema drift" option is there for sources with frequent attribute (columns) changes such as flat files. You would normally not require this for relational database sources. Sampling allows for more prompt debug and testing of large data sources by querying only a portion for the source data. In our case, the Customers table is relatively small and we will not require sampling.
- Click on "Define schema" tab to import/define source data schema
- Click on "Import from dataset" button to import metadata from Customers table
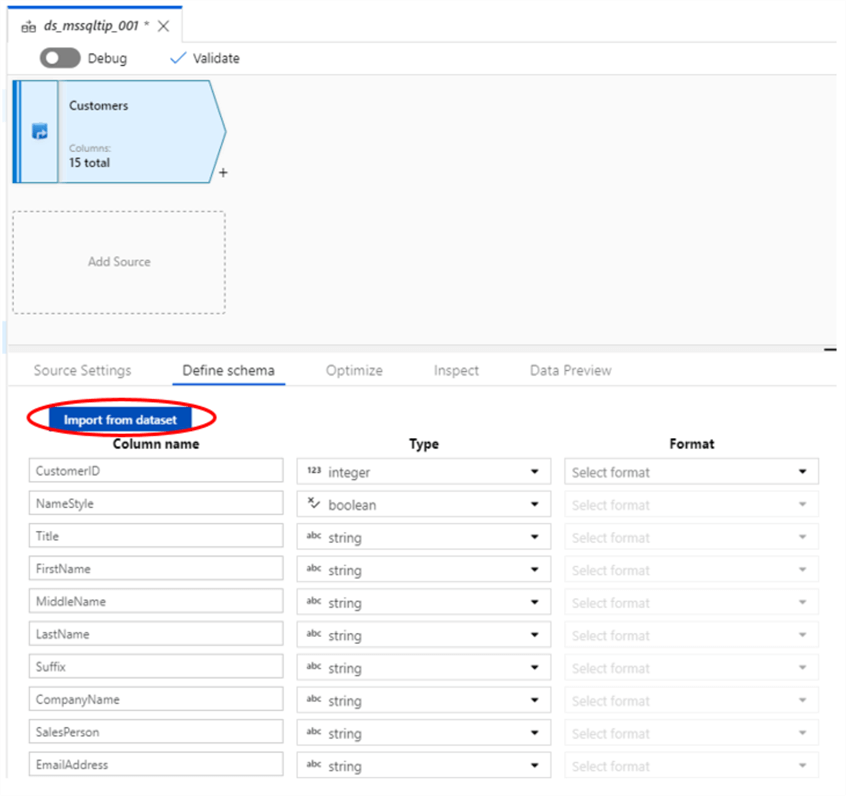
Figure 6: Import Schema from dataset to Customers Source
The Optimize tab allows for query optimization using different partitioning schemes for a data stream.
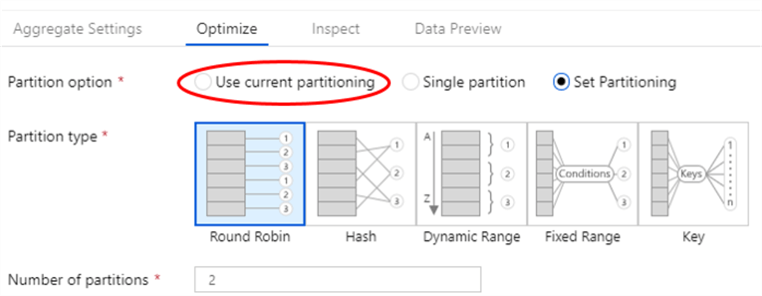
Figure 7: Optimization using partitioning
The current data stream is small enough for us not to use advanced partitioning schemes. I recommend keeping this setting at its default "Use current partitioning".
Add OrderHeaders source to data flow
Click on the gray box "Add Source" under the Customers Source and repeat the steps that you have done for the previous source. This time we will select a different source data set called "Source_OrderHeaders" as show in the picture below:
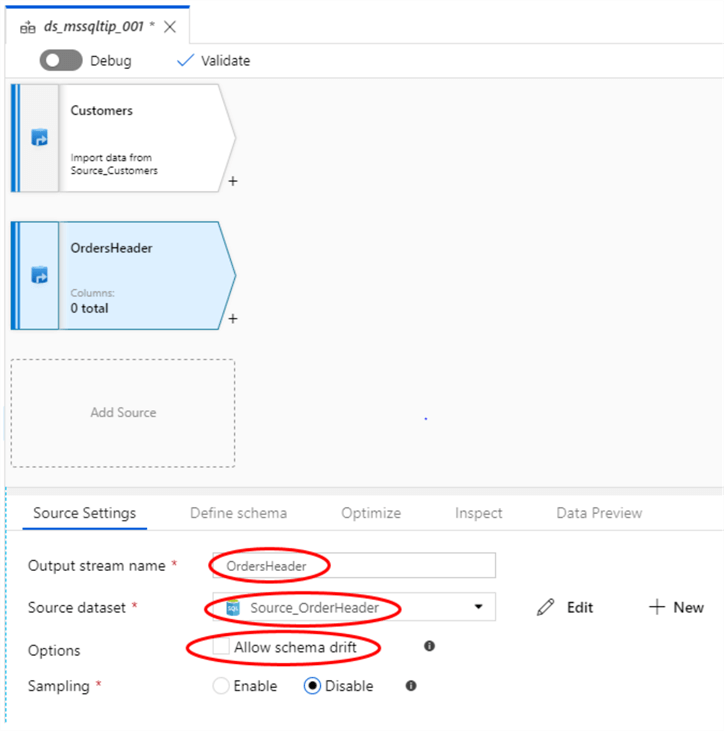
Figure 8: Add OrdersHeader Source to Dataflow
Remember to open "Define schema" tab to import the schema from the dataset. In order to save the work already done, I recommend that you publish your dataflow at this point in time by clicking "Publish All".
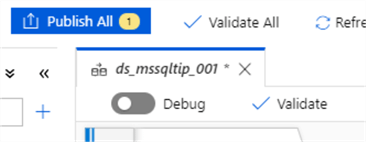
Figure 9: Publish changes to save progress
Join Customers to OrdersHeader data streams
This is our first data manipulation component. Click on the plus sign next to right bottom corner of the Customers source:
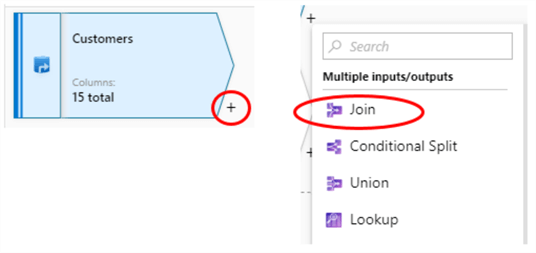
Figure 10: Add Join transformation after Customers source
A Join Component should appear right after the Customers source:
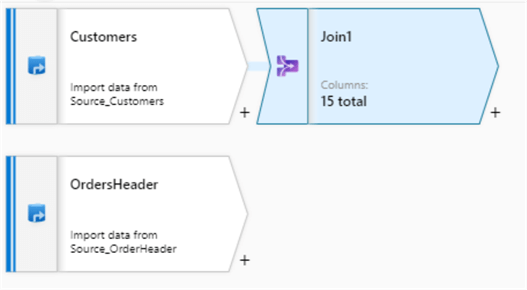
Figure 11: Illustration of newly added Join transformation
Now we need to configure our join component. Give the "Output stream name" value CustomerOrders. This will later be used as a reference name to the outgoing stream. Our Left Stream is "Customers" and we need to select the right stream as "OrdersHeaders". Choose "Left Outer" join as we would like to preserve customers that have not placed any orders yet. We are joining on the CustomersID column in both tables.
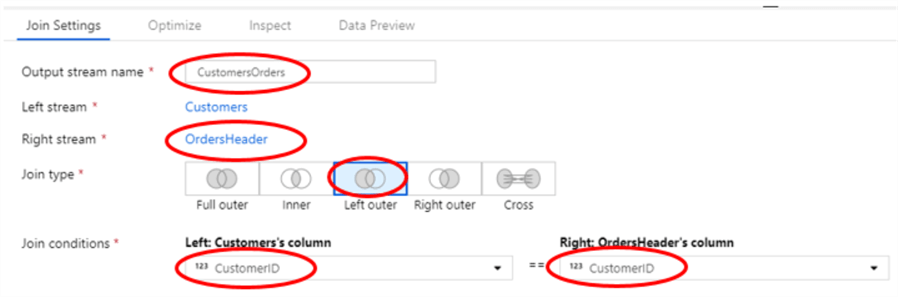
Figure 12: Configuration of Dataflow Join component
The dataflow should look like this now:
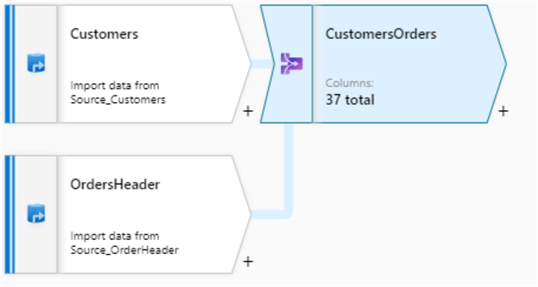
Figure 13: Joining Customers and OrdersHeaders data streams
This shows the Customers data stream joining with OrdersHeader.
Aggregate Orders by Customers
To see how many orders are placed by each customer we will add an aggregate component following the join. Click on the plus sign after the CustomersOrders stream and choose "Aggregate", see the below images.
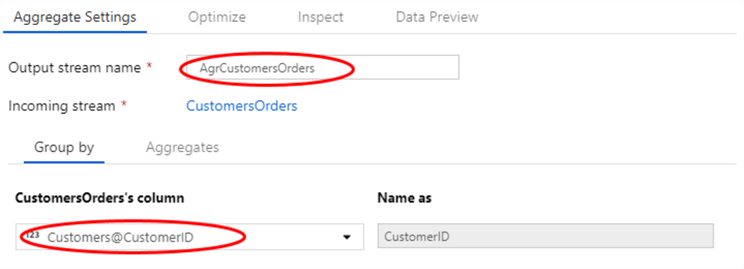
Figure 14: Group by settings of Dataflow Aggregate transformation
Configuration of Aggregates:
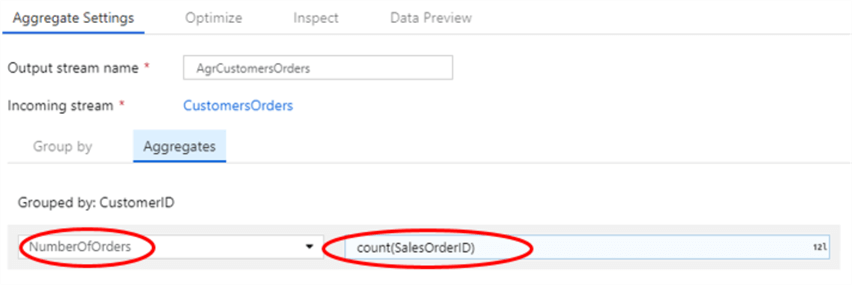
Figure 15: Aggregates configuration of Dataflow Aggregate transformation
The stream will look as follows:
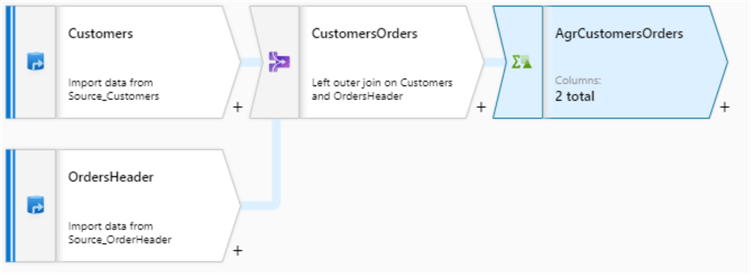
Figure 16: Dataflow with configured Aggregate transformation following joined CustomersOrders data stream
It is important to mention the choice of functions that you can choose for aggregate functions is a lot more than just count(). Here is a sample of what is available with Visual Expression Builder (syntax is case sensitive):
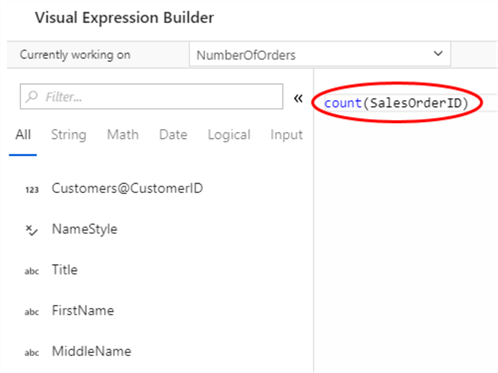
Figure 17: Configuring aggregate function using Visual Expression Builder
Adding sink to write down results
To write down data stream we need a sink at the end of the data flow. Click on the plus sign next to the aggregate transformation and choose sink from the drop-down list (under destinations) as shown below:
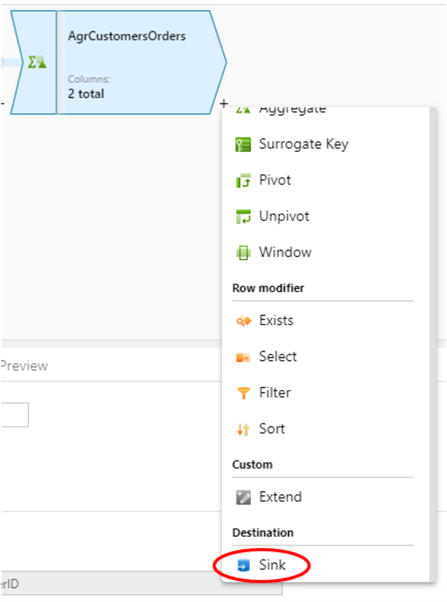
Figure 18: Adding Sink after aggregate transformation
Now we need to configure our destination (sink). Name it SinkCustomerOrders and leave incoming stream as AgrCustomersOders. Select Sink_CustomerOrders as the sink dataset. I will leave save policy as "overwrite" to avoid possible conflicts during debug.
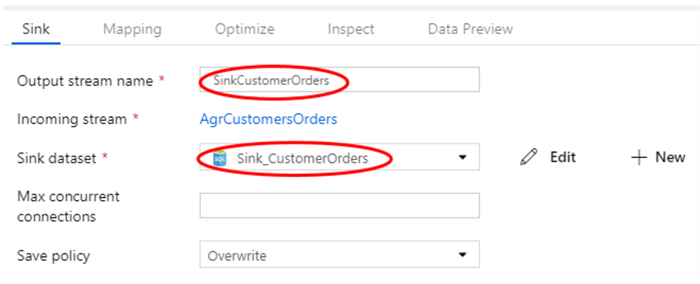
Figure 19: Sink configuration
Select the Mapping tab to map out the stream to the destination. With auto mapping on, you should not need to change anything here.
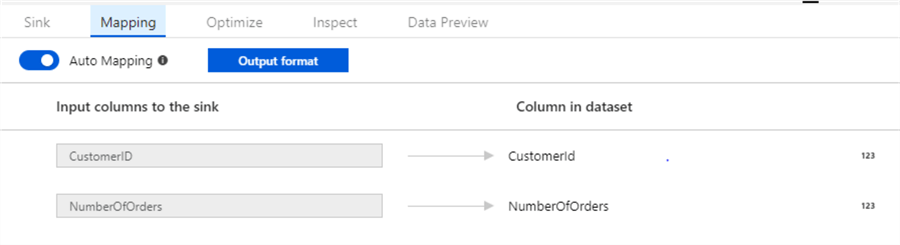
Figure 20: Mapping sink to destination table
Remember to validate and publish the data flow to not lose your progress.
Add Data Flow to ADF Pipeline
To use the data flow transformation, we need to add it to the pipeline. As already mentioned in the beginning, we will be using an empty pipeline for this tip. From pipeline activities select Data Flow (category Move & Transform).
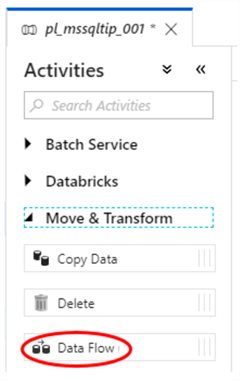
Figure 21: Adding Data Flow activity to pipeline
A dialog box (Adding Data Flow) will appear on the right side. Select "Use Existing Data Flow" and select the data flow you have created.
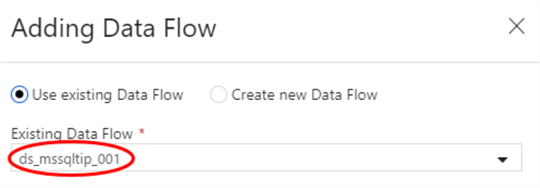
Figure 22: Adding Data Flow using existing data Flow
Click on finish button on the bottom right after you have selected the correct data flow. This will add the data flow transformation to the pipeline. Name the new pipeline object ds_mssqltip_001.
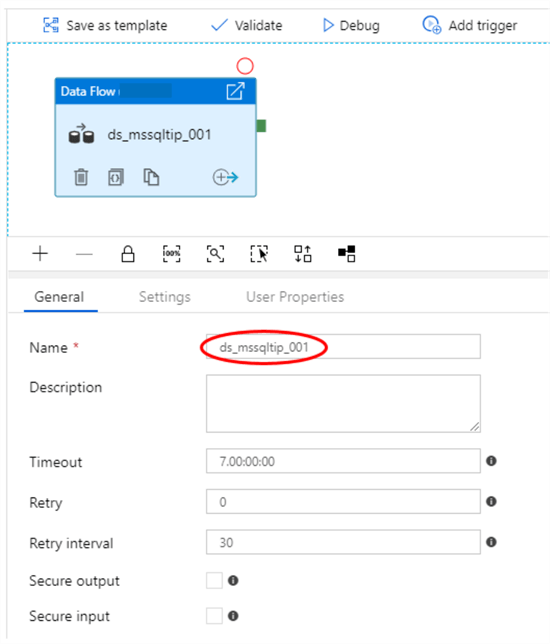
Figure 23: Naming Data Flow activity in the pipeline
For data flow transformation to work, Linked service under the settings tab must be configured. You will need the Azure Databrick service now. I have used a free 14 days trial service available from Microsoft for this article. Test the connection to make sure the credentials are working. Then publish the pipeline to save your progress.
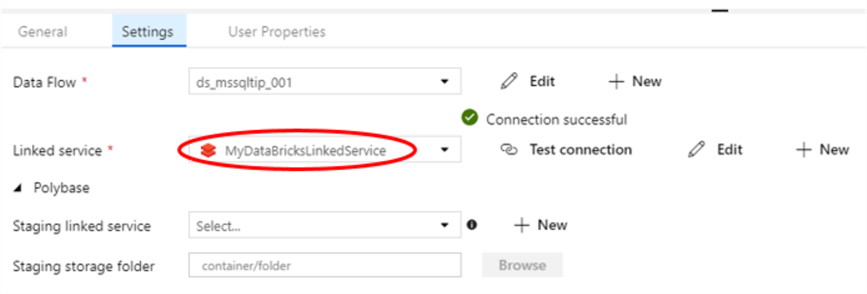
Figure 24: Configuring Databrick linked service
The dataflow pipeline is now available for debug and running.
Running Data Flow Pipeline
To test that the pipeline is working, click on debug. You should see an execution process starting with Pipeline Run ID.
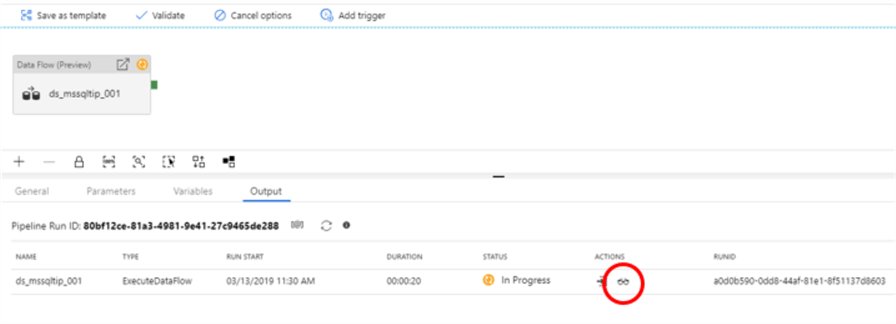
Figure 25: Running Data Flow pipeline
Click inspect process to investigate the details of execution.

Figure 26: Inspecting Data Flow while it is running
Azure Notification center will indicate if the pipeline is running:
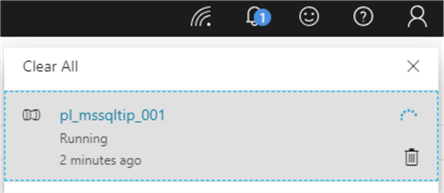
Figure 27: Azure Notification center
Once execution is complete, you will get a notification in your Azure Portal. Below you will find an example of a successful run:
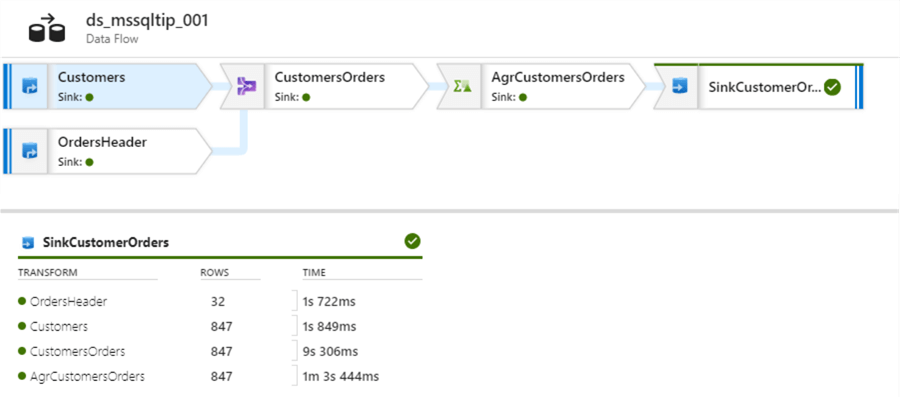
Figure 28: Successful completion of Data Flow
From start to end of execution it may take a few minutes before it is all done. Speed depends on the service tier of your Databricks.
Next Steps
- More resources on Azure Data Factory Copy data pipeline.
- Check out all of the Azure tips.
- Check out the SQL Server Integration Services Tutorial.


About the author
 Semjon Terehhov is an MCSE in Data Management and Analytics, Data consultant & Partner at Cloudberries Norway.
This author pledges the content of this article is based on professional experience and not AI generated.
View all my tips
