By: John Miner | Comments | Related: > Azure
Problem
Microsoft has provided customers with boiler plate architectural diagrams for common business problems. The solution diagrams website is a great place to start as a reference point when creating a new custom solution. One common security concern is how to create an application specific service account that has a reduced surface area so that exposure to hackers is limited? If we decide to use an Azure Active Directory account with read access to the subscription, a potential hacker will have the ability to view all the deployed objects.
A better solution is to use an Azure service principal with the correct access control rights to a particular service.
Solution
PowerShell is a scripting language that can be used to automate business processes. There are cmdlets that can be used to create a service principal, assign it the ACL rights to a given object (service) and log into Azure using the service principal.
Business Problem
Many companies are spending time and money designing a Modern Data Platform (MDP) which allows different organizational groups to use the information stored in one central place in the cloud. There are many different ways and technologies to import and process information stored in Azure Data Lake Storage (ADLS).
Our boss has asked us to revisit the Modern Data Platform (MDP) proof of concept (POC) for the World Wide Importers Company. In a previous article, an Azure SQL Data Mart was update from a file saved in Azure Data Lake Storage Gen 1. The PowerShell program leveraged credentials of an Azure Active Directory User. This user has the ability to view objects in the subscription. We are going to improve this section of code by using an Azure Service Principal. The Azure Service Principal will only have access to the Azure Data Lake Storage layer.
Azure Components
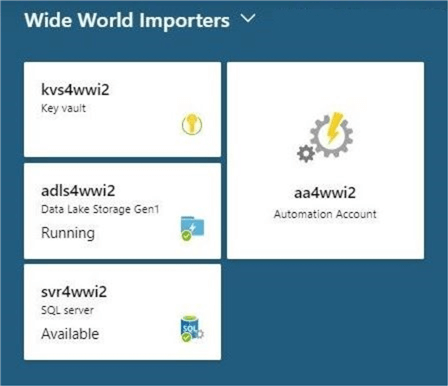
There are four main components being used in this MDP design.
First, the Azure Data Lake Storage (Gen 1) account named adls4wwi2 is being used to store the daily import file. Second, an Azure SQL server called svr4wwi2 contains an Azure SQL database designated as dbs4wwi2. Within this database is a table specified as Mart.Customer_Data which stores the most up to date information. Third, the Azure Automation service is executing the runbook labeled "load-adls-customer-data-into-azure-sqldb" which executes on a daily basis to read data from the text file in the data lake and update the table in the database. Fourth, an Azure Key Vault named kvs4wwi2 is used to keep track of secrets such as the name and password of the Azure Service Principal. In terms of security, the service principal used by the PowerShell job should have both RBAC and ACL rights to the folders and files in the data lake.
The screenshot from the portal below shows my four services pined to my dashboard.
Now that we have an overview of the components used in the design, we can focus on creating and configuring a Service Principal using the Azure Portal.
Azure Portal
There are two ways to create and configure a service principal. First, we can use Power Shell to programmatically execute these tasks. Second, we can use the Azure Portal to manually execute these tasks. In this section, we are going to focus on the portal.
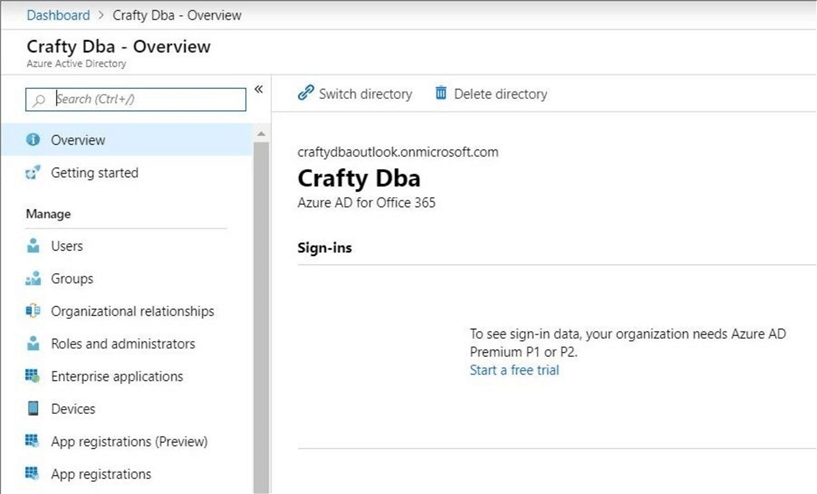
Please sign in and navigate to the Azure Active Directory section of the portal. There are two sub-menus on the Manage menu that allow for the management of Application Registrations. I suggest you choose the preview version since it has an improved interface and better features.
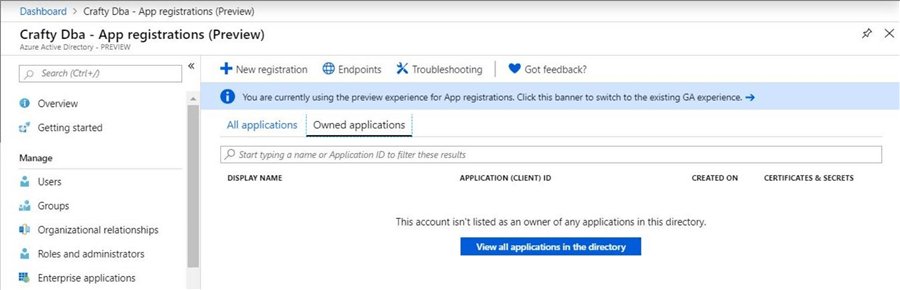
The screenshot below shows no currently deployed service principals. Click the New Registration button to start the process.
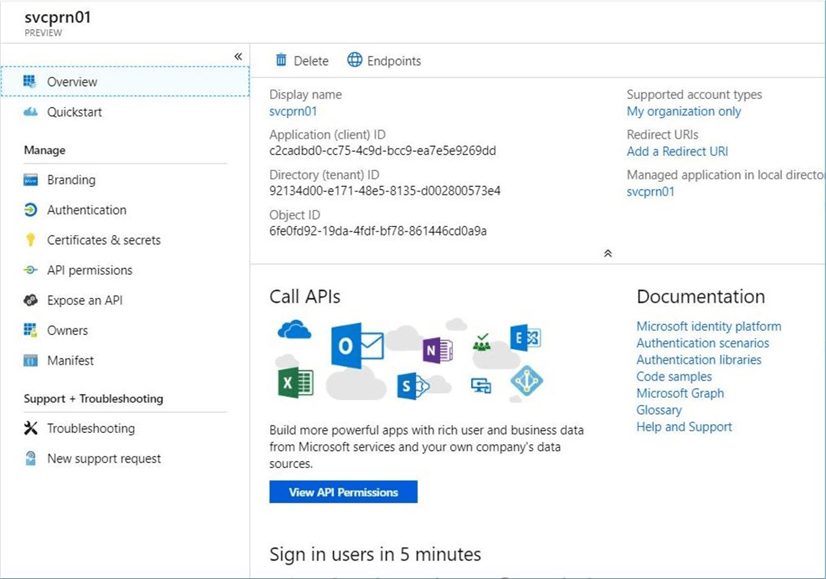
There are two fill-in the blank questions that you need to answer: "What is the name of the service principal?" and "What is the account type for this registration?". I choose to name my service principal svcprn01 and choose to have the registration tied directly to my domain.

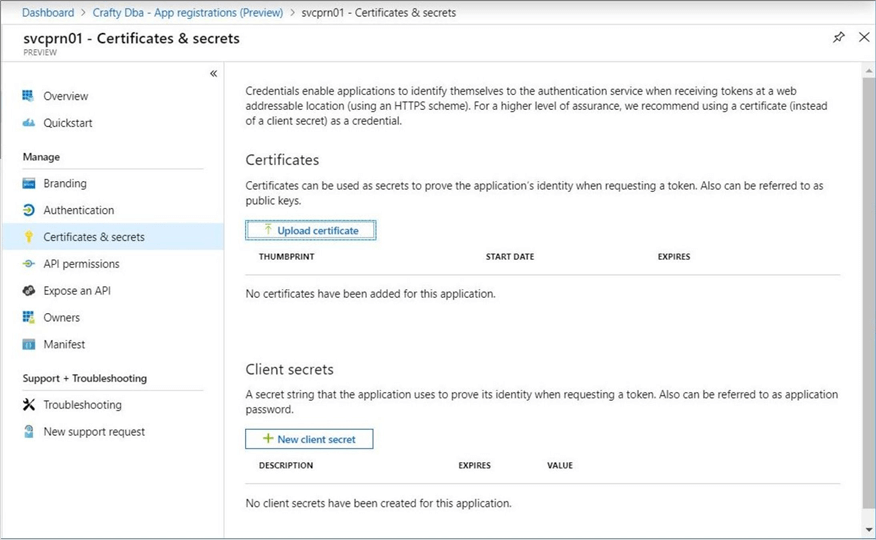
The screenshot below shows an overview of the principal. There are three pieces of information that are used by programs: display name, application id and object id. This screen can be accessed any time to review this information. Use to the certificates and secrets menu to create a new password for the service principal.
Right now, we have a registered service principal. However, we do not have a password that we can use to sign into Azure. The image below shows no existing client secrets. Use the new client secret button to generate a new password.
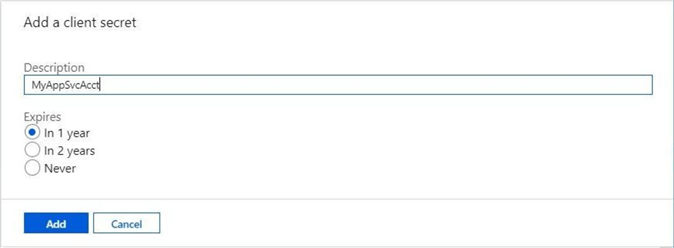
To add a client secret (password), we need to name the secret and give it an expiration date. I choose to call my secret MyAppSvcAcct and to expire my secret in one year.
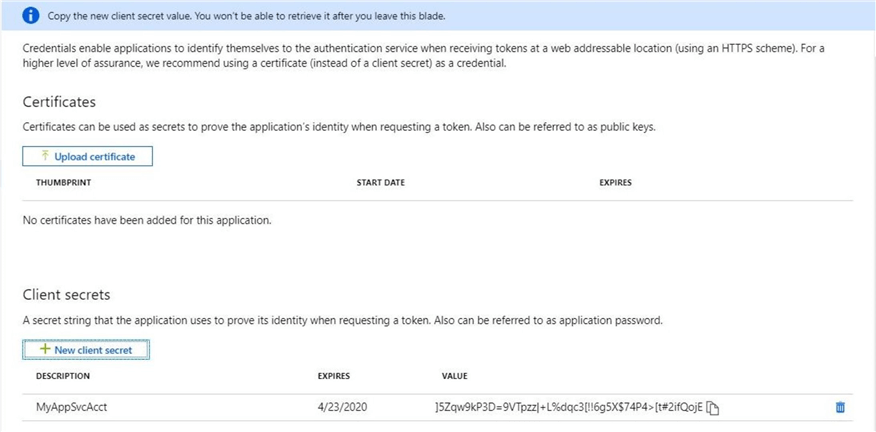
Looking at credentials and secrets screen again, we can see the new secret now exists. The secret expires on 4/23/2020. The value, which is a randomly generated string, is the password assigned to the Service Principal.
To recap, creating a service principal (application registration) and grabbing a new random client secret (password) is quite easy to do. If you are going down the manual route, do not forget to place the secret into the key vault. Day-to-day support people might not have access to Azure Active Directory, but they can be given access to the key vault to debug production issues.
Reduced Surface Area
The whole purpose of creating a service principal is to reduce the surface area that the account has access to. Therefore, a hacker that breaks into a system with the user id and password will be limited to the damage that they can do.
The code below creates a secure credential using the application (client id) and client secret (value). I have presented similar code patterns in the past when creating an Azure SQL database. The only interesting fact is that the user name is a global unique identifier (GUID). What is new in the code block below is the use of the Connect-AzureRmAccount which has a switch for service principal. Last but not least, the service principal could be used in one or more subscriptions. Therefore, we have to supply a tenant id.
#
# Step 1 - Connect to Azure using the service principal
#

# Tennant Id & Credential
$UserName = "c2cadbd0-cc75-4c9d-bcc9-ea7e5e9269dd"
$PassWord =  ConvertTo-SecureString –String ']5Zqw9kP3D=9VTpzz|+L%dqc3[!!6g5X$74P4>[t#2ifQojE' –AsPlainText -Force
$Credential = New-Object System.Management.Automation.PSCredential($UserName, $PassWord)
$TenantId = "92134d00-e171-48e5-8135-d002800573e4"

# Connect to Azure
Connect-AzureRmAccount -ServicePrincipal -Credential $Credential -TenantId $TenantId
The image below shows the output after connecting to our subscription. At this point, the service principal has not been assigned any rights. Therefore, the subscription name is an empty string.

If we try to list the resource groups in the subscription, we are denied access due to the fact that we are not associate with a subscription.

If we try to transfer a file from on premise to the Azure Data Lake, we get an access control exception.

In a nutshell, the service principal has no rights to the Azure objects after creation. The next sections outlines manually assigning rights to the data lake.
Assigning Rights
Again, we are using Azure Data Lake Storage (Gen 1) to store our data files. Therefore, we must grant both RBAC and ACL rights. Please see my prior article for full details.
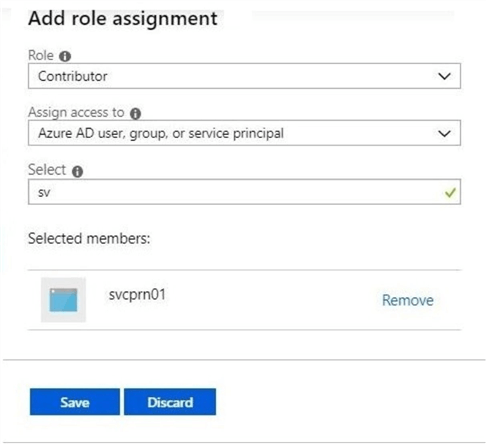
Please find to the adls4wwi2object in the all resources list. Double click the azure object to bring up the overview blade (screen). Choose the Access Control blade (screen) to give the service principal rights to the data lake. The image below shows a contributor roles assignment to the service principal. This completes our RBAC assignment.
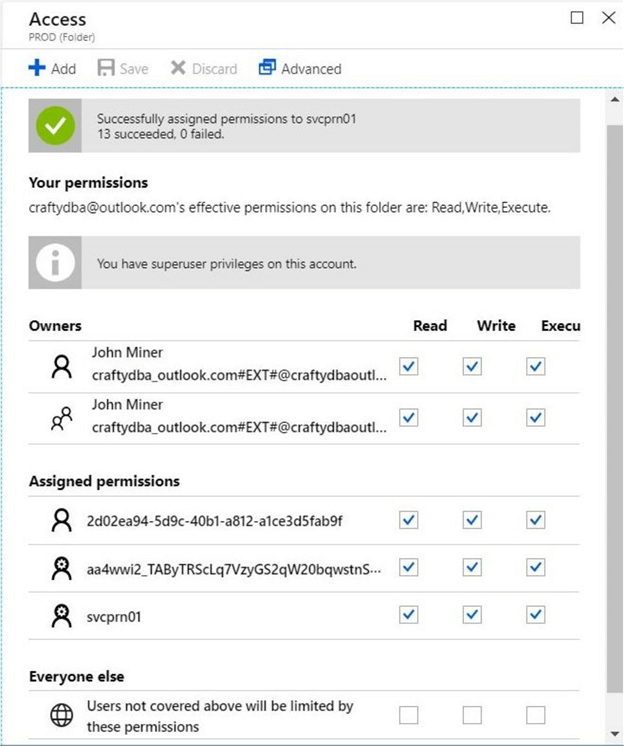
Next, please use the data explore menu to bring up the file system. Use the access menu button at the top most directory (root) to assign permissions. Choose read, write, and execute. Of course, we want to add the rights to the folder and any sub folders. This completes our ACL assignment.
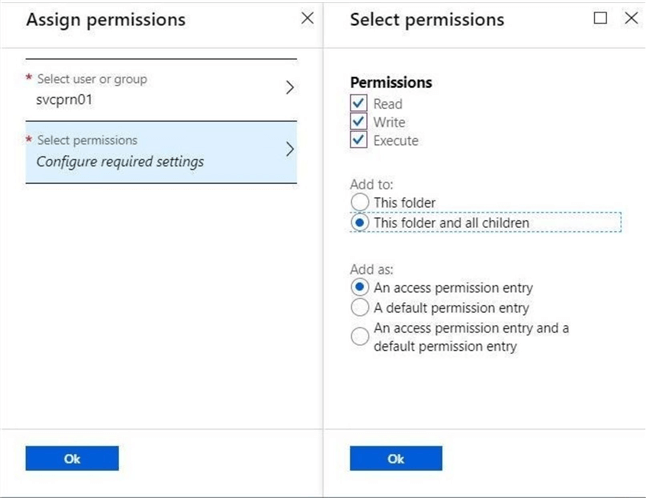
After clicking the okay button, we will see the effective rights for a given folder. We were trying to upload a file to a sub-directory under PROD. We now have the correct rights to perform this task. Let us try executing the Power Shell code again.
This time, we can see a subscription name has been associated with the Service Principal. The output below is generated after executing the Connect-AzureRmAccount cmdlet. This is a good sign that things will now work.

If we try to upload a file using the Import-AzureRmDataLakeStoreItem cmdlet, the program finishes without any errors.

In short, the service principal has been given rights just to the Azure Data Lake Storage layer. This reduces the surface attack area for a hacker.
PowerShell Scripting
PowerShell has been the language of choice to automate the deployment of objects in Microsoft Azure. In this section, we are going to concentrate on creating another service principal in an automated fashion.
The code below uses the Get-AzureRmADServicePrincipal cmdlet to determine the existence of the service principal. The most interesting feature of this code is the use of the error action flag. If the code returns an error for a missing object, we just ignore it. Otherwise, we capture the returned object from the call. On the other hand, the New-AzureRmADServicePrincipal is called to create a new service principal.
#
# Step 2 - Create a service principal
#
# Set variables
$account = "svcprn02"
# Does the s.p. exist
$principal = Get-AzureRmADServicePrincipal -SearchString $account -ErrorAction SilentlyContinue
# Only create if does not exist
if (! $principal)
{
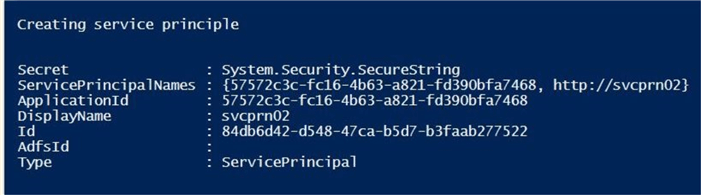
Write-Host "Creating service principal"
New-AzureRmADServicePrincipal -DisplayName $account
}
else
{
Write-Host "Service principal already exists"
Get-AzureRmADServicePrincipal -SearchString $account
}
The screen shot shows the contents of the service principal object. Please note that the key fields such as Id, ApplicationId, and DisplayName are displayed for later use.
At this point, the newly created service principal does not have a password. We could hard code a password but that goes against a design principal of storing passwords in code. Is there a better way to generate a random password?
The System.Web assembly from the .Net frame work has a buried method called GeneratePassword. The only drawback about this function is that non-numeric characters may be generated. I only like using certain symbols in my passwords. We can use the string –replace method with the correct regular expression to eliminate these characters. The code below creates an oversized password of 50 characters, removes any unwanted characters and reduces the size of the final password to 16 characters.
Now that we have random password, how do we assign it to the service principal. The New-AzureRmADAppCredential cmdlet requires a secure string password and the application id of the service principal to complete the assignment. See the code below for full details. It assumes that $principal variable is still in scope.
#
# Step 3 - Create a password for the service principal
#

# generate a password
Add-Type -Assembly System.Web
$password = [System.Web.Security.Membership]::GeneratePassword(50, 1)

# remove unwanted characters and trim to size
$pattern = '[^a-zA-Z0-9#$!]'
$password = ($password -replace $pattern, '').Substring(1, 16)

# create secure string
$value = ConvertTo-SecureString -Force -AsPlainText -String $password

# set the password
New-AzureRmADAppCredential -ApplicationId $principal.ApplicationId -Password $value
The output shows a successful assignment of the password to the service principal.

It is a best practice to save the service principal name and randomly generated password in a key vault. At my job, I work with many clients. I only need to remember user name and password to the Azure Subscription to gain access to the complete contents of the vault. This saves me from having to save of a copy of the information on my laptop.
The code below saves the secret to the key vault named kvs4wwi2.
#
# Step 4 - Save information to key vault
#
# copy contents of variables
$key1 = $account
$secret1 = $password
# name of vault
$vault = "kvs4wwi2"
# does key exist
$present = Get-AzureKeyVaultSecret -VaultName $vault -Name $key1 -ErrorAction SilentlyContinue
# Only create if does not exist
if (! $present.id)
{
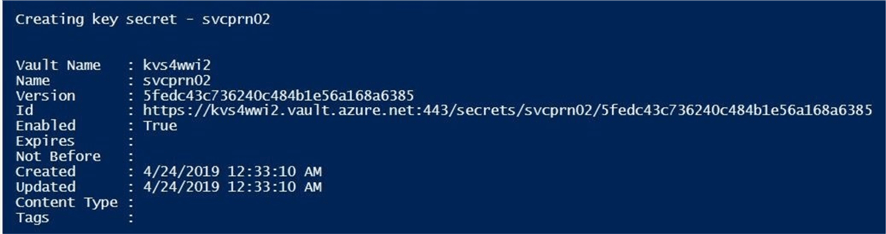
Write-Host "Creating key secret - $key1"
$value = ConvertTo-SecureString -String $secret1 -AsPlainText -Force
Set-AzureKeyVaultSecret -VaultName $vault -Name $key1 -SecretValue $value
}
else
{
Write-Host "Key secret already exists - $key1"
Get-AzureKeyVaultKey -VaultName $vault -Name $key1
}
The screenshot below is the output from successfully storing a new secret in the key vault.
The next step in the process is to assign RBAC rights to the service principal. The New-AzureRmRoleAssignment cmdlet can assign rights to a given object (scope). In our case, the object is Azure Data Lake Storage Gen 1. However, it could a Azure SQL Server. The hardest part of the call is to get the fully qualified path to the Azure object. The three types of roles that can be assigned to a user or service principal are owner, contributor and reader. If you are curious about the assigned RBAC rights for a particular service principal, use the Get-AzureRmRoleAssignment cmdlet to display the information.
Please see the PowerShell script below for details.
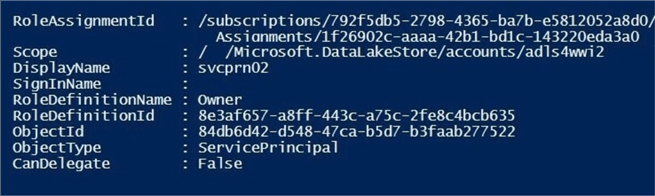
#
# Step 5 - Give owner access to ADLS GEN 1 (RBAC)
#

# variables
$role = "Owner"
$account = "svcprn02"

# only use if variables does not exist
$principal = Get-AzureRmADServicePrincipal -SearchString $account -ErrorAction SilentlyContinue

# fully qualified path
$scope = "/subscriptions/792f5db5-2798-4365-ba7b-e5812052a8d0/resourceGroups/rg4wwi2/providers/Microsoft.DataLakeStore/accounts/adls4wwi2"

# give assignment to service principal
New-AzureRMRoleAssignment -RoleDefinitionName $role -ObjectId $principal.Id -Scope $scope

# get roles assignments
Get-AzureRmRoleAssignment -ServicePrincipalName "http://$account"
The output from the cmdlet has been shortened by abbreviating the scope or fully qualified path.
The last step in the process is to assign ACL rights to the service principal. The Set-AzureRmDataLakeStoreItemAcl cmdlet can be used to assign permission to a file system path for a given user or service principal. The opposite of the set operation is a get operation. The Get-AzureRmDataLakeStoreItemAclEntry cmdlet will list all ACL assignments for a given path. The –Recurse parameter can be used in the set cmdlet to ensure the permissions are given to all directories. The code below gives full rights to the ADLS file system to the service principal named svcprn02.
#
# Step 6 - Give owner access to ADLS GEN 1 (ACL)
#

# variables
$adlsacct = "adls4wwi2.azuredatalakestore.net"
$svcacct = "svcprn02"
$id = (Get-AzureRmADServicePrincipal -SearchString $svcacct).Id

# give service principal (rwx) recursively
Set-AzureRmDataLakeStoreItemAclEntry -AccountName $adlsacct -Path / -AceType User -Id $id -Permissions All -Recurse -Concurrency 128

# show current assigned ACL entries
Get-AzureRmDataLakeStoreItemAclEntry -AccountName 'adls4wwi2.azuredatalakestore.net' -Path '/' | FL
The output from the get cmdlet is quite lengthy if many users have been given rights to a given path. Given enough patience, you will find the id associated with the service principal. See image below.

Crafting the first PowerShell script to create a service principal, assign a password, save a password to a key vault, assign RBAC rights to the data lake object and assign ACL rights to the data lake file system might take some time to perfect. I have given you 80 percent of the code and concepts. The remaining 20 percent is for you to fully understand the process and modify it to meet your business needs.
Summary
Today, I showed how to reduce the surface area that a hacker can attack by using a service principal. There are two ways to create and configure a service principal. If you are going to execute this set of tasks a limited number of times, you can easily perform all the work using the Azure Portal. On the flip side, if you are creating multiple environments on a periodic basis, you might want to invest the time to automate these tasks using Power Shell.
I did not go into how to change the PowerShell program that "Updates an Azure SQL Data Mart with ADLS files". This was the proof of concept that our boss wanted us to look at. However, it is quite easy after reading this article. Just replace the Azure Active Directory user with a service principal when logging into the subscription.
I hope you enjoyed our exploration of how to "Increase Azure Security with a Service Principal". Please consider using a service principal instead of a user for automated systems.
Next Steps
- Using a service principal with the SSIS Azure feature pack


About the author
 John Miner is a Data Architect at Insight Digital Innovation helping corporations solve their business needs with various data platform solutions.
This author pledges the content of this article is based on professional experience and not AI generated.
View all my tips
