By: Maria Zakourdaev | Updated: 2021-10-15 | Comments | Related: > Azure Cosmos DB
Problem
Azure Cosmos DB is a fully managed, fast and cost-effective NoSQL database with multi write data distribution to any Azure region. Cosmos DB cost of all database operations is measured by Request Units. A Request Unit (RU) is an abstraction of system resources, CPU, IO and memory. When you create a Cosmos DB database, you can provision a number of RUs per database or for each container (data organization units, similar to what we call tables in RDBMS). If RUs were provisioned to the database, they are shared among all the database containers. Once you provision your throughput, it doesn't matter if you run less queries, you will pay on an hourly basis in increments of 100 RUs/sec 24 hours a day 7 days a week.
If your container usage grew and your read and write operations consume more RUs than allocated, your operations will either be throttled if you are using manual throughput, or your overall throughput will be auto-scaled. However, if you want to avoid getting unexpected bills from Azure, it's better to avoid the auto-scale option and use Azure Functions to change the throughput, based on activity, time of the day or day of week.
Note that there is no way to change from database dedicated throughput to container dedicated throughput once a container is created. You will need to create a new container, provision it with dedicated throughput and migrate your data from the old to the new container.
You will face the same issue if you want to change a container partition key, a field that is used to divide the data into the logical subsets and used to move the data across physical partitions. Here you can read more on partitioning in Cosmos DB. You will also need to create a new container and move the data if you need to change the partition key.
What is the fastest and easiest way to migrate container data? Read below to find out.
Solution
There are several ways to migrate the Cosmos DB data from container to container. Among them are:
- Use any ETL Tool that has Cosmos DB connector, like Azure Data Factory.
- Use any programming language where you have a Cosmos DB connection library.
We recently moved data from container to container in order to change the throughput model, reorganize the documents and change the partition key. We have evaluated Azure Data Factory, Azure Data Migration Tool and Azure Databricks with PySpark – Python dialect to work with Spark cluster. Using Databricks was the fastest and the easiest way to move the data. PySpark is a great language for easy CosmosDB documents manipulation, creating or removing document properties or aggregating the data. I like to use PySpark for the data move-around tasks, it has a simple syntax, tons of libraries and it works pretty fast.
In this post I will show you how to use PySpark scripts in Azure Databricks service to copy data between Cosmos DB containers.
Why Databricks Service?
Databricks service is an awesome tool for Data Engineers. It is a hosted distributed Apache Spark platform, and it is very efficient at processing, transformations and loading of massive amounts of data. Data Engineers can interact with Spark cluster using various programming languages.
Environment set up
To set up an environment we will do the following.
Step 1
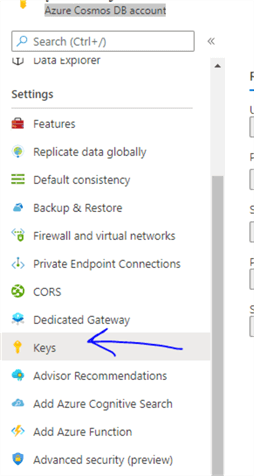
Get Azure Cosmos DB URI and Primary Key from Azure Cosmos DB account > "Keys" blade. We will use those parameters in the PySpark connection string.
Step 2
Deploy Databricks service in the same location as CosmosDB and to the same virtual network (Great article on getting started with Azure Databricks.)
Step 3
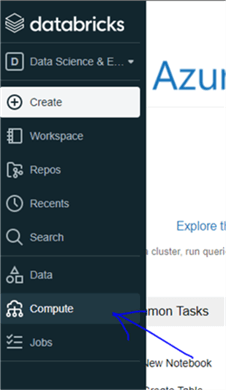
Create Databricks cluster in the Compute blade.
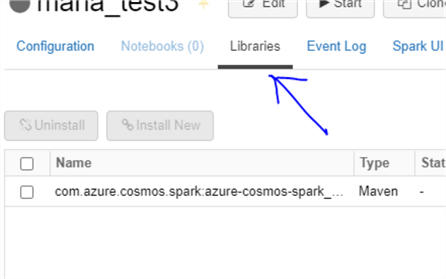
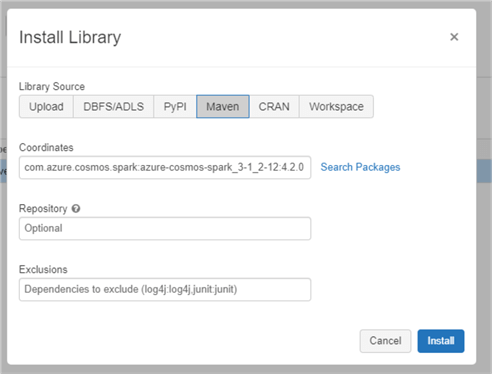
Add Microsoft Cosmos DB Spark connector: Go to "cluster" > "libraries" and add Maven package, coordinates: com.azure.cosmos.spark:azure-cosmos-spark_3-1_2-12:4.2.0
Step 4
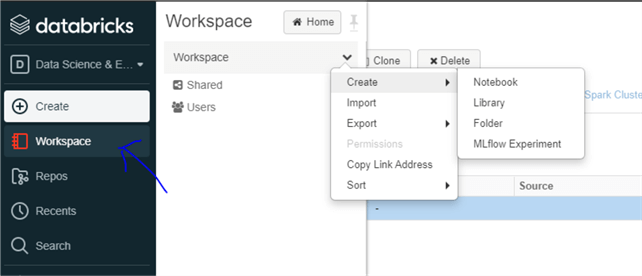
Create a Notebook, HTML interface where we will run Python scripts: Workspace > Create > Notebook
Moving data between containers
Here you can find the PySpark script to move the data from container to container.
I have divided the script into 4 commands to see the result of each step, how much rows were read and written and how long each operation took. Otherwise, I could run all 4 steps as 1 statement that reads and writes the data altogether.
Step 1
Connect to the Cosmos DB cluster
host = 'https://***:443/' #replace *** with server URI

key = '****' # replace *** with Primary or Secondary Key
database = "mydb"
sourceContainer = "old_container_name"
targetContainer = "new_container_name"

cfg_target = {
  "spark.cosmos.accountEndpoint" : host,
  "spark.cosmos.accountKey" : key,
  "spark.cosmos.database" : database,
  "spark.cosmos.container" : targetContainer,
}

spark.conf.set("spark.sql.catalog.cosmosCatalog", "com.azure.cosmos.spark.CosmosCatalog")
spark.conf.set("spark.sql.catalog.cosmosCatalog.spark.cosmos.accountEndpoint", host)
spark.conf.set("spark.sql.catalog.cosmosCatalog.spark.cosmos.accountKey", key)
spark.conf.set("spark.sql.catalog.cosmosCatalog.spark.cosmos.read.partitioning.strategy","Restrictive")
Step 2
Read the data into Spark cluster memory. In the below query you can use SQL syntax, group the data, filter it, and aggregate if needed. I am also generating an additional GIUD column because I will want to create documents with a new ID. I am generating a GUID column inside the query because I want a unique GUID for each row. The below script will print the number of rows read from Cosmos DB at the end of the read operation.
import uuid
from pyspark.sql.functions import *

query = """select uuid() as u1,*
from cosmosCatalog.{}.{}
""".format(database, sourceContainer)

df = spark.sql(query)

df.count()
Step 3
Generating a few new columns
- Generate a new partitioning key using two existing document fields
- Save old document id in a new field "OldDocumentId"
- Using generated new id column
And write the data back to CosmosDB to the target container. I do not have to write back all fields from the source documents if I do not need them.
In the below script you can see an example how nicely in PySpark you can pipeline different operations on dataframe. I am adding 3 columns, one after another, then taking 5 properties from the original document and writing the data - all in the same statement.
df.withColumn("pk",concat_ws("_",col("propertyA"),col("propertyB")))\
         .withColumn("OldDocumentId",col("id"))\
         .withColumn("id",col("u1"))\
         ["id","pk","OldDocumentId","propertyC","propertyD"]\
         .write \
         .format("cosmos.oltp")\
         .options(**cfg_target)\
         .mode("APPEND") \
         .save()
Step 4
Count rows in the new container
query = """select id
from cosmosCatalog.{}.{}
""".format(database, targetContainer)

df = spark.sql(query)

df.count()
Sometimes you will get smaller number of documents from the target container. Wait an hour or so and re-run the query. Most probably after an hour the row counts will match. The more data you have to move, the longer you will need to wait because it will take time till Cosmos DB processes the new data.
If you still getting a different row counts between old and new container and want to move the missing documents, you can use the below script to find the delta
df_old = spark.sql('select id from cosmosCatalog.<dbname>.<source_container> c')
df_new = spark.sql('select id from cosmosCatalog.<dbname>.<target_container> c')

df_delta = df_old.exceptAll(df_new).show()

print(df_delta.count())
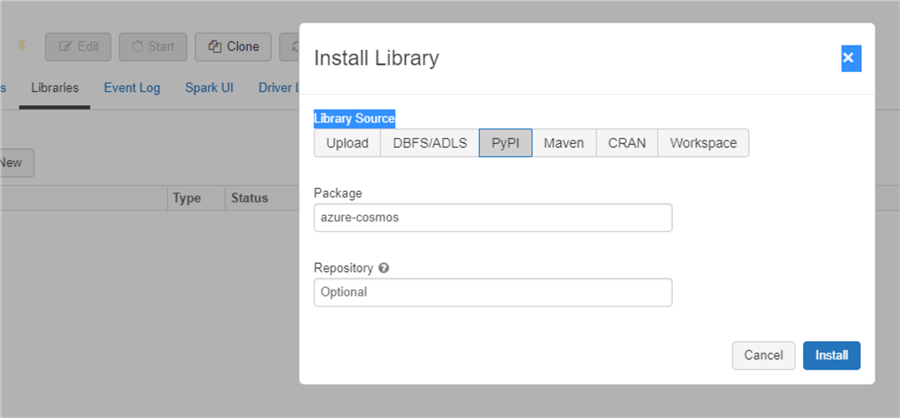
In order to speed up the data migration process, create the target container with disabled indexing. To manipulate databases and containers we will need to use a few Azure libraries. You can add those libraries with !pip install azure-cosmos inside the notebook or add it as a dependent library to the cluster.
import azure.cosmos.cosmos_client as cosmos_client
import azure.cosmos.errors as errors
import azure.cosmos.http_constants as http_constants
client = cosmos_client.CosmosClient(host, {'masterKey': key})#host and key variables were defined in the first script in this blog
db = client.get_database_client(database) #database variable was defined in the first script in this blog
policy = '''{
        "indexingMode": "none"
    } '''

container = db.create_container(
            id= targetContainer
            offer_throughput=400,
            partition_key=PartitionKey(path='/pk', kind='Hash'),
            indexing_policy= policy
)
properties = container.read()
print(properties)
Do not forget to enable indexing after the migration is over. Now you can also change the container throughput manually or programmatically.
containerPath = 'dbs/{}/colls/{}'.format(database,target_collection)
container = client.ReadContainer(containerPath)

container["indexingPolicy"] = {

    "indexingMode":"consistent",
    "spatialIndexes":[
                {"path":"/location/*","types":["Point"]}
             ],
    "includedPaths":[{"path":"/age/*","indexes":[]}],
    "excludedPaths":[{"path":"/*"}]
}
response = client.ReplaceContainer(containerPath, container)

# read container throughput
offer = container.read_offer().properties
print(offer)

#replace throughput
offer = container.replace_throughput(offer.offer_throughput + 1000)
print(offer)
Next Steps
- Great article on Getting Started with Azure Databricks
- Read this article Introduction to Azure Cosmos DB database and the SQL API


About the author
 Maria Zakourdaev has been working with SQL Server for more than 20 years. She is also managing other database technologies such as MySQL, PostgreSQL, Redis, RedShift, CouchBase and ElasticSearch.
This author pledges the content of this article is based on professional experience and not AI generated.
View all my tips
Article Last Updated: 2021-10-15
