By: Nai Biao Zhou | Updated: 2022-01-12 | Comments | Related: > Python
Problem
In recent years, there has been a proliferation of Python applications for performing routine tasks, such as web scraping, data cleansing, and ETL processing. These routine jobs may need to run at scheduled times. Task Scheduler, a job scheduler in Microsoft Windows, allows us to run a task at a specific time or when an event occurs. In addition, Windows Event Viewer (sometimes called the event log) stores everything that happens in the operating system. Therefore, it seems reasonable to use Task Scheduler to run Python scripts and then employ Windows Event Viewer to check the Python script execution history. So, how can we use all these techniques to automate routine tasks using Python on Windows?
Solution
The tip "Creating a SQL Server Agent Job to Run Python Scripts in a Virtual Environment" introduces a method to enable a SQL Server Agent job to run a batch file, which executes a Python script. This method uses the batch file to handle an exit code from Python script execution. Besides SQL Server Agent, Windows Task Scheduler can run an executable file automatically at a specific time. However, Windows Task Scheduler does not handle the exit code from Python script execution the same way as SQL Server Agent. For example, the task scheduler does not show any error or warning when abnormal execution throws an exception or exits with a non-zero exit code. To make a failure in the task execution noticeable to IT professionals, we can trigger Windows Task Scheduler to run another task when the task scheduler detects a specific exit code. We also can create custom event views to check the task execution logs.
To exhibit the process of creating an automated task using Windows Task Scheduler and examining the execution status through Windows Event Viewer, we use the project introduced in the author’s other tip (Zhou, 2021). The project asks us to download data from an HTML table to an SQL Server database table every day. Rather than exploring the steps to install Python on Windows, create a Python virtual environment, and organize application files on a server, this article focuses on using Windows Task Scheduler and Windows Event View.
This article consists of three sections. Section 1 first tells us how to run the Python script in a virtual environment. The section then explores creating an automated task in Task Scheduler. Next, we create two other scheduled tasks triggered by the Python script exit codes. Section 2 starts with a brief introduction to Windows Event Viewer. We then create two custom event views to check Python script execution status. Next, in Section 3, we let Task Scheduler automatically run the task to download data from the web page, and we then check if any error happened in Python script execution.
The author tested the project on Windows 10 Pro 10.0 <X64> and ran the Python script with Python 3.10.0 (64-bit). The DBMS is the Microsoft SQL Server 2019 Developer Edition (64-bit). The database table is created by using SQL Server Management Studio 15.0.18338.0. In addition, Notepad++ v8.1.9.2 (64-bit) is used to edit the XML queries for creating custom event view filters.
1 –Scheduling Python Scripts Using Windows Task Scheduler
Windows Task Scheduler is one of the most practical Windows applications (Dinita, 2021). The application enables us to configure and schedule automated tasks. In this section, we create a scheduled task to run a Python script in a virtual environment, and we also want to use Task Scheduler to check Python script execution status. So, we create another two event-triggered tasks to satisfy this requirement. The event-triggered task runs when the Python script exits with code 1 or 2. We then can examine the event logs to know if the Python script runs successfully.
1.1 Prerequisite
We follow the steps in the tip "Creating a SQL Server Agent Job to Run Python Scripts in a Virtual Environment" to install Python on Windows. Next, we click here to download the complete source code. We then use the "requirements.txt" in the downloaded package to create a virtual environment in the "C:\pyvirtuals\htmltablescraping" folder. We put the Python file in the "C:\pyapps\htmltablescraping" folder. We also need to create a database table and configure the connection string in the Python script. Note the following two functions in the Python script, "read_web_page_content()" and "save_html_table_data()", may exit the program with two codes 1 and 2, respectively.
We use the following command to run the Python script several times. The function "read_web_page_content()" has a 50% chance of failing. The other function, "save_html_table_data()," fails if we have already downloaded data into the database table. Figure 1 illustrates the output of the program execution.
C:\pyvirtuals\htmltablescraping\Scripts\python.exe C:\pyapps\htmltablescraping\HTML_Table_Scraping.py
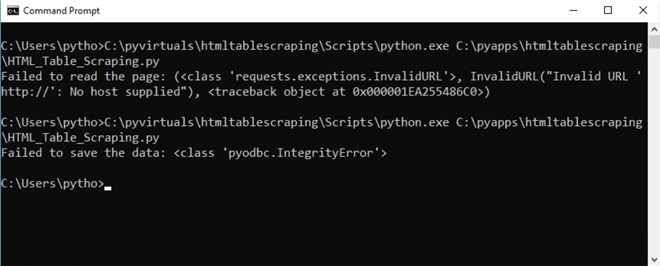
Figure 1 The Python Program Exits with Error Message
Since the two exit codes represent failures in executing these two functions, respectively, we can use the event which action completed with a non-zero return code to trigger another two tasks, "failed to access web page" and "failed to save data." We then know the Python script has not run successfully if one of these two tasks started. Now, let us create a task to run the Python script every day.
1.2 Creating an Automated Task in Windows Task Scheduler
There are several ways to create an automated task using Windows Task Scheduler. For example, we can create a task using either the basic or advanced setting (Huculak, 2019). The basic setting provides us a wizard to create a task; therefore, creating a basic task is convenient for beginners. In this article, we walk through steps to create a basic task.
1.2.1 Launch Windows Task Scheduler
To launch Windows Task Schedule, we first need to ensure that the task scheduler service is running. We use the "Windows + R" keyboard shortcut to open the "Run" command window (Roe, 2020). We then enter the command "services.msc" in the "Open" box, as shown in Figure 2.
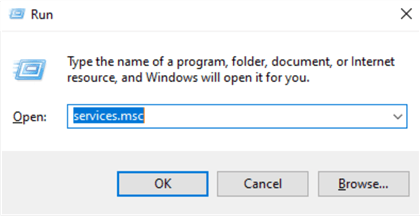
Figure 2 Open the Run Command Window
Click on the "OK" button to open the services window, as shown in Figure 3. The task scheduler service should have a "Running" status. We then close the services window.
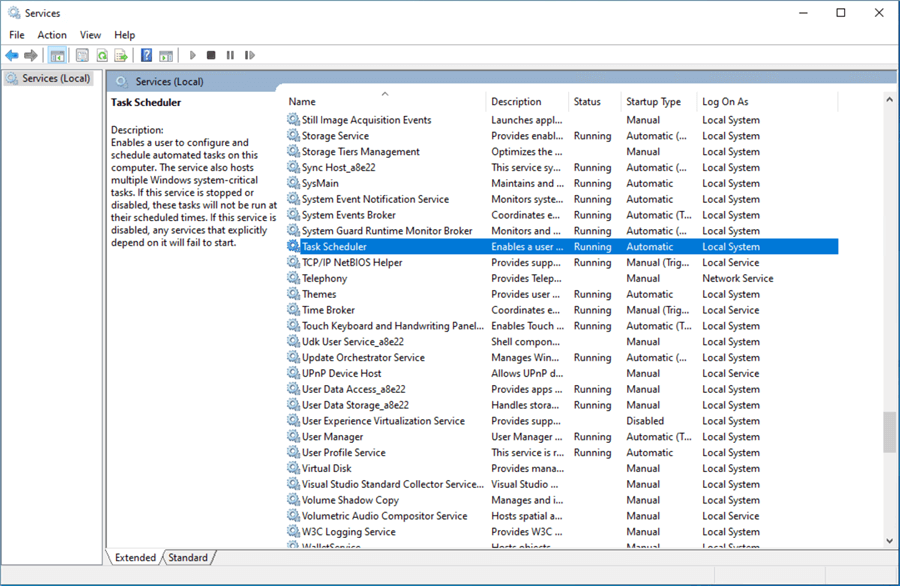
Figure 3 The Services Window
We use the "Windows + R" keyboard shortcut to access the "Run" command window again. This time, we then enter the command "taskschd.msc" in the "Open" box (Neagu, 2018). Next, click on the "OK" button to launch Windows Task Scheduler. Under the "Task Scheduler (Local)" root, expand the "Task Scheduler Library" folder. The window should look like Figure 4. The middle pane shows a list of tasks, and the "Actions" pane is on the left.
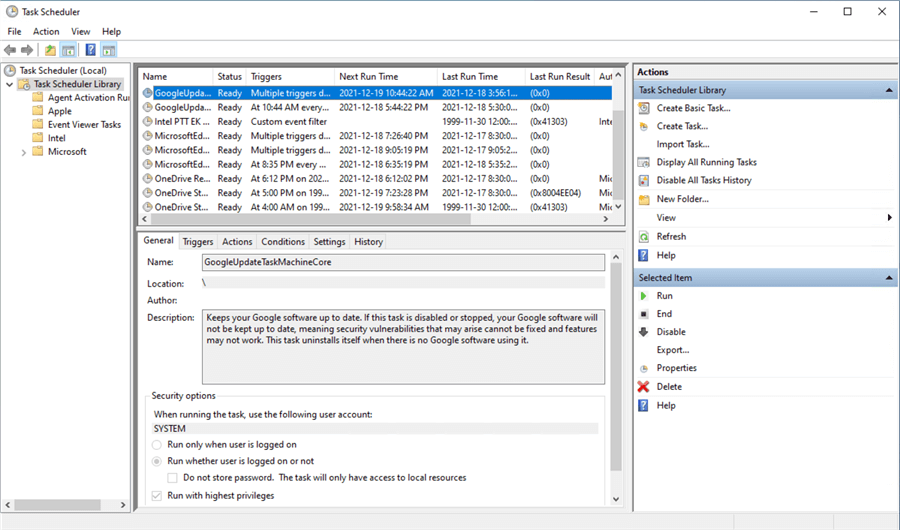
Figure 4 The Task Scheduler Window
1.2.2 Create a Schedule Folder
Under the "Task Scheduler Library" main folder, several folders arrange all tasks into different groups. We want to create a new folder, "MSSQLTips," for this project. Select the "Task Scheduler Library" folder and click on the "New Folder…" from the "Actions" pane. A dialog appears. We enter "MSSQLTips" in the "Name" box, as shown in Figure 5.
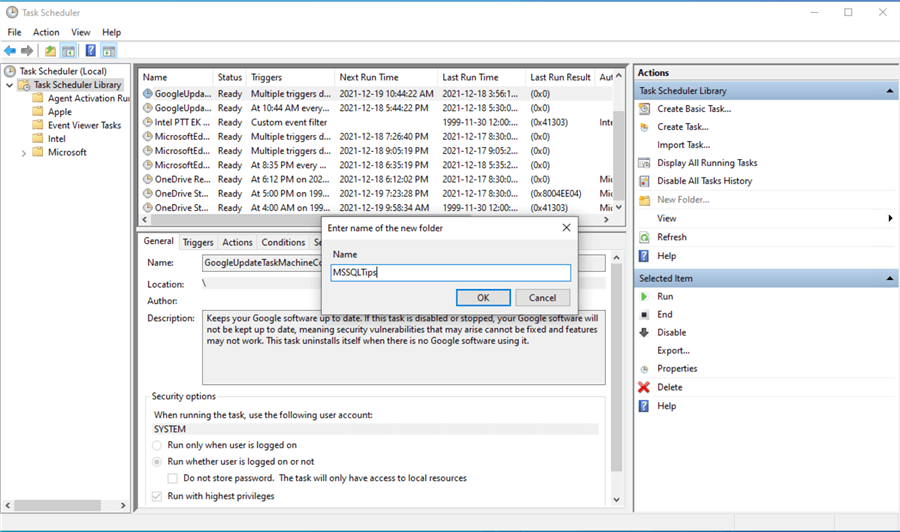
Figure 5 Create a New Folder
Click on the "OK" button to close the dialog. We should see the new folder under the main folder, "Task Schedule Library." When clicking on the new folder, we can observe that the task list in the middle pane is empty, as shown in Figure 6.
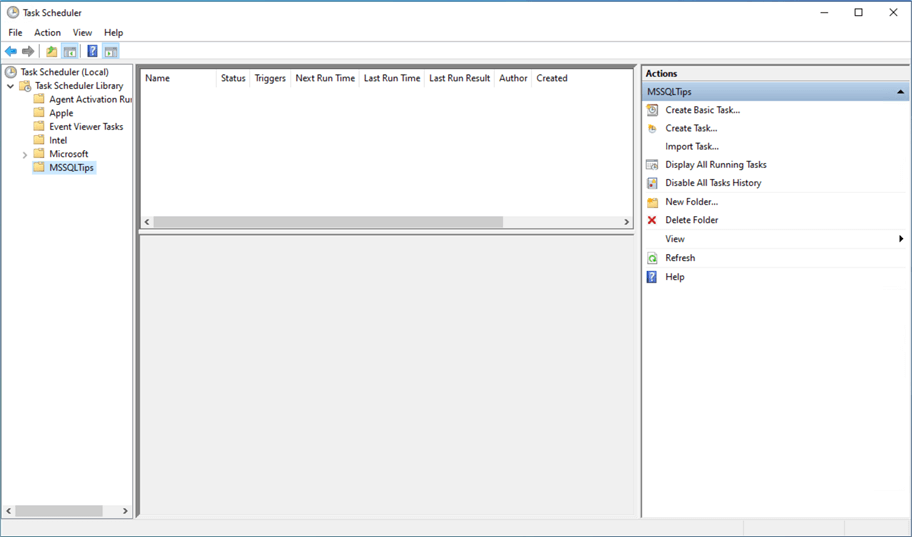
Figure 6 View Tasks in the New Folder
1.2.3 Create a Basic Task
We select the "MSSQLTips" folder. In the "Action" pane, click on "Create Basic Task…" to open the "Create Basic Task Wizard" dialog. We enter the text "Download HTML Table" in the Name field. Then, the "Next" button becomes enabled. The "Description" box is optional. When creating a task on a production server, we should use this box to introduce the task. The dialog should look like Figure 7 . Click on the "Next" button to move to the next step.

Figure 7 Create a Basic Task
1.2.4 Create a Trigger
In the "Task Trigger" dialog, select the "Daily" option, as shown in Figure 8. If a required frequency, such as Hourly, is not in the list, we can select the "Daily" option for now and come back to edit the trigger.
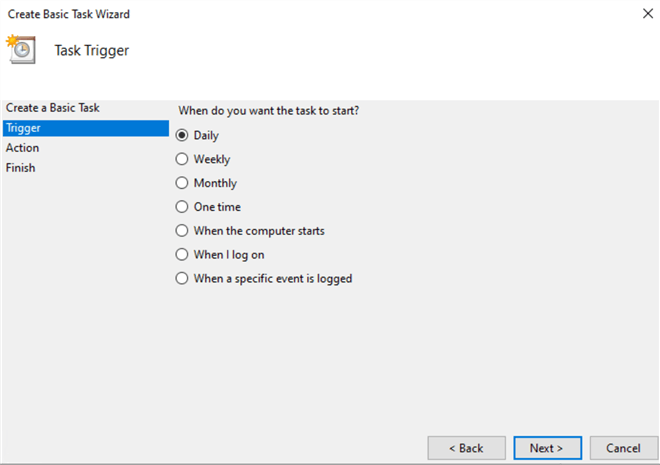
Figure 8 Create a Trigger
Click on the "Next" button to open a new dialog to specify the start date and time. First, we enter a date and time, as shown in Figure 9. We then click on the "Next" button to move to the "Action" dialog.
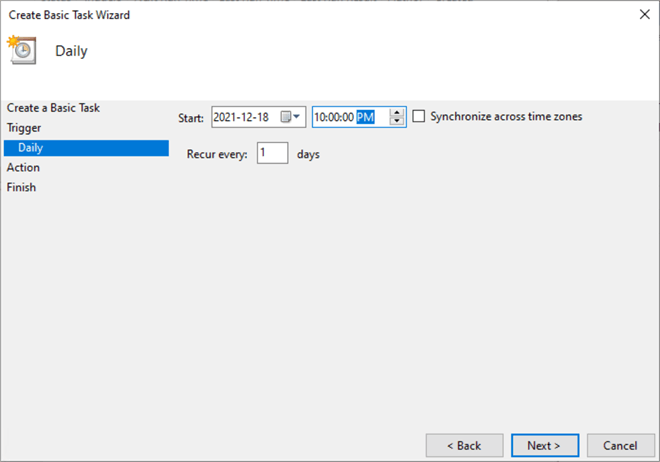
Figure 9 Specify the Start Date and Time to Run the Task
1.2.5 Define an Action
In the "Action" dialog, we select the "Start a program" option, shown in Figure 10. We then click on the "Next" button to open a new dialog.
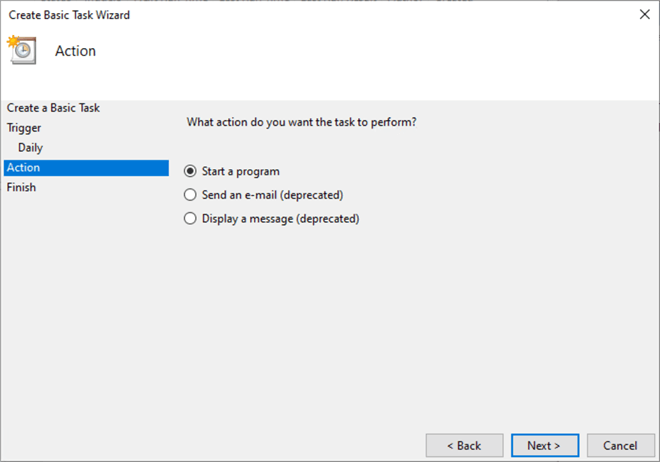
Figure 10 Define an Action
The title of the new dialog is "Start a Program," in which we can tell the task to run which program. We enter "C:\pyvirtuals\htmltablescraping\Scripts\python.exe" in the "Program/script" field and enter "C:\pyapps\htmltablescraping\HTML_Table_Scraping.py" in the "Add arguments(optional)" field. Then, the "Next" button becomes enabled. The dialog should look like Figure 11. We click on the "Next" button to complete the action definition.
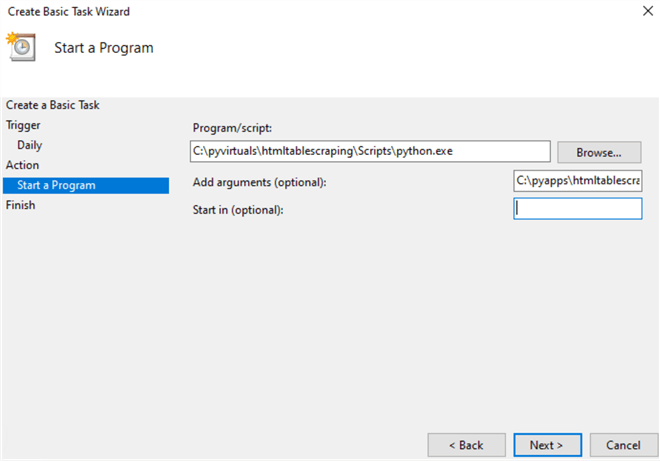
Figure 11 Specify a Program for the Task to Perform
1.2.6 Complete Creating the Task
After defining the action, we arrive at the "Summary" dialog. Select the "Open the Properties dialog for this task when I click Finish" option. The dialog should look like Figure 12. Click on the "Finish" button to open the "Properties" dialog.
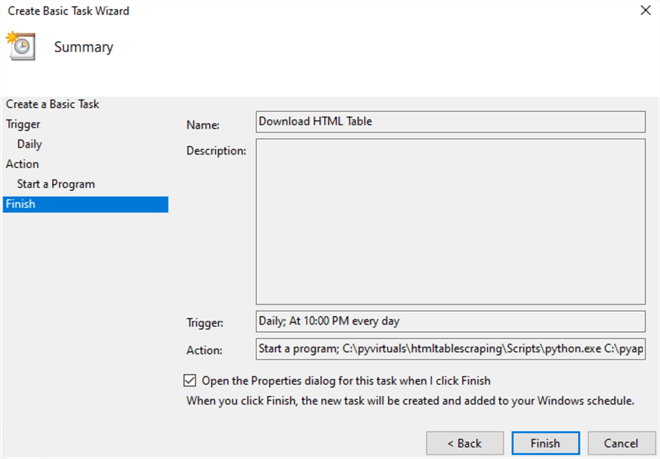
Figure 12 Task Summary
1.2.7 Configure the Task Security
Under the "Security options" section in the "Properties" dialog, we select the "Run whether user is logged on or not" option and select the "Run with highest privileges" option. The dialog should look like Figure 13.
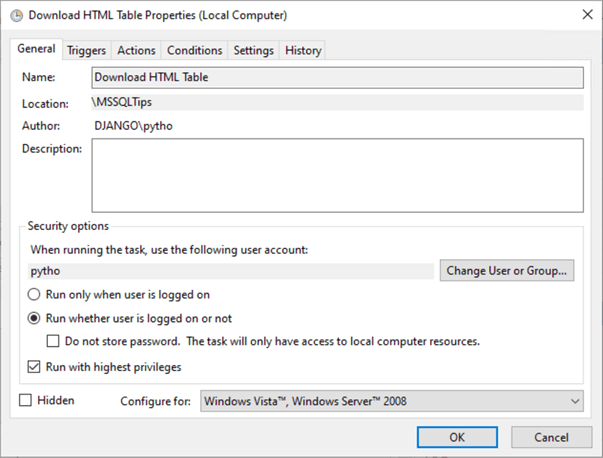
Figure 13 Configure the Task Security
Click on the "OK" button. A pop-up window, shown in Figure 14, appears and asks us to enter the password for the user account that runs the task.
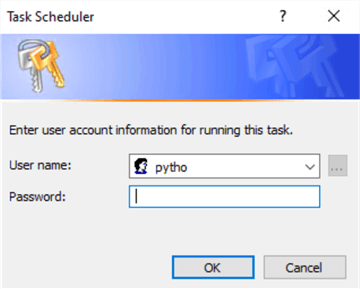
Figure 14 Enter User Account Information for Running this Task
Enter the password and click on the "OK" button to complete the creating task process. Now we can see the new task in the "MSSQLTips" folder, as shown in Figure 15.

Figure 15 Complete Creating a Scheduled Task
1.2.8 Run the Task Manually
Select the new task and then click on the "Run" button in the "Actions" pane. The status of this task, shown in the middle pane, changes to "Running." To ensure the task is complete, we can click on the "Refresh" button in the "Actions" pane. When the task status changes to "Ready," the task is complete.
We can also examine the "Last Run Result" column to determine the Python script execution status. The value in this column indicates the return code. For example, the value "0x1" representing a hexadecimal value of 0x80070001 implies the return code 1 from the program execution. When converting the HEX value into a decimal format, the return value is 2147942401. Likewise, the value "0x2" representing HEX 0x80070002 implies the return code should be 2. The HEX value is 2147942402 in decimal format.
We repeat the process several times and write down the "Last Run Result" values. Then, after observing return codes "0x1" and "0x2," we switch to the "History" tab and select an event "Action Completed" (Event ID: 201), as shown in Figure 16. The return code is 2147942401, which means the function "read_web_page_content()" failed and exited with code 1. However, even though the Python execution throws exceptions, the Task Scheduler considers action completed successfully. Thus, it is not convenient for us to detect exceptions in Python execution by viewing task execution history.

Figure 16 The Function read_web_page_content() Failed and Returned Code 1
Switch to the "Details" tab. We can see more detailed information about the event log, as shown in Figure 17. These three properties, "TaskName," "ActionName," and "ResultCode," help us to identify event logs of interest.
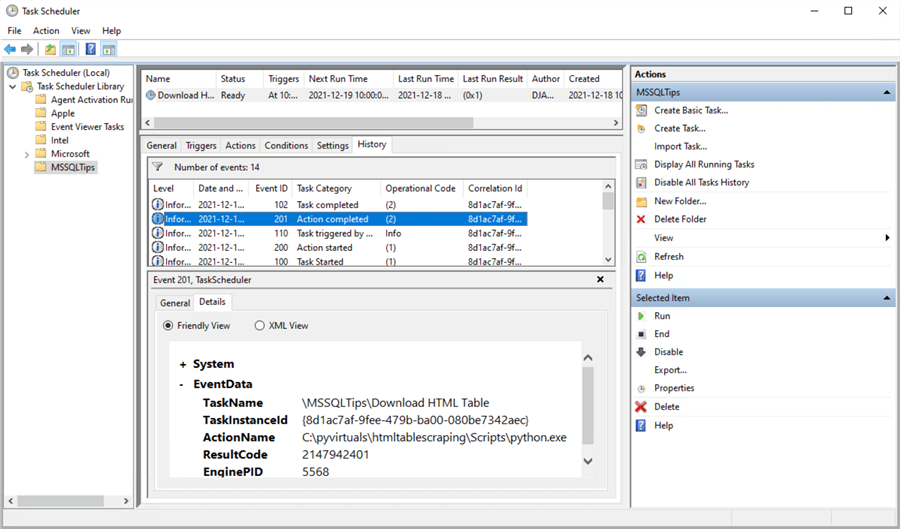
Figure 17 Details About an Event "Action Completed" Log
We can find another "Action Completed" log in the "History" tab, in which the return code is 2147942402. This return code indicates the Python user-defined function "save_html_table_data()" throws an exception.
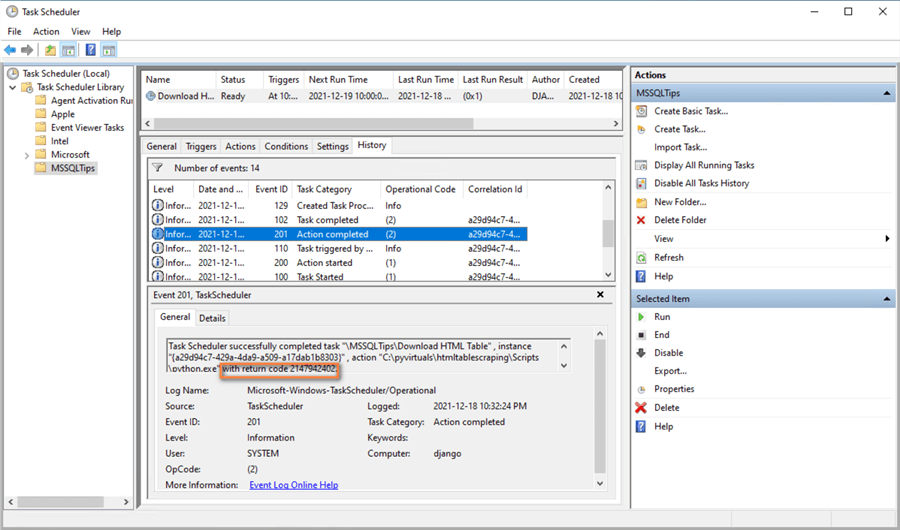
Figure 18 The Function save_html_table_data() Exited the Program with Code 2
To make these Python script execution errors noticeable to IT professionals, we will create two other tasks in the "MSSQLTips" folder. These two tasks start to run only when the "MSSQLTips\Download HTML Table" task detects return codes 2147942401 and 2147942402, respectively.
1.3 Trigger Other Tasks Based on Exit Codes
In the preceding section, we created a trigger that starts a task at 10:00 PM every day. We call this trigger the time-based trigger. Another trigger type is the event-based trigger, which starts an action after a specific event (Dinita, 2021). In this section, we create the second task, "failed to access web page," that starts to run when the "MSSQLTips\Download HTML Table" task detects return code 2147942401. Next, we create the third task, "failed to save data," that starts to run when the task detects return code 2147942402. Therefore, we know the Python script execution status by viewing these two new tasks’ execution.
1.3.1 Create Another Two Basic Tasks
We follow the steps in Section 2.1 to create two basic tasks, "failed to access web page" and "failed to save data" in the "MSSQLTips" folder. Rather than using "python.exe" in the "Start a Program" dialog, we enter a meaningful fake program name, as shown in Figure 19. The action will fail since the fake program name is not an actual program. We use errors from these two tasks to imply exceptions in Python script execution.
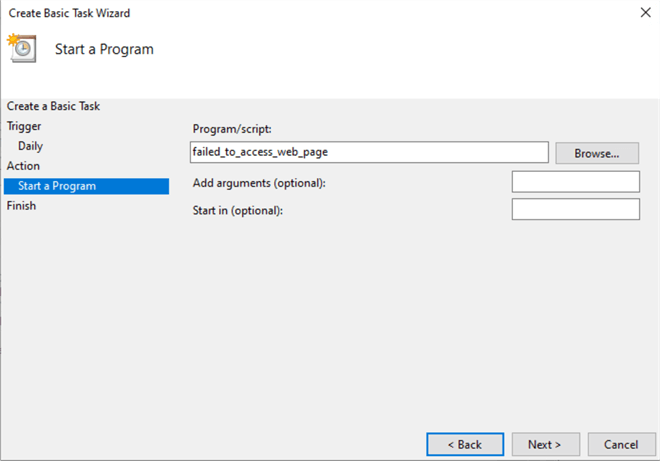
Figure 19 Use a Fake Program Name to Fail the Task Intentionally
After we create the two new tasks, there should be three tasks in the "MSSQLTips" folder, as shown in Figure 20.
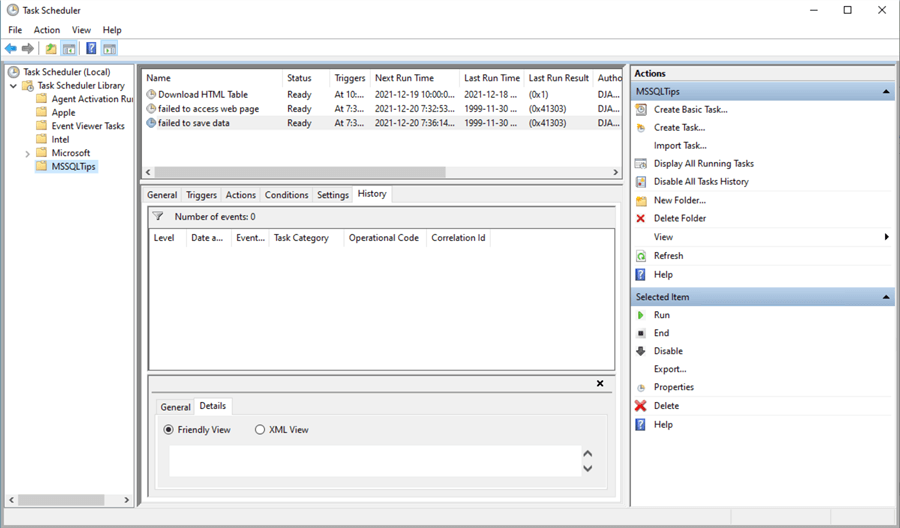
Figure 20 Three Tasks in the MSSQLTips Folder
1.3.2 Create Event-based Triggers
Select the "failed to access web page" task and click on the "Properties" button in the "Actions" pane to open the "Properties" dialog. In the dialog, switch to the "Trigger" pane, as shown in Figure 21.
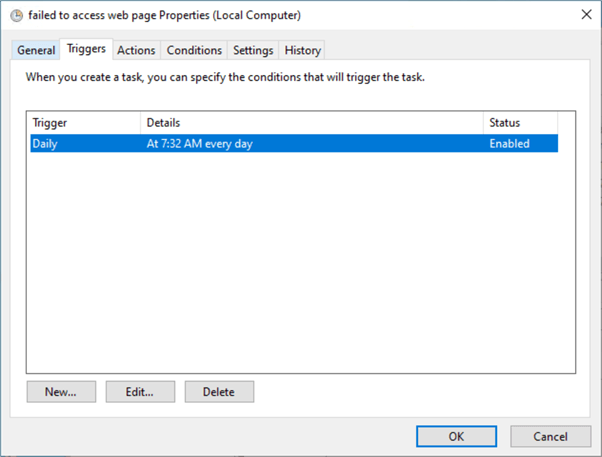
Figure 21 The Trigger Used in This Task
Click on the "Edit…" button to open the "Edit Trigger" dialog. Next, we select "On an event" in the "Begin the task" dropdown list and select "Custom" in the "Settings" section. The dialog should look like Figure 22.
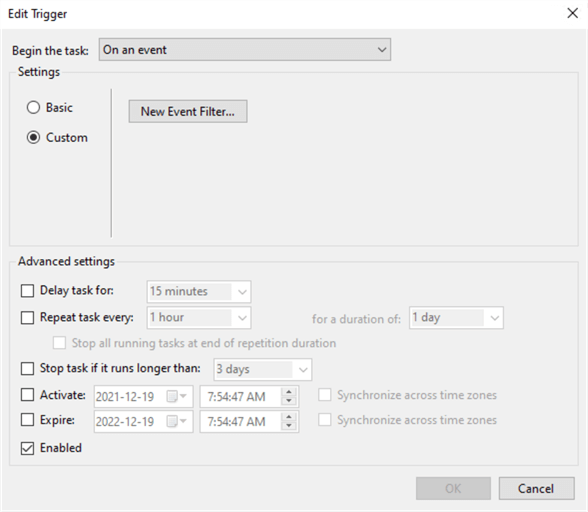
Figure 22 Create an Event-based Trigger
Click on the "New Event Filter" button to open the "New Event Filter" dialog. Switch to the "XML" tab and select the "Edit query manually" checkbox. When a dialog with a warning message appears, we click the "Yes" button to continue. Then, the text box becomes editable. We enter the following query in the text box. The "New Event Filter" dialog should look like Figure 23.
<QueryList>
  <Query Id="0">
    <Select Path="Microsoft-Windows-TaskScheduler/Operational">
      *[System[(EventID=201)]]
        and
      *[EventData[Data[@Name='TaskName'] and (Data='\MSSQLTips\Download HTML Table')]]
        and
      *[EventData[Data[@Name='ActionName'] and (Data='C:\pyvirtuals\htmltablescraping\Scripts\python.exe')]]
        and
      *[EventData[Data[@Name='ResultCode'] and (Data='2147942401')]]
    </Select>
  </Query>
</QueryList>

Figure 23 A Custom Event Filter in XPath Form
We click on a series of "OK" buttons one after the other to close dialogs and save changes. Now we want the return code 2147942402 to start the task "failed to save data." We use the same steps to create the task that uses an event-based trigger. We use the following query to define the custom event filter:
<QueryList>
  <Query Id="0">
    <Select Path="Microsoft-Windows-TaskScheduler/Operational">
      *[System[(EventID=201)]]
        and
      *[EventData[Data[@Name='TaskName'] and (Data='\MSSQLTips\Download HTML Table')]]
        and
      *[EventData[Data[@Name='ActionName'] and (Data='C:\pyvirtuals\htmltablescraping\Scripts\python.exe')]]
        and
      *[EventData[Data[@Name='ResultCode'] and (Data='2147942402')]]
    </Select>
  </Query>
</QueryList>
1.3.3 Run the Download HTML Table Task Manually
Select the "Download HTML Table" task in the middle pane and click on the "Run" button in the "Actions" pane. When the task is complete, we write down the value that is in the "Last Run Result" column. We repeat the process several times until our record has 0x1 and 0x2 values.
Selecting the task "failed to access web page," we notice some errors, as shown in Figure 24. The Python script execution exception does not directly generate the errors, but the errors tell us that the Python script failed to access the web page.
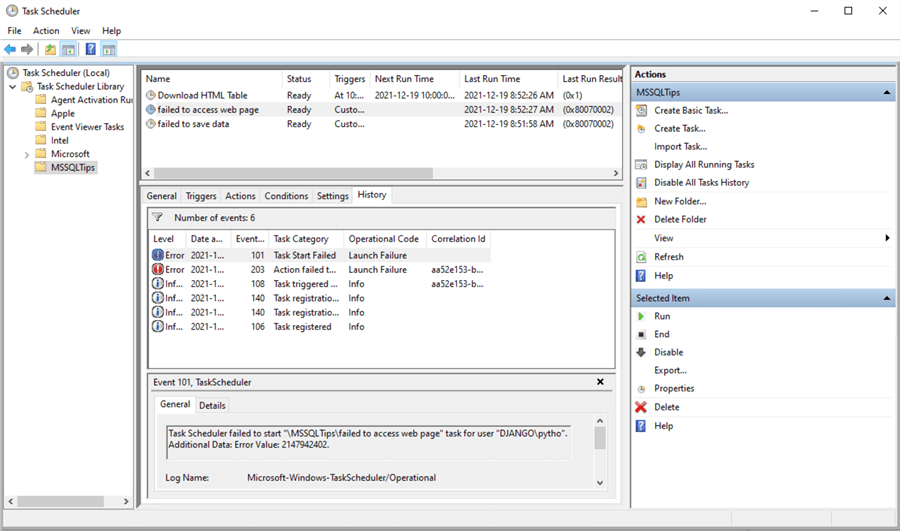
Figure 24 The Task Detects the Exception in the Python User-defined Function read_web_page_content()
We also see some errors when selecting the task "failed to save data," shown in Figure 25. The errors inform us that the Python script failed to save data into the database table.
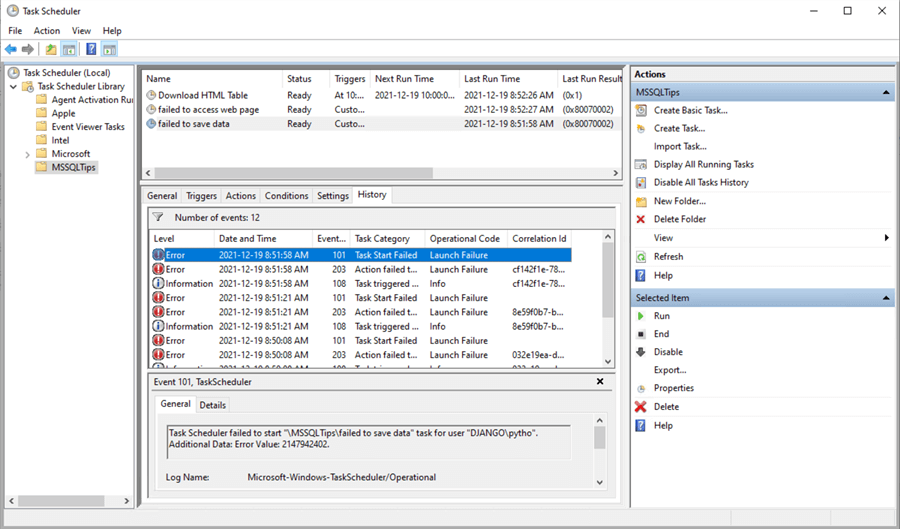
Figure 25 The Task Detects the Exception in the Python User-defined Function save_html_table_data()
These two tasks make the exceptions in Python script execution noticeable to IT professionals who monitor Task Schedule regularly. However, these two tasks are not necessary for downloading HTML data into a database table. The Python script itself should handle all exceptions and notify users.
2 – Checking Python Execution Status in Windows Event Viewer
Windows Event Viewer is a handy tool that shows a log of application and system messages including errors, information messages, and warnings (Hoffman, 2018). The tool categorizes event logs into four main groups, i.e., "Custom Views," "Windows Logs," "Applications and Services Logs," and "Subscriptions." Besides using Task Scheduler to check Python script execution status, we use Windows Event Viewer to access task execution history in this section.
2.1 Viewing Task Scheduler Logs
The Task Scheduler logs are in the "Applications and Services Logs" main group. We created the task "Download HTML Table" in Section 1.2. We can find the logs for this task in this subfolder: "Applications and Services Logs -> Microsoft -> Windows -> TaskScheduler -> Operational." However, it is not convenient to view logs through this path.
2.1.1 Launch Windows Event Viewer
We use the "Windows + R" keyboard shortcut to launch the "Run" command window. We then enter the "eventvwr.msc" command in the "Open" box. Finally, click on the "OK" button to launch Windows Event Viewer, which should look like Figure 26.
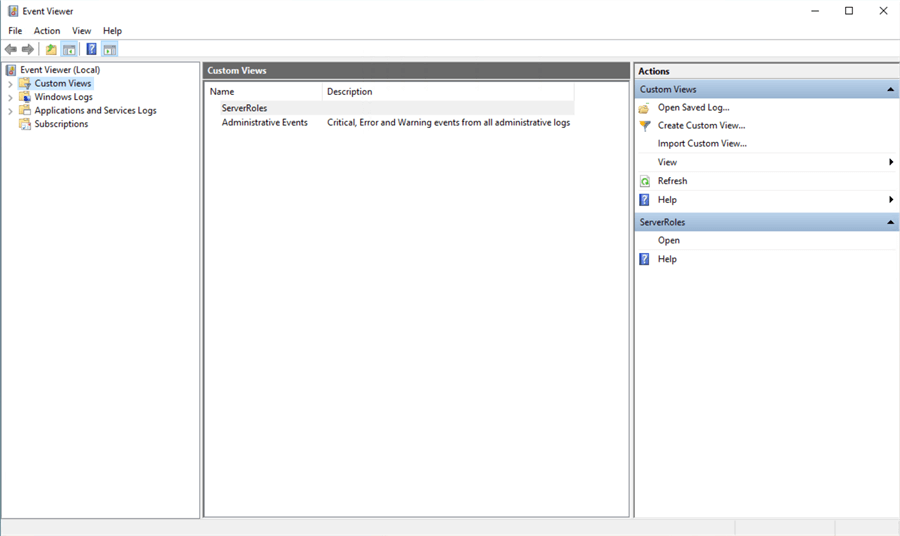
Figure 26 Launch Window Event Viewer
2.1.2 Navigate to Task Scheduler Logs
Expand the "Applications and Services Logs" folder in the left pane. We follow this path to expand subfolders: "Applications and Services Logs -> Microsoft -> Windows -> TaskScheduler." Next, under the "TaskScheduler" subfolder, we click on the "Operational" node. We see an extensive list of event logs in the "Operational" pane. As an example, we can find the log for the scheduled task we manually started, shown in Figure 27.
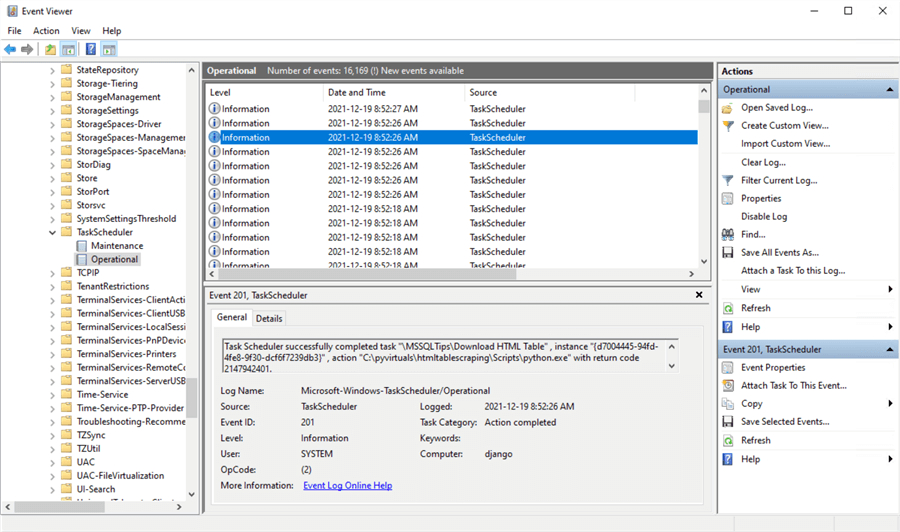
Figure 27 Navigate to Task Scheduler Logs
It is not convenient to view logs in this way. Therefore, the following section creates custom event views to exclude all uninterested logs and only show specific information.
2.2 Viewing the Download HTML Table Task Logs Through Custom Event Views
Custom Views allow us to view the messages that interest us (Buckell, 2018). For example, we want to see logs from the task "Download HTML Table" with return code 1. In this case, we do not need to find these specific logs from all logs in the "Operational" list.
2.2.1 Create Custom Views
Select "Custom Views" on the left pane. Then, on the "Actions" pane, click on the "Create Custom View…" button. A dialog should appear, as shown in Figure 28.
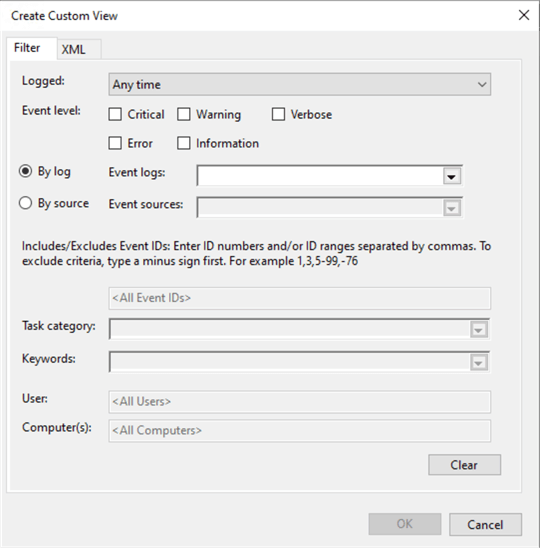
Figure 28 The Create Custom View Dialog
Switch to the "XML" tab and select "Edit query manually." A warning message shows up, as illustrated in Figure 29.
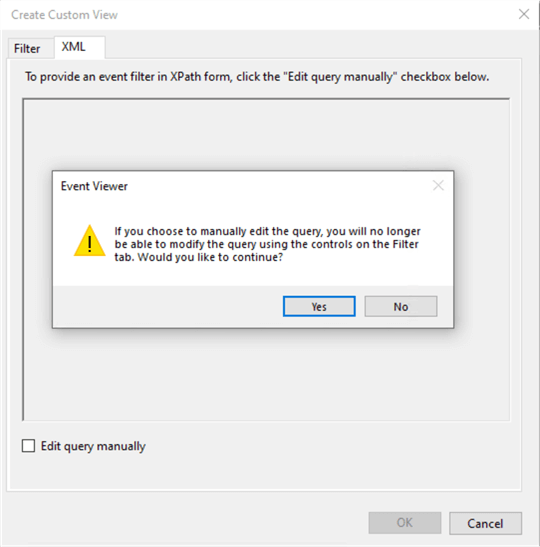
Figure 29 A Warning Message from Event Viewer
Click on the "Yes" button to continue. Then, the text box becomes editable. We copy the first query in Section 1.3.2 to the text box. The dialog should look like Figure 30. When using XML filtering, we can use custom views to drill through event logs and only display the information we need (Pyle, 2019).
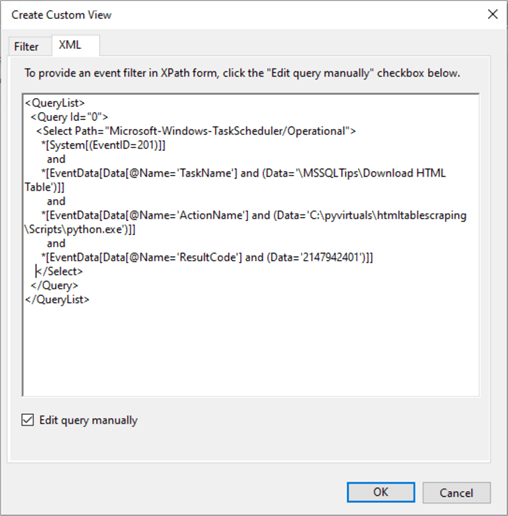
Figure 30 Create a Custom View for the Return Code 1
Click on the "OK" button to secure changes, and a new dialog shows up to ask for more information about this custom view. We enter the text "failed to access web page" as the name of this view and click on the "New Folder" button. We name the new folder "MSSQLTips," as shown in Figure 31. Click on the "OK" button to save the folder name. Then, click on the "OK" button to close the "Save Filter to Custom View" dialog.
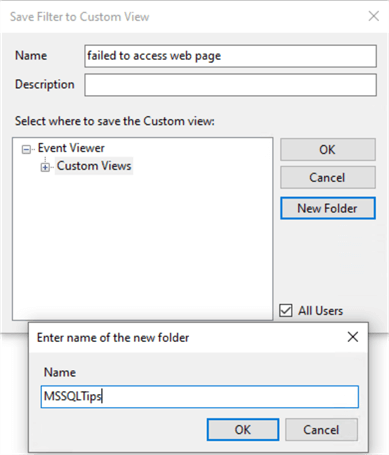
Figure 31 Create a New Folder for Custom View
2.2.2 View Specific Logs in Custom Views
After we close the "Save Filter to Custom View" dialog, we go back to the "Event Viewer" window. Next, we select the new custom view to show the logs of interest, as shown in Figure 32.
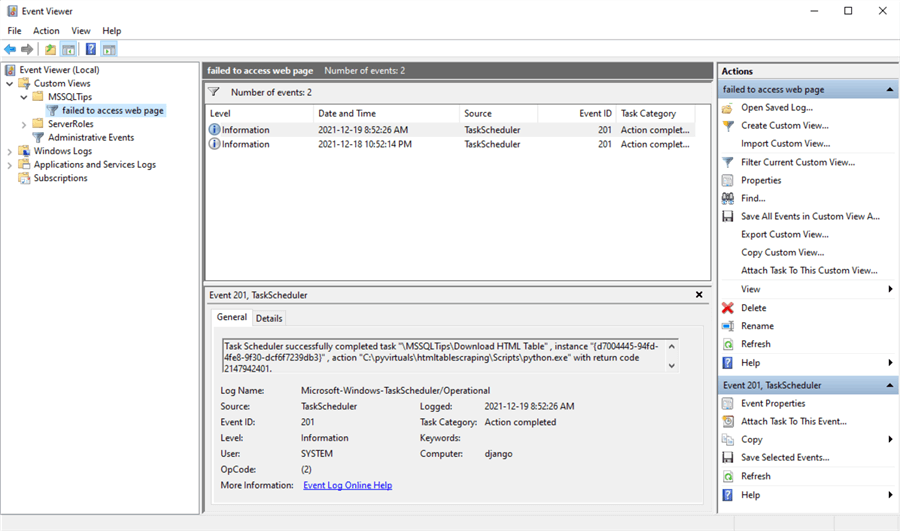
Figure 32 View "failed to access web page" Logs in the Custom View
We repeat the steps to create another custom view "failed to save data." We use the second query in Section 1.3.2 to create a filter during this process. Note that we should select the "MSSQLTips" folder when saving the filter to the custom view. After we create two custom views, the "Event Viewer" window should look like Figure 33.
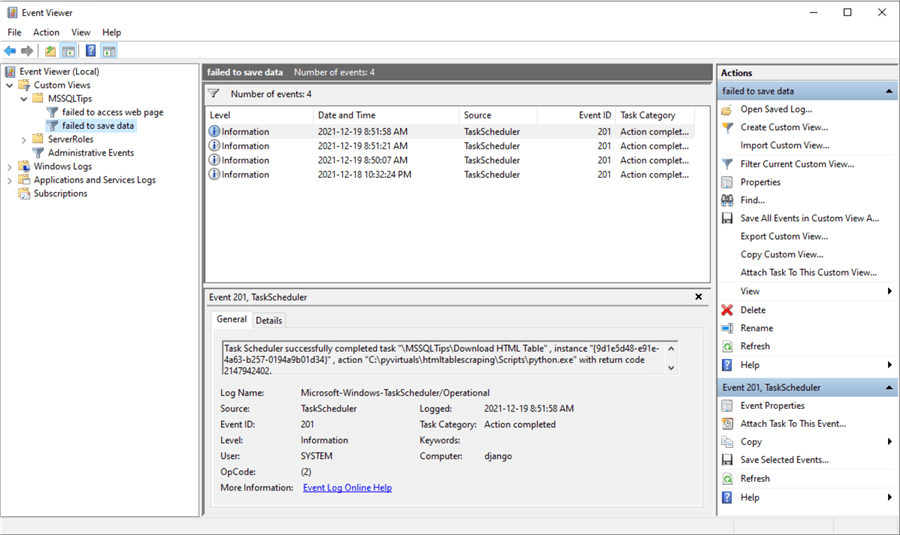
Figure 33 View "failed to save data" Logs in the Custom View
3 – Python Script Automation Using Task Scheduler
We created a basic task that has a time-based trigger. The task runs the Python script at 10:00 PM every day. The Python script always throws one exception at run-time for testing purposes. We manually started the task during the development phase. We viewed the Python script execution status through the task history tab in the task scheduler and custom views in the event viewer. To ensure the solution works on the production server, we log out of the development machine and let the task scheduler run the Python script. After the task scheduler has executed the script several times, we log into the development machine to check the execution logs.
3. 1 View Task Scheduler History
We launch Windows Task Scheduler by following the steps in Section 1.2.1. We then expand the "Task Scheduler Library" folder to find the "MSSQLTips" folder. Next, click on the "MSSQLTips" folder to show a list of tasks. We then select the "failed to access web page" task. Subsequently, click on the "History" button to open the history tab, shown in Figure 34. We find errors that occurred at 10:00 PM on 2012-12-21. These errors indicate that the Python script failed to access the web page at the scheduled time. Through this approach, we immediately know the Python script execution status. We can then report the errors to the technical support team.
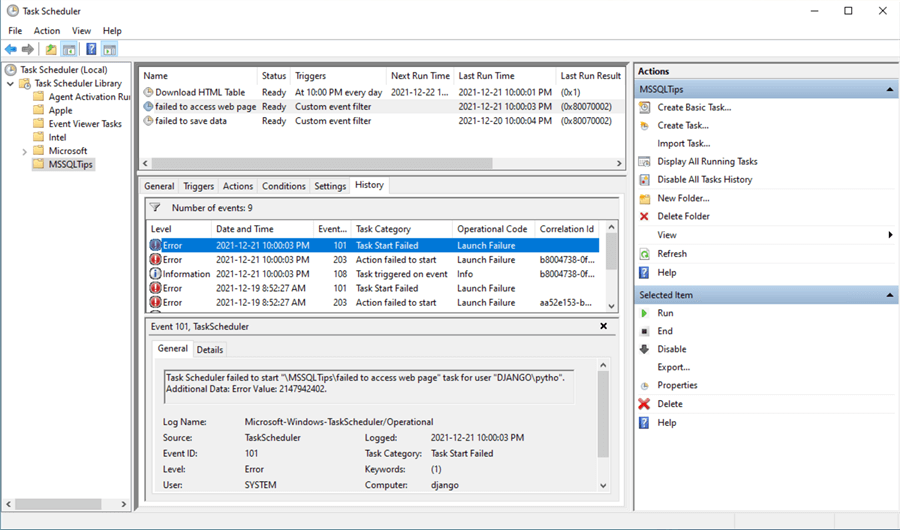
Figure 34 View History Data of the "failed to access web page" Task
Next, we select the "failed to save data" task. Click on the "History" button again to open the history tab, shown in Figure 35. The errors indicate that the Python script failed to save data on 2021-12-19 and 2021-12-20. It is worth noting that the errors are not caused by the Python script execution directly. The message in the general tab does not help fix the issue. Instead, to troubleshoot the errors, we should rely on the logs written by the Python scripts.
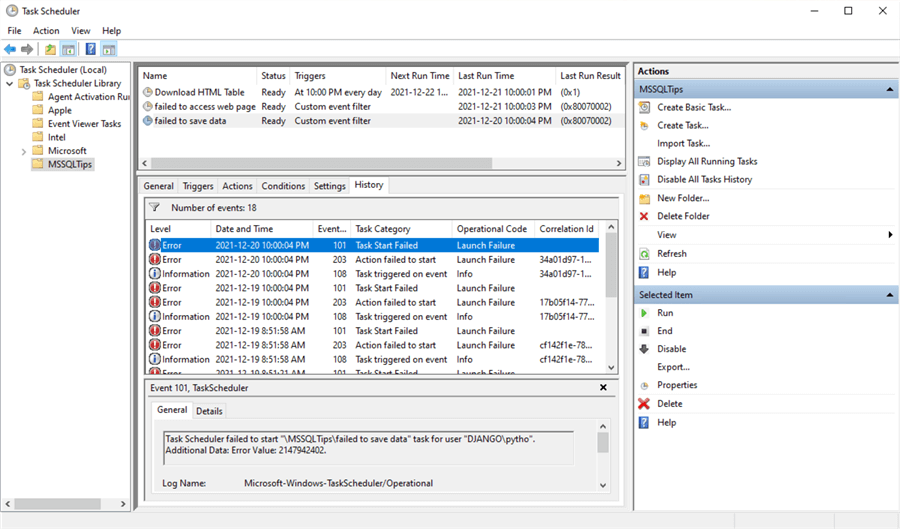
Figure 35 View History Data of the "failed to save data" Task
3. 2 Check Custom Event Views
Some IT professionals may prefer to use Windows Event Viewer to check Windows and application logs. To do this, we first launch the event viewer by following the steps in Section 2.1.1. We then expand the "Custom Views" folder to find the "MSSQLTips" sub-folder. There are two custom views in the "MSSQLTips" folder.
Selecting the first view "failed to access web page," we can see a list of events, as shown in Figure 36. The view displays all events that have returned code 1 from the Python script execution. The user-defined function "read_web_page_content()" exits the program with code 1 when the function fails to access the web page. Therefore, all events in this view imply the failure in this user-defined function. For example, we can observe a failure that occurred at 10:00 PM on 2021-12-21.

Figure 36 The "failed to access web page" Custom View
Selecting the second view "failed to save data" to open another custom view, as shown in Figure 37. All these events have returned code 2 from the Python script execution. The user-defined function "save_html_table_data()" exits the program with code 2 when the function fails to save data into the database table. Therefore, all events in this view imply failure in this user-defined function. For example, we can observe a failure that occurred at 10:00 PM on 2021-12-19 and 2021-12-20.
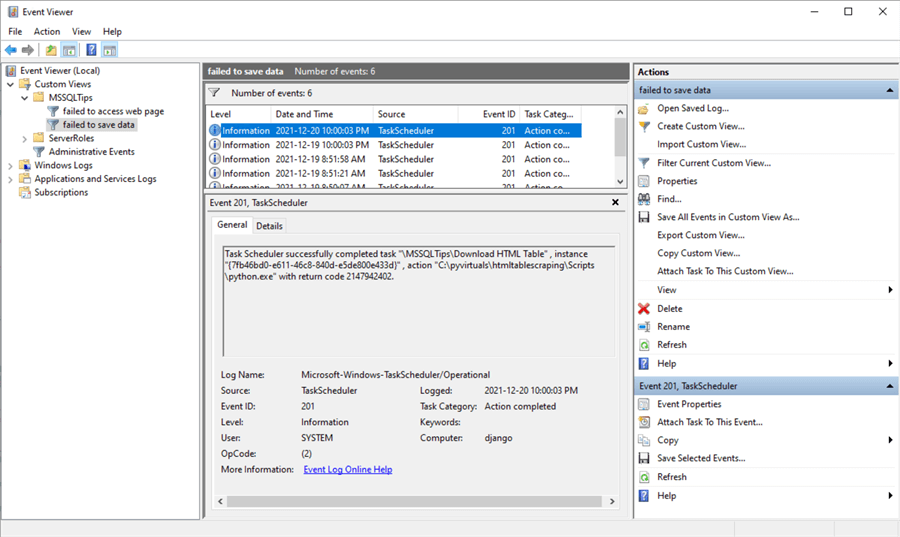
Figure 37 The "failed to save data " Custom View
Summary
Since Python is easy to learn and read, many IT professionals use Python to perform routine jobs. Windows Task Scheduler is a tool that can execute a program at a pre-defined time. In addition, Windows Event Viewer can show detailed information about significant events on a Windows system. These tools enable us to automate Python scripts to perform routine tasks and examine execution status. This article introduced running a Python script through the Windows Task Scheduler and viewing the Python script execution history through Windows Event Viewer.
We started with a gentle introduction to creating an automated task in Windows Task Scheduler. We then created two event-based tasks that run when the automated task has a return code, either 1 or 2. Subsequently, we manually ran the automated task and examined the Python script execution status through the two event-based tasks.
Next, we created two custom views in Windows Event Viewer. Then, we used these two custom views to view the Python script execution status.
Finally, we let the Task Scheduler run the Python script automatically. We then viewed the Python script execution status through the task history tab in Window Task Scheduler and custom views in Windows Task Viewer.
Reference
Buckell, F. (2018). What Are Custom Views in Windows Event Viewer and How to Create One. https://www.maketecheasier.com/windows-custom-views-event-viewer/.
Dinita, M. (2021). How to schedule tasks in Windows 10. https://windowsreport.com/schedule-tasks-windows-10/.
Hoffman, C. (2018). What Is the Windows Event Viewer, and How Can I Use It?. https://www.howtogeek.com/123646/htg-explains-what-the-windows-event-viewer-is-and-how-you-can-use-it/
Huculak, M. (2019). How to create an automated task using Task Scheduler on Windows 10. https://www.windowscentral.com/how-create-automated-task-using-task-scheduler-windows-10/.
Neagu, C. (2018). 9 ways to start the Task Scheduler in Windows (all versions). https://www.digitalcitizen.life/ways-start-task-scheduler-windows/.
Pyle, N. (2019). Advanced XML filtering in the Windows Event Viewer. https://techcommunity.microsoft.com/t5/ask-the-directory-services-team/advanced-xml-filtering-in-the-windows-event-viewer/ba-p/399761.
Roe, A. D. (2020). 6 ways to open the Run command window in Windows. https://www.digitalcitizen.life/run-window-windows-7-why-use-it-anymore/.
Zhou, N. (2021). Creating a SQL Server Agent Job to Run Python Scripts in a Virtual Environment. https://www.mssqltips.com/sqlservertip/7083/run-python-scripts-sql-server-agent-job/
Next Steps
- This tip used Windows Task Scheduler and Window Event Viewer to check Python script execution status. This method may be convenient for some IT professionals to maintain windows systems and applications. However, Python scripts themselves must handle all exceptions. The exception handling should log all warning or error messages. Python provides a built-in logging module with four main components: loggers, handlers, filters, and formatters. ZetCode offers a Python logging tutorial that shows how to do logging in Python with the logging module.
- Check out these related tips:
- Learning Python in Visual Studio 2019
- CRUD Operations in SQL Server using Python
- Recursive Programming Techniques using Python
- Python Programming Tutorial with Top-Down Approach
- Using Python to Download Data from an HTML Table to an SQL Server Database
- Creating a SQL Server Agent Job to Run Python Scripts in a Virtual Environment


About the author
 Nai Biao Zhou is a Senior Software Developer with 20+ years of experience in software development, specializing in Data Warehousing, Business Intelligence, Data Mining and solution architecture design.
This author pledges the content of this article is based on professional experience and not AI generated.
View all my tips
Article Last Updated: 2022-01-12
