By: Temidayo Omoniyi | Updated: 2023-03-24 | Comments (3) | Related: > Azure Data Factory
Problem
Microsoft Azure Databricks and Data Factory are both cloud-based services for data integration and (Extract, Transform, and Load) ETL that can manage a variety of data formats, including batch-streaming and unstructured and structured data. Azure Data Factory (ADF) is a solution for orchestrating data transfer at scale and ETL procedures for Data Integration services. Azure Databricks is a fully managed platform for analytics, data engineering, and machine learning, executing ETL and creating Machine Learning models.
Data ingested in large quantities, either batch or real-time, must be transformed appropriately to the proper format and stored in a database in the cloud or on-premises.
Solution
The need for data coming in the correct format for data analyst and scientist are on the rise more than ever before, where Azure Databricks is used to perform the entire ELT process and load the transformed data into a database.
This entire project will be carried out using ADF and Azure Databricks: mounting Azure SQL and Azure Data Lake Gen2 storage on Azure Databricks, writing the entire transformation code in PySparks on Azure Databricks, and creating a trigger to activate the ETL process of Azure Databricks right from Azure Data Factory.
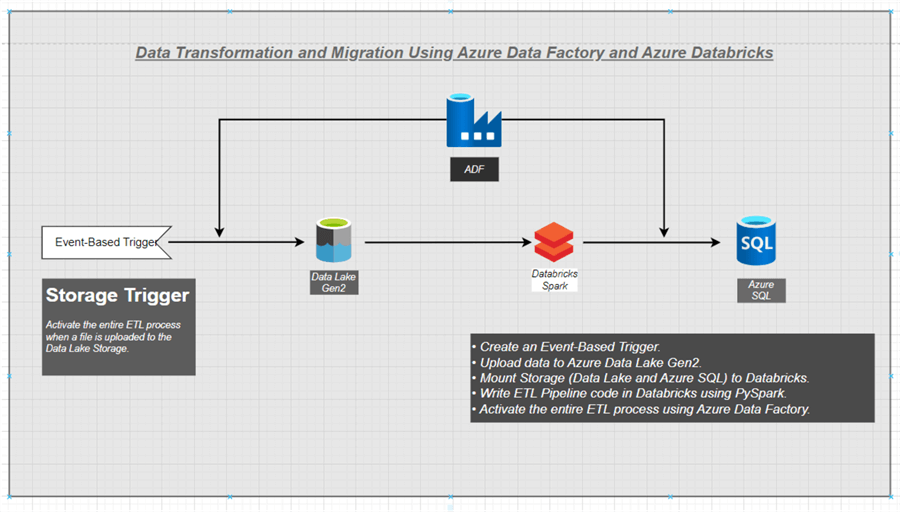
Project Architecture
However, before we start, let us first understand Databricks.
Understanding Databricks
Databricks is a cloud-based platform that combines data analytics, data engineering, and machine learning to process and analyze enormous amounts of data and enable collaboration between engineers, business analysts, and data scientists.
The cloud-based platform is built on top of distributed cloud computing infrastructure like Azure, AWS, or Google Cloud, which enables executing programs on CPUs or GPUs dependent on analysis requirements. In addition, Databricks can be integrated with another cloud platform to help manage enormous amounts of data and execute machine learning tasks by organizations.
What is Azure Databricks?
Azure Databricks is an Apache Spark-based analytics platform built on Microsoft Azure. Azure Databricks is used in opening lake houses and processing large amounts of data, allowing collaboration between data scientists, data engineers, and business analysts to obtain meaningful insights.
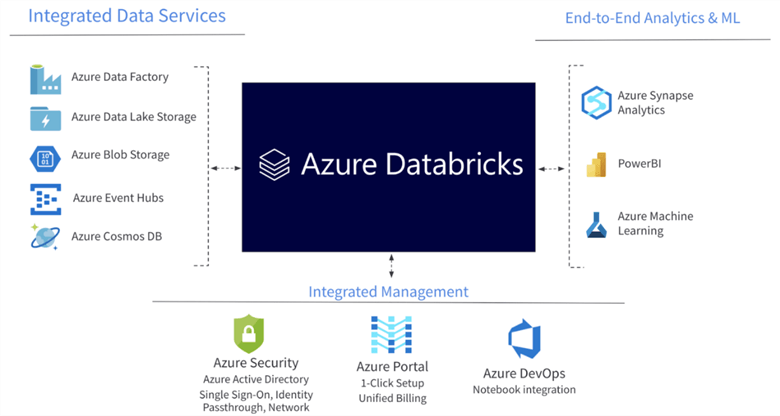
Azure Databricks by Microsoft
Create Azure Databricks
To work with Azure Databricks, you must first have an active Azure subscription. You will create all the necessary resources for this project in your Azure Portal site.
Create a Resource Group
Azure resource group is a container that holds related resources for an Azure solution. However, you can include all of the solution's resources in the resource group or only the resources you want to manage collectively.
Check out Connect Power BI to Azure Data Lake Gen2 Storage for Reporting for more information.
Azure Databricks Service
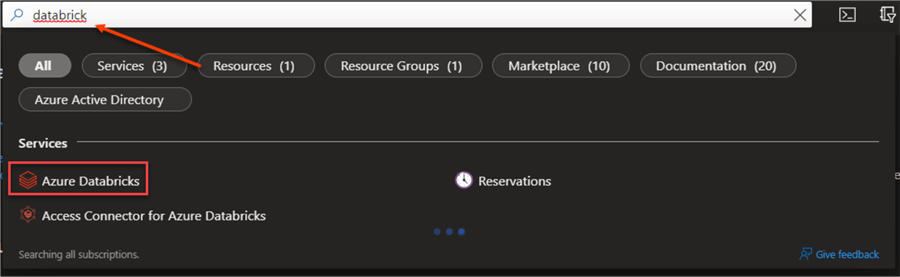
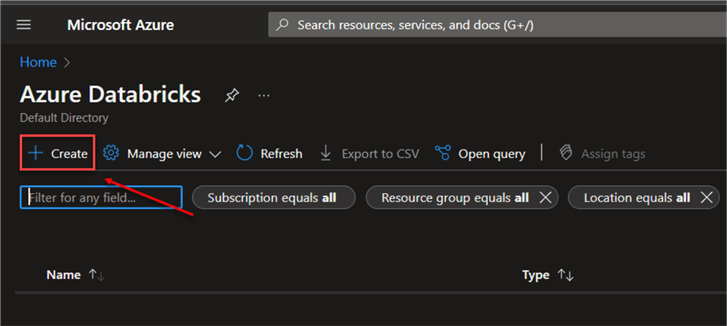
In the Azure Portal, go to the search resources, service, and docs at the top and type "databricks". This will bring up a list of resources. Select Azure Databricks.
Now, click + Create. This will open a new window where you are expected to input all necessary information.
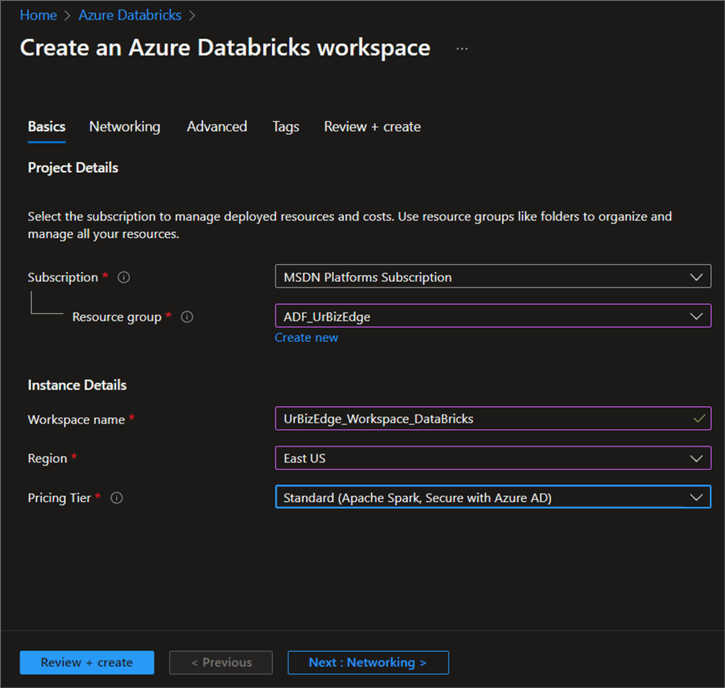
Basic Configuration
Complete all necessary information:
- Subscription: Select your Azure subscription.
- Resource Group: Select the resource group created. This will be used to house all Azure resources.
- Workspace Name: Provide the workspace with a unique name.
- Pricing Tier: We have 2 options, Standard and Premium. For this project, we will be using the Standard Tier. Note: I suggest using the Premium Tier if you work for a larger organization with multiple collaboration features.
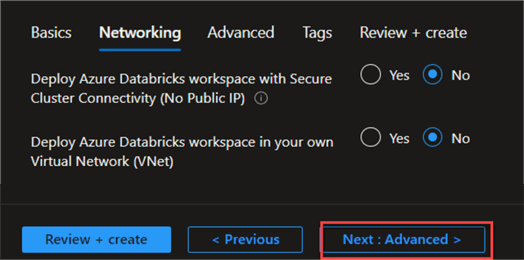
Networking
In the networking stage, you can leave it in the default settings.
Review + Create
This is the final step: click on the review + create button. This will start the validation process.
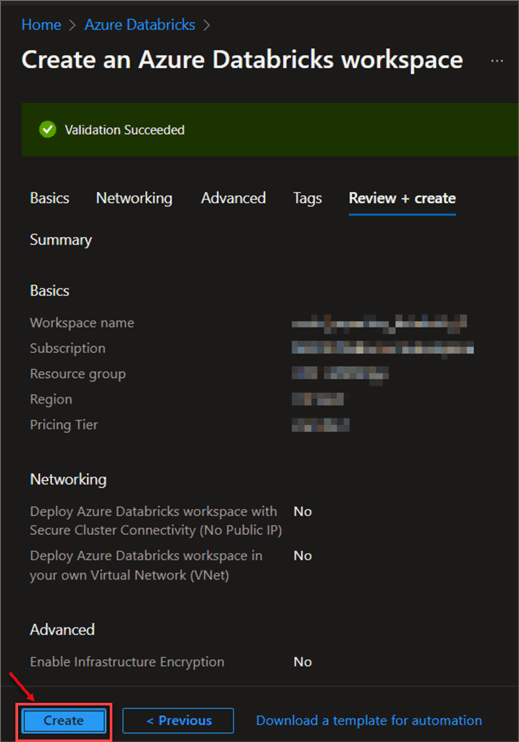
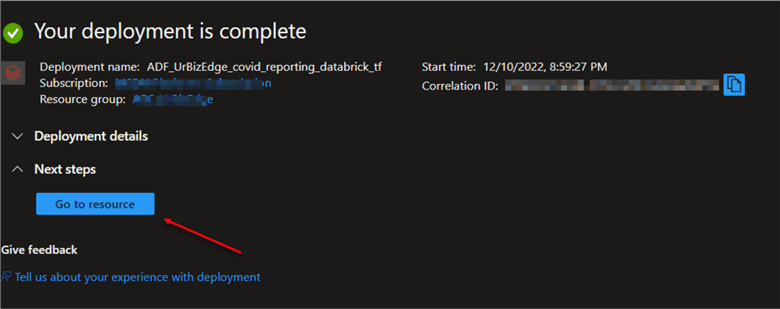
The Deployment stage can take a couple of minutes. When done, you will get a successful message.
Now click on "Go to resource." This will take you to the Azure Databricks resource we just created.
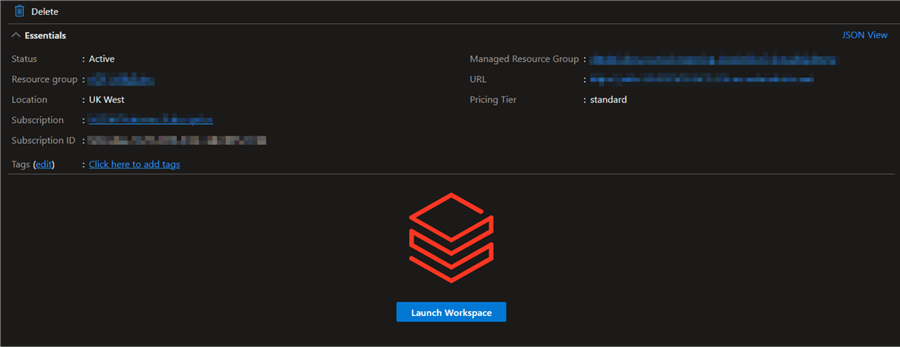
In the Azure Databricks resource, click on "Launch Workspace." This will take you to the Azure Databricks environment.
Databricks Cluster
Databricks clusters are a set of computation resources and configurations on which data engineers, science, and analytics run their workloads, such as production ELT pipelines, streaming analytics, ad-hoc analytics, and machine learning.
Types of Databricks Cluster
In Azure Databricks, the workloads are manually or automatically executed through notebook instructions. There are two types of clusters supported in Databricks:
- All Purpose Clusters: These clusters are employed in interactive notebooks for group data analysis. The CLI, UI, or REST API are used in creating them. You can also manually stop the "All Purpose Cluster."
- Job Clusters: These clusters are used for quick and reliable automated tasks. They are generated when a job is conducted on your brand-new Job Cluster, and the cluster is terminated when the job is finished. Note: This cluster cannot be restarted.
Create an All-Purpose Cluster
Let us create an all-purpose or interactive cluster in Azure Databricks. You might notice the name is now called "Compute," formally called Cluster.
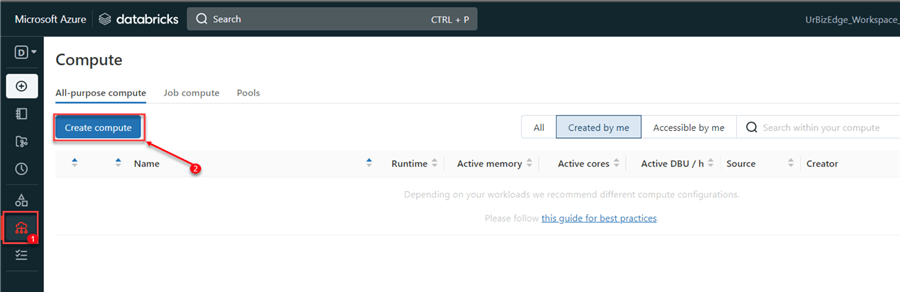
Step 1: Create a Cluster
In your Azure Databricks environment, scroll to the bottom left corner and click "Compute." Under the All-purpose compute, click on "Create compute."
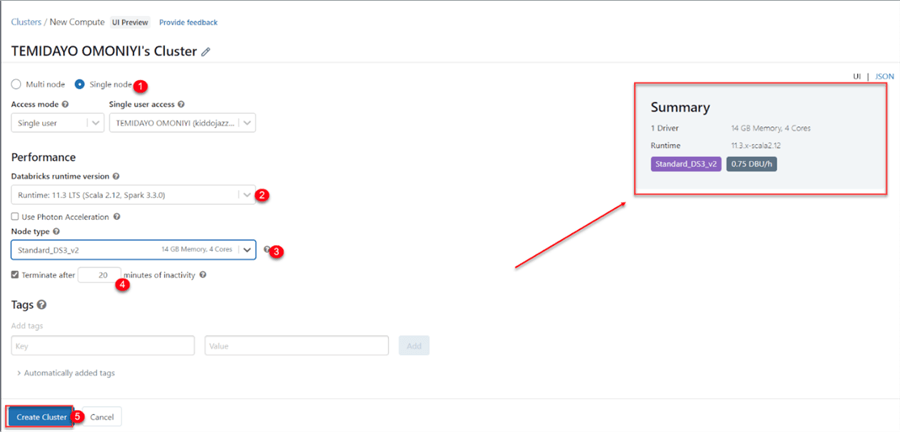
Step 2: Databricks Cluster Setting
Setting up the Azure Databricks cluster will require the following configuration:
- Node: We will use a "Single Node" to create it for one user. Spark jobs are executed on the driver node in a single node cluster with no workers.
- Runtime Version: Select the Runtime: 11.3 LTS (Scala 2.12, Spark 3.30) version for the runtime.
- Node Type: For this project, we will use the "Standard_DS3_v2 14GB Memory, 4 Cores." You can go for a higher version of the node depending on the project you want to work on.
- Terminate: This is used to terminate the cluster after a certain period of inactivity.
- Create: Click the Create Cluster button when you are done setting up the cluster configuration.
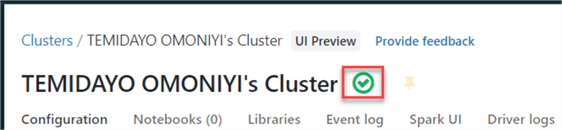
This process will take a couple of minutes to create. After the cluster is created, you will get a "successful" message with a green check mark indicating your cluster is actively running.
Mount Azure Data Lake Gen2 to Azure Databricks
In mounting Azure Data Lake Gen2 to Databricks, we need to complete the following:
- Create Azure Service Principal.
- Grant access for Azure data lake to Azure Service Principal.
- Create the mount in Databricks using Service Principal.
App Registration
We first must create an app in the Azure Service portal before we mount Azure Storage to Databricks.
Follow the steps listed below to create an App:
Step 1
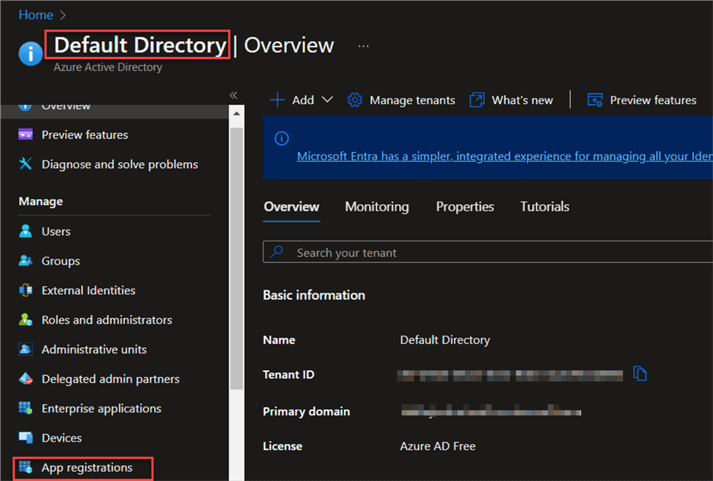
Enter "Azure Active Directory" in the search box of your Microsoft Azure Portal, then select "App Registration."
Step 2
In the app registration window, click on the "New Registration" button to register the app.

Step 3
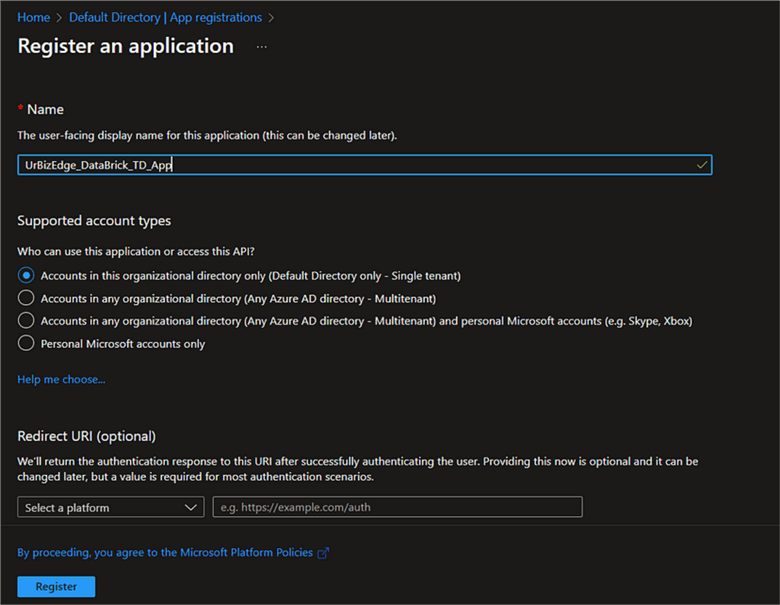
Give the app a unique name, leave other default settings, and click Register.
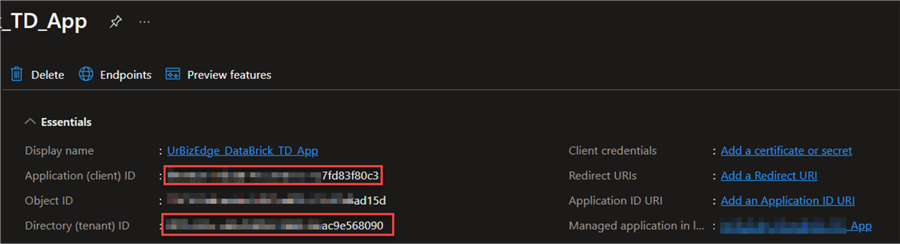
A new window appears, providing you with the necessary IDs to copy. These IDs are needed in mounting your data lake storage in Databricks:
- Application ID
- Directory ID
Step 4
In the new app created, you need to get the Secret ID. In the app, click "Certificates & secrets," then "New Client Secrets," give it a description, and click Add.
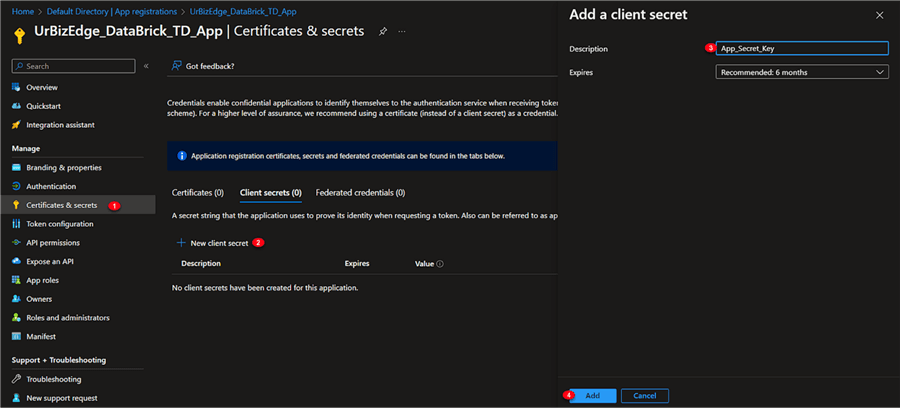
Step 5
Copy the App Secret Value. Note: The secret value appears only once.

Grant App Access to Data Lake Storage
We need to grant access to the app just created to Azure data lake storage.
Step 1
In your Azure Portal, navigate to the Data Lake Gen2 resource you already have. If you do not have Azure Data Lake Gen2 in your resources, check out our previous article on creating data lake storage: Connect Power BI to Azure Data Lake Gen2.
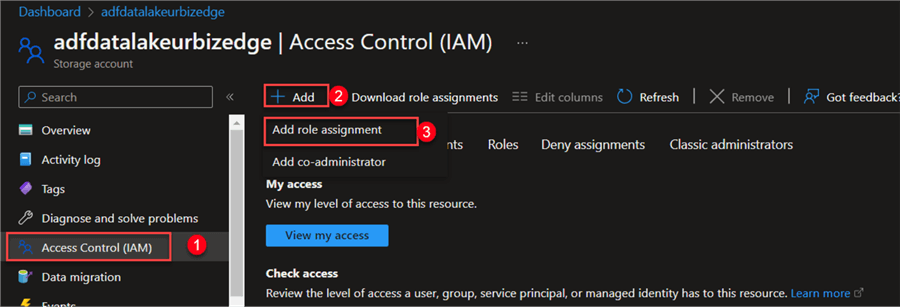
In the Data Lake Gen2 resource, click on Access Control (IAM), click +Add, and select "Add role assignment."
Step 2:
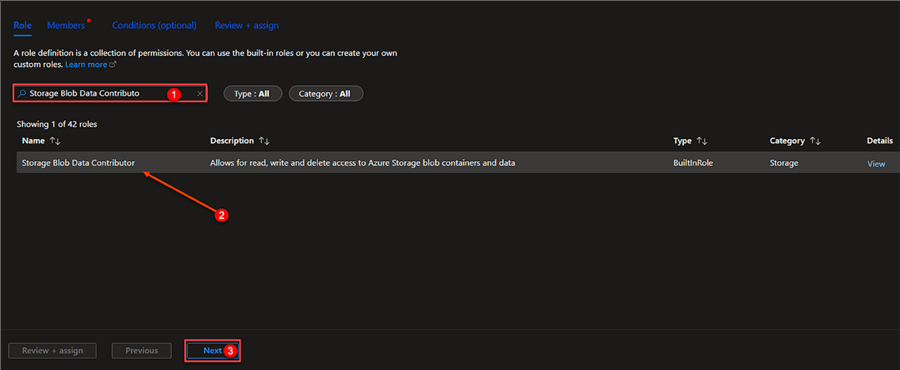
Search for "Storage Blob Data Contributor" in the role assignment window. Click next after selecting it.
Step 3:
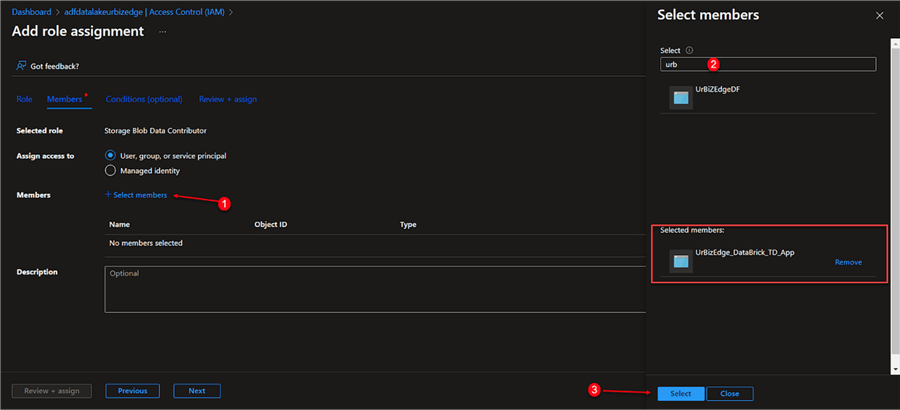
Click the "Select member" icon on the member's page, look for the APP name you created, and then add it. Click "Review + assign" after that.
Set Mount Configuration
Now that all registration is completed in Azure Portal, you will need to navigate the Azure Databricks environment.
Step 1: Configuration
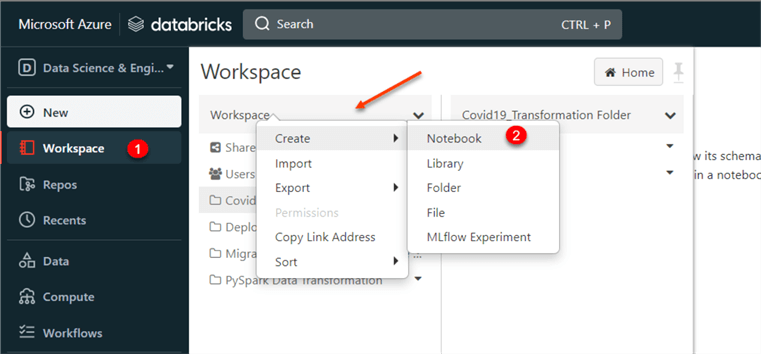
In your Azure Databricks environment, click on the "Workspace" at the top left corner. Right-click on the workspace and select Create | Notebook. This process will help create a new Notebook for writing code using the PySpark.
In the Notebook, write the code below, which will help with the mount configuration settings. You must provide the "Application ID, App Key, and Directory ID" code obtained during your app registration.
configs = {"fs.azure.account.auth.type": "OAuth",
           "fs.azure.account.oauth.provider.type": "org.apache.hadoop.fs.azurebfs.oauth2.ClientCredsTokenProvider",
           "fs.azure.account.oauth2.client.id": "<app-id>",#application-id
           "fs.azure.account.oauth2.client.secret": "<secret_key>",#secret key
           "fs.azure.account.oauth2.client.endpoint": "<Tenant _id>"}#Tenant ID Directory
Step 2: Mount Folder Directory
You will need to indicate the source and mount point name.
- <storage_name>: Name of Azure Data Lake Gen2 created.
- <folder_name>: This is the name of the container (folder) found inside the Azure data lake storage.
dbutils.fs.mount(
  source = "abfss://<folder_name>@<storage_name>.dfs.core.windows.net/",#Mount your data lake gen 2
  mount_point = "/<storage_name>/<folder_name>",
  extra_configs = configs)
Step 3: Check the Folder
The line of code below checks for files in the folder we just mounted.
dbutils.fs.ls("/mnt/<storage_name>/<folder_name>") # This shows the list of the Mounted folder.
Note: To save money, you can always terminate the cluster running.
Data Transformation in Databricks using PySpark
This stage requires data to be transformed and processed to the right format, which will be migrated to the Azure SQL for a data analyst to derive insight and other useful information.
Step 1: Read Data from Mount Point
Mount the data directory we want to work on with the exact CSV file directory.
#Read Data from Mount Point
df_pyspark_2 = spark.read.csv("/mnt/adfdatalakeurbizedge/cleanfile/sales_data.csv", header=True, inferSchema=True)
#InferSchema endures the right datatype are in each individual column
- Header: True promotes the first row as a header.
- inferSchema: This helps auto-detect the right data types.
Step 2: Exploratory Data Analysis
Let us get information about the data we want to transform and migrate.
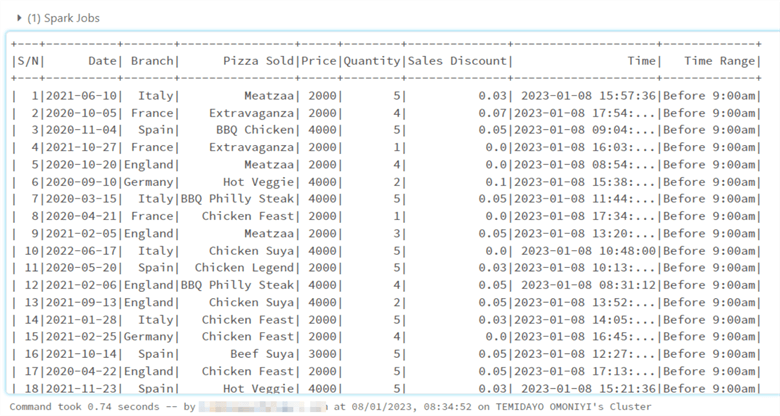
Show Data. Azure Databricks uses Apache PySpark, which is similar to Python Pandas.
df_pyspark_2.show() #show() is used to show the data frame we want to work on
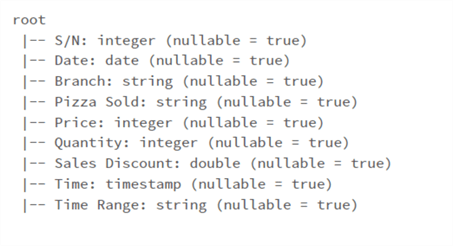
Data Type. The printSchema() function is used to get the right data type of each column. It is the same as pandas info().
#View each columns datatypes
df_pyspark_2.printSchema()
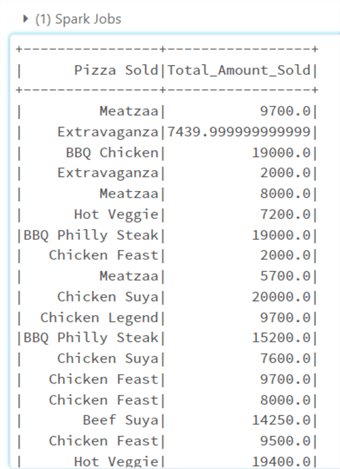
Calculations & New Columns. You need to import the column function. This will give PySpark the ability to create a new column when trying to get the total amount sold.
from pyspark.sql.functions import to_date, col
df_pyspark_2 = df_pyspark_2.withColumn("Total_Amount_Sold", col("Quantity") * col("Price")*(1-col("Sales Discount")))
df_pyspark_2.select(["Pizza Sold","Total_Amount_Sold"]).show()# Select the #Pizza sold and Total Amount sold Column
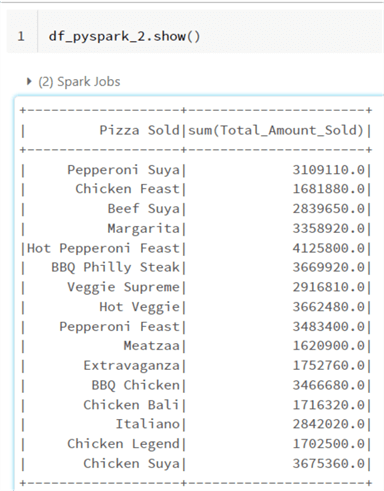
Groupby and Aggregate. The groupBy function works the same way as that of SQL. It will provide the unique of all the "PizzaSold" column and the sum aggregate of the "Total_Amount_Sold" column.
df_pyspark_2 = df_pyspark_2.groupBy("PizzaSold").agg({"Total_Amount_Sold":"sum"})
Now that we have completed the transformation, we need to migrate the transformed data from Azure Data Lake Gen2 to Azure SQL Database.
Create Azure SQL Database
To create an Azure SQL database, you will need to follow the steps listed below:
Step 1
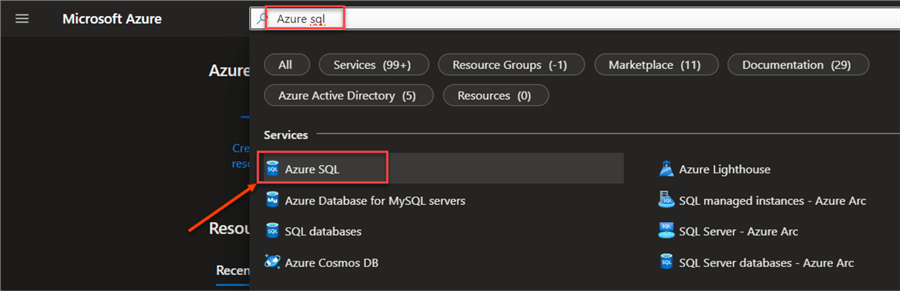
In your Azure Portal, search for Azure SQL resource. This should take you to the resource environment. Click the "Create +" sign at the top left corner.
Step 2
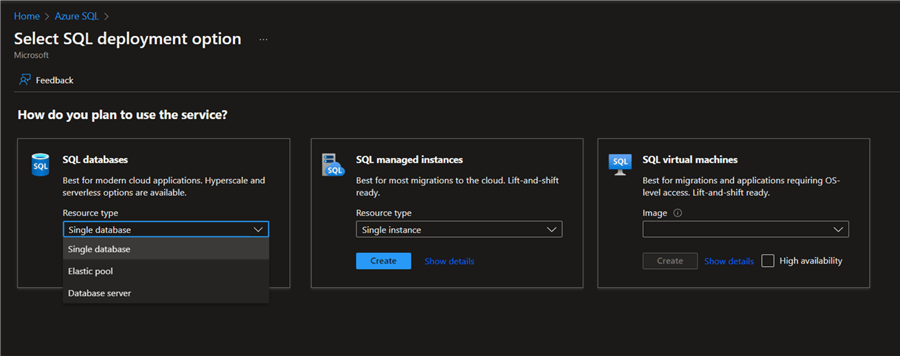
In the SQL deployment environment, you will have 3 options. For this project, we will use the "SQL databases – Single database." Then click Create.
Step 3
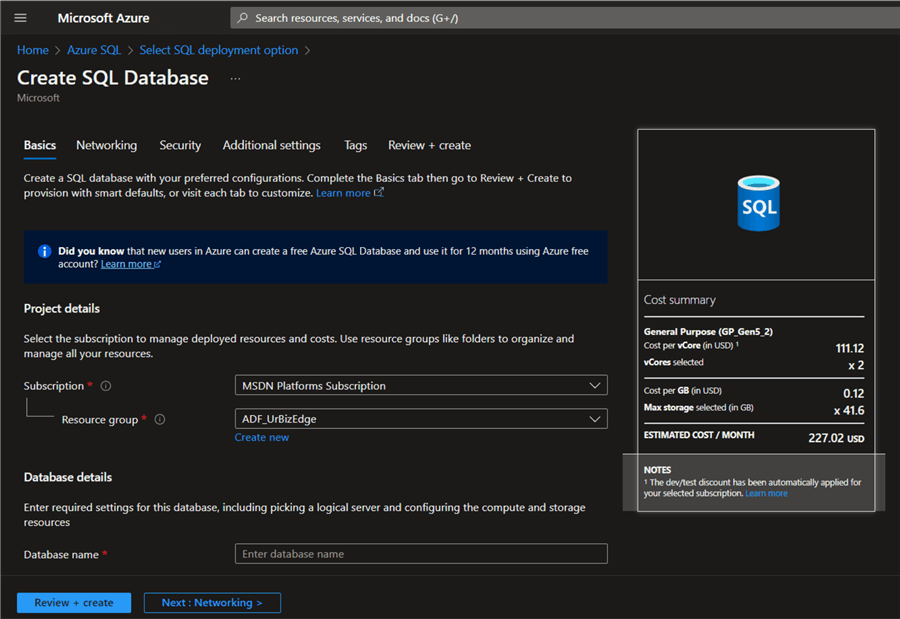
For the SQL configuration settings, you must fill in all necessary settings from your resource group, database name, and Server name.
Step 4
Create a username and password to login to your Azure SQL. For other settings, click "Networking" and provide the necessary information. If not, click on "Review + create." This will create the Azure SQL resource.
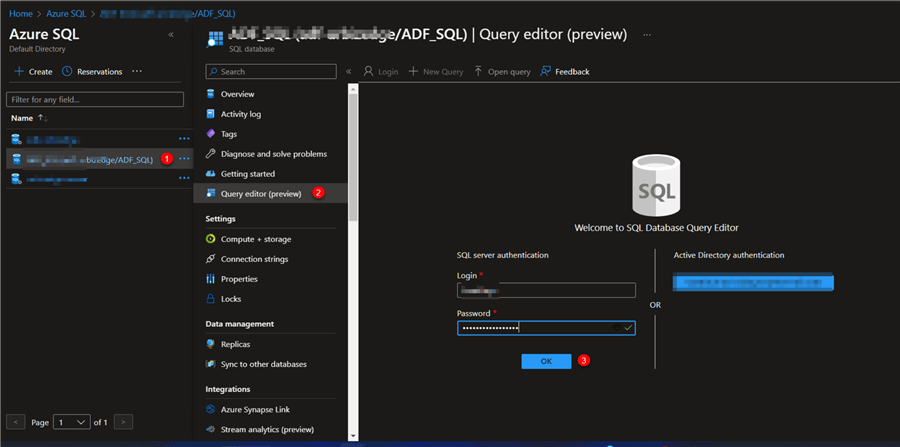
Step 5
Now that you have successfully created the Azure SQL database, you need to login. Click on the Azure SQL resource you just created, then select "Query Editor (Preview),"and enter your necessary login information.
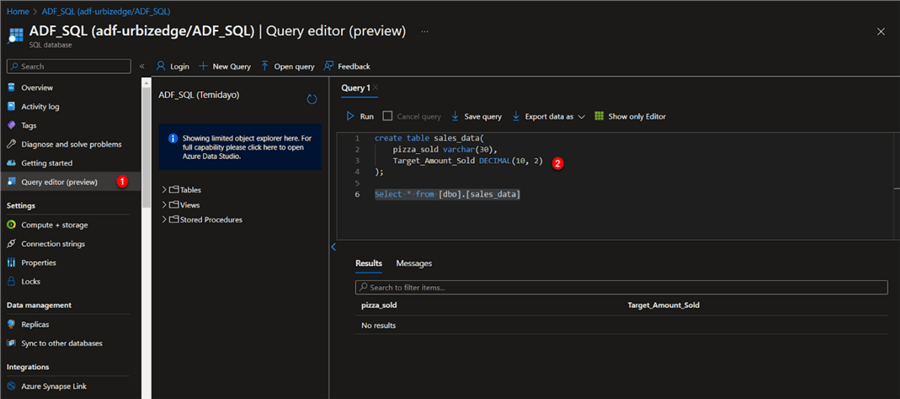
Create a Sales Data Table in Azure SQL
In the Azure Portal SQL resource, write this query below to create a table.
create table sales_data (
   pizza_sold varchar(30),
   Target_Amount_Sold DECIMAL(10, 2)
);
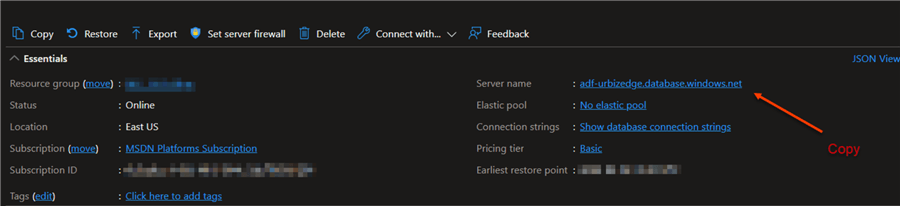
Write to Azure SQL. This is the final step. At this point, we will import the transformed data to Azure SQL. You are expected to fill in the following information:
- Server name: This is obtained from the Azure SQL resources created in Azure Portal.
- Database: This is the name given to the database when creating the Azure SQL resources.
- Table: The table name created is "Sales data."
- User: Username to your Azure SQL resources.
- Password: Password to your database resources.
df.write .format("jdbc").option("url", "jdbc:sqlserver://<servername>:1433;databaseName=<databasename>").option("dbtable", "[<optional_schema_name>].<table_name>").option("user", "<user_name>").option("password", "<password>").save()
Trigger Databricks Pipeline in Azure Data Factory
The Azure Data Factory is a cloud-based service that performs the complete ETL process for ingesting, preparing, and transforming all data at scale. Apart from the ETL operation performed by ADF, it can also be used in running Databricks Notebook directly from the ADF environment. The process uses the Job cluster in Azure Databricks.
Azure Databricks Access Token
The Access token is required when creating a connection between ADF and Databricks.
The steps listed below show how to generate an Azure Databricks access token.
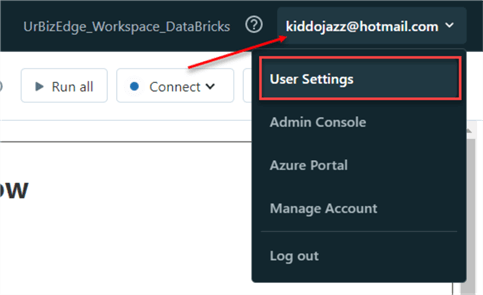
Step 1
At the top right corner of your Azure Databricks account, select "User Settings."
Step 2
Under the Access tokens, click Generate new token.

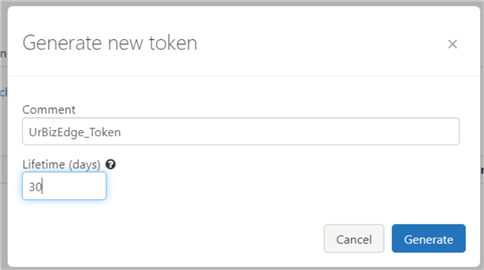
Step 3
Add a Token Name and the lifetime you want your token to last, and click Generate.
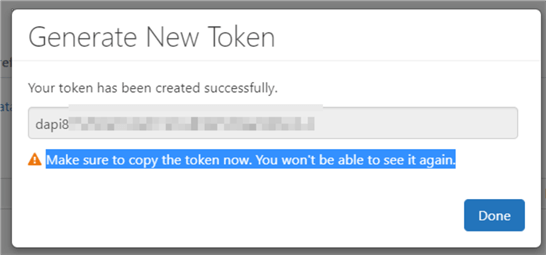
Step 4
From the new window, the access token is generated. You are expected to copy and keep the token in a secure place to which only you have access.
Create Azure Databricks Linked Service
In your ADF environment, navigate to the left pane and click the "Manage" icon. In the Manage session, click on "+ New." Select the "Compute" tab in the new window, then click on Azure Databricks.

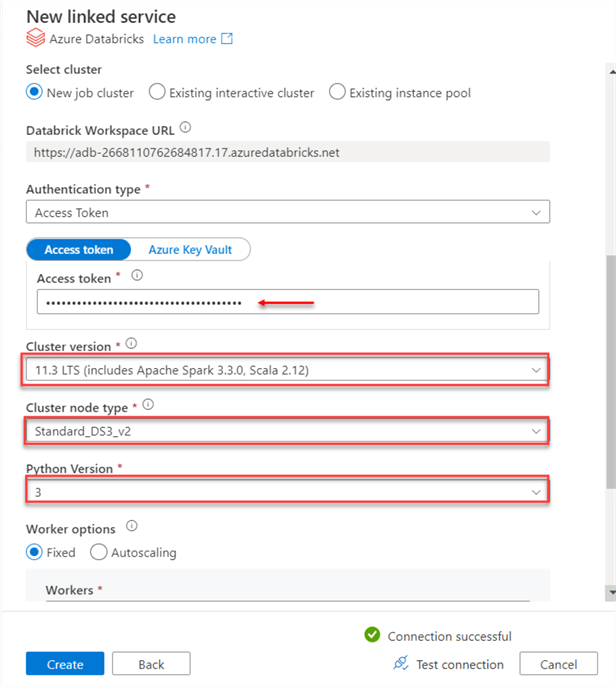
Set Up Serviced Link for Databricks
In your Azure Databricks linked service, you must fill in the correct configuration settings.
Note: Ensure all information in the Linked Service is the same as the Azure Databricks cluster created. The image below helps explain the configuration process for the Databricks service.
Activity Pipeline for Azure Databricks
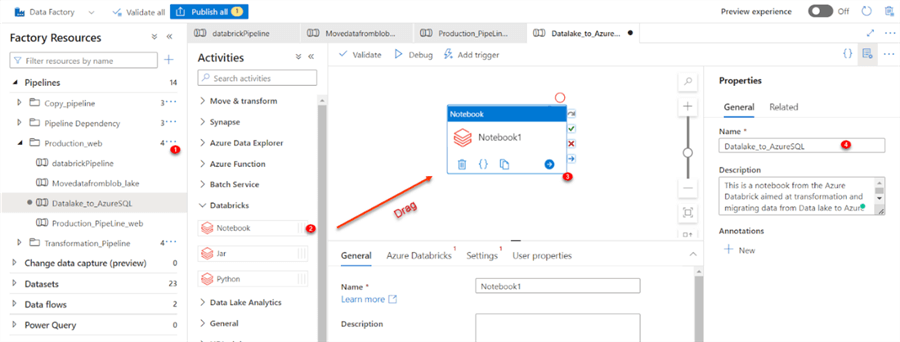
Step 1: Create a Pipeline Activity
In the ADF author window, create a new activity. Search for the Databricks and drag Notebook to the activity pipeline environment. You are also expected to name your Notebook activity or leave it as the default name.
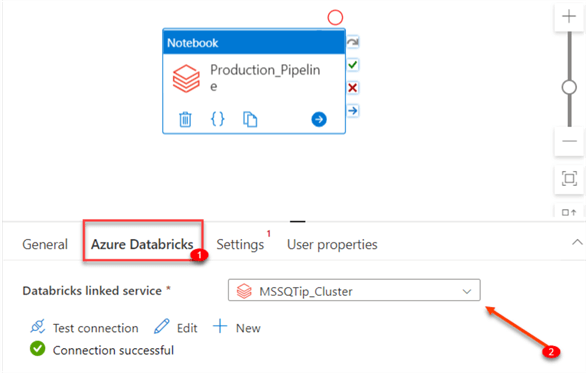
Step 2: Activity Settings and Configuration
- Databricks Linked Service: In your activity setting (Notebook), click on the Azure Databricks tab and select the correct Databricks linked service we created.
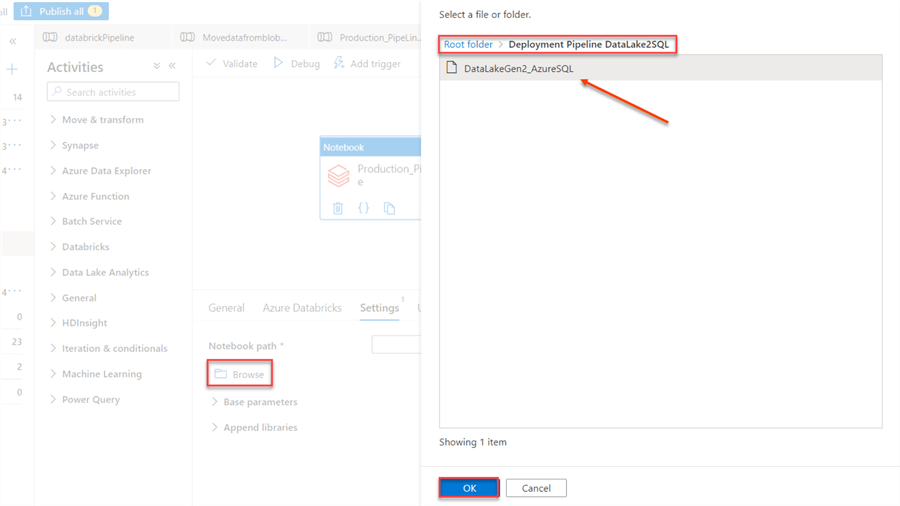
- Notebook: Click on the "Settings" tab, then browse to the directory of the Notebook in the Azure Databricks root folder.
Publish Pipeline
To save the entire activity we created in ADF, click on the Publish all icon at the top left corner.
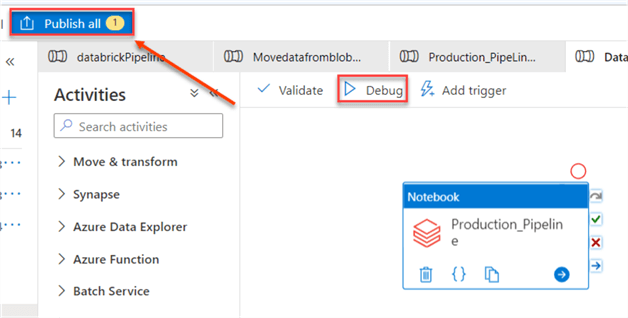
Debug Pipeline
To run the pipeline, click on the "Debug" icon. This will run the entire Notebook activity pipeline. This starts an in-job cluster in Azure Databricks. It should take a couple of minutes, depending on the ETL pipeline you want to run.
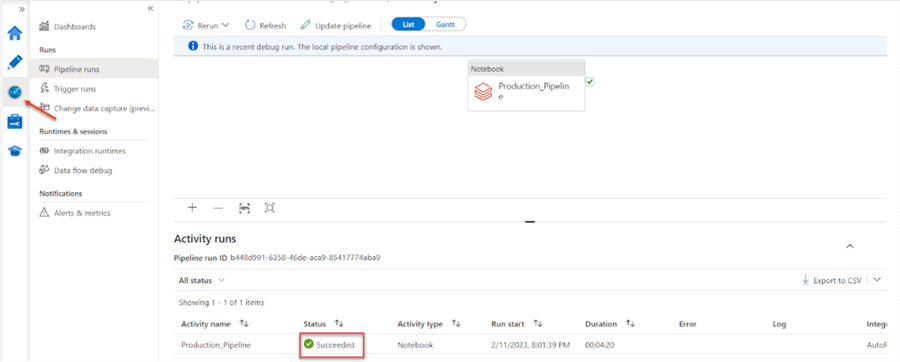
To monitor the pipeline activity and check the debugging status, click on the "monitor" tab and select debug. This should provide you with the status.
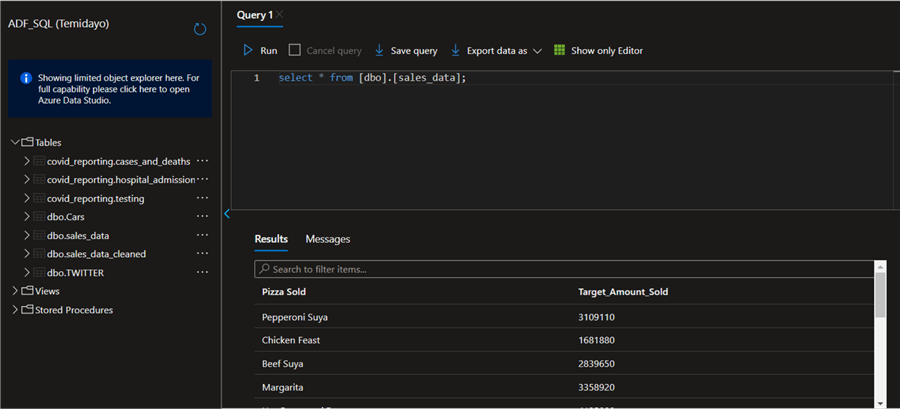
Query Result
In your Azure Portal, select the Azure SQL resource table you migrated the transformed data into and run the SELECT * FROM query to see your result.
Automate Pipeline
Data Engineering involves automating the ETL process. To achieve this, we will create a "storage event trigger," which activates the entire ETL process whenever data is uploaded into the Azure Data Lake Gen 2 storage.
Truncate Data Table
Truncating removes all data from a table but keeps the table structure intact. Let’s remove the sales_data and repeat the ETL process, but this time with an event-based trigger.
Truncate table [dbo].[sales_data];

Create Storage Event Trigger
Now that we have deleted all the data from the Azure SQL, let's create a "storage-based event trigger" in ADF.
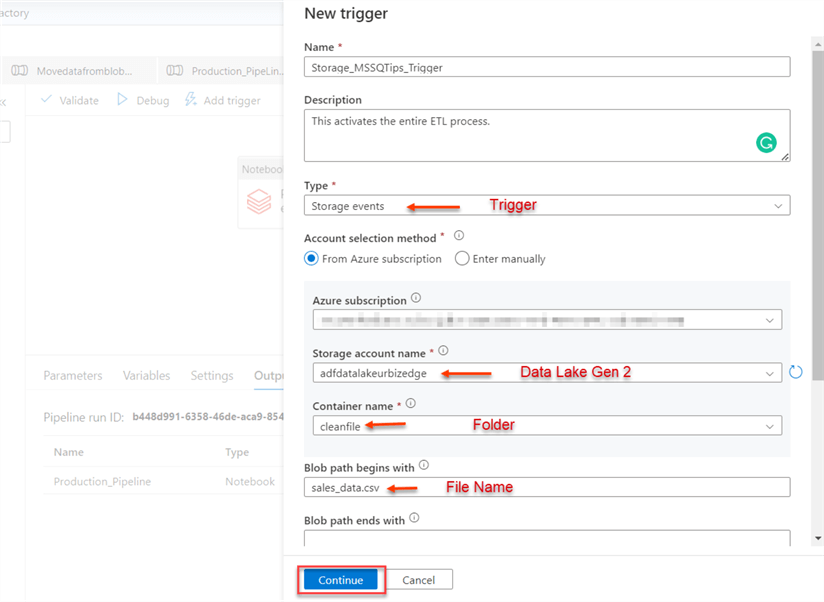
The steps below show how to create an event-based trigger in ADF:
- Type: This indicates the type of trigger we want to work with.
- Subscription: Select the subscription you are currently on.
- Storage account name: We will use the Azure Data Lake Gen 2 storage.
- Container name: Select the folder to which the file will be uploaded in your data lake.
- The blob path begins with: Copy the file name upon which you want to base your trigger.
Publish All
You need to click on the Continue icon to activate your trigger.
Test Trigger
Now that we are done creating the event-based storage trigger let's head to Azure Data Lake Gen 2 and upload the sales_data to the storage.
Upload Data
In your Azure Data Lake Gen2, navigate to the cleanfile folder, and click "Upload." Select the sales_data file from your local machine.

Note: As soon as the files are uploaded, this triggers the entire pipeline in Azure Data Factory.
Monitor
In ADF, click on the monitor pane with Triggered by: All configured then you will see that the pipeline ran successfully.

Test
Now that the pipeline has run successfully head to your Azure SQL and run the SELECT FROM function to view the entire data.
Conclusion
In this article, you learned different Azure Databricks applications and how to mount Azure Data Lake Gen 2 on Azure Databricks to perform data transformation and migration to Azure SQL database. We also created an event-based storage trigger, which helped us improve the entire process and reduce human interaction to the nearest minimum.
It is important to note that including other Azure resources, like Azure Function and Azure Logic Apps, can further improve the ETL process. It will also further help in automating the entire process.
To learn more about Azure, check out the Azure Tips segment on MSSQLTips.com or subscribe to the MSSQLTips.com newsletter.
Next Steps
- Using Control Flow Activities
- Azure Functions
- Azure Databricks
- Check out related articles:


About the author
 Temidayo Omoniyi is a Microsoft Certified Data Analyst, Microsoft Certified Trainer, Azure Data Engineer, Content Creator, and Technical writer with over 3 years of experience.
 This author pledges the content of this article is based on professional experience and not AI generated.
View all my tips
Article Last Updated: 2023-03-24