Problem
As a SQL/BI developer, I want to run and store my SQL scripts and documentation efficiently in a Notebook as an alternative to using Azure Data Studio SQL Notebooks since Azure Data Studio is retiring soon. Read on to learn more about Visual Studio Code Polyglot Notebooks.
Solution
The solution is to use Polyglot Notebook in Visual Studio Code to perform similar SQL-based operations and keep documentation preserved in the same way we do using Azure Data Studio Jupyter Notebook with SQL kernel.
In this tip, we will explore how to use Visual Studio Code Polyglot Notebooks to run and preserve SQL scripts successfully as an alternative to running SQL Scripts in Azure Data Studio SQL Notebooks.
FAQ about Polyglot Notebooks and SQL Notebooks
Let us look at what a Jupyter Notebook is, how it differs from the special SQL Notebooks that are specifically used in Azure Data Studio, and why Visual Studio Code Polyglot Notebook is a good alternative to SQL Notebook.
What is a Jupyter Notebook?
A Jupyter Notebook is simply a file with interactive capabilities that allows its developer to mix and match (descriptive) text, code, and visualizations in one file. One of the purposes of using Jupyter Notebook is to keep a live version of documentation with code that can run at the same time.
Jupyter Notebook typically uses the Python language to run the code.
What is a Cell in Jupyter Notebook?
A cell is a portion of the Notebook that can be a formatted text, a piece of code, or even a visual. We can run all the cells in one go or individually, as per requirements.
What is a SQL Notebook in Azure Data Studio?
Azure Data Studio specifically provides the functionality to use Jupyter Notebooks, which typically use the Python language, to run SQL code in them called SQL Notebooks.
The SQL Notebooks created in Azure Data Studio are a specialized form of Jupyter Notebooks that can run SQL scripts natively by using SQL Kernel connected to a local, remote, or cloud SQL database.
What is the Problem with SQL Notebooks in Azure Data Studio?
You might ask why not use Azure Data Studio SQL Notebooks if this is a convenient way. There is no problem with SQL Notebooks in Azure Data Studio. However, as mentioned before, Azure Data Studio is retiring on February 28, 2026, and Microsoft now recommends using Visual Studio Code for newer developments and migrating any existing work.
What is the Closest Alternative to Azure Data Studio SQL Notebooks in Visual Studio Code?
The closest alternative to Azure Data Studio SQL Notebooks is Polyglot Notebooks in Visual Studio Code.
What is a Polyglot Notebook?
A Polyglot Notebook is a combination of Polyglot programming and Jupyter Notebook that we can use to run SQL scripts directly as if we are running SQL code against a native SQL client, like SQL Server Management Studio (SSMS).
There is no need to use wrapper libraries or magic commands to run SQL code once you are using Polyglot Notebook.
What is Polyglot Programming?
Polyglot programming is a programming style that uses multiple languages, as per their strengths, to maximize the speed and strength of achieving an objective.
For example, you can use SQL, JavaScript, and PowerShell in a single Polyglot Notebook in each cell to get the most out of these languages, provided the purpose is served to achieve the objective rather than to demonstrate that multiple programming languages are in use.
However, the scope of this tip is limited to using Polyglot Notebook for SQL tasks and operations similar to the way we do in SQL Notebooks in Azure Data Studio.
Azure Data Studio SQL Notebooks vs Visual Studio Code Polyglot Notebooks
Please note that SQL Notebooks are not supported in Visual Studio Code, and the best alternative way to achieve a similar functionality is via Visual Studio Polyglot Notebooks. However, both SQL Notebooks in Azure Data Studio and Polyglot Notebooks in Visual Studio Code rely on SQL kernel, the engine that helps to run queries against a database.
Getting Started with Visual Studio Code Polyglot Notebooks
Now that we know what Polyglot Notebooks are, it is time to start hands-on experience by configuring, writing, and running SQL scripts and their documentation in Visual Studio Code.
Getting Visual Studio Code (VS Code) Ready
Please install the latest version of VS Code from the official website.
This tip assumes that you have already installed the latest version of VS Code and are familiar with the basics of VS Code.
Requirements for Polyglot Notebooks in VS Code
The following two items are required to use Polyglot Notebooks in VS Code:
- Polyglot Notebooks extension
- .NET 9 SDK
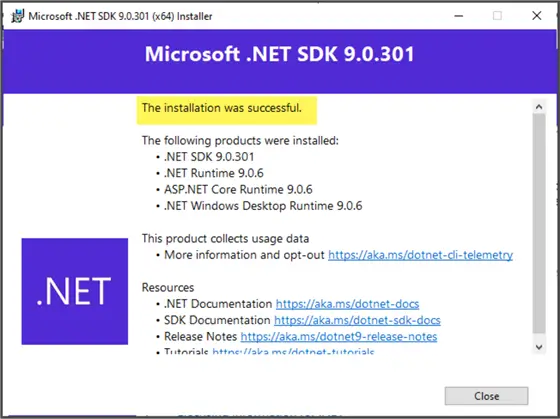
Note: In this tip, we assume that the latest .NET 9 SDK is installed on your machine. If it is not, then use this link to install and choose your platform: Download .NET 9.0 (Linux, macOS, and Windows) | .NET.
However, if you want to install on a Windows 64-bit machine, then use the this link: Download .NET 9.0 SDK (v9.0.301) – Windows x64 Installer.
A successful .NET 9.0 SDK installation is shown below:
Installing Polyglot Notebooks Extension
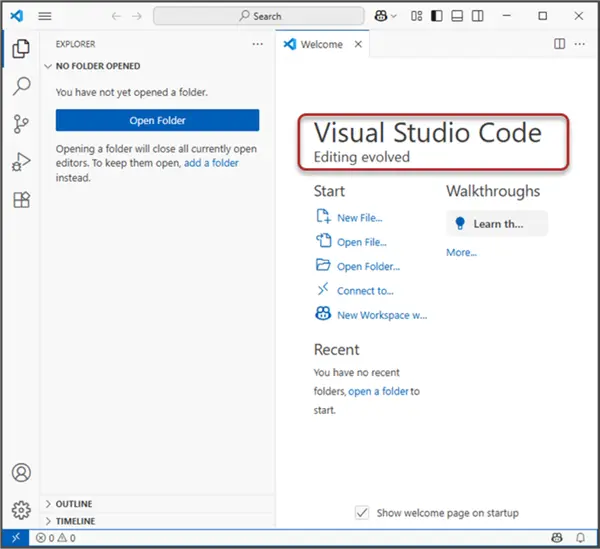
Open VS Code as shown below by clicking on the app on your machine:
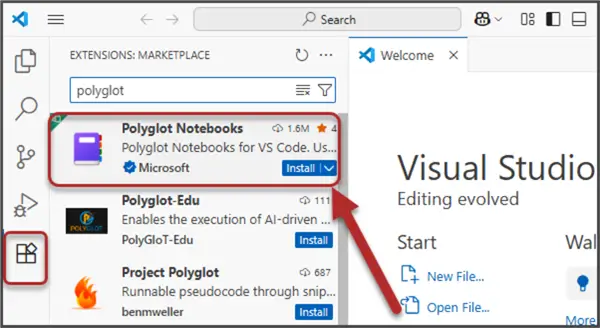
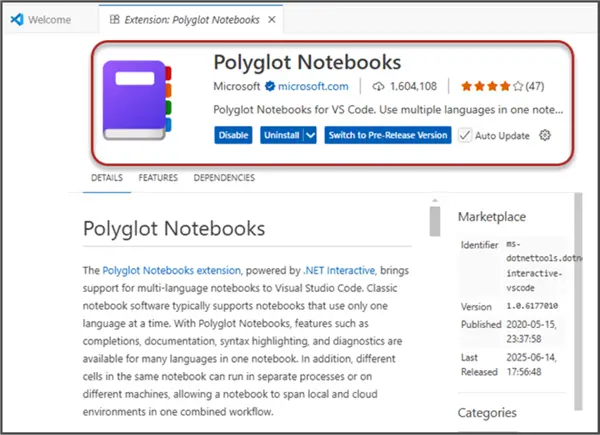
Switch to the extensions (CTRL+SHIFT+X) and type ‘polyglot’ in the search box. This should return the Polyglot Notebook extension by Microsoft, along with some other third-party extensions.
Click on Install to begin the installation process.
A successful installation of Polyglot Notebooks extension should be similar to the following screenshot.
Congratulations! You have successfully installed the desired extension.
.NET Interactive Engine and Polyglot Notebooks
Please note this extension is fully backed up by the .NET Interactive engine. This is the core engine that makes the multi-language support available in a Notebook, including SQL. In this manner, the Polyglot Notebooks with SQL capabilities are more powerful than Azure Data Studio SQL Notebooks because the context switching from one language to another is much more efficient in Polyglot Notebooks, while SQL Notebooks are limited to running SQL scripts only (of course, the text part with full Markdown support is present in both Notebooks).
Polyglot Notebooks Supported Languages and Variable Sharing Features
The following languages are supported by Polyglot Notebooks:
- C#
- F#
- PowerShell
- JavaScript
- SQL
- KQL (Kusto Query Language)
- Python
- R
- HTML
- HTTP
- Mermaid
Interestingly, Polyglot Notebooks allow variables sharing within these supported languages, except Mermaid and HTML, where variable sharing is not possible.
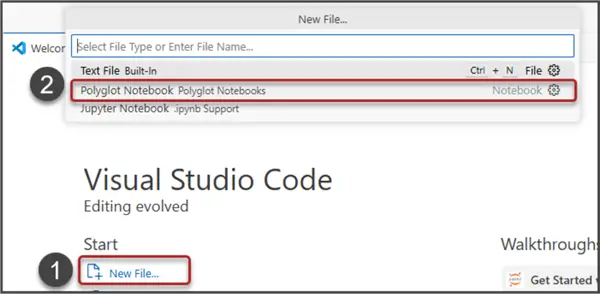
Creating First Polyglot Notebook in VS Code
Let us create our first Polyglot Notebook in VS Code by clicking on New File… and selecting Polyglot Notebook, as shown below:
If .NET 9 SDK is not installed, you will be asked to install it first. Simply click on Install here to go to the official website to download and install it:
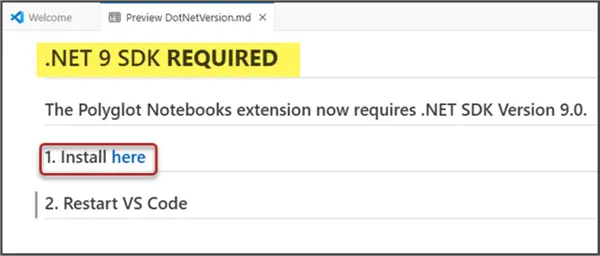
You will be taken to the download page where you can select the most suitable option for you. In this case, it is x64 and, as mentioned earlier, this tip assumes .NET SDK has already been installed.
Choosing Between .dib or .ipynb Extensions
After clicking New File.. and selecting Polyglot Notebook, you will be asked to choose either .dib or .ipynb extension for your Polyglot notebook, as shown below.

The difference between dib and ipynb is:
- .dib Polyglot Notebook: Only saves the code along with text (recommended for preserving sensitive outputs, such as API Key).
- .ipynb Polyglot Notebook: Not only saves the code and text, but also the output of the code.
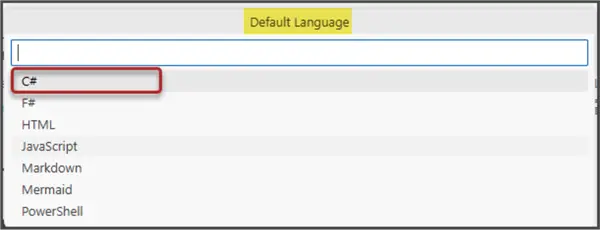
Choosing Default Language – C#
Next, select C# (C Sharp) as the default language. This language enables Azure SQL support to connect to our Azure SQL database.
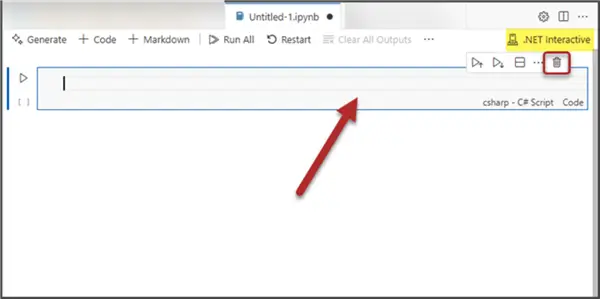
Deleting the First Auto-generated Code Cell
Delete the first automatically generated code by clicking on the bin icon on the top right side of the cell, as shown below:
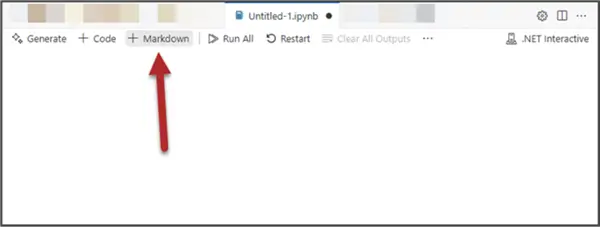
Adding a Markdown Cell
Now, add a Markdown cell by clicking the Markdown icon from the menu bar of the Notebook to add some text to the Notebook first.
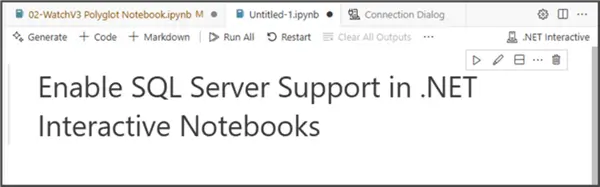
Add the following code to the Markdown text:
# Enable SQL Server Support in .NET Interactive Notebooks
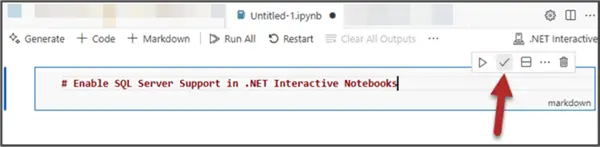
Next, click on the tick arrow on the top right side to complete editing the text.
Enable SQL Server Support in .NET Interactive Notebooks (Polyglot Notebooks)
One of the first things is to initialize the Polyglot Notebook to connect to our SQL database, which is an Azure SQL Database.
However, getting connected to the database, we need to enable SQL Server support in the Notebook by adding the following code to the code cell:
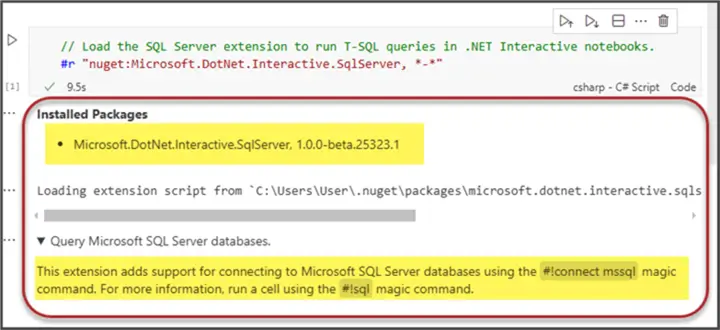
//MSSQLTips.com (C# Script)
// Load the SQL Server extension to run T-SQL queries in .NET Interactive notebooks.
#r "nuget:Microsoft.DotNet.Interactive.SqlServer, *-*"
Run the cell by pressing the key combination (CTRL+ALT+Enter) or clicking the play button at the top left side of the cell:

The following output confirms that you have successfully enabled SQL Server support in the Polyglot Notebook:
Connect to SQL Database in Polyglot Notebook
The next step is to connect to our desired SQL database, which is Azure SQL Database.
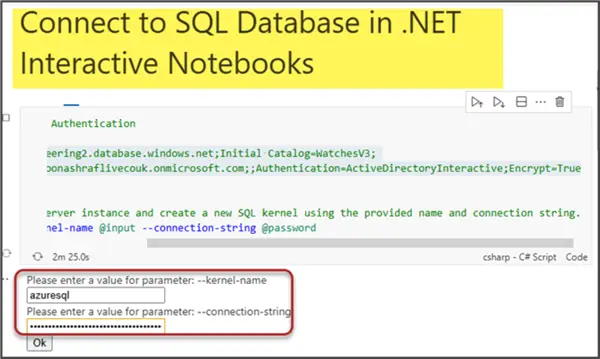
First, create a new markdown cell and add the following code to it:
# Connect to SQL Database in .NET Interactive NotebooksNext, connect to your desired SQL Database using the relevant connection string and the code below which is specifically for connecting to Azure SQL database:
//MSSQLTips.com (C# Script)
// Microsoft Entra ID Authentication
/*
Data Source=<ServerName>;Initial Catalog=<DatabaseName>;
User ID=<youruserid>;Authentication=ActiveDirectoryInteractive;Encrypt=True
 */

// Connect to a SQL Server instance and create a new SQL kernel using the provided name and connection string.
#!connect mssql --kernel-name @input --connection-string @password
Now, when you run this cell, you will be asked to input the kernel name (azuresql) and connection string:
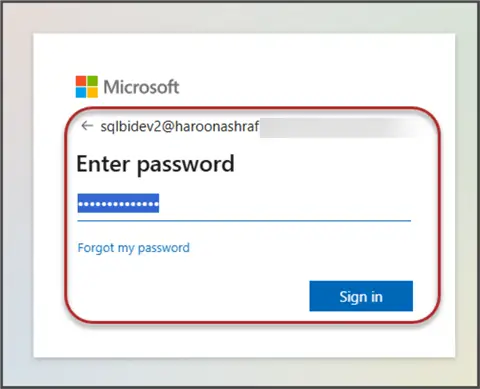
Once the connection string is correct, you will be asked to input your Azure credentials in a browser window. Note: This is a recommended approach because you don’t need to store the credentials in this Notebook. Instead, you have to provide the credentials on the fly when the Notebook cell runs. In this way, the credentials remain secure and safe.
The database has been successfully connected when you see the following message on the Notebook:

Query the Database
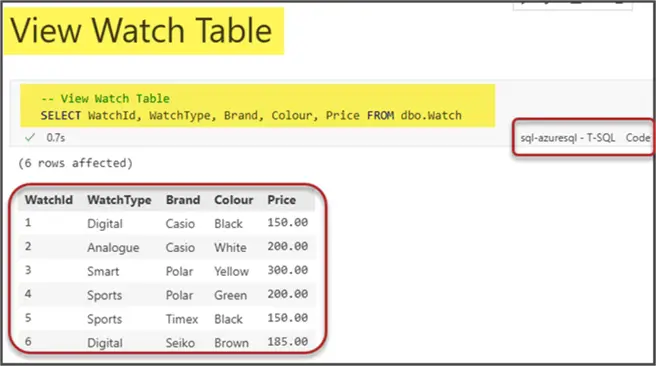
First create a new cell using Markdown to describe viewing the Watch table results by inputting the following line of code:
# View Watch TableThen we create another cell. This time select the sql-azuresql kernel and leave the next option as Code, as shown below:
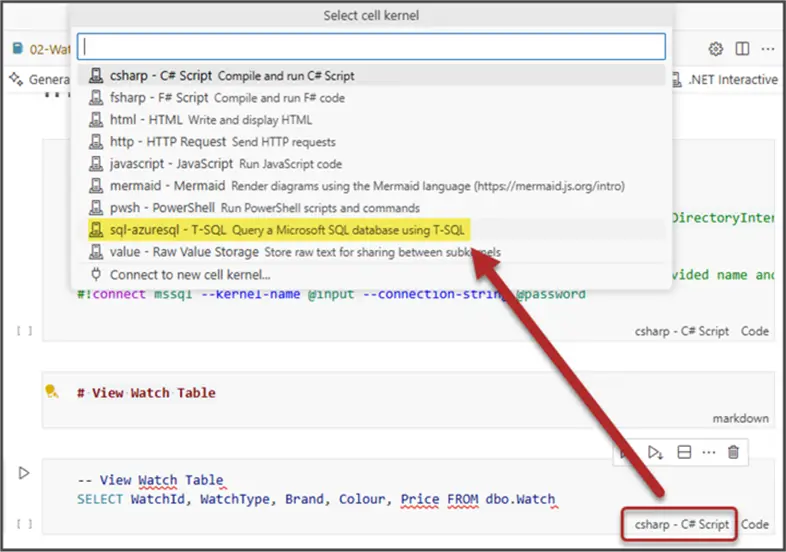
Write the following code into the cell:
--MSSQLTips.com (sql-azuresql T-SQL)
-- View Watch Table
SELECT WatchId, WatchType, Brand, Colour, Price FROM dbo.Watch
Let us run the cell and view the output:
Congratulations!
You have successfully learned how to use Visual Studio Code Polyglot Notebooks to run your SQL scripts and queries directly in the same manner you do with Azure Data Studio Jupyter (SQL) Notebooks.
Since Azure Data Studio will ultimately retire, it is always good to start using Visual Studio Code Polyglot Notebooks sooner rather than later, whether you are working as a beginner or a professional.
Next Steps
- The Polyglot Notebooks can also be used as a live document to create your documentation and code in the same place to run again and again as per your requirements.
- You can work on a professional scenario by creating a new cell that tells you the total number of digital watches and another cell that shows you the total number of other watches, which includes all the other types. Once you have these two cells ready, try adding and modifying the data in the back end to see how the results differ each time. This will give you a good idea about how useful these Notebooks can be.
- Also, you will be surprised that these Notebooks can also be used for data cleaning and preparation purposes for further analysis or reporting, or even for processing. So, please add a duplicate record in the back end and create a cell to clean the data by removing duplicates.
- Another interesting use of these Notebooks is to share the output of a cell with another cell, which means the SQL output can be used by Python for further analysis or transformation.
- Also, you can share variables between the cells.
- Finally, Polyglot Notebooks can also be used as a part of a data pipeline for data cleaning or transformation purposes.
- Please review this tip to see if you can set up a database and create a Polyglot Notebook to perform the same database operations.
