Problem
As part of migrating the MOSS 2007 portal and site contents to SharePoint 2010, moving the existing User Profiles and MySites is also critical. This important task usually leaves a big headache for IT system administrators.
Solution
This solution explains how to achieve that using the database attach method.
Step 1: Take a backup of the MOSS 2007 SSP and the My Site databases through SQL Server.

Step 2: Restore the SSP database as ‘Profile DB’ and the My Site Content database as ‘WSS_Content_MySites’ in the SharePoint 2010 -SQL Server instance.

Step 3: Create a Web Application through SharePoint 2010 Central Administration to host My Site.

Step 4: Attach and upgrade the restored 2007 My Sites database (i.e. WSS_Content_MySites) using the SharePoint 2010 Management Shell.

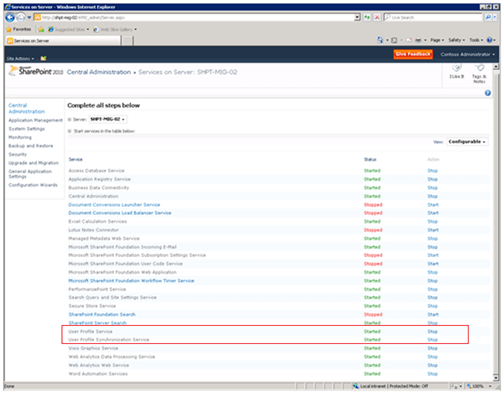
Step 5: Turn off the following services in your SharePoint 2010 Central Administration site:
- User Profile Service
- User Profile Synchronization Service.
Step 6: Now delete the existing User Profile Service Application(s) if they already exist [ in Central Administration -> Application Management -> Manage Service Applications]
- Make sure to check the box to delete the associated data/content
- Reset IIS
Step 7: Create a new User Profile Service Application in Central Administration [Central Administration -> Manage Service Applications -> New]
- Name = User Profile Service Application.
- Create New App Pool.
- Use the restored 2007 SSP database as the “Profile Database Name” (Profile_DB).
- Accept all other default database names.
- Enter the newly created MySites web application URL (e.g. http://mysites) as the default MySites location for the new User Profile Service Application.
- Go to “Administrators” in the ribbon menu for the User Profile Service Application and verify that DOMAIN\farm_account has “Full Control” rights.
- Start the User Profile Service in Central Administration [Central Administration -> Application Management -> Manage Services on Server].
Step 8: Start the User Profile Synchronization service in Central Administration [Central Administration -> Application Management -> Manage Services on Server]
- Use the DOMAIN\farm_account credentials.
- This will take a few minutes…
- Follow progress in the ULSViewer.exe if you are concerned it is failing & filter by Category=”User Profile”.
- Reset IIS.
Step 9: In services.msc on your Central Administration host server (i.e. “App Server”), verify the two ForeFront Identity Management Windows services.
- Services are started.
- Set to startup type “Automatic”.
- Running as DOMAIN\farm_account.
Step 10: Setup the Profile Import [Central Administration -> Manage Service Applications -> User Profile Service Application – click on title]
Step 11: Click on the link to “Add New Synchronization Connection”
- Name = DOMAIN
- Forest Name = sub.domain.local
- Specify a DC = dc.sub.domain.local
- Authentication = Windows Authentication
- Account Name = DOMAIN\ad_sync_account
- Make sure your chosen account has “Replicating Changes” rights in AD.
- Click “Populate Containers”.
- Click “Select All” and click the ‘OK’ Button.
Step 12: Run a Full Import
- Central Administration -> Manage Service Applications” -> “User Profile Service Application” -> “Start Profile Synchronization” -> select the Full Import radio button option
- This will take a few minutes.
Step 13: Setup Profile Sync schedules [Central Administration -> Monitoring -> Timer Jobs]
Step 14: Now we have done everything and it’s time now to test the MySites site with a domain user account.
Next Steps
- Check out MSSQLTips.com for great information about Microsoft SQL Server.
