By: Tim Ford | Comments (3) | Related: > SQL Server Configurations
Problem
In part one of our four-part series on connecting Microsoft Access to a SQL Server database, we outlined the steps for creating a ODBC Data Source Name (DSN) using the SQL Server OLE DB driver. With the advent of SQL Server 2005 we had a new driver at our disposal for the purpose of connecting to SQL Server 2005: the SQL Native Client or SNAC for short. If you want to take advantage of some of the new features associated with SQL 2005 and later you'll need to use SNAC. How is using this driver any different? Are there any new capabilities with this new driver?
Solution
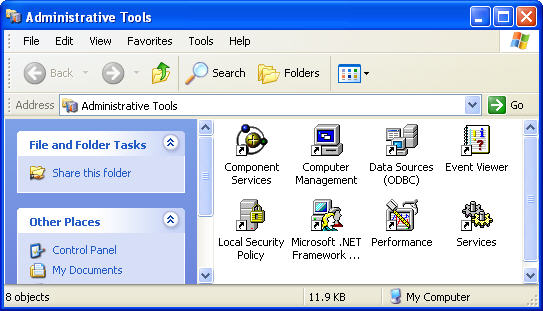
Let's break down the process to show some of the similarities and new opportunities. The initial step in creating any Data Source Name (DSN) is locating the Data Sources (ODBC) Control Panel icon. Navigate to the Administrative Tools via Start\Control Panel.
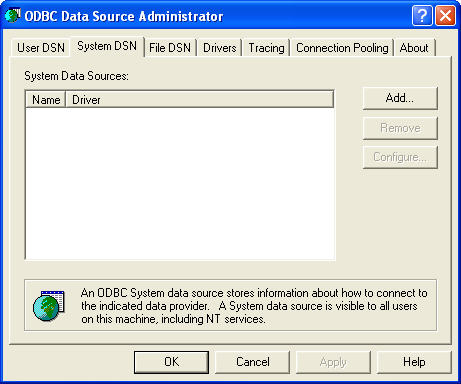
Selecting Data Sources (ODBC) will present you with the ODBC Data Source Administrator dialog box. Depending of the requirements of your environment you may choose to create a User, System, or File DSN. The differences between the three type of DSNs are presented in the first tip in this series. Based upon the fact that a System DSN is available to all users of the workstation or server on which it is created, we will be creating a System DSN in this tip. Furthermore, after the selection of a DSN type the process of creating a DSN is essentially the same.
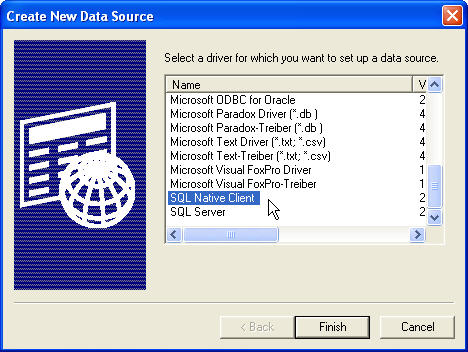
You'll now be presented with option of selecting the driver you'll be utilizing for this DSN. We've previously outlined the process for creating a DSN using the SQL OLE DB driver, this time around we'll explore the SNAC driver-base ODBC DSN. Select the SQL Native Client driver and then click Finish.
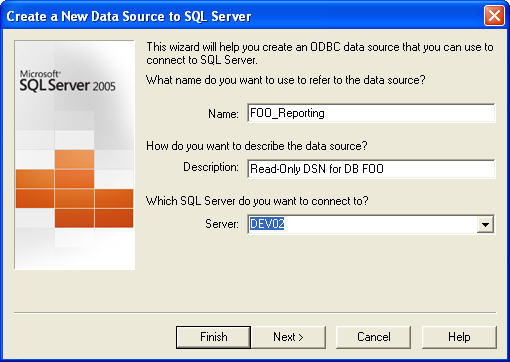
You'll now be prompted for the basic information about your new SQL Server System DSN. Enter a name and description for the DSN and then either type the name of the SQL instance you'll be connecting to or select it from the instances available in the list. Two important things to remember when entering values on this dialog: you will be referring to the DSN name when utilizing it in Access, Excel, or other applications that will be connecting to the database. Be sure that your name is not too cryptic and that it conforms to any naming conventions used in your environment. In regards to the selection of a target Server, remember that this value should be the SQL instance you desire to connect to, not the server itself. If you wish to connect to the SQL1 instance on ServerX, the value you would enter into the Server field on this form would be 'ServerX\SQL1'. Enter the values required for your environment and click Next to continue.
At this point you are now going to be prompted to configure the security for the DSN. You should be familiar with the two options available: Windows NT authentication or SQL Server authentication. Windows authentication will pass the context of the current Win O/S login to the database, whereas SQL security uses a login/password model where both are stored as objects in the master database of the identified SQL instance. Below you will see both options presented. In either case I recommend selecting the check box authorizing a connection to the SQL instance to collect metadata about the login being passed within the DSN. This will allow you to determine if the user context of the DSN will be compatible with the security set up for this user within the SQL instance. It is my recommendation that you set up security in the SQL instance first, before creating any associated DSNs.
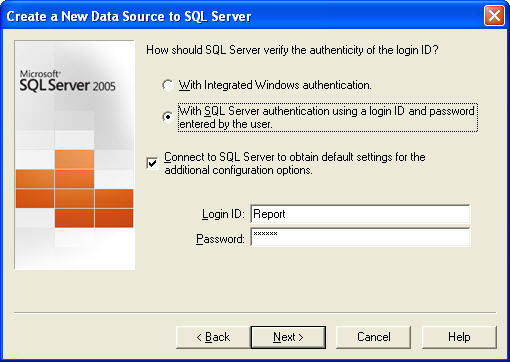
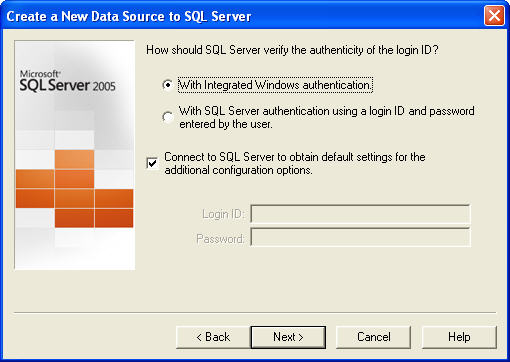
You'll note that when working with the Windows method of authentication, you are unable to enter a login and password. This is specifically due to the fact that the login passed to the database for authentication will be dependent upon what login is active on the workstation/server at the time of use. Later in the DSN creation process you'll be able to "test" the DSN. During this test, when using Windows security mode, the test will be performed with your active network login as the active user of the system at the time. Select Next to proceed.
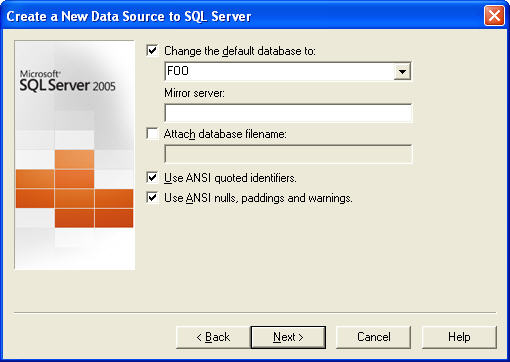
Select the database you want to associate with this DSN. All databases that the user has any level of rights to is listed in the database combo box. If you do not see the database in this list it is because:
- If using Windows security, you as the DSN creator, do not have rights to the database
- If using SQL security, either the login\password combination is incorrect or the login does not have database rights.
After selecting the database, determine the connection-level settings for quoted identifiers and ANSI nulls, padding, and warnings the select Next.
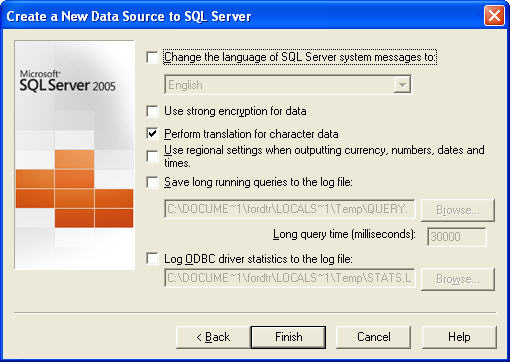
On this form I strongly recommend that you leave all defaults in place and continue. There may be reasons to deviate from the defaults but those would most-likely be limited to situations where you're serving data out globally to users that have different language or currency formats, or if you are not utilizing encryption schemes available to the relational database management system (RDBMS). Nine times out of ten, simply select Finish and move on.
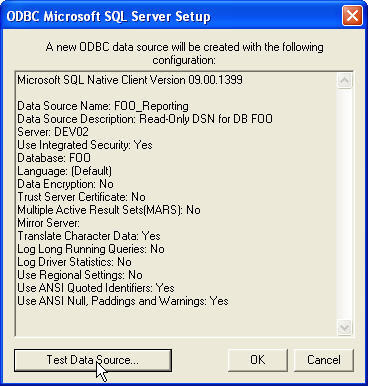
I mentioned earlier that you would have the chance to test your DSN and this is the time. Select the 'Test Data Source' button on the bottom left of the interface. The DSN settings are displayed below prior to proceeding with testing of both a Windows security and a SQL security based DSN.

If for some reason your DSN test fails, possible issues may include:
- The login\password does not match the login\password combination on the SQL instance you're connecting to in the DSN
- The login specified does not have rights to the SQL instance or database
- The SQL instance is not online or is not accepting connections for another reason
- Networking issues between the workstation or server where you're creating the DSN and the server hosting the SQL instance
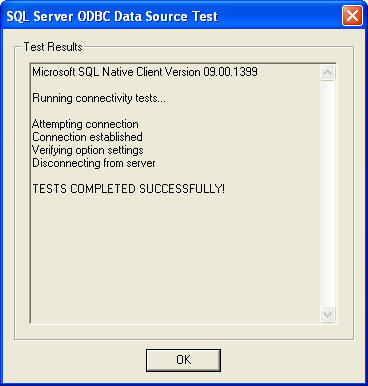
Once you work out any possible configuration issues, you should receive results similar to the following screen.
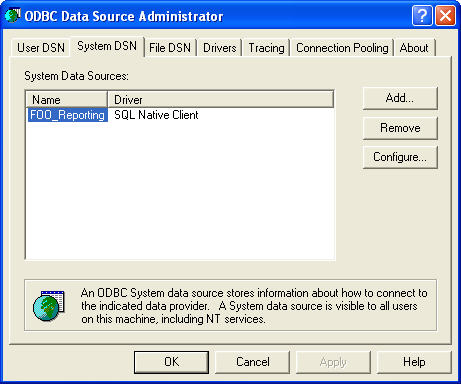
Clicking OK will then return you to the ODBC Data Source Administrator dialog. If at a later date you need to edit the DSN you just created, you would do so by selecting the DSN and then clicking the 'Configure...' button.
Next Steps
- Review the first tip in this series on creating SQL OLEDB DSNs
- Stay tuned for subsequent tips on linking Access objects to SQL database objects, and creating SQL Pass-Through Queries in Microsoft Access.
- Learn more about Named Instances at MSSQLTips.com
- Create your own DSN and configure it with different settings. What happens when you attempt to configure a DSN with incorrect security?


About the author
 Tim Ford is a Senior Database Administrator with MindBody.
This author pledges the content of this article is based on professional experience and not AI generated.
View all my tips
