By: Graham Okely | Comments (1) | Related: > Application Development
Problem
You are an experienced SQL Server DBA and you wish to use PHP to provide some front end web pages to help with monitoring and management. How do you setup PHP and SQL Server? What are the steps? What needs to be installed? Can you provide any checklists?
Solution
Here are some tips on building a development environment for PHP and SQL Server. Using my checklist will help you cover each point.
Step 1: Reboot Server/PC/Laptop
Install all Windows Updates and reboot your server. Backup anything important just in case.
Step 2: Install SQL Server
Get SQL Server up and running on your machine. In my case I used my basic desktop that already had SQL Server 2012 Express running.
Here are SQL Server installation related tips:
Here are SQL Server Express Edition related tips:
Step 3: Install PHP
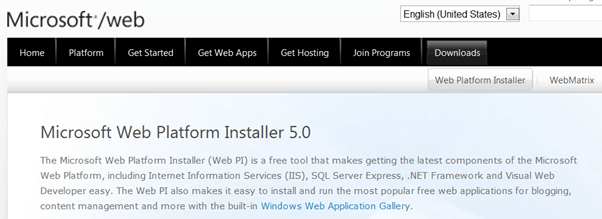
If you are installing PHP on a Windows desktop system use this guide: Microsoft Web Platform Installer.
"The Microsoft Web Platform Installer (Web PI) is a free tool that makes getting the latest components of the Microsoft Web Platform, including Internet Information Services (IIS), SQL Server Express, .NET Framework and Visual Web Developer easy. The Web PI also makes it easy to install and run the most popular free web applications for blogging, content management and more with the built-in Windows Web Application Gallery."

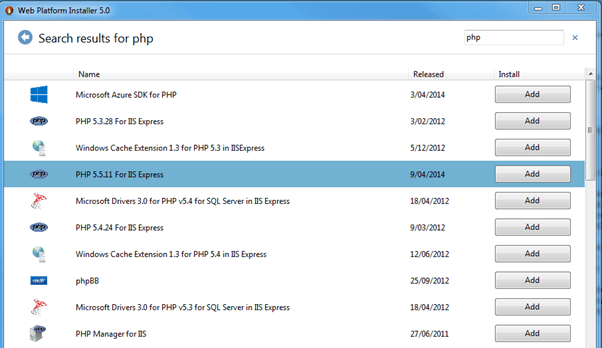
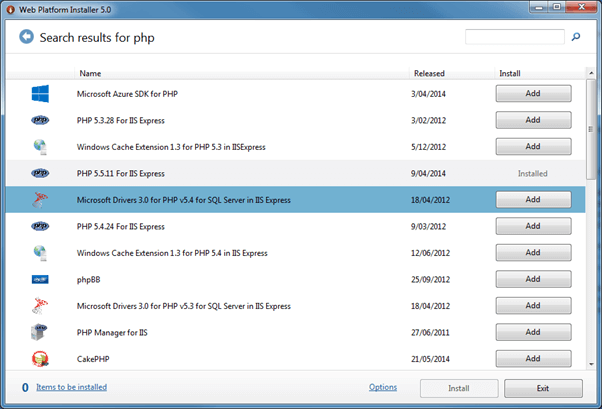
The installer works well. Click on the green "Free Download" button. Then run the wpilauncher.exe application that was downloaded. Click on the Applications button and then search for PHP. Add the PHP version most relevant to your system. Note that you can install the Microsoft Drivers for PHP at this point, but I explain the installation more later in this tip. As a DBA I choose NOT to install SQL Server via this Web Platform Installer.
Note the installation folder that PHP uses.
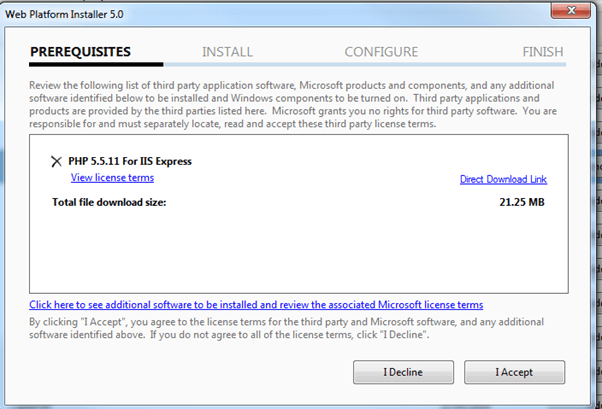
Accept agreement.
A few applications to install.
Install the SQL Server drivers for PHP.
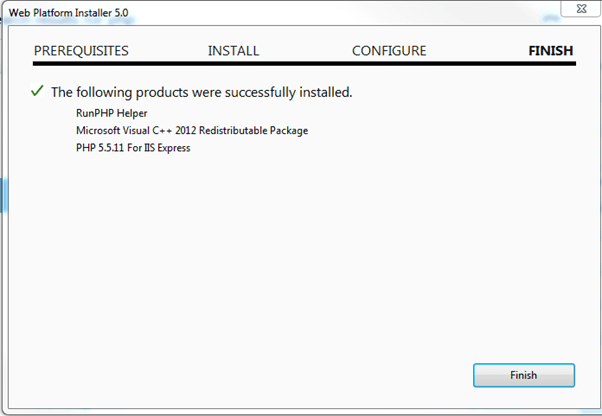
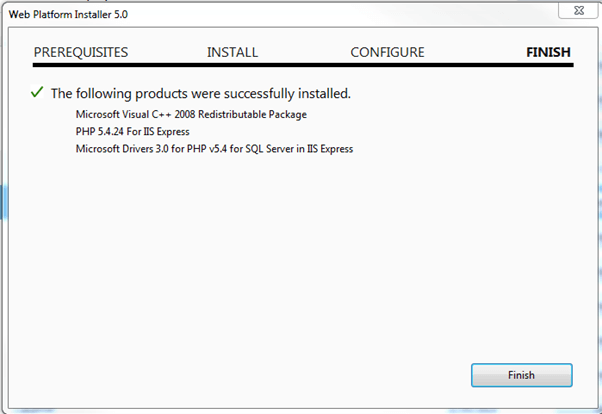
Confirm the applications installed.
At this point reboot your computer and ensure all is working correctly.
Step 4: Internet Information Services (IIS)
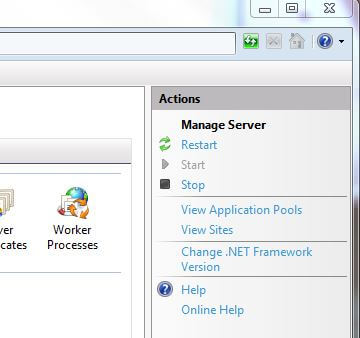
The next step is getting Internet Information Services (IIS) running. First see if the application is running. Start a browser and type in localhost as the URL and see if a basic page is displayed. If not, then you need to start IIS. In Windows click on the Start button and the Run option in Windows then enter "inetmgr" as documented in this Microsoft web site. Click on the start link as shown below to get IIS up and running. If your operating system does not support this command then search Microsoft TechNet.
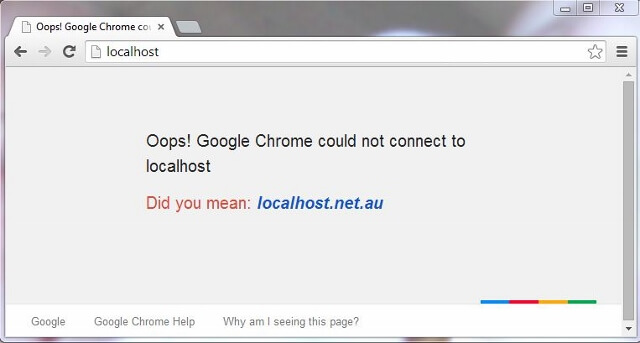
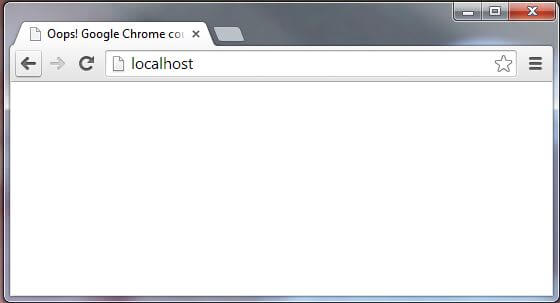
To test if IIS is running start a browser. Then enter "localhost" as the URL and refresh the browser. If this error message is displayed then IIS is NOT running.
A blank browser will mean IIS is running, but no local file was found to display.
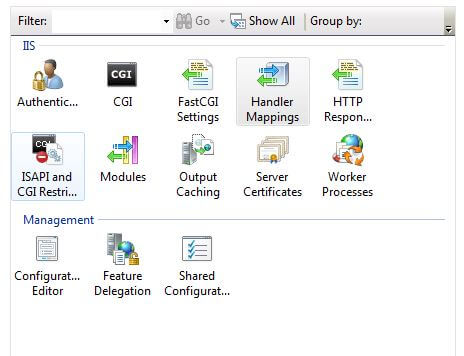
Step 5: Configure IIS
Next you need to configure IIS. First we need to turn on FastCGI. 'FastCGI reduces overhead associated with interfacing the web server and CGI programs'.
Click on Start -> Run and type optionalfeatures.exe and click OK. Then expand Internet Information Services -> World Wide Web Services -> Application Development Features -> enable CGI -> click OK and wait until the installation is complete.

Next we need to tell PHP that we have enabled FastCGI. We do that in the php.ini configuration file. When you installed PHP you should have noted the installation folder. Mine is in C:\Program Files\PHP\v5.3\php.ini
Backup *.ini files like this prior to editing them. Simply copy the file and place it in a backup folder first then edit the original file with your favorite editor.
Search for the section titled [WebPIChanges] and edit or add these settings.
fastcgi.impersonate = 1
fastcgi.logging = 0
cgi.fix_pathinfo=1
cgi.force_redirect = 0
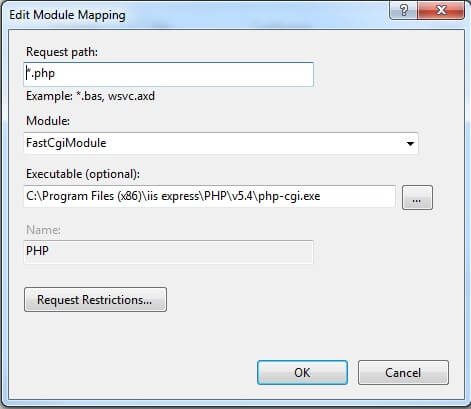
Next we set the PHP handler mapping. What this does is tell the browser to run the PHP.exe command when it encounters a file with an extension of *.php.
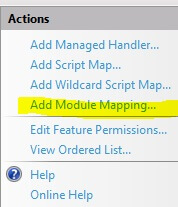
Open the dialog box by clicking on Start in Windows then click on Run and type inetmgr and click OK. In the manager double click on Handler Mappings and then click on Add Managed Handler.
Add the details and click OK.
Restart IIS or even your server to ensure all is OK.
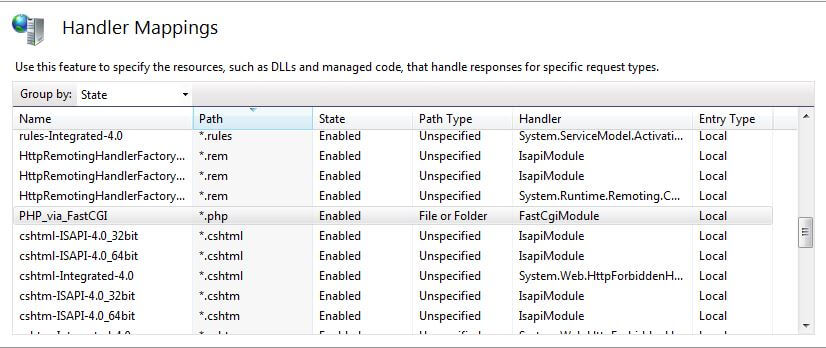
Your Handler Mappings should show *.php allocated.

Your FastCGI Settings should show the path to php-cgi.exe. Reboot your machine again.
If you get stuck use this resource - FastCGI Configuration.
*** NOTE *** - For Mac users install or enable Apache and PHP on a MacBook
I decided to use PHP as the front end because I learned PHP at University and PHP could run on my Mac and Windows systems. I choose to configure my Mac after I had PHP running on my Windows machine. If you have a Mac with OS X try this resource for enabling Apache.
Mac OS X comes bundled with PHP. Here is a guide for enabling PHP on OS X.
Note that the Mac will not actually connect to the SQL Server directly. The Mac can use the PHP pages on your chosen server. The PHP pages on the machine running SQL Server use the SQL Server PHP drivers to access SQL Server. You can develop pages on the Mac, but copy them to the Windows machine when they need to connect to SQL Server. You may ask why then have PHP on the Mac? The answer is that I can develop pages remotely.
Step 6: Confirm PHP runs on each machine
The usual method to confirm PHP is installed and available to you is to "run" a simple command. The command is echo phpinfo(); Follow these steps to do that:
Step 1
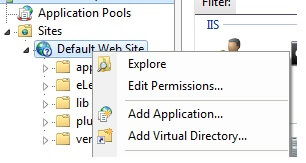
Find your "DOCUMENT_ROOT".
The "DOCUMENT_ROOT" is the folder that holds the files that the web service can see.
Note that the "DOCUMENT_ROOT" folder is actually an IIS setting.
So start inetmgr again and right click on "Default Web Site" and choose explore.
Windows Explorer will open up at your "DOCUMENT_ROOT".
Step 2
Save this snip of PHP into a file called phpinfo.php
<?php

echo phpinfo();

?>
Step 3
Place that file into your "DOCUMENT_ROOT" folder.
On my machine that was C:\inetpub\wwwroot by default. This is the PHP code in that snip of PHP.
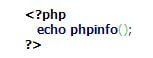
The echo means display and the phpinfo() function returns all the data associated with PHP and your machine. Note: It is a PHP file and needs to be located in or below the "DOCUMENT_ROOT" on my system that is C:\inetpub\wwwroot\Index.php
IIS and PHP work together to process PHP commands and display the result in your computer browser. For example the result of the command phpinfo() should show something like this:

And so on.... as the result is a lot of data.
Step 7: Configure PHP for the SQL Server drivers
Now we need to tell PHP, via a configuration file, about those SQL Server drivers.
Locate your php.ini file by looking in the phpinfo output page.
Mine is located in C:\Program Files\PHP\v5.3\php.ini
The PHP.ini file is the main PHP configuration file. Be careful with it.
Copy that file into a backup folder to back it up before editing it.
Edit the file using your favorite editor.
Then add these two driver names to it. Under the [ExtensionList] section.
[ExtensionList]
extension=php_pdo_sqlsrv.dll
extension=php_sqlsrv.dll
If you get stuck try this blog on SQL Server drivers.
Reboot your machine.
Step 8: Create a SQL Server Login and User for Database Access
Don't use the sa login to access SQL Server from your PHP pages. (Did I need to say that?) Create a specific login and user name. In terms of naming conventions, if you are you just getting reporting data from SQL Server then try a login name like "Report_Reader". Or if you plan to read and write consider a login name such as "Data_User_RW". Make your life easy by using names that are intuitive. Here is some T-SQL below to create a login called "Author_RW".
USE [master]
GO

CREATE LOGIN [Author_RW] WITH PASSWORD=N'MakeOneUp',
DEFAULT_DATABASE=[master], DEFAULT_LANGUAGE=[us_english],
CHECK_EXPIRATION=OFF, CHECK_POLICY=OFF
GO
I generally recommend using the master database as the default database for your logins rather than the user defined database just in case you drop your database or it is inaccessible. On start-up SQL Server should have master available and so your login should be able to access the SQL Server instance.
Grant that user read and write access to your database or whatever permissions are needed. In my example, I will add data reader permissions to the msdb database to allow the user to read database backup information.
CREATE DATABASE [Creativity]
GO
USE [Creativity]
GO
CREATE USER [Author_RW] FOR LOGIN [Author_RW] WITH DEFAULT_SCHEMA=[dbo]
GO
ALTER ROLE [db_datareader] ADD MEMBER [Author_RW]
GO
ALTER ROLE [db_datawriter] ADD MEMBER [Author_RW]
GO


-- Add data reader ONLY over msdb so we can see backup records
USE [msdb]
GO
CREATE USER [Author_RW] FOR LOGIN [Author_RW]
GO
USE [msdb]
GO
ALTER ROLE [db_datareader] ADD MEMBER [Author_RW]
GO
Tip: Immediately test that login to access your SQL Server instance via SQL Server Management Studio. Enter the Server Name, for Authentication choose 'SQL Server Authentication' and enter the user name as well as the password.
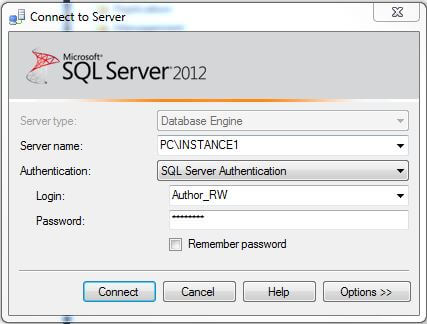
Do not proceed until that login is working as expected.
Step 9: Create a PHP page to test the SQL Server connection
Here is a basic connection method for PHP to SQL Server.
Find your "DOCUMENT_ROOT" as per step 6.
Create a file called Index.php and save that "DOCUMENT_ROOT" folder.
To connect PHP to SQL Server we need these settings:
echo '<html>';
$Instance = "PC\Instance1";
$ConnectionInfo = array( "Database"=>"Creativity", "UID"=>"Author_RW", "PWD"=>"MakeOneUp");
At this point if you do not know PHP then try some tutorials or find a good book at your local library.
Now we use those settings to connect using the command sqlsrv_connect. If the connection fails we will see the errors.
$conn = sqlsrv_connect( $Instance, $ConnectionInfo);
if( $conn ) {
        echo "Connection established to $Instance.";
}else{
 echo "Connection could not be established.";
 print_r($ConnectionInfo);
     die( print_r( sqlsrv_errors(), true));
}
For the initial connection let us check the last backup dates. Note I convert the dates as it is simpler to display the dates in PHP that way. I found fields as normal SQL Server DATETIME format did not display by default using PHP. We will use sqlsrv_query to query the database. When using PHP the period "." is the concatenate command.
$SQL_String = "SELECT
  MAX(sys.sysDataBases.Name) as DatabaseName,
  Coalesce(max(CONVERT(VARCHAR(28),msdb.dbo.BackUpset.BackUp_Finish_Date,120))
               ,'No backup taken') as LastBackupCompleted,
  Coalesce(max(convert(varchar(50),CEILING(msdb.dbo.BackUpset.BackUp_Size/1000/1000)))
               ,'No backup taken') as MBBackedUp
FROM
  sys.sysDataBases
  LEFT OUTER JOIN msdb.dbo.BackUpset
    ON msdb.dbo.BackUpset.DataBase_Name = sys.sysDataBases.Name
GROUP BY sys.sysDataBases.Name
ORDER BY 1";

$result = sqlsrv_query( $conn , $SQL_String) or die ( "sqlsrv_query failed"  );

echo '<table align="center">';
echo '<th>Database</th><th>Last Backup Date (120 format)</th><th>Size MB</th>';
$output = '';
while ( $row = sqlsrv_fetch_array($result, SQLSRV_FETCH_ASSOC))
        {
  $output .= '<tr>'.
   '<td>' . $row['DatabaseName'] . '</td>' .
   '<td><center>' . $row['LastBackupCompleted'] . '</center></td>' .
   '<td>' . $row['MBBackedUp']  . '</td>' .
   '</tr>';
 }
echo $output;
echo '</table>';
echo '</br>';
echo '</html>';
Hopefully you can see we have extracted an array out of SQL Server. Then we use the PHP while loop to display the results.
Save all that PHP code above into your "Index.php" file, here is a sample
file -
click here. Unzip and place that file in the "DOCUMENT_ROOT" as per step 6.
Step 10: Confirm your first PHP page has produced results
Start your browser up and type in localhost/Index.php as the URL.
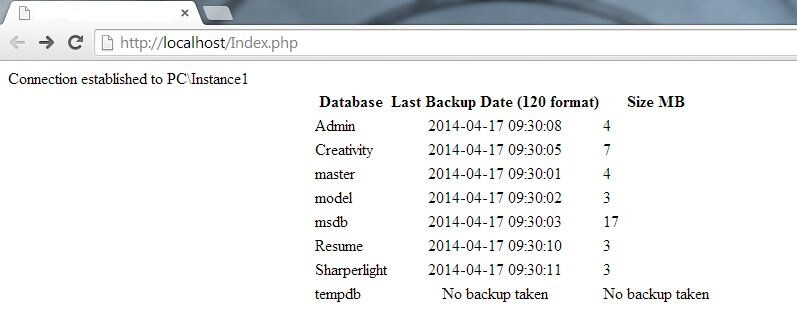
Congratulations. If you are this far along you are doing well.
If you have no results examine your php file and make sure you have the semi colon at the end of each line in PHP or the whole page fails to load!
Then check the SQL Server logs and see if there is an error there.

Tips
- PHP single line comments are //
- PHP multi line comment begin with a /* and end with a */ Use these to debug portions of your code.
Next Steps
- Design the folder structure for your projects under the document root:
- Use CommonCode as the main folder for common code, header, footer, etc.
- Use Configuration as the folder for XML configuration settings or your database connection settings.
- Create a Backup folder under Configuration for copies of things like php.ini
- Use CSS as the folder for CSS files.


About the author
 Graham Okely is a SQL Server DBA and has been working with database systems since 1984 and has been specializing in SQL Server since 2007.
This author pledges the content of this article is based on professional experience and not AI generated.
View all my tips
