By: Rob Fisch | Comments (3) | Related: > SharePoint Administration
Problem
Often times users leave SharePoint documents in a "Checked Out" status. This can happen for a variety of unintended reasons. As an administrator, I would like to be able to remedy these situations when they happen. Is there a way to do it without having to log in as the user?
Solution
Yes. As a user with "Full Control" of a SharePoint site, you can take control of "Checked Out" documents.
First let's understand some of the reasons why documents are in a Checked Out status.
- The obvious:
- A user might really be working on the document. Don't under-estimate this.
- A user doesn't understand how SharePoint works. Offer frequent SharePoint trainings on various topics.
- A user may have left the project, the department, or even the organization.
- Not so obvious:
- The document 'check out' feature can cause documents to be 'checked
out' without the user realizing it. Here's how:
After clicking the 'Browse" button to upload a document, the user finds a document and clicks "OK". They are then presented with a form to fill out various metadata fields about the document. Even before completing the form, the document has actually been uploaded to the system. (This is transparent to the user at this point.) If the document library has the document check out/in requirement set and the user, for whatever reason, doesn't complete the form and simply closes the web browser (perhaps they don't have enough information to complete all the fields), the document will remain in the system in a 'checked out' status. The user won't really know because the web browser has been closed.
For the obvious reasons, you will see that a document is checked out, and as a user with Full Control, you can 'check in' the document directly.
If it's the last ("not so obvious") reason, even a user with Full Control will not see the document at all in the document library. To remedy the situation, you must follow the procedure below:
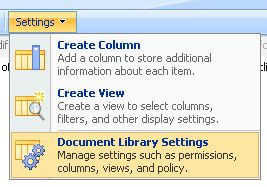
In the document library, click "Settings", then "Document Library Settings".
Click "Manage checked out files".

(If you see any documents with checkboxes next to them here, you can be pretty sure there is an issue that needs attention.)
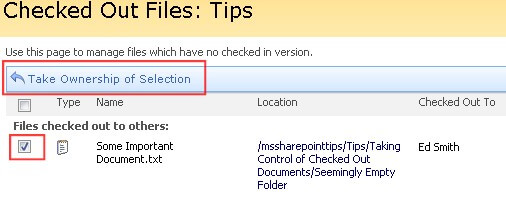
Check the checkbox next to the document you want to take control of. Then click "Take Ownership of Selection".
In the library, you will now see the document, but it will still be in a "Checked Out" status. (Notice the little green box with the white arrow.) Click the document dropdown and then select "Check In". (You may need to complete any required metadata fields.)

After completing the process, the document will be in a normally checked in status.
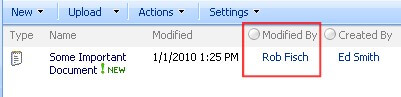
Notice that, in this case, now I am the last person listed as modifying the document.
Next Steps
- Check out these other SharePoint tips.


About the author
 Rob Fisch has worked with SQL Server since version 6.5 as a dba, developer, report writer and data warehouse designer.
This author pledges the content of this article is based on professional experience and not AI generated.
View all my tips
