By: Rob Fisch | Comments | Related: > SharePoint
Problem
By default, SharePoint uses the name of the server as the root URL address. For example, if the server host name is 'usweb1019', your SharePoint URL address will start with 'http://usweb1019/xxxxxx'. I'd like to use a friendly name. Even still if we have to migrate or upgrade to new hardware, I would like the URL to the main site to stay the same.
Solution
The solution is to use a host header, however there are several configurations to change in order to make this work. For a smooth configuration change, it is important to put these steps in the proper sequence. Step #A Always, always, always...backup your systems. The most critical component to backup (and to know how to restore) is the SharePoint SQL databases. Step #B Always, always, always...rehearse this procedure on test or development systems before running on production. The cookbook overview is as follows:
- Add a CNAME in DNS.
- Add a host header in IIS
- Add the new path to your Excel Services list of trusted paths.
- Change the Public URL of the Virtual Directory in Alternate Access Mappings.
- Reset the web server.
- Install the SharePoint Administrative Toolkit and run 'updatealert' from the stsadm utility.
- Delete your crawled content in Search settings and start a new full search crawl.
- Test your system.
Now for the step-by-step instructions.
In this example, we will change the URL path users will use to "http://portal". You can use anything you like. The hostname of the SharePoint server is 'jazz-moss07'. The desired host header name is 'portal'.
1) Add a CNAME DNS entry to your current SharePoint root. (You may need your DNS system administrator to do this for you.) You can also (optionally) map to the IP address instead of the hostname of the server.
Completed DNS entry.

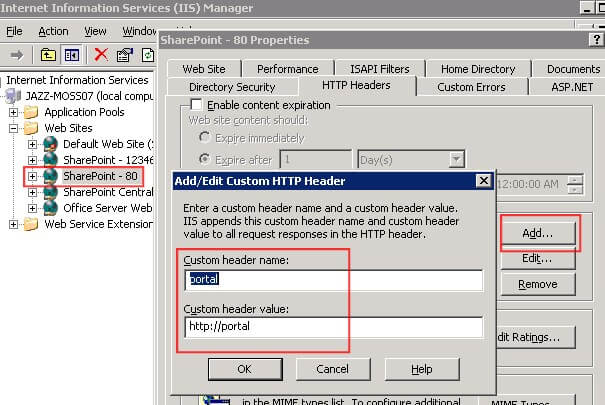
2) In IIS on the SharePoint server, find the virtual directory that maps to the main SharePoint site (not the Central Admin or SSP sites). If you kept the default options it will say "SharePoint - 80".
- Right click on the virtual directory and select "Properties".
- In the "HTTP Headers" (tab), click "Add".
- Enter the desired header name that was used in the DNS setup (Step #1).
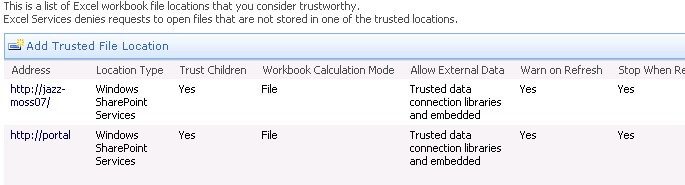
3) Update the Excel Services Trusted Location settings. (If you are not using Excel Services you can skip this step). Add any needed entries. This can be found in SharePoint Central Administration --> SharedServices --> Excel Services Settings --> Trusted File Locations
4) Change the Public URL of the Virtual Directory in Alternate Access Mappings.
- Open SharePoint Central Administration
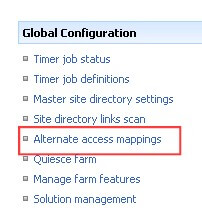
- Open "Operations".
- Under "Global Configuration", click "Alternate access mappings".
- Note the existing entries. Take a shot and/or write down the existing
entries in case you have to reverse the procedure. Click "Edit Public
URLs".
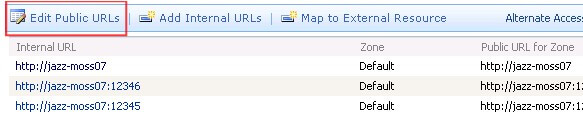
- Make sure the "Alternate Access Mapping Collection" is pointed to your content Virtual Directory.
- Change the "Default" to the new Host Header name.
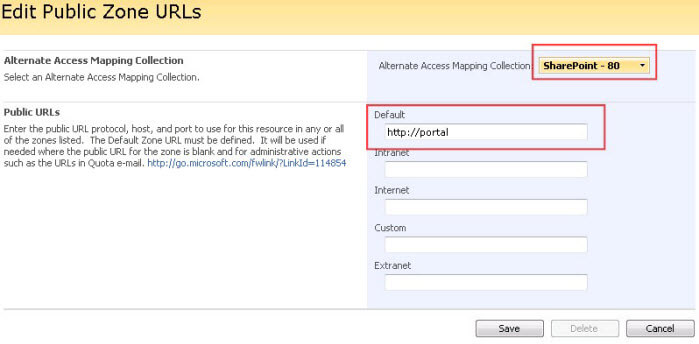
- Below is what the new entry will look like:

5) Reset the web server. (From the command line on the SharePoint server, type "IISRESET" and press enter.
6) Install the SharePoint Administrative Toolkit from Microsoft for your operating system. It is available from this web page: http://technet.microsoft.com/en-us/library/cc508851.aspx, After installing, this will add a new option to the stsadm.exe utility called "updatealert". The syntax is as follows:
stsadm -o updateAlert -url <YourNewURL> -oldUrl <YourOldURL>
In my case, I entered:
stsadm -o updateAlert -url http://portal -oldUrl http://jazz-moss07
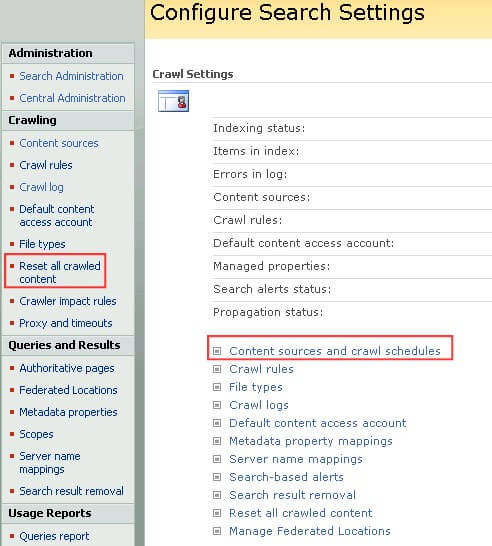
7) Delete your crawled content and start a new full search crawl. Back in SharePoint Central Administration, Shared Services.
- Under the "Search" section, click "Search settings".
- Under "Crawling" in the left navigation area, click "Reset all crawled content".
- Then click "Content sources and crawl scheduled"
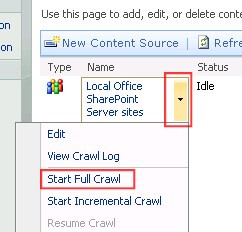
- Hold the mouse over "Local Office SharePoint Server sites" until you see
the dropdown arrow. Click on the arrow, then select "Start Full Crawl".
8) Test the new host header URL and all server functions.
NOTE: If for some reason, you need to revert back to the way it was, the critical steps would be to reverse the entries made in Step #4 and Step #6 above, then follow the procedure in Step #7 for resetting and starting the crawl again.
Next Steps
- Check out MSSQLTips.com for great information about Microsoft SQL Server.


About the author
 Rob Fisch has worked with SQL Server since version 6.5 as a dba, developer, report writer and data warehouse designer.
This author pledges the content of this article is based on professional experience and not AI generated.
View all my tips
