By: John Grover | Comments (4) | Related: > Amazon AWS
Problem
I'm running my SQL Server on an Elastic Compute Cloud (EC2) instance, but my databases are growing bigger than anticipated. The Elastic Block Storage (EBS) volumes attached to the server are nearly full, how can I expand them to get more space for my data?
Solution
Unlike most on-premises storage systems, an Amazon EBS volume's size is fixed when it is created. Despite our best efforts at capacity planning sometimes we run out of space. In AWS there are two ways to address this problem. The first is to simply add more EBS volumes to the server and create new data files on the fresh volumes. This is relatively simple, and has the advantage that you do not have to reboot your server to gain access to the new space. The disadvantage is that the new layout may conflict with existing server standards or cause problems with backups. The second is a bit more complicated, but allows us to keep the mount points or drive letters unchanged. It is also the only way to get more space for the root volume (C: drive) when it runs out of space. It is this method that will be covered in this tip.
"Resizing" a volume consists of several steps that can be accomplished both through the AWS console and via PowerShell. In practice, a mixed method will probably be easiest. If you find yourself doing this frequently you may want to try to fully automate the process, but a closer look at your capacity planning is probably warranted! The steps are listed here and we will cover each one in detail both from the console and using PowerShell. This tip is specifically for SQL Server running on EC2, if you are using Amazon RDS for SQL Server the process will be very different.
- Determine the instance id, volume id, and device name of disk to be resized.
- Shut down the associated EC2 instance.
- Create a snapshot of the disk to be resized.
- Create new, larger volume from the snapshot.
- Detach the old volume from the EC2 instance.
- Attach the new volume to the EC2 instance.
- Start up the EC2 instance.
- Expand the disk partition to utilize the additional space in the volume.
In this tip I am assuming the reader is familiar with the AWS Console and running Powershell in the AWS environment. The Amazon PowerShell commandlets require authentication for each invokation. Your credentials can be set up in your environment as I described in a previous article Backing up your SQL Server to Amazon's Cloud in Three Easy Steps in step two about installing and configuring the Amazon PowerShell Module. I've added the code to set up my credentials in my profile so they are automatically available when I start a new session.
Step 1 - Identify the Volume
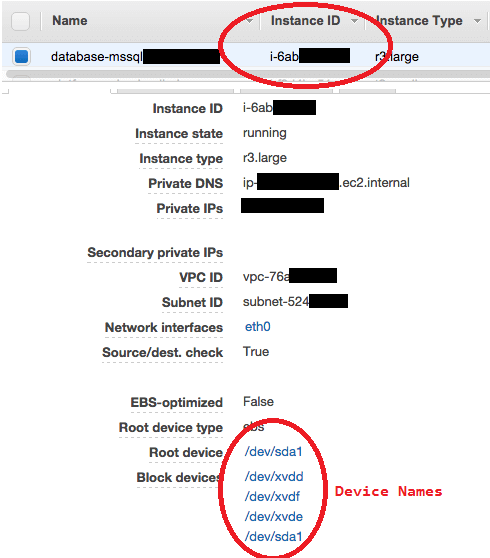
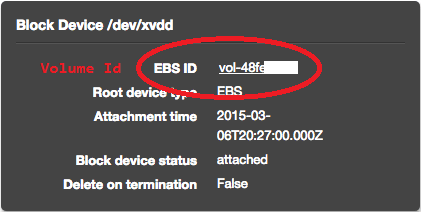
From the console we can identify the volume and device name from the EC2 page on the description tab. The device names are "unixy" due to the underlying virtualization. As a rule we find that /dev/sda1 is the C: drive and the /dev/xvd* devices are mounted to the drive letter corresponding to the last letter of the device name. i.e. /dev/xvdd is drive D: and /dev/xvde is drive E: and so on. By clicking on the device name we see the EBS volume id in the tool tip. Make sure to write down the instance id, device name and the EBS volume id, they are needed in the next steps. The ids are in the format of a prefix identifying the object type, then an eight-digit hex value i.e. i-1234abcd for an EC2 instance or vol-abcd1234 for an EBS volume.
A PowerShell script that maps disk drive letters to EBS volume ids and device names for an instance can be found on the Amazon support web site. It's a clever piece of code that burrows into the WMI disk information and matches it with the EBS information. I've adapted it a bit for this tip, but credit goes to Amazon for the original. This code should be run from the instance that has the EBS volume attached to it, otherwise we need to get the instance id and availability zone from another source (like the console) and replace the first two lines with simple variable assignments.
# List the Windows disks
# From the Amazon AWS Documentation Website circa 9/3/2015
#   - correction to $Map hash table creation
#
# http://docs.aws.amazon.com/AWSEC2/latest/WindowsGuide/ec2-windows-volumes.html
#

# Create a hash table that maps each device to a SCSI target
$Map = @{"0" = '/dev/sda1'}
for($x = 1; $x -le 25; $x++) {$Map.add($x.ToString(), [String]::Format("/dev/xvd{0}",[char](97 + $x)))}
for($x = 78; $x -le 102; $x++) {$Map.add($x.ToString(), [String]::Format("/dev/xvdc{0}",[char](19 + $x)))}

Try {
    # Use the metadata service to discover which instance the script is running on
    $InstanceId = (Invoke-WebRequest '169.254.169.254/latest/meta-data/instance-id').Content
    $AvailabilityZone = (Invoke-WebRequest '169.254.169.254/latest/meta-data/placement/availability-zone').Content
    $Region = $AvailabilityZone.Substring(0, $AvailabilityZone.Length -1)

    # Get the list of volumes attached to this instance
    $BlockDeviceMappings = (Get-EC2Instance -Region $Region -Instance $InstanceId).Instances.BlockDeviceMappings
}
Catch
{
    Write-Host "Could not access the AWS API, are your credentials loaded?"  -ForegroundColor Yellow
}

Get-WmiObject -Class Win32_DiskDrive | %{
    $Drive = $_
    # Find the partitions for this drive
    Get-WmiObject -Class Win32_DiskDriveToDiskPartition |  Where-Object {$_.Antecedent -eq $Drive.Path.Path} | %{
        $D2P = $_
        # Get details about each partition
        $Partition = Get-WmiObject -Class Win32_DiskPartition |  Where-Object {$_.Path.Path -eq $D2P.Dependent}
        # Find the drive that this partition is linked to
        $Disk = Get-WmiObject -Class Win32_LogicalDiskToPartition | Where-Object {$_.Antecedent -in $D2P.Dependent} | %{
            $L2P = $_
            # Get the drive letter for this partition, if there is one
            Get-WmiObject -Class Win32_LogicalDisk | Where-Object {$_.Path.Path -in $L2P.Dependent}
        }

        $BlockDeviceMapping = $BlockDeviceMappings | Where-Object { $_.DeviceName -eq $Map[$Drive.SCSITargetId.ToString()] }

        # Display the information in a table
        New-Object PSObject -Property @{
            Device = $Map[$Drive.SCSITargetId.ToString()];
            Disk = [Int]::Parse($Partition.Name.Split(",")[0].Replace("Disk #",""));
            Boot = $Partition.BootPartition;
            Partition = [Int]::Parse($Partition.Name.Split(",")[1].Replace(" Partition #",""));
            SCSITarget = $Drive.SCSITargetId;
            DriveLetter = If($Disk -eq $NULL) {"NA"} else {$Disk.DeviceID};
            VolumeName = If($Disk -eq $NULL) {"NA"} else {$Disk.VolumeName};
            VolumeId = If($BlockDeviceMapping -eq $NULL) {"NA"} else {$BlockDeviceMapping.Ebs.VolumeId}
        }
    }
} | Sort-Object Disk, Partition | `
Format-Table -AutoSize -Property Disk, Partition, SCSITarget, DriveLetter, Boot, VolumeId, Device, VolumeName


Disk Partition SCSITarget DriveLetter  Boot VolumeId     Device     VolumeName
---- --------- ---------- -----------  ---- --------     ------     ----------
   0         0          0 NA           True vol-1234abcd /dev/sda1  NA
   0         1          0 C:          False vol-1234abcd /dev/sda1
   1         0          3 D:          False vol-1235abcd /dev/xvdd
   2         0          4 E:          False vol-1236abcd /dev/xvde
   3         0          5 F:          False vol-1237abcd /dev/xvdf
   4         0         78 Z:          False NA           /dev/xvdca Temporary Storage 1
Step 2 - Stop the EC2 Instance
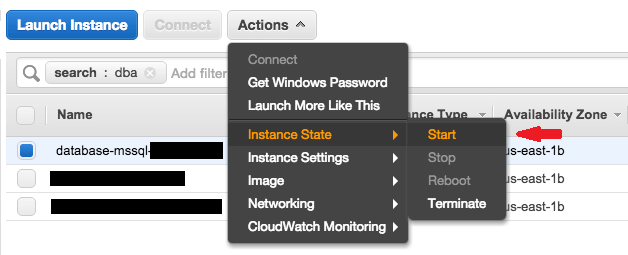
To ensure that the data on the volume is consistent when we create a snapshot the instance should be shut down. We can either log on to the instance to shut it down, stop it from the console, or issue a single PowerShell command (from another machine) to stop it. When this is done from the console be sure to choose "Stop" and not "Terminate" from the Actions menu or you will get a chance to practice your server recovery procedure!
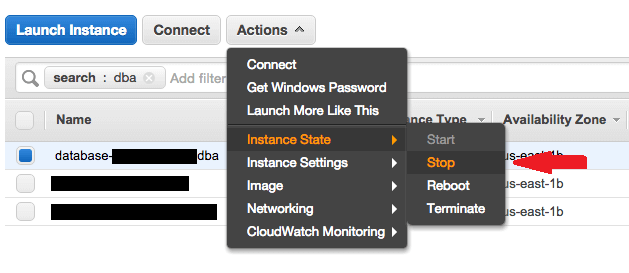
The PowerShell commandlet needed to stop the instance is Stop-EC2Instance and requires the instance id to be stopped. We need to run this on a different machine than the one whose disk is being resized. I recommend that you have the AWS PowerShell module installed on your desktop or jumpbox and run the next few steps from there.
# From the output of the PowerShell in step one set these variables in a session on this machine.

$InstanceId = "i-abcd1234"
$AvailabilityZone = "us-east-1b"
$OldVolumeId = "vol-1235abcd" # Choose the volume id from the output of the first script
$DeviceName = "/dev/xvdd"     # /dev/xvdd is (usually) the D: drive, the C: drive is usually /dev/sda1
$NewVolumeSize = 100          # The size of the new volume in GB

Initialize-AWSDefaults -ProfileName default

Stop-EC2Instance -Instance $InstanceId

# Wait for the instance  to stop.
Write-Host -NoNewLine "Checking $InstanceId "
while ((Get-EC2Instance -Instance $InstanceId).Instances.State.Name -ne "stopped") {
  Write-Host -NoNewline "."
  sleep 5
}

Write-Host "."
Write-Host Instance: $InstanceId is stopped
Step 3 - Snapshot the Old Volume
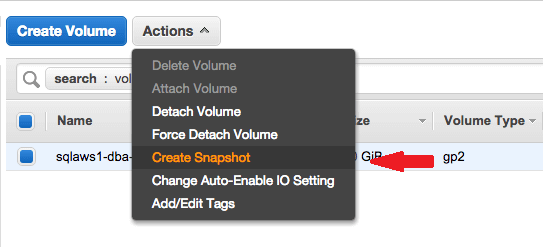
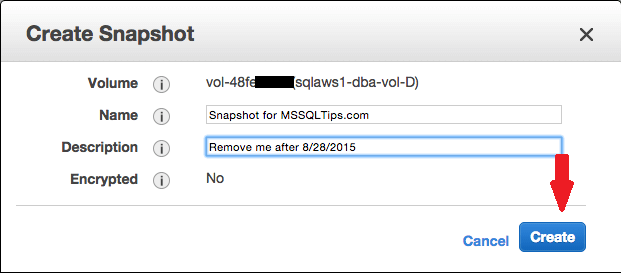
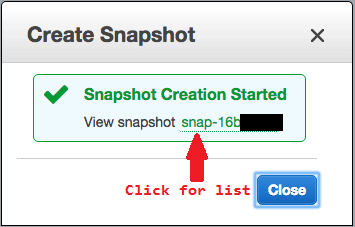
With the instance stopped and the volume information at hand we can resize the volume. Resizing is really a misnomer, what we will do is backup the volume and restore it to a larger one that will replace the original. To back up the volume we will create a snapshot. From the console EC2 page click the volumes link on the left side. If your environment is like ours there are hundreds of volumes listed. To find the one we want type its id (or the value of one of its tags) in the filter area. Then select the volume and from the Actions menu select Create a Snapshot. Be sure to write down the snapshot id of the snapshot that is created or just click the link provided to go to the Snapshot list. Depending on the size of the volume this may take a while.
The PowerShell commandlet used to create a snapshot is New-EC2Snapshot, it requires the volume id of the old volume that will be backed up.
$SnapShot = (New-EC2Snapshot -VolumeId $OldVolumeId -Description "Snapshot for MSSQLTips.com")

# Wait for the snapshot to complete, this may take a while for large volumes
Write-Host -NoNewLine Checking $SnapShot.SnapshotId
while ((Get-EC2Snapshot -SnapshotId $SnapShot.SnapshotId).State -ne "completed") {
  Write-Host -NoNewline "."
  sleep 5
}
Write-Host "."
Write-Host Snapshot: $SnapShot.SnapshotId is ready
Step 4 - Create a New and Larger Volume
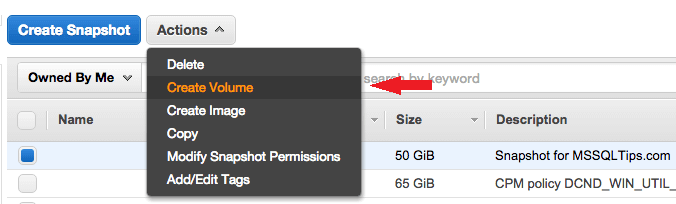
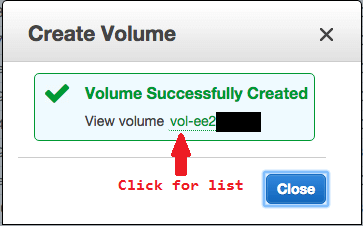
Once the snapshot is complete we need to create a new, larger volume based on the snapshot. From the Snapshot List on the EC2 page of the console select the newly created snapshot and from the Actions menu select Create Volume then fill in the size of the new volume. Note the volume id or click the link in the dialog presented when the volume is created to switch to the volume list and wait for it to become available.
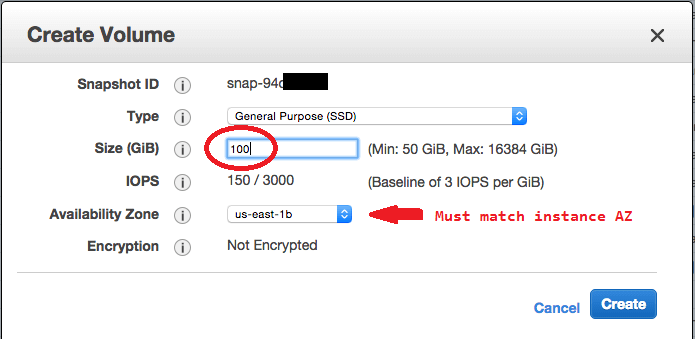
The PowerShell commandlet to create a volume is New-EC2Volume which will need the snapshot id, size, availability zone, and volume type. You need to be sure the volume is created in the same AZ as the target EC2 instance or you will not be able to attach it!
$Volume = ( New-EC2Volume -SnapshotId $SnapShot.SnapshotId `
                          -Size $NewVolumeSize `
                          -AvailabilityZone $AvailabilityZone `
                          -VolumeType "gp2" )

# Wait for the creation to complete, this may take a while for large volumes
Write-Host -NoNewLine Checking $Volume.VolumeId
while ((Get-EC2Volume -VolumeId $Volume.VolumeId).State -ne "available") {
  write-host -NoNewline "."
  sleep 5
}
Write-host "."
write-host Volume: $Volume.VolumeId is ready
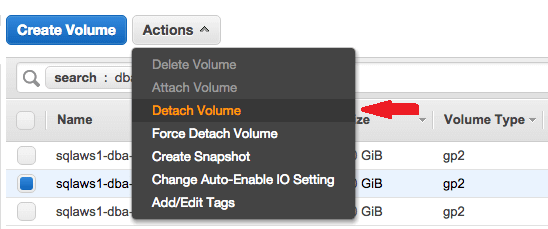
Step 5 - Detach the Old Volume
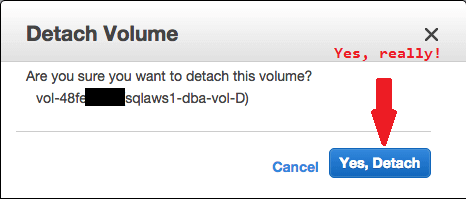
The new, larger volume is now ready to replace the older, smaller volume. First the old volume needs to be detached from the EC2 instance. Select the old volume on the Volume List in the console and select Detach Volume from the Action menu, then confirm you really want to detach it.
The PowerShell commandlet to detach a volume is Dismount-EC2Volume and requires the volume id. Adding the instance id and device name helps ensure we are detaching the right volume by making the request more specific.
Dismount-EC2Volume -VolumeId $OldVolumeId -InstanceId $InstanceId -Device $DeviceName

# Wait for the dismount to complete
Write-Host -NoNewLine Checking $OldVolumeId
while ((Get-EC2Volume -VolumeId $OldVolumeId).State -ne "available") {
  write-host -NoNewline "."
  sleep 5
}
Write-host "."
write-host Volume: $OldVolumeId is dismounted
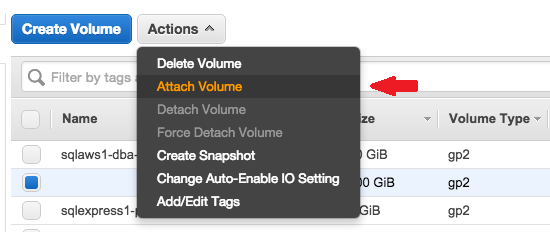
Step 6 - Attach the New Volume
With the old volume detached from the instance the new, larger volume can be attached in its place. Find the new volume in the volume list, search by the new volume id or by the snapshot id that was used to create the volume, then select Attach Volume from the Action Menu. Fill in the instance id and device name then click Attach.
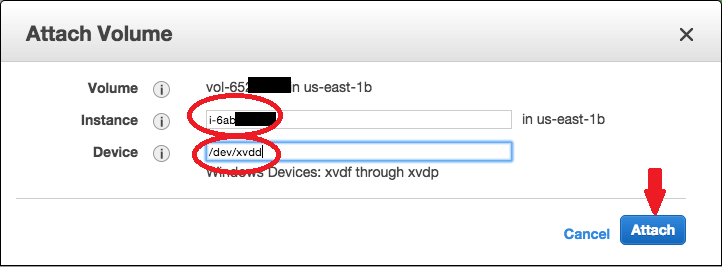
The PowerShell commandlet to attach a volume is Add-EC2Volume and requires the instance id, the volume id to be attached, and the device name where the volume will be attached.
Add-EC2Volume -InstanceId $InstanceId -VolumeId $Volume.VolumeId -Device $DeviceName

# Wait for the attachment to complete
Write-Host -NoNewLine Checking $Volume.VolumeId
while ((Get-EC2Volume -VolumeId $Volume.VolumeId).State -ne "in-use") {
  write-host -NoNewline "."
  sleep 5
}
Write-host "."
write-host Volume: $Volume.VolumeId is attached

# Optionally delete the old volume to avoid paying for the storage.
# Remove-EC2Volume -VolumeId $OldVolumeId
Step 7 - Start the EC2 Instance
The surgery is over and the volume has been replaced with a newer larger one. All that's left to do is spin up the EC2 instance and let Windows know about the new space. On the console Instance List select the instance and click Start from the Action menu
From PowerShell the commandlet to start an EC2 instance is Start-EC2Instance, it just needs the instance id.
Start-EC2Instance -InstanceId $InstanceId

# Wait for the instance  to start.
write-Host -NoNewLine "Checking $InstanceId "
while ((Get-EC2Instance -Instance $InstanceId).Instances.State.Name -ne "running") {
  write-host -NoNewline "."
  sleep 5
}

Write-host "."
write-host Instance: $InstanceId is started
Step 8 - Expand the Partition to use the New Disk Space
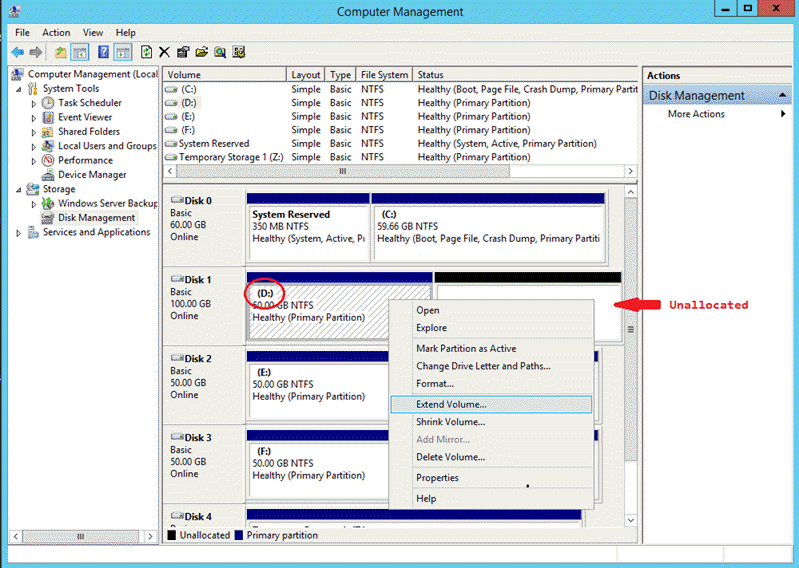
The final step enables Windows to recognize the new space added to the volume (or device from its point of view). Log on to the EC2 instance whose volume is being resized. On Windows Server 2012, on the taskbar, right-click the Windows logo, and then select Disk Management. On Windows Server 2008, click Start, point to Administrative Tools, select Computer Management, and then select Disk Management. Look at the lower pane, there will be a disk with unallocated storage. Right-click on the disk and select Extend Volume. This pops up a wizard that will expand the disk to encompass the entire new volume.
Be aware that the session must be run "as Administrator" for these commands to work. First, get a list of the partitions available to resize. The commandlet Get-Partition with no arguments will provide the list.
Get-Partition
   Disk Number: 0

PartitionNumber  DriveLetter Offset                                        Size Type
---------------  ----------- ------                                        ---- ----
1                            1048576                                     350 MB IFS
2                C           368050176                                 59.66 GB IFS


   Disk Number: 1

PartitionNumber  DriveLetter Offset                                        Size Type
---------------  ----------- ------                                        ---- ----
1                D           1048576                                      50 GB IFS
In this case we are working on the "D:" drive which shows up here as Disk Number 1 and Partition Number 1. We want to use all the newly available space for the drive so the following PowerShell will extend the partition to the end of the volume. We can then run Get-Partition to verify the new size. In this example the size has increased from 50 GB to 100 GB
Resize-Partition -DiskNumber 1 `
                 –PartitionNumber 1 `
                 -Size (Get-PartitionSupportedSize –DiskNumber 1 –PartitionNumber 1).SizeMax

Get-Partition -DiskNumber 1 -PartitionNumber 1

   Disk Number: 1

PartitionNumber  DriveLetter Offset                                        Size Type
---------------  ----------- ------                                        ---- ----
1                D           1048576                                     100 GB IFS
Next Steps
There you have it, a process for "resizing" an EBS volume on your AWS hosted SQL Server. I'm looking forward to the new Elastic File System currently in beta to see if it can solve this problem more elegantly but it is not currently available in our home region. I'm learning AWS and PowerShell as I go so if you see a way this process can be improved, please share your thoughts with the MSSQLTips.com community in the comments below
- Get a copy of the AWS PowerShell tools from http://aws.amazon.com/powershell
- Spend some time RTFM at http://docs.aws.amazon.com/powershell/latest/reference/Index.html


About the author
 John Grover is a 25-year IT veteran with experience in SQL Server, Oracle, clustering and virtualization.
This author pledges the content of this article is based on professional experience and not AI generated.
View all my tips
