By: John Miner | Comments (2) | Related: > Azure Backup and Restore
Problem
Many institutions have the requirement to take a database copy at the end of the month. This allows the institution to look at the state of the database at a point in time. How can this business requirement be solved with Azure SQL database?
Solution
Microsoft has provided the database developer with both Transact SQL and PowerShell commands to perform this action.
Business Problem
This article assumes you know how to create an Azure SQL Server and Azure SQL Database. If you are not familiar with these tasks, please see my earlier article that goes over these basic steps using PowerShell.
There are many financial companies that invest in the stock market via mutual funds. Our factious company named Big Jon Investments is such a company. As a proof of concept, they want track the S&P 500 mutual fund for the last 12 months.
Our
task is to load stock information from Yahoo Financials on the
GSPC mutual fund into a Azure SQL database. For auditing, there is a requirement
to have monthly database copies in both the East US and West US data centers.
Gathering Stock Data
The historical data section of the Yahoo Financials site allows you to download stock data for a given mutual fund. Make sure you enter the S&P 500 symbol and the correct date range. Next, click the apply button followed by the download data button. Choose a location to save the table.csv file.
The image below shows this file loaded into Microsoft Excel. Columns A thru H contain the data we want to load into a table. I added some background color for the header row to stand out.
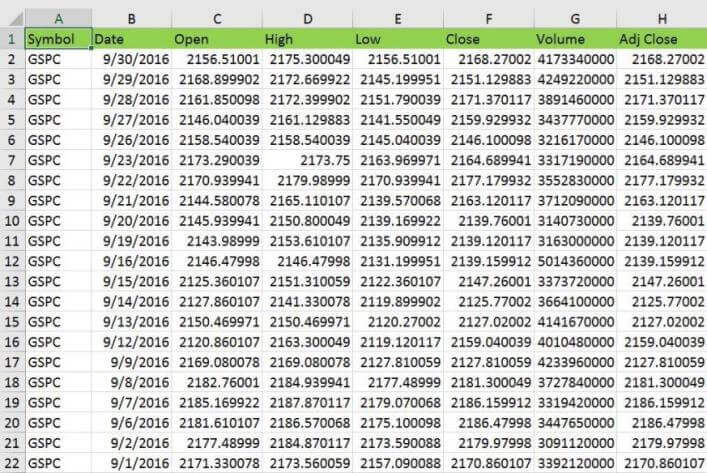
How can we load this data via monthly batches into a Azure SQL Database?
One technique is to save the file in a Microsoft Excel format, create a formula that will take all the column data as input and output a correctly formatted INSERT statement as TEXT. The results of the formula are stored in column J which is labeled as TSQL.

To meet the business requirements, we need to copy the INSERT statements for each month and save them into a aptly named script file. The image below shows the twelve Transact SQL files. Each file represents the statistics for every trading day in a given month. Also, there is the Microsoft Excel file that was used to generate these scripts from the raw data. Enclosed is a zip file that contains the contents of this directory.

Simple Database Table
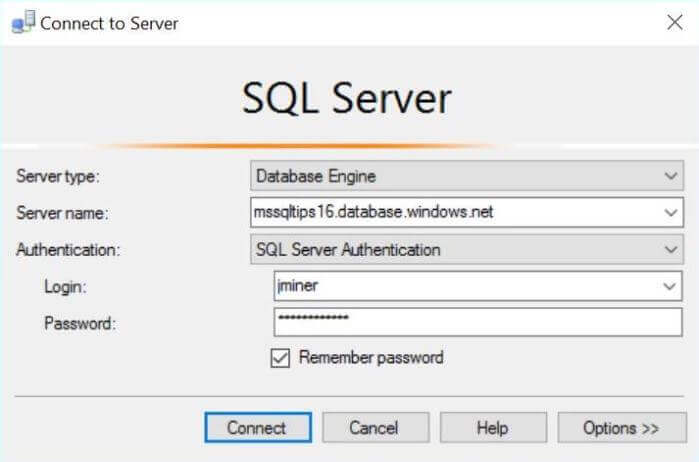
To set the stage for our proof of concept, it is required that both a Azure SQL Server named mssqltips16 and a Azure SQL Database named [PORTFOLIO] exist. Both of these objects can be created in the Azure Portal. Before we can create a schema and table to hold our stock data, we need to log into the database using SQL Server Management Studio (SSMS). The image below shows me logging into the server with the jminer user account.
The transact SQL code below creates a new schema named [ACTIVE] and a table named [STOCKS]. We will be loading monthly stock data into this table.
--
-- Create ACTIVE schema
--

-- Delete existing schema.
DROP SCHEMA IF EXISTS [ACTIVE]
GO

-- Add new schema.
CREATE SCHEMA [ACTIVE] AUTHORIZATION [dbo]
GO


--
-- Create ACTIVE table
--

-- Delete existing table
DROP TABLE IF EXISTS [ACTIVE].[STOCKS]
GO

-- Create new table
CREATE TABLE [ACTIVE].[STOCKS]
(
  ST_ID INT IDENTITY(1,1) NOT NULL CONSTRAINT PK_STOCKS_ID PRIMARY KEY,
  ST_SYMBOL VARCHAR(32) NOT NULL,
  ST_DATE DATE NOT NULL,
  ST_OPEN REAL NULL,
  ST_HIGH REAL NULL,
  ST_LOW REAL NULL,
  ST_CLOSE REAL NULL,
  ST_VOLUME BIGINT NULL,
  ST_ADJ_CLOSE REAL NULL
);
The output from executing the above code is shown below.
Loading Monthly Data
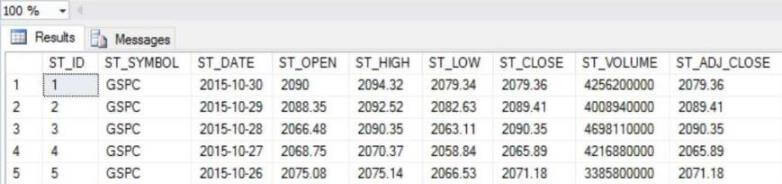
It is very easy to load data into the table. Just open the correct TSQL script and execute the INSERT statements. The first file to open is named OCT2015-DATA.SQL. The code snippet below can be used to show the most recent records by date.
-- Show newest loaded data
SELECT TOP 5
     [ST_ID]
    ,[ST_SYMBOL]
    ,[ST_DATE]
    ,[ST_OPEN]
    ,[ST_HIGH]
    ,[ST_LOW]
    ,[ST_CLOSE]
    ,[ST_VOLUME]
    ,[ST_ADJ_CLOSE]
FROM [ACTIVE].[STOCKS]
ORDER BY ST_DATE DESC
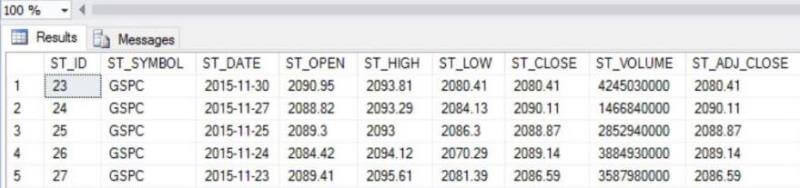
The image below shows the table loaded with the October 2015 data.
Secondary Data Center
Currently, we have all the Azure objects in the East US region. The business requirement was to make a monthly database copy in a remote data center. To accomplish this goal, we need to create a resource group named rgtips16w in the West US region.
I will be using PowerShell to create these objects but will be skipping the nitty gritty details. If you are not comfortable with these commands, please see my article on deploying Azure SQL Database using Resource Manager PowerShell cmdlets. Only the results of the work will be shown below.
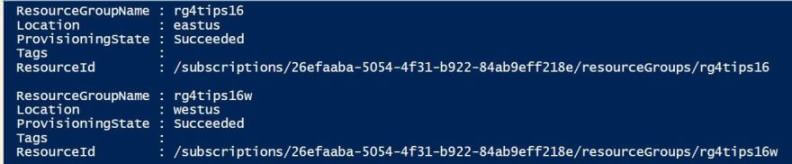
Executing the Get-AzureRmResourceGroup cmdlet shows resources groups available in my current subscription.
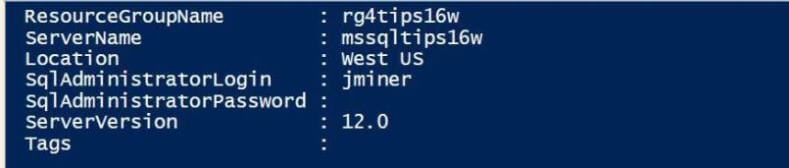
Now that we have a resource group in the West US region, we need to create a logical SQL Server named mssqltips6w in that region.
Executing the Get-AzureRmSqlServer cmdlet shows the newly create server.
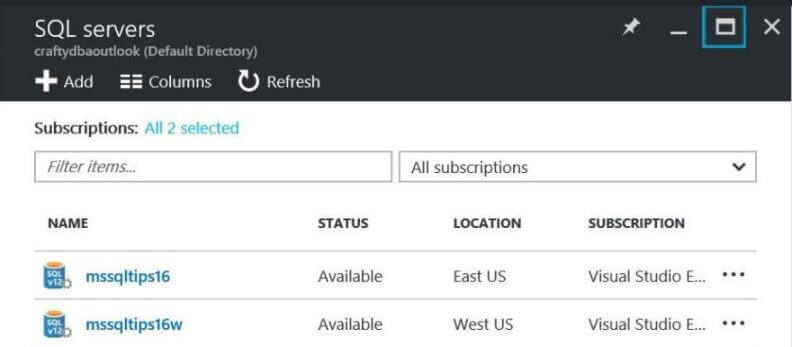
If everything went well, you should be able to browse for SQL Servers via the Azure Portal. Your results should look like the image below.
Transact SQL Statements
How can we use Transact SQL to create a copy of our existing Azure SQL database?
The syntax of the CREATE DATABASE statement was changed to allow for the new COPY OF clause. This new clause solves our business problem.
To make a copy of the database in the same data center, perform the following steps. First, login into the [master] database of the SQL Server in the East US region using SSMS. Next, execute the first TSQL statement to create the [PORTFOLIO-201510] database copy. In other query windows, execute the second and third TSQL statements. These statements will give you the status of the database copy operation.
-- Make a local copy
CREATE DATABASE [PORTFOLIO-201510] AS COPY OF PORTFOLIO;

-- Get copy status (run from master)
SELECT
    name,
    database_id,
    state_desc
FROM
    sys.databases;

-- Get operation status (run from master)
SELECT
    session_activity_id,
    resource_type_desc,
    major_resource_id,
    operation,
    state,
    state_desc,
    percent_complete
FROM
    sys.dm_operation_status
The image below shows the status of the database copy querying the sys.databases view.

The following screen shot shows the status of the database copy querying the sys.dm_operation_status view.

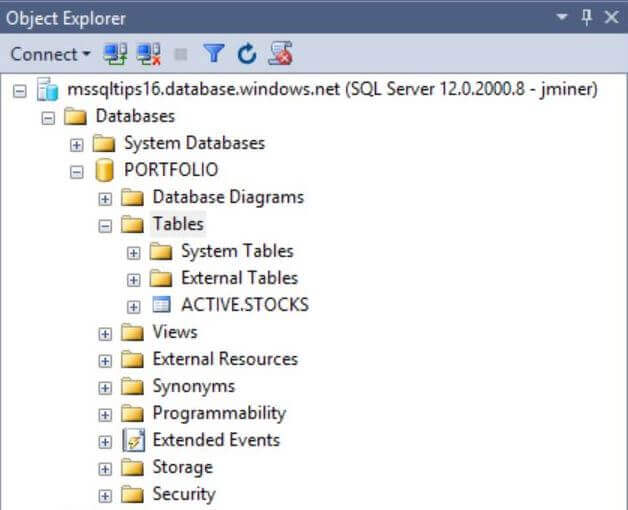
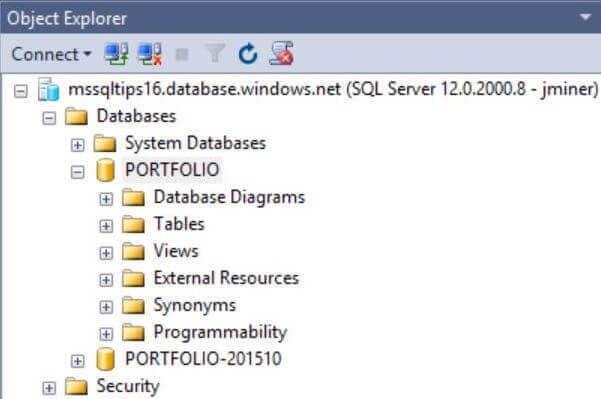
When the database copy is complete, refresh the database node in the object explorer in SSMS. You should now see both the original database and the new copy.
Copying the database to a remote data center is slightly more complicated. First, login into the [master] database of the SQL Server in the West US region using SSMS. Second, execute the TSQL statement below. Please note, the actual source database is referenced by a two part notation, server and database. To make life easy, the user account should have full access to both servers.
-- Create a remote copy
CREATE DATABASE [PORTFOLIO-201510] AS COPY OF mssqltips16.PORTFOLIO;
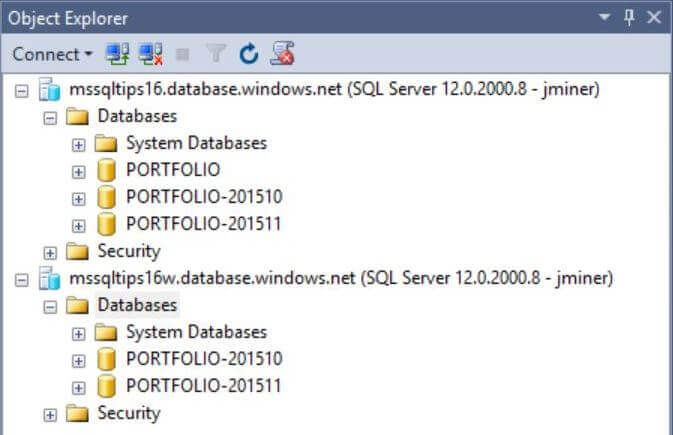
If you refresh the database node in the object explorer in SSMS, you should see the following. In my case, I have connections opened to both the East and West servers.
PowerShell Cmdlets
To continue with our proof of concept, please load the next month's worth of data. This can be accomplished by executing the INSERT statements in the NOV2015-DATA.SQL file. If you execute the previous SELECT statement, you should now have 42 rows in the table with row 23 having the latest trading date.
How can we use PowerShell to create a copy of our existing Azure SQL database?
Microsoft has supplied the script developer with New-AzureRmSqlDatabaseCopy cmdlet to complete this request. Just supply the local resource group, local server name and local database name as parameters. Last but not least, enter the copy database name to complete the required information. Just like the TSQL commands, it might take a minute or so to complete the operation.
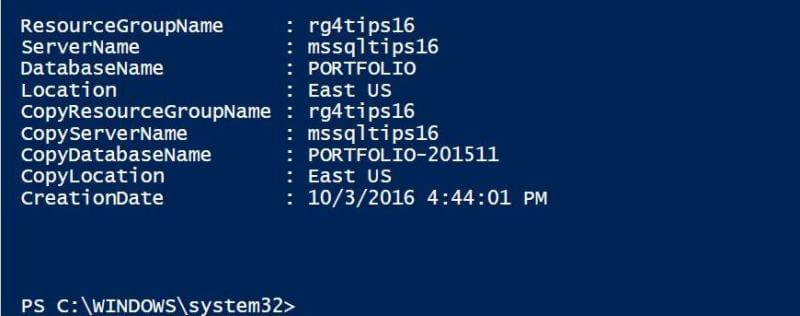
Listed below is the PowerShell command to make a local database copy for the cumulative table that contains data for October and November.
# Make a local copy
New-AzureRmSqlDatabaseCopy -ResourceGroupName "rg4tips16" -ServerName "mssqltips16"  `
    -DatabaseName "PORTFOLIO" -CopyDatabaseName "PORTFOLIO-201511"
The screen shot below shows the output for executing the above script in the Power Shell Interactive Scripting Environment (ISE). This is the local copy of the database.
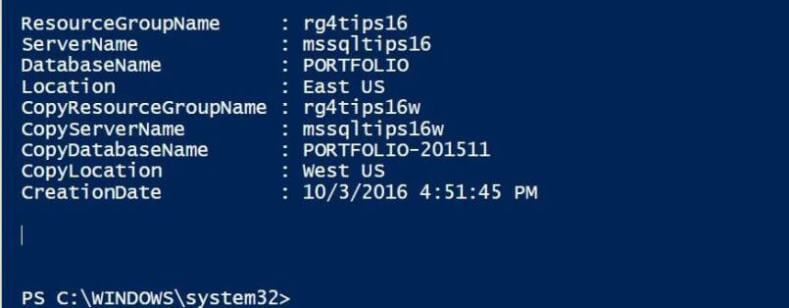
To create a remote copy of the [PORTFOLIO] database in the West US region, a few more parameters need to be supplied. The copy resource group and copy server name are supplied as parameters to pin point the exact local of the target. Please execute the script below to create a remote copy of the database.
# Make a remote copy
New-AzureRmSqlDatabaseCopy -ResourceGroupName "rg4tips16" -ServerName "mssqltips16" `
    -DatabaseName "PORTFOLIO" `-CopyResourceGroupName "rg4tips16w" `
 -CopyServerName "mssqltips16w" -CopyDatabaseName "PORTFOLIO-201511"
The screen shot below shows the output for executing the above script in the Power Shell Interactive Scripting Environment (ISE). This is the remote copy of the database.
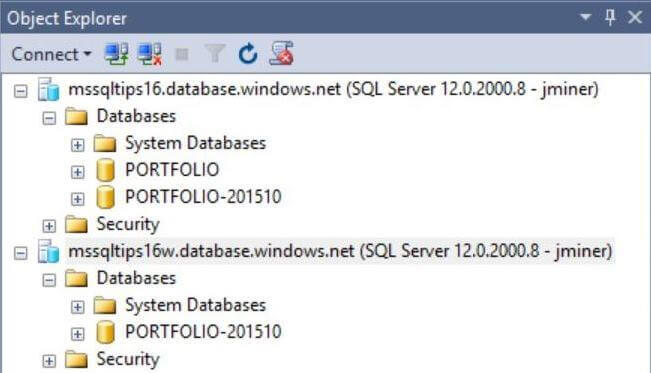
To verify the success of the copy operations, just refresh the object explorer nodes in SSMS for both servers. As you can see, we now have two database copies in both the East US and West US regions.
Final State
To satisfy the requirements of the proof of concept, we need to repeat the following
steps. The database copy can be performed by either using Transact SQL or PowerShell.
I leave the choice of which method to use for you to decide.
- Load the main database with next month of data.
- Make a copy of the database in the East US region.
- Make a copy of the database in the West US region.
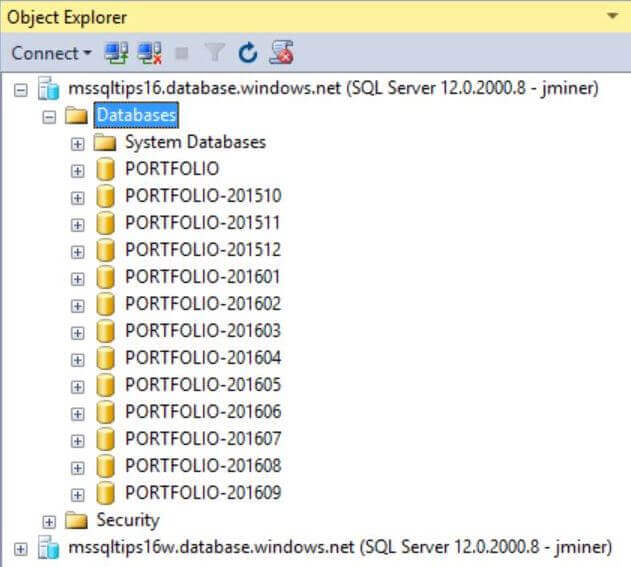
The screen shot below shows the server in the East US region with the cumulative database as well as each month's snapshot (database copy).
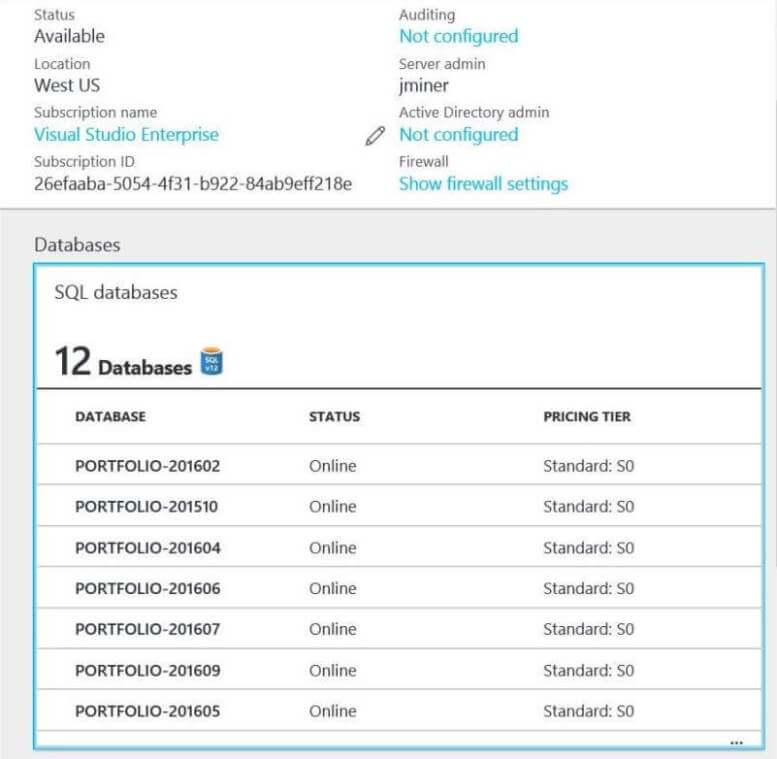
Looking at the server via the Azure Portal, we can see that I am paying for the Standard tier pricing. Since I am not going to use these databases until my next article, I have decided to change the tier to Basic to save some money on my MSDN subscription. In short, I want to scale down my resource usage for all these databases.
The PowerShell script below takes a database name as a variable and changes the pricing tier to Basic in both the East US and West US regions. Execute the script to change the pricing tier for two databases. Repeat this process until all databases have been changed to the Basic tier.
# Change 4 each month
$DbName = "PORTFOLIO-201510"

# Change service tier 2 basic 4 east
Set-AzureRmSqlDatabase -ResourceGroupName "rg4tips16" -ServerName "mssqltips16" `
    -DatabaseName $DbName -Edition "Basic"

# Change service tier 2 basic 4 west
Set-AzureRmSqlDatabase -ResourceGroupName "rg4tips16w" -ServerName "mssqltips16w" `
    -DatabaseName $DbName -Edition "Basic"
It is always wise to check one's work. Looking at the server view of the mssqltips16w server, we can see that all databases are set to the Basic tier.

Summary
Big Jon's Investments wanted to create a proof of concept in which stock portfolio
data could be stored in a table in Azure on a daily basis. To comply with internal
auditing, an end of the month database copy would be captured in both the East US and
West US regions. It was demonstrated that both Transact SQL and PowerShell can be
used to execute this requirement. During the copy process, several system views
can be used to monitor the status of the operation. If you want to learn more, check
out Azure
Documentation on this subject.
Next Steps
- Cross database queries can be written with the on premises version of SQL Server using a three dot notation to reference the source object in the FROM clause. This is not an uncommon request since the [SALES] database might have to reference the [HR] database.
How can we implement cross database queries in Azure SQL database?


About the author
 John Miner is a Data Architect at Insight Digital Innovation helping corporations solve their business needs with various data platform solutions.
This author pledges the content of this article is based on professional experience and not AI generated.
View all my tips
