By: Manvendra Singh | Comments | Related: > SQL Server on Linux
Problem
In a previous tip, I explained how to Restore a SQL Server database on a Linux based instance from a backup on a Windows instance using the sqlcmd utility. In this tip I will explain the same process but using SQL Server Management Studio (SSMS). We will first connect to a Linux based SQL Server remotely using SSMS from a Windows machine and then we will use SQL Server Management Studio to restore the SQL Server database running on the Linux server.
Solution
Restoring SQL Server databases is a basic administrative task that DBAs do every day. I recommend you read my last tip in which I explained the step by step method to restore a SQL Server database on a Linux server. You will learn how to take backup and copy the backup file to the target Linux machine for the restore process. I will not show you how to issue a backup and copy the backup file to the Linux server in this tip. In this tip, I assume you read my last article where I explained these steps. I will use the same backup file which was created in last tip to restore the SQL Server database onto the Linux based SQL Server using SQL Server Management Studio.
Restore database on Linux based SQL Server using SSMS
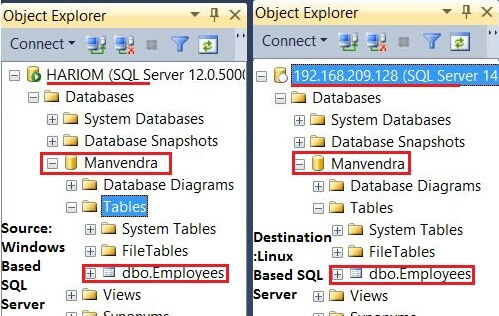
Step 1: The image below shows the details of the source and destination servers. I have a SQL Server 2014 instance hosted on Windows 2012 R2 Server as the source and a SQL Server vNext instance hosted on Red Hat Linux server as the destination. I have hosted a database named "Manvendra" on the Windows based SQL Server. We took a backup of this database in my last tip and restored it on a Linux based SQL Server using the sqlcmd utility. You can see the "Manvendra" database on both servers which also looks identical in the below image.
Step 2: I will use the same backup from the source database "Manvendra" hosted on the Windows based SQL Server which I copied to /var/opt/mssql/backup in my last tip and will restore to a new database named "Manvendra_GUI".
Now let's start the restore process. Connect to the Linux server through SSMS on your Windows machine, right click on the 'Database' folder and choose the "Restore Database..." option.
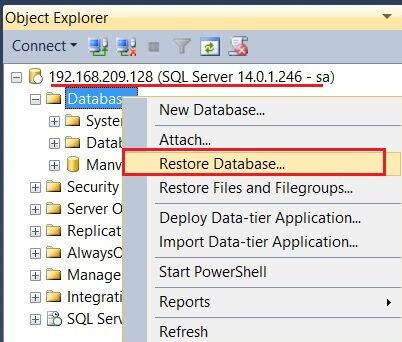
Another window named "Restore Database" will appear on your screen as shown in the below screenshot.
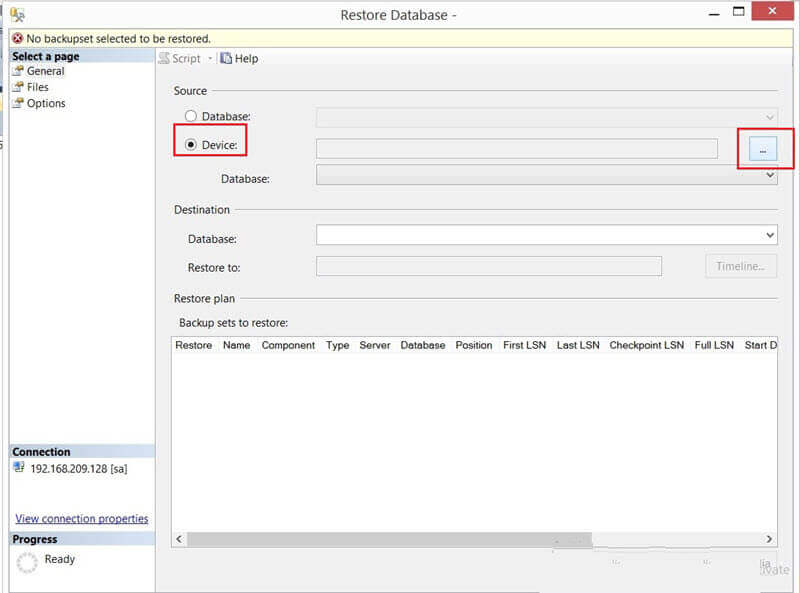
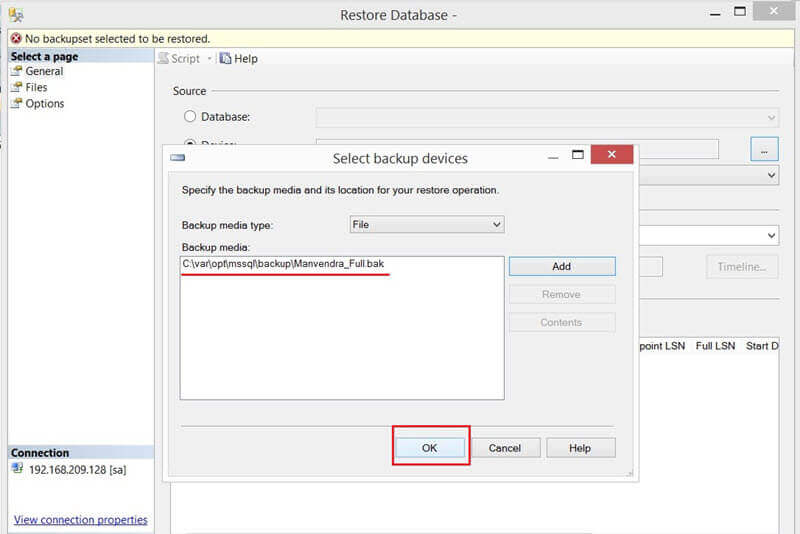
Step 3: Next choose the "Device" option as source and click on the ellipse next to this option as highlighted in the above image. A small sub-window will appear asking you to select the backup devices as displayed in the below image.
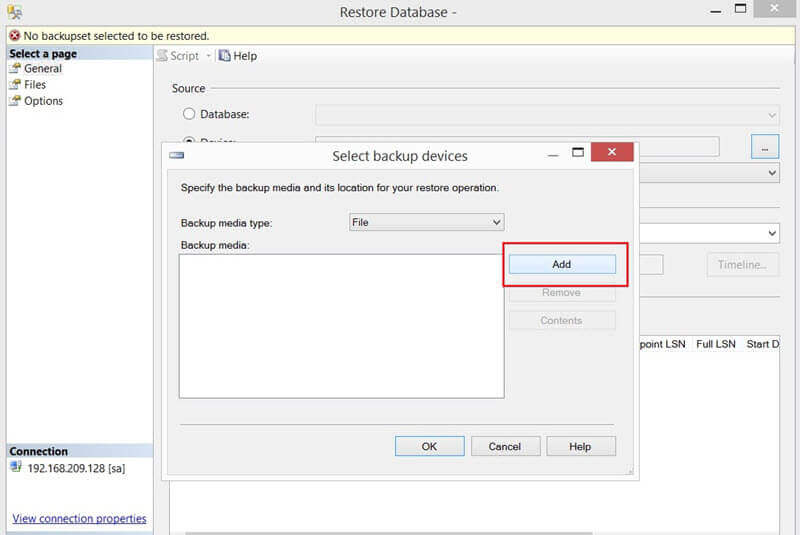
Click the "Add" button to select the backup file to restore this database. Once you click on the "Add" button a separate window will display which will ask you to choose the backup file path from the displayed location.
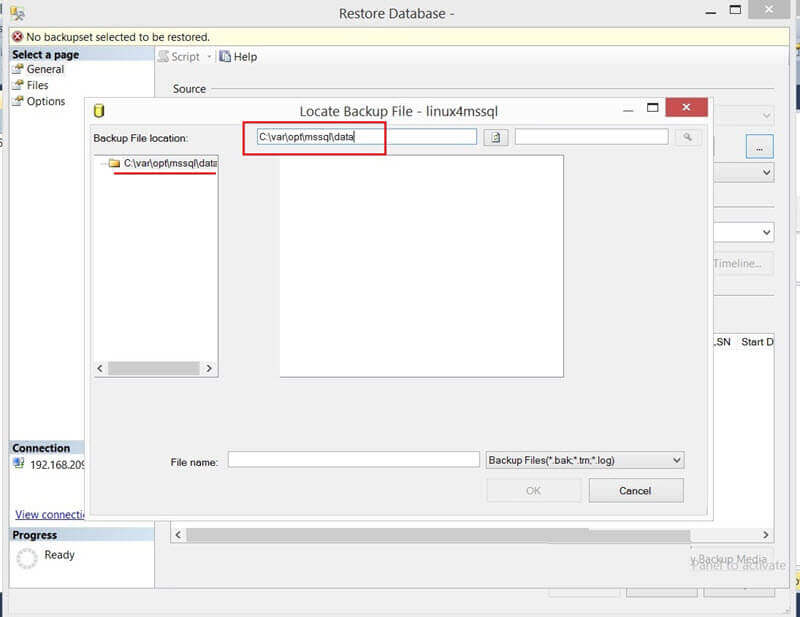
We can see the backup path is not selected in the above image, so we will change it to our backup file location /var/opt/mssql/backup where we have placed our backup file. Once you change the location, you will be able to see your target backup file as shown in the below picture.
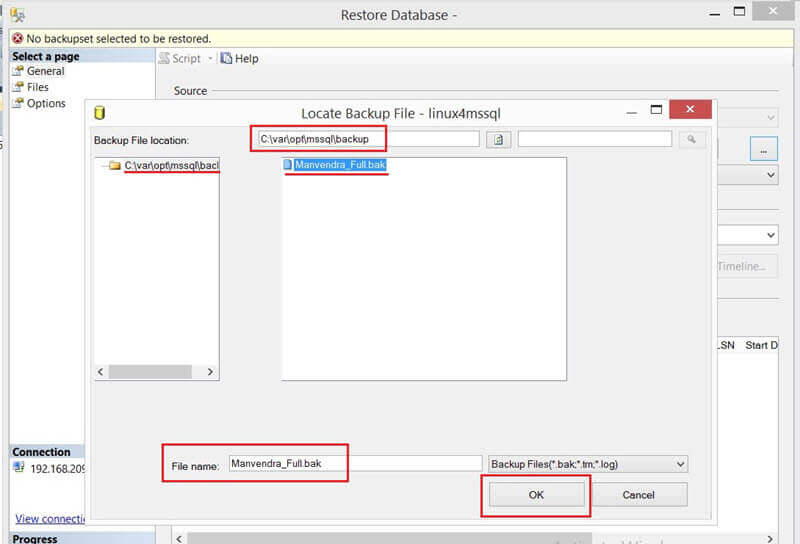
Step 4: Now select this file and click the "OK" button to proceed. The below screen will appear once you click on "OK" in the above step. Again click on the "OK" button to proceed.
Step 5: Once you click on the "OK" button you will get to the main "Restore Database" window with the details of the backup file. Click on the checkbox just below "Restore" to select the backup file as shown in the image below.
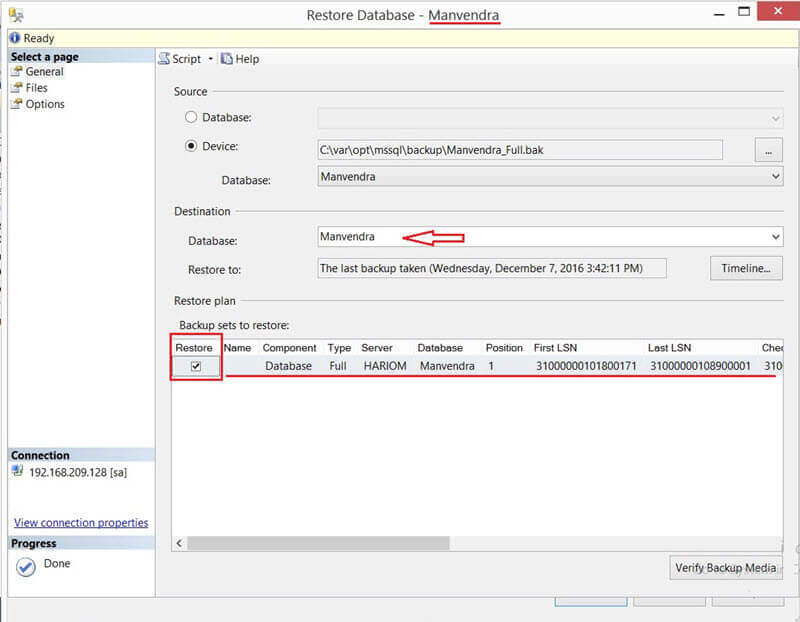
One item you will notice is that the database name in the destination section in the above image still shows "Manvendra". However, there is already a database with that name on this instance, so change the database name as per your requirements. I changed the database name from "Manvendra" to "Manvendra_GUI". Now click on the "Files" tab in the left pane as shown in the below screenshot.
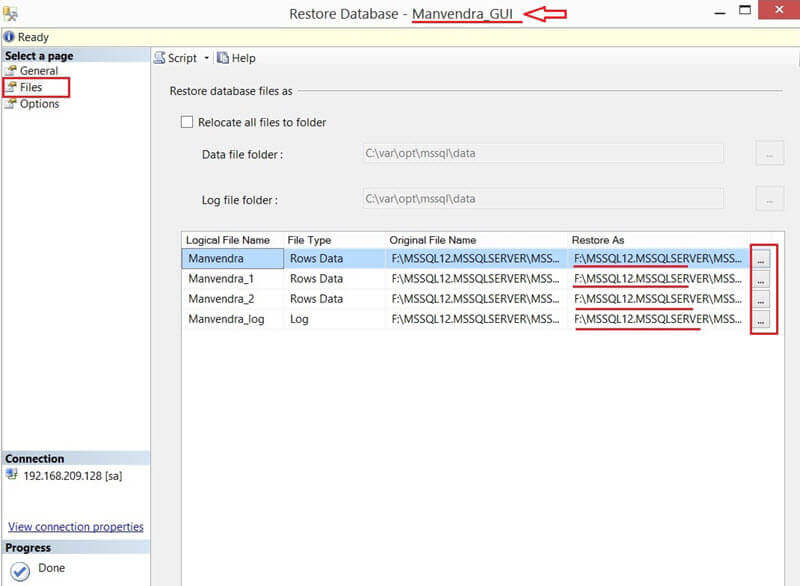
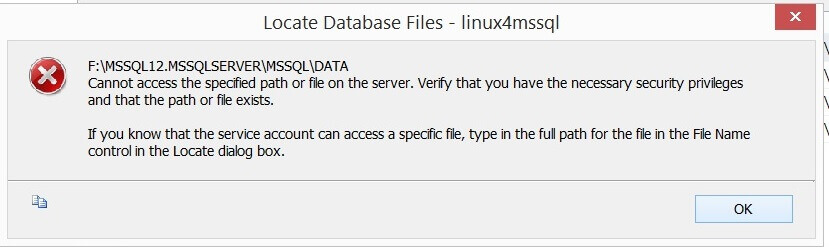
You can see the original file names as well as destination file names are the same. Since there is a different directory structure in Windows vs. Linux, we need to change the location and file name of each database file in the above image. If you try to restore your database with the same directory structure you will get the below error.
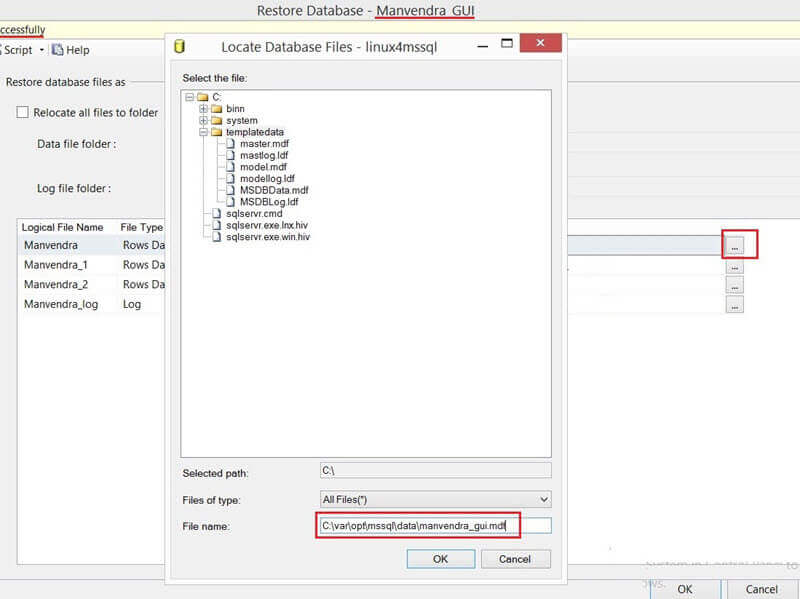
Step 6: Now we will change the destination database file location and the corresponding file names. Click on the three dots next to each database file in the "Restore As" column one after another. Enter the correct data file location and file name for each file. Enter the database file name along with the full path in below highlighted section as I did for the primary data file. You can ignore the drive letter "C" references as it displays when you see the Linux path from Windows. If you noticed, I changed the data file name from Manvendra.mdf to Manvendra_GUI.mdf, because Manvendra.mdf is already being used by the existing "Manvendra" database.
Repeat the same process for each of the database files. Once you update each data file along with the corresponding location the interface will look like the below image.
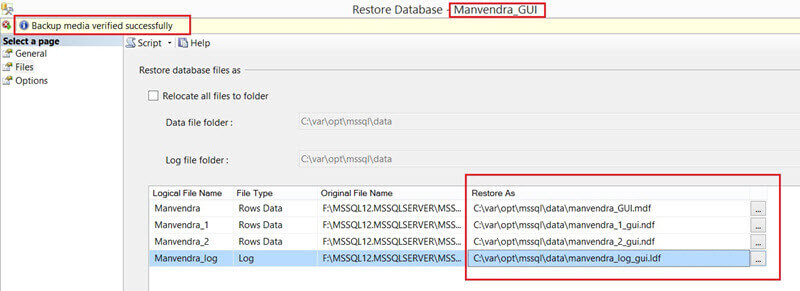
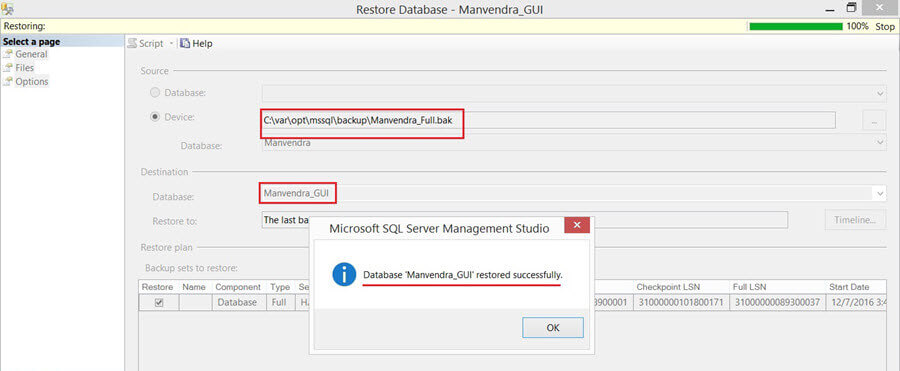
Now that you have chosen the correct data file names along with their respective locations in the above image, it's time to restore the database, so go ahead and click OK to restore the database. Below we can see database has been successfully restored in the below image.
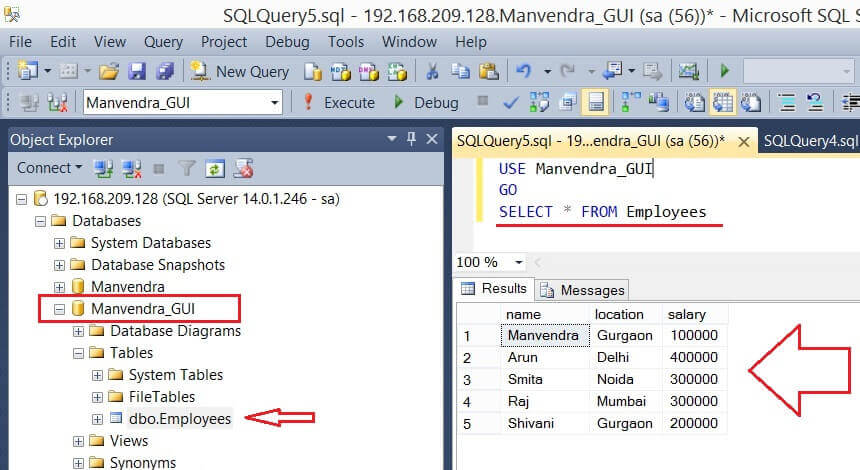
Step 7: Now we will validate whether the restored database "Manvendra_GUI" is accessible. We can see the source database has one table "Employees" in the first screenshot back in Step 1, so this database should also have the same table. We can see database "Manvendra_GUI" is available along with database "Manvendra". The "Employees" table is also available. I ran a simple SELECT statement to check the details of this table as shown below.
Next Steps
- Learn more on SQL Server vNext to get more exposure.
- Stay tuned for my next couple of tips for SQL Server running on Linux.
- Explore more knowledge on SQL Server Database Administration Tips.


About the author
 Manvendra Singh has over 5 years of experience with SQL Server and has focused on Database Mirroring, Replication, Log Shipping, etc.
This author pledges the content of this article is based on professional experience and not AI generated.
View all my tips
