By: John Miner | Comments (4) | Related: > Azure Backup and Restore
Problem
Many institutions have the requirement to take a weekly backup of a user defined database. The actual timing of the backup is not important; however, keeping restore points for several years is important. How can this business requirement be solved with Azure SQL database?
Solution
Azure recovery services allows the database developer to store up to ten years of backups in a recovery vault. Microsoft has provided the data platform developer with PowerShell commands to perform this action.
Business Problem
Our boss has asked us to enable long term backup storage for our Azure Database using Azure Recovery Services. This tip will complete our talk on backups. Please see my prior article on the three restore types for Azure SQL databases.
Sign into Azure Portal
This tip assumes you have an active Azure Subscription with money to spend. We must log in with a valid subscription owner before we can do any work. The Add-AzureRmAccount cmdlet will prompt you for credentials to login in.
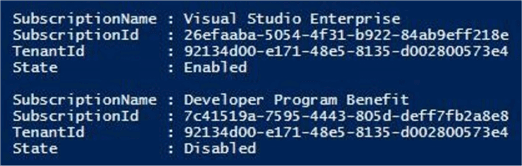
An account might have several subscriptions associated with it. Use the Get-AzureRmSubscription cmdlet to list the subscriptions associated with your account. My account is associated with [email protected].
The output from this command shows two subscriptions. Since the Developer Program Benefit only has $25 associated with it, we want to make sure any new deployments are on the Visual Studio Enterprise subscription. Last but not least, use the Set-AzureRmContext cmdlet to choose the correct subscription
The PowerShell code below logs into the portal, lists the subscriptions and selects the correct subscription. Of course, manual intervention is needed for the sign on.
#
# Azure Subscriptions
#

# Prompts you for azure credentials
Add-AzureRmAccount

# List my subscriptions
Get-AzureRmSubscription

# Pick my MSDN one
Set-AzureRmContext -SubscriptionId '26efaaba-5054-4f31-b922-84ab9eff218e'
List Azure Resource Manager CmdLet
Today’s data platform developer needs to be a jack of all trades. While you may not be a master of all trades, you need to be able to find out information for an Azure Service when asked.
The Get-Module cmdlet retrieves information about all locally installed PowerShell modules. Using the -ListAvailable parameter, you are shown all modules that can be downloaded from the PowerShell Gallery.
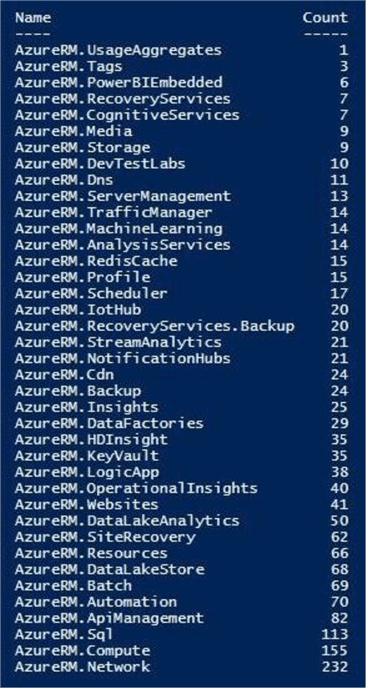
The first snippet of code below is used to select, filter, group and order the output of the Get-Module cmdlet for only Resource Manager modules. There are two modules related to Recovery Services which has a total of 27 individual cmdlets in the modules.
The second snippet of code builds upon the fact that the raw output of the Get-Module command was stored in an object array named $CmdList. Therefore, we can very easily list the names of the cmdlets and which module they belong to.
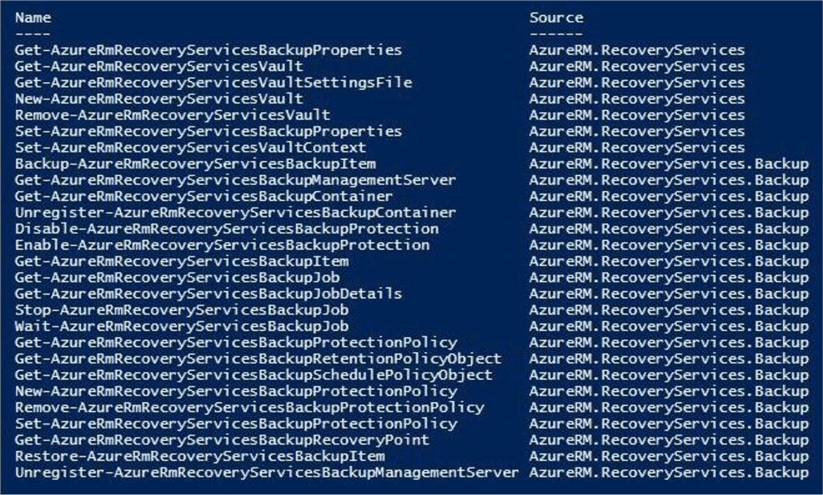
In a nutshell, the PowerShell code below summarizes all the Azure Resource Manager modules by total cmdlets and lists the name of all cmdlets associated with Recovery Services.
#
# Azure RM cmdlets
#

# 1 - List module & no of cmdlets
$CmdList = Get-Module -ListAvailable | Where-Object { $_.Name -like 'AzureRM*' } `
    | ForEach-Object { $_.ExportedCommands.Values }
$CmdList | Group-Object Source | Select-Object Name, Count | Sort-Object Count

# 2 - Show Recovery Services cmdlets
$CmdList | Where-Object { $_.Source -like 'AzureRM.RecoveryServices*' } `
    | Select-Object Name, Source
Registering the provider
One might try to execute a New-AzureRecoveryServicesVault cmdlet to start our journey off. More than likely, this command will fail the first time. Unlike other services, the provider must be registered at the subscription level.
The image below shows a typical error message when the subscription does not have the provider (namespace) registered correctly.

The PowerShell code below performs three actions: show me the current registered services, what locations a service exist in and how I register the service. The last action is the most important since it is required as the first step before creating your first recovery vault.
#
# Register recovery services
#

# Is R.S. a registered service?
Get-AzureRmResourceProvider

# List locations of availability
$ListRegions = @()

Get-AzureRmResourceProvider -ListAvailable `
| Where-Object { $_.ProviderNamespace -eq 'Microsoft.RecoveryServices' } `
| Select-Object Locations | foreach-object { $ListRegions += $_.Locations }

$ListRegions | Sort

# Register the service
Register-AzureRmResourceProvider -ProviderNamespace Microsoft.RecoveryServices
The Get-AzureRmResourceProvider cmdlet can be used to find out what providers are already installed and what providers are available.
The output below shows the successful registration of the Microsoft.RecoveryServices namespace using the Register-AzureRmResourceProvider cmdlet.

Recovery Services Vault
Now that we have all the preparatory work done, we can finally setup our long-term storage. A recovery services vault is created at the resource group level.
The output below shows the creation of the new recovery services vault using the New-AzureRecoveryServicesVault cmdlet. The vault named bv4sqltips is assigned to the resource group named rg4tips17.

Properties such as redundancy can be defined for the vault. No redundancy is enabled as the default.
I suggest you use the Set-AzureRmRecoveryServicesBackupProperties cmdlet to add either local or geo redundancy to the mix. This will ensure that the backups are stored in more than one place.
We need to associate the vault with the logical Azure SQL Server named mssqltips17. That is where the Set-AzureRmSqlServerBackupLongTermRetentionVault cmdlet comes in handy.
The PowerShell code below executes all three tasks described above.
#
# Create a recovery services (backup) vault
#

# Make a new vault
$Vault = New-AzureRmRecoveryServicesVault -Name "bv4sqltips" -ResourceGroupName `
    "rg4tips17" -Location "EAST US 2"
$Vault

# Set local redundancy
Set-AzureRmRecoveryServicesBackupProperties -BackupStorageRedundancy LocallyRedundant -Vault $Vault

# Assign vault 2 logical server
Set-AzureRmSqlServerBackupLongTermRetentionVault -ResourceGroupName 'rg4tips17' `
    -ServerName "mssqltips17" -ResourceId $Vault.Id
The image below shows the recovery vault being assigned to the correct resource group and logical server.

Custom Retention Policy
The next step is to create a custom retention policy. In our fictitious business case, our manager wants us to save one year’s worth of weekly backups for the Azure SQL database named MATH.
The Get-AzureRmRecoveryServicesBackupRetentionPolicyObject cmdlet returns a base schedule policy object. We want to create a policy named OneYearRetentionPolicy to meet our requirements. The completed code below does just that. Most times, the PowerShell cmdlets are just wrappers for the REST API calls. Here is the reference to the backup policy object in Recovery Services. There are a ton of properties that you can set via the policy object.
The New-AzureRmRecoveryServicesBackupProtectionPolicy cmdlet associates the backup policy to the workload type. However, there is no parameter to specify which vault to add the policy to.
Thus, we might want to call Set-AzureRmRecoveryServicesVaultContext to make sure you are specifying the correct vault. This becomes more important when working with multiple vaults.
The PowerShell code below creates our one year retention policy, sets the backup vault context and assigns the policy to the workload named AzureSQLDatabase.
#
# Create a retention policy
#

# Create a policy
$Retention = Get-AzureRmRecoveryServicesBackupRetentionPolicyObject -WorkloadType AzureSQLDatabase
$Retention.RetentionDurationType = "Years"
$Retention.RetentionCount = 1
$RetentionName = "OneYearRetentionPolicy"

# Set this vault as the default
Set-AzureRmRecoveryServicesVaultContext -Vault $Vault

# Add to backup vault 2 Azure SQL DB
$Policy = New-AzureRmRecoveryServicesBackupProtectionPolicy -name $RetentionName `
    -WorkloadType AzureSQLDatabase -retentionPolicy $Retention
Applying Policy to User Defined Database
So far, we have assigned a recovery services vault and backup policy to the mssqltips17 logical server. None the less, these actions do not get us anywhere since we have not specified any objects (databases) to backup.
The last step is to apply the policy to the user defined database. This action notifies the recovery services of our intent to save the backups for an extended period of time.
The code below uses the Set-AzureRmSqlDatabaseBackupLongTermRetentionPolicy cmdlet to complete this action.
#
# Apply policy to selected DB
#

# Apply policy to MATH database
Set-AzureRmSqlDatabaseBackupLongTermRetentionPolicy -ResourceGroupName "rg4tips17" `
    -ServerName "mssqltips17" -DatabaseName "MATH" -State "enabled" -ResourceId $Policy.Id
The image below shows the retention policy being assigned to the MATH database. This output is generated inside the PowerShell Integrated Scripting Environment.

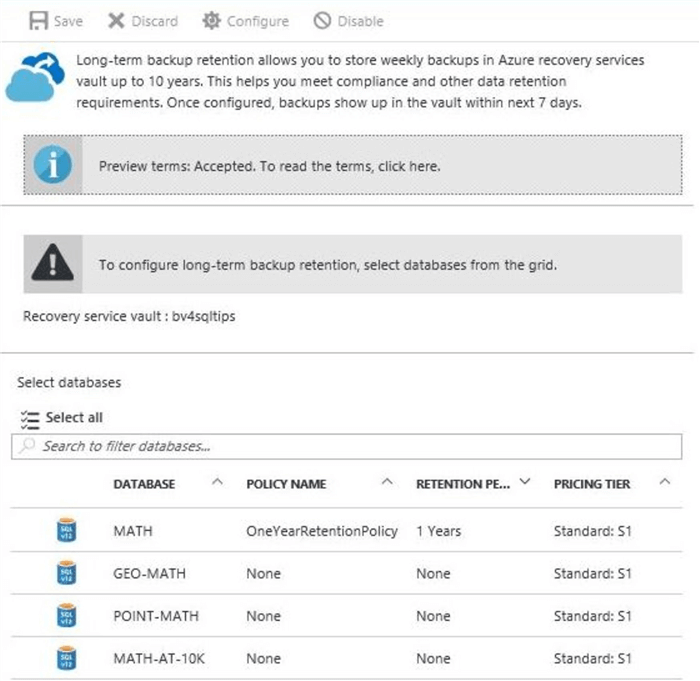
If we log into the Azure Portal via a web browser and find the properties of the mssqltips17 server, we can then select the long-term backup retention blade. The image below shows our new policy being assigned to the MATH database.
I will be using the abbreviation of L.T.B. in the future to stand for long term backup.
Restoring a Long Term Backup from the Azure Portal
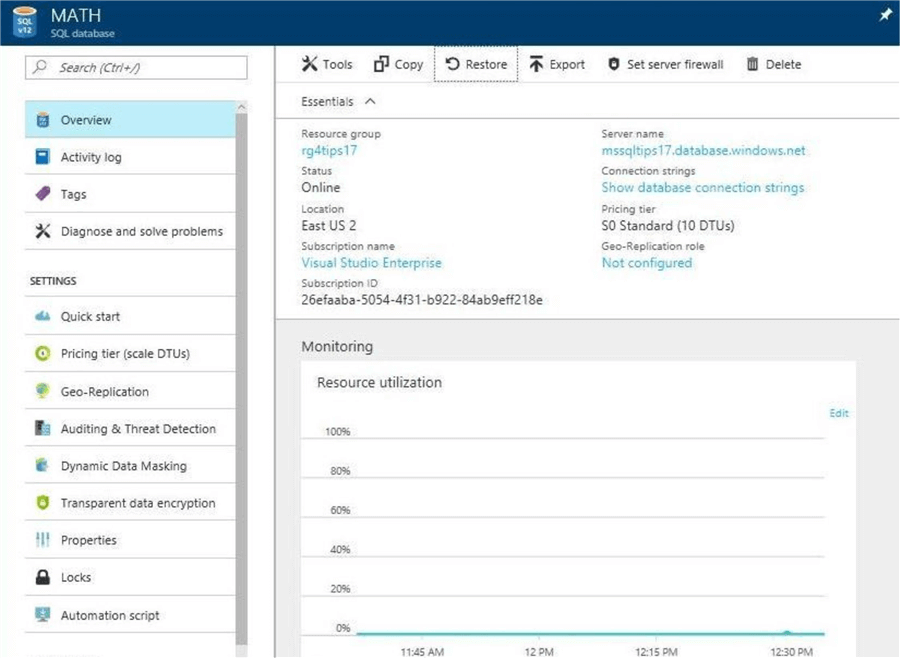
Use the Azure Portal to get to the overview blade of the MATH database. On the top right tool bar, you can see a button labeled restore. Click this button to bring up the restore blade. See image below for details.
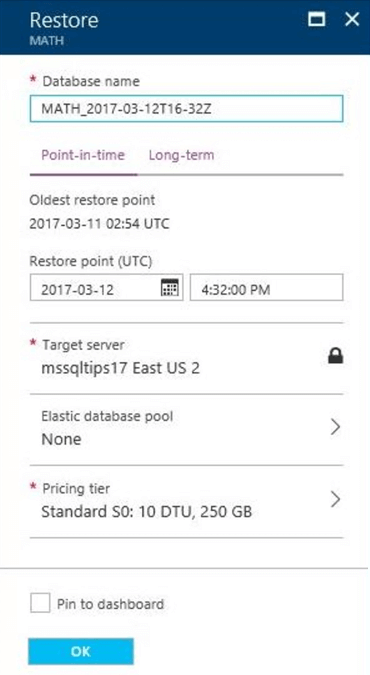
By default, the point-in-time restore blade is the default. Click the long-term tag to change the blade options.
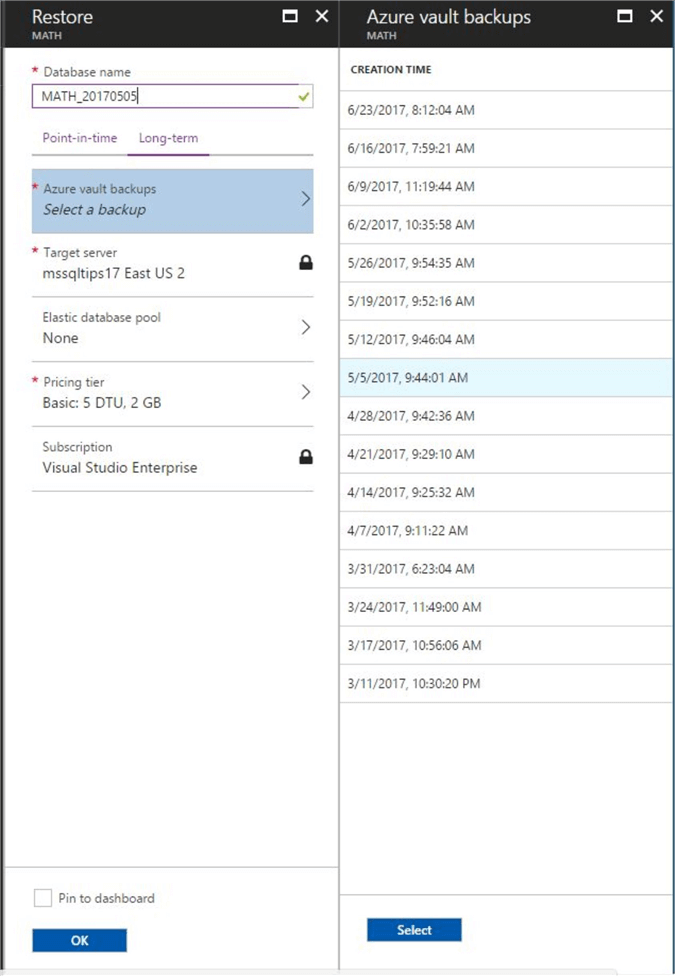
Drill into the Azure vault backups section to find all the restore points for the MATH database. In our case, we are going to select the backup for May 5th.
There are several options that you can change at this time. I suggest you change the name of the database to something meaningful. Both the target server and database size can be modified at this time. I am going to choose the pin to dashboard checkbox before hitting the okay button.
The tile on the dashboard will show the deployment of an Azure SQL database from our recovery services vault.

When the action is complete, we will see the database in an on-line state.
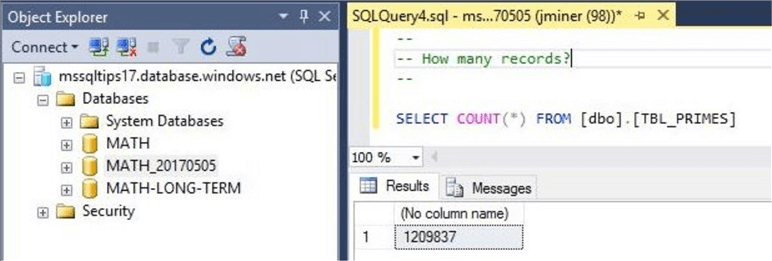
Testing is always part of a successful deployment. The image below shows the output from a query executed inside of SQL Server Management Studio. If you have an idea of how many records were in a table at a point in time, you can verify this using a very simple SELECT statement.
The Azure Portal is a nice interface to use for a single restore. However, PowerShell is the only way to automate multiple restores. In the next section, we will show how to display all the restore points in the vault and restore a chosen backup.
Restoring a Long Term Backup using PowerShell
Using PowerShell to restore an Azure SQL database from long term backup storage is a several step process. The simple algorithm for this action is listed below. Each step has cmdlets that will be explained.
- Set the recovery services vault context.
- Get the container that holds the backups.
- Get the metadata associated with database.
- Repeatedly ask for backup item details every 30 days.
- Verify the resource id of the backup.
- Restore the database using the resource id.
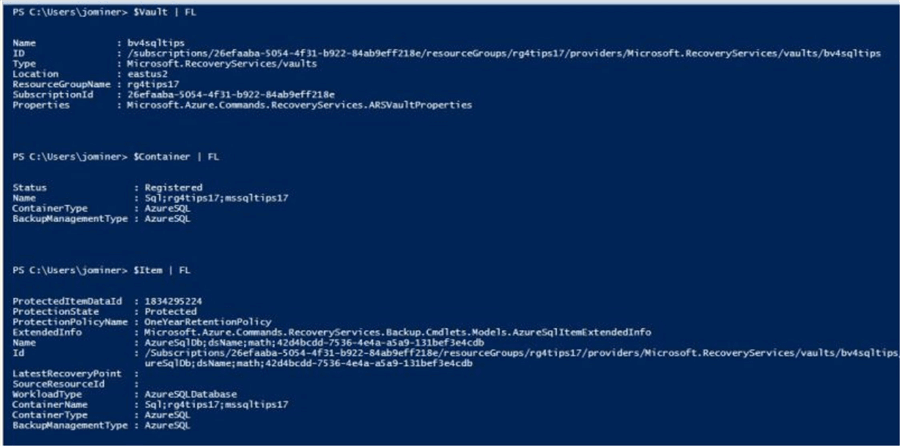
The first step is to set the vault context. In other words, “What is the default vault we are working with?” The Get-Azure-RecoveryServicesVault cmdlet returns an object to the vault given the resource group named rg4tips17 and vault named bv4sqltips. Use the Set-AzureRmRecoveryServicesVaultContext cmdlet to declare our default vault.
The second step is to get the container that holds the backups for Azure SQL database. The Get-AzureRmRecoveryServicesBackupContainer cmdlet requires a container type and vault name as parameters. It returns an object to the storage container that contains our backups.
The third step is to get the meta data associated with our database. The Get-AzureRmRecoveryServicesBackupItem cmdlet requires a workload type, database name and container pointer. It returns an object to the backup items associated with our database.
The image below displays the vault, container and item objects. As we can see, there are no details about our recovery points.
The fourth step is the most difficult part of the algorithm. The Get-AzureRmRecoveryServicesBackupRecoveryPoint cmdlet only returns the last 30 days of backups. This is not that useful since we could use a point-in-time backup instead of using a long-term backup for the restore.
For us to list all the backups within our policy, we need to pass both the start and end times as parameters. The $List variable in the code below is used to build up an object array. The $NumArray variable is used to mark off our thirty-day window. A basic for-each-element-loop is used to call the cmdlet for the correct window. Results are added to the final object list.
The fifth and final step is to verify which object in the sorted list is the backup we want to restore from. To make the output very clean, I removed the Id from the display. You should add this back since it is the required value for the restore command.
The PowerShell code below can be used to find a backup in a given recovery services vault.
#
# Restore from backup vault (part 1)
#

# 1 - Set the vault context
$Vault = Get-AzureRmRecoveryServicesVault -ResourceGroupName "rg4tips17" -Name "bv4sqltips" `
Set-AzureRmRecoveryServicesVaultContext -Vault $Vault

# 2 - Get the container
$Container = Get-AzureRmRecoveryServicesBackupContainer -ContainerType AzureSQL `
    -FriendlyName $Vault.Name

# 3 - Get the metadata associated with database
$Item = Get-AzureRmRecoveryServicesBackupItem -Container $Container `
    -WorkloadType AzureSQLDatabase -Name "MATH"

# 4 - Get all available backups (1 year)
$List = @()
$NumArray = (360, 330, 300, 270, 240, 210, 180, 150, 120, 90, 60, 30)
Foreach ($Num in $NumArray)
{
    # Get state & end dates
    $StartDate = (Get-Date).AddDays(-$Num)
    $EndDate = (Get-Date).AddDays(-$Num+29)

    # Ask for backups
    $Available = Get-AzureRmRecoveryServicesBackupRecoveryPoint -Item $Item `
    -StartDate $StartDate.ToUniversalTime()  -EndDate $EndDate.ToUniversalTime()

    # Add to list
    $List += $Available | Select-Object RecoveryPointType, RecoveryPointTime, RecoveryPointId, `
    FriendlyName, ItemName, WorkloadType, `
    ContainerName, ContainerType, BackupManagementType

    # Very long identifier, include when ready to restore
    # , Id
}
$OrderedList = $List | Sort-Object RecoveryPointTime

# 5 – Show the first backup
$OrderedList[0]
I decided to choose the earliest backup as the restore point. It contains the prime numbers for the first 80 thousand integers. The image below shows the details of this backup.

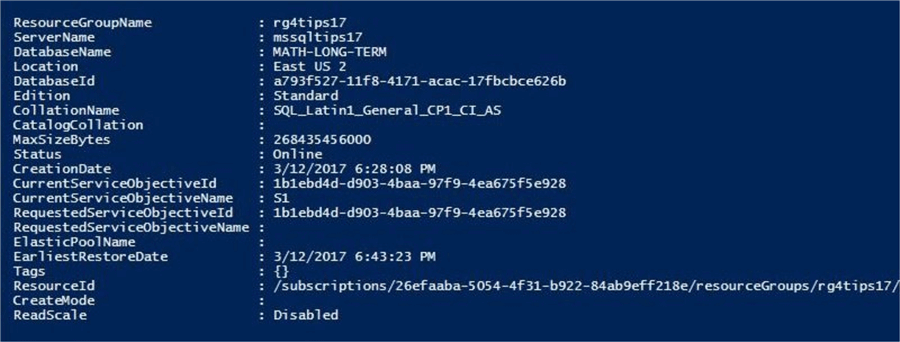
We are going to use the Restore-AzureRmSqlDatabase cmdlet like we did in my prior article. However, we have a new restore type named -FromLongTermRetentionBackup. I am not going to go into the details about the PowerShell code below. I just want to point out that the resulting name of the restored database is MATH-LONG-TERM.
#
# Restore from backup vault (part 2)
#

# Restore from long term storage
if ($OrderedList[0])
{
  Restore-AzureRmSqlDatabase -FromLongTermRetentionBackup -ResourceId $OrderedList[0].Id
  -ResourceGroupName "rg4tips17" -ServerName "mssqltips17" -TargetDatabaseName "MATH-LONG-TERM"
  -Edition "Standard" -ServiceObjectiveName "S1"
}
The image below shows the output window in the PowerShell ISE after successfully executing the restore command.
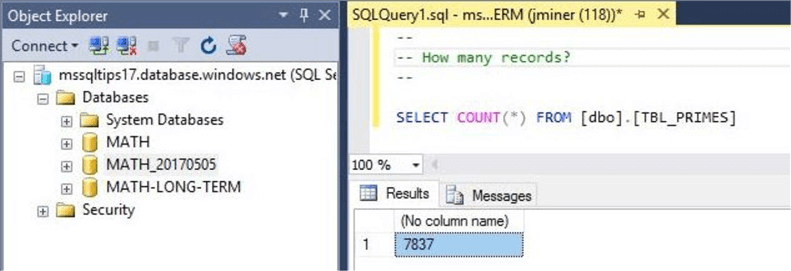
Again, testing is always part of a successful restore process. The image below shows the output from a query executed inside of SQL Server Management Studio. I knew there were 7,837 prime number between 2 and 80 thousand. Thus, the restore from a long-term backup stored in recovery services was successful.
Summary
Recovery services can be used to save restore points for a user defined database for up to 10 years. Each recovery vault can have up to 1,000 databases and each region can have 25 recovery vaults. Check out the Azure Subscription and Services limits documentation for details. In short, there are many ways to satisfy our business problem.
Today, I showed how to programmatically setup recovery services for long term backups using PowerShell. A weekly backup was picked as interval and one year was selected as the retention period. The start of the backup process was decided by the service. What I did not explore is the many options that can be set for a backup policy. This includes a daily interval if needed as well as a determined schedule.
In conclusion, I hope you enjoyed my articles on restoring Azure SQL databases using PowerShell. For more information, please see the Microsoft Azure documentation on this subject.
Next Steps
- Using a different retention period and schedule for long term backups, work through this process to meet your requirements.


About the author
 John Miner is a Data Architect at Insight Digital Innovation helping corporations solve their business needs with various data platform solutions.
This author pledges the content of this article is based on professional experience and not AI generated.
View all my tips
