By: Manvendra Singh | Comments | Related: > SQL Server on Linux
Problem
SQL Server installation or removal is an important DBA task. I have written many articles on how to install SQL Server 2017 on different Linux flavors and you can take a look at “Next Steps” section to access those articles. In this tip, I am going to demonstrate how to uninstall SQL Server 2017 from an Ubuntu Linux server.
Solution
As you probably know, Microsoft started SQL Server support on Linux operating systems starting with SQL Server 2017. This has generally been referred to as SQL Server vNext. Now you can design, build and deploy your application anywhere whether its Windows or Linux. This version has brought SQL Server to a larger audience.
Sometimes, we need to remove SQL Server from an existing operating system as per business needs and we will cover how to do this for SQL Server running on Ubuntu.
Uninstall SQL Server 2017 Running on Ubuntu
I installed SQL Server 2017 on this machine and now I want uninstall it cleanly from the Ubuntu machine. Follow the steps in this tip to proceed with the SQL Server 2017 uninstall.
NOTE: I recommend testing this first on a lower life cycle system before performing this action in production.
Step 1 - Preliminary SQL Server Database Backups
Make sure you have proper approvals in place to uninstall the SQL Server installation. The next step to proceed with the uninstall of SQL Server is to secure your data for future reference. Make sure to run full database backups of all databases and save to a secure location so that you can access the if needed in the future. You can use the BACKUP DATABASE command or your backup jobs to execute the backups.
Step 2 - Connect to the SQL Server with PuTTY to Begin the Uninstall
Once you have executed the backup and saved the backup files, we will proceed with the uninstallation steps. Launch PuTTY terminal and connect to your Ubuntu server on which SQL Server is running that needs to be uninstalled. You can also directly be logged in to the Ubuntu server locally and connect to with a local terminal window.
I have performed this process using PuTTY terminal. If you are going to use PuTTY then launch a terminal screen and enter your Ubuntu server details to establish the connection. Once you will get the login screen, type your login and password and press enter to connect.
Step 3 - Determine if the SQL Server Services are Running
Once you connect to the Ubuntu server, we need to uninstall SQL Server 2017. The next step is to check and verify whether SQL Server is installed and running on this server or not. We will check the SQL Server services that are running by executing the below commands.
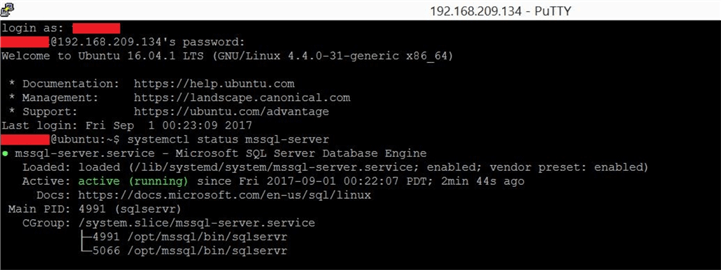
#Check SQL Server Service
Systemctl status mssql-server
You can see the in the below screenshot where we have executed the command and we can see SQL Server is active and running on this machine.
Step 4 - Validate the SQL Server Directories
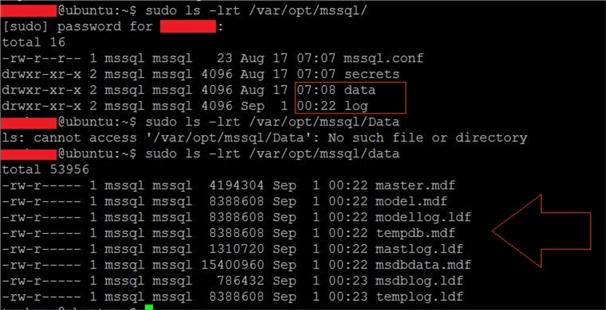
Now we will check and verify the database files under their respective directory. SQL Server installs databases under /var/opt/mssql directory. I ran the ls-lrt command to check the files and folders present under this directory. We can see the data folder is showing under /var/opt/mssql directory and when we look inside the data directory, we can see the mdf and ldf database files.
To access the content of the above directory we need to run the commands using sudo access. I have executed this to see the below files in the below screenshot.
#Access /var/opt/mssql
sudo ls -lrt /var/opt/mssql

#Get inside /var/opt/mssql/data
sudo ls -lrt /var/opt/mssql/data
Step 5 - Begin the SQL Server Uninstall
Now we will start the SQL Server uninstall from this Ubuntu server by executing the below command.
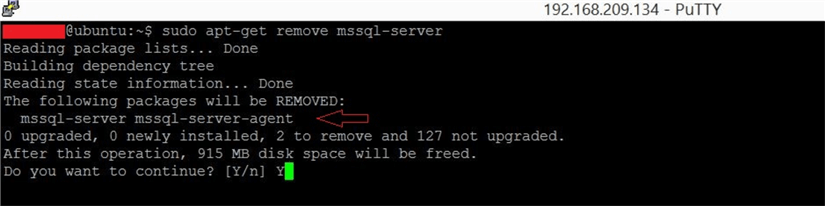
#Uninstall SQL Server 2017 from Ubuntu Server.
sudo apt-get remove mssql-server
You can see I have executed the above command in the below screenshot. Once we execute the command, it will read the package list and build a dependency tree as shown in the below image. This command will remove two SQL Server packages mssql-server and mssql-server-agent. We can see this in the output of the command. Execution will ask you again to enter Y to proceed with the removal. You can also see how much disk space will be freed post uninstalling SQL Server from this machine in the below screenshot.
Once you will type Y and press enter to proceed with the uninstall, execution will start to remove SQL Server from this Ubuntu server. You can have a look at the below screenshot where SQL Server has been removed from the Ubuntu server.

Step 6 - Validate the SQL Server Database Directory
We can see in above the screenshot that SQL Server and SQL Server Agent have been uninstalled from the Ubuntu server. The package name for SQL Server and SQL Server Agent is mssql-server and mssql-server-agent respectively that have been removed from this Ubuntu server.
But uninstalling SQL Server or the SQL Server package does not delete the created database files from the server. We need to delete them manually in order to clean the system from SQL Server.
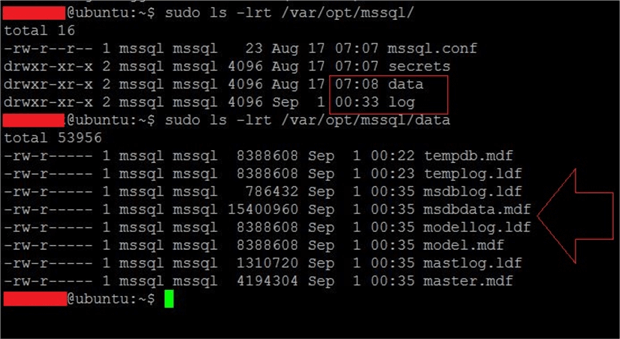
First, let’s verify whether the database files or mssql folder under directory /var/opt/ is removed or still present.
Run the same commands we ran in Step 4 to check the database files. We can see all of the files and folders are still there. Now we need to remove them manually.
Step 7 - Remove the MSSQL Folder and Files
We will remove the mssql folder, so that all files and folders inside this directory are removed from this Ubuntu server. Be aware that running the below command will remove whatever directory you pass.
Run the below command to remove all mssql related files.
#Remove SQL Server folders and files.
sudo rm -rf /var/opt/mssql/
When you access the above folder to see the details, you will end with the below error because all files and folders have been removed.

Step 8 - Very the SQL Server Services Do Not Exist
Now you have completely removed SQL Server from the Ubuntu machine. Next, we will verify this uninstall by checking the SQL Server service. Run the below command to check the SQL Server service.
#Check SQL Server Service
Systemctl status mssql-server
The SQL Server service was not found on the Ubuntu server as shown in the below screenshot.

Next Steps
- Check out this tip to install SQL Server on Ubuntu.
- Read more articles on SQL Server on Linux.
- Explore more knowledge with these SQL Server Database Administration tips.


About the author
 Manvendra Singh has over 5 years of experience with SQL Server and has focused on Database Mirroring, Replication, Log Shipping, etc.
This author pledges the content of this article is based on professional experience and not AI generated.
View all my tips
