By: Jeffrey Yao | Comments (3) | Related: > SQL Server Agent
Problem
From time to time, there may arise a business requirement that in a SQL Server Agent Job, we want to pass a parameter value or multiple values from step 1 to step 2. For example, in job step 1, I insert a record to a table with an identity column, and I want to pass the newly inserted identity value, i.e. scope_identity(), to the next job step.
There are many different types of SQL Server Agent Job steps, such as ActiveX Script, PowerShell script, SSIS packages, T-SQL script, etc., out of these job steps, the most difficult one is probably the T-SQL Script type as T-SQL usually does not have an easy way to write data outside of the scope for the next step to consume, while ActiveX Script, PowerShell and SSIS package can easily generate an external file or even access to the OS environment variables for data exchange purposes.
So what solutions do we have to address this data exchange issue for T-SQL type job steps?
Solution
Actually, there is a common way to do this work, i.e. create a permanent table and then use this table as the "liaison" or "messenger" to exchange data between job steps. There is nothing wrong with this approach, however, there may be other ways that are more flexible and robust with less footprint or better alignment with business requirements.
We will explore these potential solutions other than using a permanent table.
We assume that we want to pass two parameters, one is an integer parameter, @parmInt and another a string parameter, @parmStr.
For demo purposes, we assume we have a job with two steps, and we will pass values from step 1 to step 2.
Method 1: Pass data via an Extended Property between SQL Server Agent Job Steps
An extended property is a good place for us to store temporary values as its initial purpose is for "documentation" of database objects.
To make things simpler, we will add extended properties to TempDB to pass the data between job steps.
So, in job step 1, we have the following:
if exists (select * from tempdb.sys.extended_properties where class=0 and name='parmInt')
   exec tempdb.sys.sp_dropextendedproperty @name='parmInt';

if exists (select * from tempdb.sys.extended_properties where class=0 and name='parmStr')
   exec tempdb.sys.sp_dropextendedproperty @name='parmStr';

EXEC tempdb.sys.sp_addextendedproperty
@name = N'parmStr',
@value = 'HelloWorld'; -- assuming 'HelloWorld' is what we want to pass

EXEC tempdb.sys.sp_addextendedproperty
@name = N'parmInt',
@value = '123'; -- assuming '123' is what we want to pass
In job step 2, we can use the following script to retrieve the values:
declare @parmInt int, @parmStr varchar(128);

select @parmInt = cast([value] as int)
from tempdb.sys.fn_listextendedproperty('parmInt', null, null, null, null, null, null);

select @parmStr = cast([value] as varchar(128))
from tempdb.sys.fn_listextendedproperty('parmStr', null, null, null, null, null, null);
/*
-- other regular business processing with @parmInt and @parmStr;
-- you can even drop these Eps after the work is done using sp_dropextendedproperty
*/
Method 2: Pass value via Error Log between SQL Server Agent Job Steps
In this method, we will write the parameter value into the error log and then in the next job step, read from the SQL Server error log.
So in step 1, we will write to the log using raiserror … with log. The 'with log' will write the message into the SQL Server error log.
For the raiserror statement, if we set the severity level to be 0 (or 10), the job step will not fail, and in such cases, raiserror itself is only to write some information to the error log.
So, in job step 1, we have the following code
-- other business logic block
-- now we want to pass values to next step
declare @parmInt int = 1234, @parmStr varchar(128) = 'hello world'
raiserror ('@parmInt = %d;; @parmStr = %s', 10, 1, @parmInt, @parmStr) with log;
And in the SQL Server error log, we can see the following:

In the next step we can run the following code to retrieve the data based on the data format from step 1:
set nocount on;
declare @t table (LogDate datetime, ProcessInfo varchar(100), [text] varchar(300));

insert into @t (LogDate, ProcessInfo, [Text])
exec master.sys.sp_readerrorlog 0, 1, 'parmInt';

declare @parmInt int, @parmStr varchar(128);

select top 1 @parmInt = cast(substring([text], len('@parmInt = ')+1, charindex(';;', [text])-len('@parmInt = ')-1) as int)
, @parmStr = substring([text], charindex('@parmstr = ', [text])+len('@parmStr = ')+1, 128)
from @t
order by LogDate desc; -- find the most recent data
raiserror('@parmInt = %d', 0, 1, @parmInt) with nowait; -- for debug purpose
raiserror('@parmStr = %s', 0, 1, @parmStr) with nowait; -- for debug purpose

/*
-- the result is exactly as expected
@parmInt = 1234
@parmStr = hello world
*/
Method 3: Pass value via Job Description Property between SQL Server Agent Job Steps
We know each SQL Server Agent Job has a description section as highlighted below.
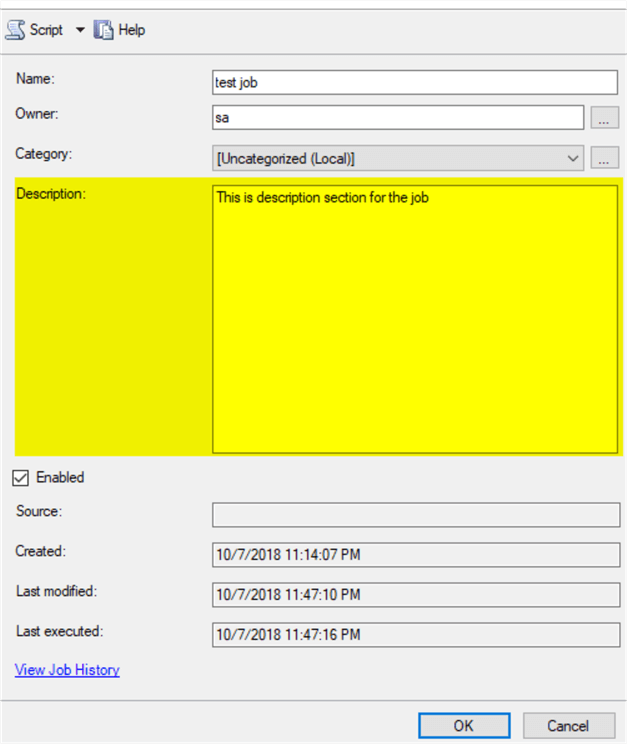
We can actually use this section to pass the data. The only thing we need to be aware of is that many jobs may already use this section, so we should append the data to the existing information and later clean it up after parameter values are retrieved.
In step 1, we have the following code, in which, we use the job token '$(ESCAPE_SQUOTE(JOBNAME))'.
/*
The regular business codes
-- the following is to put parameter values into job description section
*/

declare @parmInt int, @parmStr varchar(128);
-- assume we need to pass the following data to next step
select @parmInt = 123, @parmStr = 'hello world';

declare @desc nvarchar(512);
declare @crlf char(2) = char(0x0d) + char(0x0a);

select @desc = description
from msdb.dbo.sysjobs
where name = '$(ESCAPE_SQUOTE(JOBNAME))';
print @desc;
-- append the info

set @desc = @desc + @crlf + '@parmInt = ' + cast(@parmInt as varchar(20)) + ';' + @crlf;
set @desc = @desc + '@parmStr = ' + @parmStr + ';' + @crlf;

-- update the job description with newly appended data
exec msdb.dbo.sp_update_job @job_name = '$(ESCAPE_SQUOTE(JOBNAME))'
, @description = @desc;
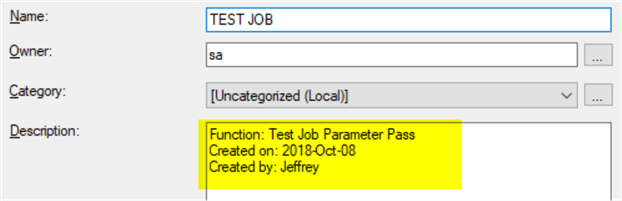
If my initial job description is like the following:
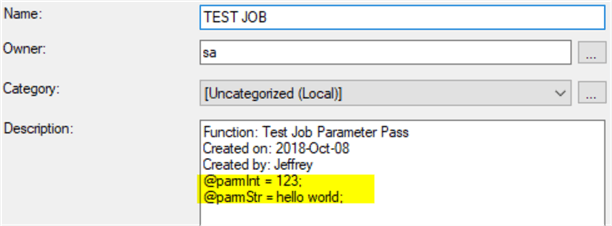
After job step 1 is run, we will see a modified description section as follows:
In job step 2, we can retrieve the appended info with the following code:
declare @parmInt int, @parmStr varchar(128);
declare @desc nvarchar(512);

select @desc = description
from msdb.dbo.sysjobs
where name = '$(ESCAPE_SQUOTE(JOBNAME))';

select @parmInt=cast(substring(@desc, charindex('@parmInt', @desc)+len('@parmInt = ')+1, charindex(';', @desc, charindex('@parmInt', @desc))-charindex('@parmInt', @desc) - len('@parmInt = ')-1 ) as int)
, @parmStr = substring(@desc, charindex('@parmStr', @desc)+len('@parmStr = ')+1, charindex(';', @desc, charindex('@parmStr', @desc))-charindex('@parmStr', @desc) - len('@parmStr = ')-1 )

raiserror('@parmInt = %d', 0, 1, @parmInt) with nowait; -- for debug purpose
raiserror('@parmStr = %s', 0, 1, @parmStr) with nowait; -- for debug purpose

/*
-- the result is exactly as expected
@parmInt = 123
@parmStr = hello world
*/
Method 4: Pass value via External File between SQL Server Agent Job Steps
In this method, we will use two processes, one is to use sqlcmd.exe and its option -o to output a file in job step 1, and another is to use bulk insert to import the file generated in step 2.
To do a proof of concept, we can run the following sqlcmd command in job step 1, whose type should be Operating system (CmdExec) as shown below.
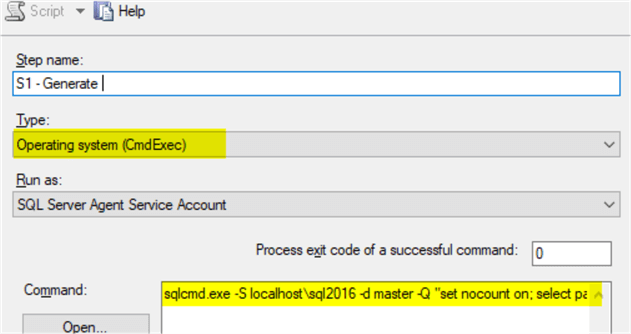
sqlcmd.exe -S localhost\sql2016 -d master -Q "set nocount on; select parmInt=1234, parmStr='hello world'" -o c:\temp\dataExch.txt -s '|'
The result is to generate a csv-type file c:\temp\dataExch.txt, and if we open this text file in Notepad, we will see this.
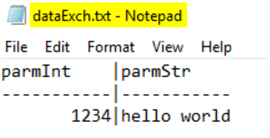
We see that file is composed of three lines, with the first line for the variable name, the 2nd line is a separator, and the 3rd line contains the values. We are using '|' (vertical bar) as the field separator.
So, in job step 2, we can use bulk insert to get the data from this file.
if object_id('tempdb..#t', 'U') is not null
   drop table #t;
create table #t (col_1 int, col_2 varchar(128))

set nocount on
BULK INSERT #t
   FROM 'c:\temp\dataExch.txt'
   WITH
      (
         FIELDTERMINATOR ='|',
         ROWTERMINATOR ='\n' ,
     FIRSTROW =3 -- so we omit the column header line and the separator line
      );

declare @parmInt int, @parmStr varchar(128) -- we will populate these two params

select top 1 @parmInt = col_1, @parmStr = col_2 from #t;

raiserror('@parmInt = %d', 0, 1, @parmInt) with nowait; -- for debug purpose
raiserror('@parmStr = %s', 0, 1, @parmStr) with nowait; -- for debug purpose
/*
-- the result is exactly as expected
@parmInt = 1234
@parmStr = hello world
*/
Summary
In this tip, we explored various ways to pass data between SQL Server Agent Job Steps. The methods discussed here should be applicable to SQL Server 2008+ versions. I have tested each method in SQL Server 2012/2014/2016.
Each may have its own pros and cons compared to using a permanent table for data exchange purposes. For example, in one of my previous environments, there is a business rule that any non-vendor-created permanent tables are not allowed to be created. We ended up using the error log for data exchange to avoid compromising the rule. It was proven to be a pretty robust solution.
Next Steps
Starting with SQL Server 2016/2017, we can actually embedded R and Python scripts inside a T-SQL script, and so it is even easier to generate external files to hold the exchange data.
There is another, bit more complex way, i.e. using Service Broker, to do data exchange. As next steps, you can try to explore these methods.
The following links will help you to better understand the SQL Server features I have used in this tip.
- Working with SQL Server Extended Properties
- Passing SQL Server Agent tokens to an Integration Services package
- Execute SQL Server Script Files with the sqlcmd Utility
- Sqlcmd utility
- Use Tokens in Job Steps
- Reading the SQL Server log files using TSQL


About the author
 Jeffrey Yao is a senior SQL Server consultant, striving to automate DBA work as much as possible to have more time for family, life and more automation.
This author pledges the content of this article is based on professional experience and not AI generated.
View all my tips
