By: Tim Smith | Comments | Related: > PowerShell
Problem
In this tip, we'll look at some of the basics of creating files with PowerShell. We may create files to add data, creating flags for processes, specifying formats, or formatting output in a manner we can use in spreadsheets or database tables. In this tip, we'll start by creating simple text files, special formats, like CSV and XML, and also see how we can create our own custom file with its own extension for custom applications we build or maintain.
Solution
In this tip we will cover a few examples.
Creating a Simple Text File with PowerShell
In our first example, we'll create a text file with text in a location where the running user can create and add text to the file. In our first line, we'll actually create the file with a sentence and then call our next function to add content in the form of another sentence to the same file.
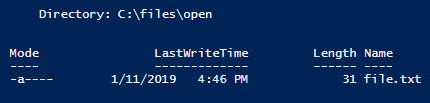
In the first image, the New-Item returns input indicating the time the file was last written, the file length, and its name (differing from base name and full name). The next function Add-Content will add data to the file that we created. If the file didn't exist, it would create the file. This latter point is important because if we want to add data to an existing file, we want to ensure that we're specifying an existing file when we call it, otherwise, we'll end up with multiple files with data. To reduce this error, we've set a variable with the file name in the second block of code and called both functions again with a different file name; this allows for re-use and also prevents multiple files since the function Add-Content will create new files if we don't follow the same name.
New-Item "C:\files\open\file.txt" -ItemType File -Value "The first sentence in our file."
Add-Content "C:\files\open\file.txt" "The second sentence in our file."

Here is another way of doing the same thing.
$file = "C:\files\open\file2.txt"
New-Item $file -ItemType File -Value "The first sentence in our file."
Add-Content $file "The second sentence in our file."
Creating a CSV File with PowerShell
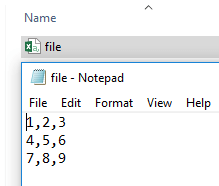
We can create other files using the same functions as well. One popular file format is the comma-separated format (csv) and we can create this file with its extension and see it reflected as a CSV in Windows. However, as we saw in the above image, we'll have to add a new line after the content of New-Item to ensure our file adds a new line for the next function Add-Content, unless we want our first line to have 1,2,34,5,6. As we also see, Add-Content adds a new line at the end of each call of the function, so we don't have to specify the new line for this function.
$filecsv = "C:\files\open\file.csv"
New-Item $filecsv -ItemType File -Value ("1,2,3" + [Environment]::NewLine)
Add-Content $filecsv ("4,5,6")
Add-Content $filecsv ("7,8,9")
Creating Text Files Using a SQL Server Query and PowerShell
For the next few exercises, we'll be creating files from queries - views or direct insert statements. You can execute these function calls with your own queries to see the results.
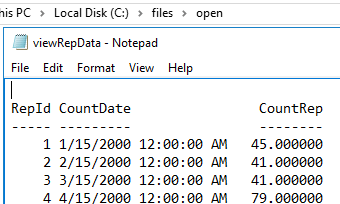
We can create text files from SQL queries and in the below example, we create a text file from the function Invoke-Sqlcmd. Since we are using integrated security, we're not specifying connection information for this query to succeed. If you are in an environment where you must use a SQL user and password, you'll want to add -Username "Value" -Password "Value", replacing the "Value" with the appropriate values. By passing in the server and database name along with the query (in this example, a view), we can then carry the result over to the next function after the pipe (or vertical bar) - Out-File which results in a file creation with the data. We see the below result of this particular view (other views will generate similar output of headers with data under the headers).
Invoke-Sqlcmd -ServerInstance "OurServer" -Database "OurDatabase" -Query "SELECT * FROM view_OurView" | Out-File "C:\files\open\viewOurView.txt"
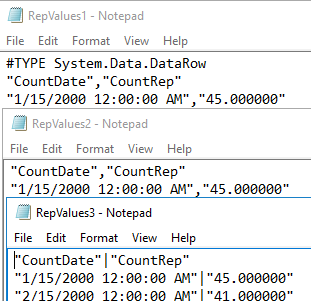
However, we may want a specific format, so we can specify formats when we take the output from the first part of our function to the piped part of our function. In the below examples, we switch from using the Out-File function in the piped section to the Export-Csv function and we call it with three different formats: the first is a comma separated file with the type information included in the file, the second is a comma separated file without the type information, and the final is a pipe (or vertical bar) delimited file without the type information.
Below these file creations, we see the output in the file. In the first file, we see the values separated by commas with the first line of the fine including the type information of the data (#TYPE System.Data.DataRow - this type is from the DataRow class of the System.Data library in .NET). Unless a source wants the type information for reference or origin information details, we will probably exclude this in output and only return the data without this information. In the second function below, we call the same details without the type information. Finally, because commas can sometimes exist within columns themselves, we look at generating a delimited file that uses a pipe (or vertical bar) as opposed to a comma.
Invoke-Sqlcmd -ServerInstance "OurServer" -Database "OurDatabase" -Query "SELECT * FROM RepValues" | Export-Csv "C:\files\open\RepValues1.csv"
Invoke-Sqlcmd -ServerInstance "OurServer" -Database "OurDatabase" -Query "SELECT * FROM RepValues" | Export-Csv "C:\files\open\RepValues2.csv" -NoTypeInformation
Invoke-Sqlcmd -ServerInstance "OurServer" -Database "OurDatabase" -Query "SELECT * FROM RepValues" | Export-Csv "C:\files\open\RepValues3.csv" -Delimiter "|" -NoTypeInformation
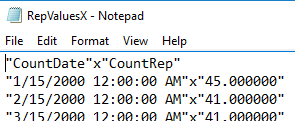
Finally, because I get asked frequently if we can use non-standard delimiters, like a letter, we see that we can specify a delimiter of "x" using the above function logic to create a delimited file with x separating the values.
Invoke-Sqlcmd -ServerInstance "vmserverone" -Database "GenExAll" -Query "SELECT * FROM RepValues" | Export-Csv "C:\files\open\RepValuesX.csv" -Delimiter "x" -NoTypeInformation
In our last example, we will create a custom file that (as of a recent Yandex search) doesn't exist and is designed to be a custom format for internal use. As we've seen PowerShell can create standard files like text files, comm separated files, and even custom delimiters files and some of these can be called easily with one-line function calls. We can also create custom file extensions.
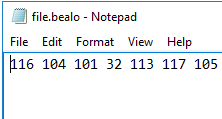
In the below code, we create a file with the extension of bealo and add data to the file. Depending on how strict your anti-virus is, this may cause an immediate flag since some anti-viruses won't recognize the file extension and may flag it when they detect data being added to the file. Since we've created in our authorized folder structure and we are creating the file and adding the data, we may allow this path to go unmonitored only for a test if it raises a flag, relative to what anti-virus we're using (and we want to ensure when we're done with our test, we either remove the path or monitor it again). It's a general practice to be skeptical of file extensions we don't recognize, so anti-viruses flagging this file extension is a positive sign. At the time of this article, the file extension "bealo" is not used by anything.
New-Item "D:\Authorized\Test\file.bealo" -ItemType File
Add-Content "D:\Authorized\Test\file.bealo" -Value "116 104 101 32 113 117 105 99 107 32 98 114 111 119 110 32 102 111 120 32 106 117 109 112 101 100 32 111 118 101 114 32 116 104 101 32 108 97 122 121 32 100 111 103 115"

Some applications are built to require custom files as a form of access restriction and security. For an example, the file we created may raise flags of anti-viruses even if the file has legitimate data, so this is a way in which some companies protect their data - using uncommon extensions with encryption that raise flags in other systems. As we see, PowerShell can create custom files that match our criteria in this case, if we had a client, we sent data to through custom files that raised flags in other systems that did not recognize the file extension.
Next Steps
- Since we are creating files, we want to restrict access to the paths where this is allowed. For an example, if we generate flat files that will be sent externally, saving them temporarily to a share or path will allow us to strictly monitor the path. In addition, because we can read and add data to files along with creating files using PowerShell (including custom files), these operations may sometimes be flagged by our anti-virus as suspicious activities since information creation and data transmission can be nefarious activity in some cases. For this reason, I suggest using a group of paths to establish a clear pattern. I do not suggest disabling anti-virus for paths because many anti-virus applications use behavior, so suspicious behavior needs to be flagged and reviewed.
- PowerShell supports some file creations in the functions we've tested. For custom files like our last example, we can still use development techniques to create custom files that we may require for our clients and applications.
- All PowerShell code in the above scripts used PowerShell version 5. Because all of the above were PowerShell functions, these functions may change in the future or have some of the parameter removed that we've used.


About the author
 Tim Smith works as a DBA and developer and also teaches Automating ETL on Udemy.
This author pledges the content of this article is based on professional experience and not AI generated.
View all my tips
