By: Pablo Echeverria | Updated: 2022-04-26 | Comments (1) | Related: > Encryption
Problem
To prevent data from being intercepted while transmitted and falling into unauthorized hands, for government contact requirements, and to comply with security standards for Payment Card Industry (PCI), Personal Health Information (PHI), Personal Information (PI) among others, it is required to encrypt data from end-to-end between a client and the database. But how is this enabled in SQL Server running on Windows, in Oracle running on Windows, and what are the differences?
Solution
Transport Layer Security (TLS) like Secure Sockets Layer (SSL) is an encryption protocol which obfuscates data end-to-end and is more secure than the previous cryptographic protocols such as SSL 2.0, SSL 3.0, TLS 1.0, and TLS 1.1. Although this can be configured outside of the database, it is important for the Database Administrator to know how it can be enabled, provide proof requested by auditing, and troubleshoot connectivity issues.
You learned in this tip how to create containers for SQL Server and Oralce and install the software, but we need to make a change in order to connect externally.
For Oracle we need to expose port 1521 so the command needs to be:
docker run -it --name ServerA -v C:\temp:C:\setup -p 1521:1521 mcr.microsoft.com/windows/servercore:ltsc2019 powershell
For SQL Server we need to expose port 1433 so the command needs to be:
docker run -it --name ServerB -v C:\temp:C:\setup -p 1433:1433 mcr.microsoft.com/windows/servercore:ltsc2019 powershell
To encrypt the connection there are two methods
- creating an IPSec tunnel between the client and the server
- and using certificates.
To create an IPSec tunnel, here is an answered question from ServerFault which clearly describes the process: in Windows Firewall you need to create a server-to-server rule in both computers, specify both IPs in each case but switched depending on who is the local and who is the remote, require authentication in both directions, select an authentication method, and use a pre-shared key. It can also be done programmatically using PowerShell as described in this answered question from StackOverflow and in this article. If the client is Linux this can also be set up as indicated here. However, in the Docker container with Microsoft Windows Server Core 2019 the firewall can't be enabled, so you can't test this process with the Docker containers we've created so far; only in Oracle can you enable native encryption without relying on the OS.
With certificates there are several options: create a Windows certificate on the server and another on the client which are sent to a trusted Certificate Authority to be signed and returned to be installed, use those certificates when creating the Firewall rules in an IPSec tunnel, and in Oracle you can authenticate without using passwords as described in this article.
Take note there is no way to know directly from the database which encryption protocol was used because that occurs at the session layer, which is the 5th layer in the Open Systems Interconnection (OSI) model, but in some cases you can know from SQL Server Extended Events Trace as explained in this link although not when running it in a container. Another way to know it is using a network packet analyzer like Wireshark (it also has a console mode), using "netsh trace" or "New-NetEventSession -Name Capture" but you also need etl2pcapng and Wireshark to read the trace file, or use ODBC Trace.
In the following sections you will learn how TLS 1.2 can be enabled in both SQL Server and Oracle using a certificate, and what the differences in the process.
Connect to Oracle using TLS 1.2
To be able to connect to Oracle in the Docker container from our host machine, there must be listener forwarding requests to the database, which is not started by default so you can start a generic one with the command below:
lsnrctl start
The output is this:
LSNRCTL for 64-bit Windows: Version 19.0.0.0.0 - Production on 01-MAR-2022 21:22:40
Copyright (c) 1991, 2019, Oracle.  All rights reserved.
Starting tnslsnr: please wait...
TNSLSNR for 64-bit Windows: Version 19.0.0.0.0 - Production
Log messages written to c:\app\diag\tnslsnr\b7c811d170be\listener\alert\log.xml
Listening on: (DESCRIPTION=(ADDRESS=(PROTOCOL=tcp)(HOST=b7c811d170be)(PORT=1521)))
Connecting to (ADDRESS=(PROTOCOL=tcp)(HOST=)(PORT=1521))
STATUS of the LISTENER
------------------------
Alias                     LISTENER
Version                   TNSLSNR for 64-bit Windows: Version 19.0.0.0.0 - Production
Start Date                01-MAR-2022 21:22:44
Uptime                    0 days 0 hr. 0 min. 6 sec
Trace Level               off
Security                  ON: Local OS Authentication
SNMP                      OFF
Listener Log File         c:\app\diag\tnslsnr\b7c811d170be\listener\alert\log.xml
Listening Endpoints Summary...
  (DESCRIPTION=(ADDRESS=(PROTOCOL=tcp)(HOST=b7c811d170be)(PORT=1521)))
The listener supports no services
The command completed successfully
Remember when you create the database you can assign a password for the SYSTEM user, but if you did not assign one, run the command below to assign a password to it from within the Docker container replacing <SystemPassword> with your own:
"ALTER USER SYSTEM IDENTIFIED BY <SystemPassword> ACCOUNT UNLOCK;" | sqlplus -s / as sysdba
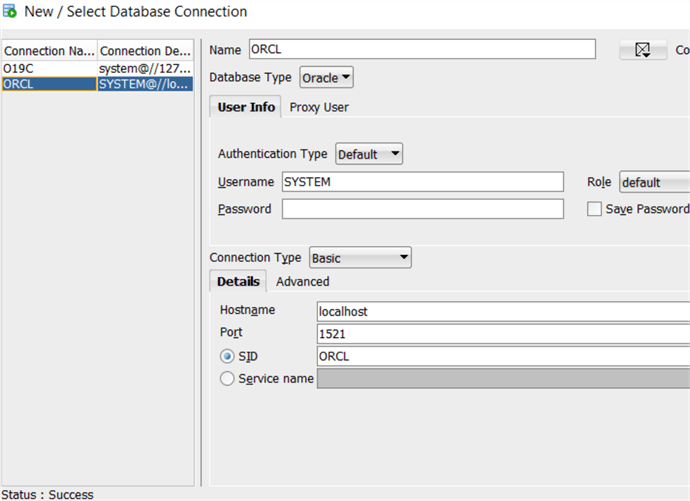
Then, from your local machine you can connect using SQL Developer to the database as follows:
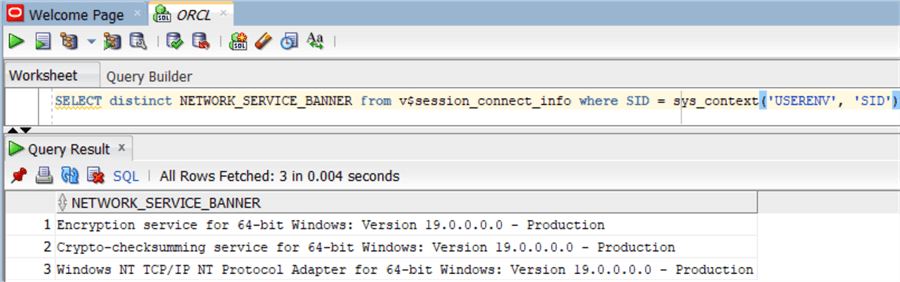
Once connected, you can get the connection configuration with the query below:
SELECT distinct NETWORK_SERVICE_BANNER from v$session_connect_info where SID = sys_context('USERENV', 'SID')
The output is as follows, as you can see it lists the encryption and crypto-checksum services but those are not being used:
You can also run the query below to see the protocol and authentication method:
SELECT sys_context('USERENV', 'NETWORK_PROTOCOL') as network_protocol, sys_context('USERENV', 'AUTHENTICATION_METHOD') as authentication_method FROM dual
The output is below, note it is standard TCP without encryption:

To enable TLS 1.2 the official documentation is in Net Services Administrator's Guide but it is easily explained in this link and this other link, and troubleshooting is explained in this link and in this other link; the steps I followed are described below:
Step 1 - Create an Oracle Wallet to securely store and retrieve certificates with the command below replacing <WalletPassword> with your own password, note if you specify auto_login_local you will get an error later in the process, and in older Oracle versions you had to specify compat_v12 but now it's not required, you can see the full command options running "orapki wallet help":
orapki wallet create -wallet C:\app\Oracle19c\data\wallet -auto_login -pwd <WalletPassword>
Step 2 - Add a self-signed certificate to the wallet with the command below, DN is to add a domain which in our case will be added as the container computer name (CN), keysize is 2048 for TLS 1.2, and validity is for 365 days; note in older Oracle versions you had to specify the hashing algorithm with sign_alg_sha256 but now it's not required:
orapki wallet add -wallet C:\app\Oracle19c\data\wallet -pwd <WalletPassword> -dn "CN=$env:COMPUTERNAME" -keysize 2048 -self_signed -validity 365
Once created you can display it with the command and see its output below:
orapki wallet display -wallet C:\app\Oracle19c\data\wallet -pwd-complete
Output:
Oracle PKI Tool Release 19.0.0.0.0 - Production
Version 19.3.0.0.0
Copyright (c) 2004, 2019, Oracle and/or its affiliates. All rights reserved.
Requested Certificates:
User Certificates:
Subject:        CN=B7C811D170BE
Issuer:         CN=B7C811D170BE
Serial Number:  7C:86:1A:D6:57:43:3E:7A:51:21:33:8B:92:F1:49:B4
Key Length      2048
MD5 digest:     CC:02:AE:AA:E6:65:E4:7B:38:E9:EA:BD:96:D9:4C:F7
SHA digest:     89:7F:A0:27:DA:F5:A4:03:44:9A:F8:4C:FB:8E:75:35:35:B7:1C:0C
Trusted Certificates:
Subject:        CN=B7C811D170BE
Issuer:         CN=B7C811D170BE
Serial Number:  7C:86:1A:D6:57:43:3E:7A:51:21:33:8B:92:F1:49:B4
Key Length      2048
MD5 digest:     CC:02:AE:AA:E6:65:E4:7B:38:E9:EA:BD:96:D9:4C:F7
SHA digest:     89:7F:A0:27:DA:F5:A4:03:44:9A:F8:4C:FB:8E:75:35:35:B7:1C:0C
Step 3 - Export the database certificate to be used in the client with the command below, replacing the computer name (CN) with your own as in the output from the previous command:
orapki wallet export -wallet C:\app\Oracle19c\data\wallet -dn CN=B7C811D170BE -cert C:\app\Oracle19c\data\wallet\rootcertificate.crt -pwd <WalletPassword>
You can confirm this certificate is signed with the SHA-256 algorithm by running the command below on the exported certificate and looking at its output:
& C:\app\Oracle19c\jdk\bin\keytool.exe -printcert -file C:\app\Oracle19c\data\wallet\rootcertificate.crt
Output:
Owner: CN=B7C811D170BE
Issuer: CN=B7C811D170BE
Serial number: 7c861ad657433e7a5121338b92f149b4
Valid from: Sat Mar 12 19:37:55 CST 2022 until: Sun Mar 12 19:37:55 CST 2023
Certificate fingerprints:
         MD5:  CC:02:AE:AA:E6:65:E4:7B:38:E9:EA:BD:96:D9:4C:F7
         SHA1: 89:7F:A0:27:DA:F5:A4:03:44:9A:F8:4C:FB:8E:75:35:35:B7:1C:0C
         SHA256: 9B:DA:E5:36:A2:75:13:F9:10:1A:8C:75:FA:F0:DA:10:54:3D:2E:9D:EC:A9:C1:5D:30:98:2A:74:8C:99:F7:EF
Signature algorithm name: SHA256withRSA
Subject Public Key Algorithm: 2048-bit RSA key
Version: 1
Step 4 - Copy the exported certificate to a location where we can use it outside of the container with the command below, remember when we created the container the folder "c:\setup" is mapped to "c:\temp" in the host machine outside of the container:
Copy-Item C:\app\Oracle19c\data\wallet\rootcertificate.crt c:\setup
Step 5 - Get the Oracle OS services running the database with the command and see its output below:
Get-Service -name *ora*
Output:
Status   Name               DisplayName
------   ----               -----------
Stopped  OracleJobSchedu... OracleJobSchedulerORCL
Stopped  OracleOraDB19Ho... OracleOraDB19Home1TNSListener
Stopped  OracleRemExecSe... OracleRemExecServiceV2
Stopped  OracleServiceORCL  OracleServiceORCL
Stopped  OracleVssWriter... OracleVssWriterORCL
Step 6 - Get the OS user running the database with the command and see its output below:
Get-CimInstance -Query "select * from win32_service where name='OracleServiceORCL'" | fl StartName
Output:
StartName : NT SERVICE\OracleServiceORCL
Step 7- Get the OS user running the listener with the command and see its output below:
Get-CimInstance -Query "select * from win32_service where name='OracleOraDB19Home1TNSListener'" | fl StartName
Output:
StartName : NT SERVICE\OracleOraDB19Home1TNSListener
Step 8- Grant read access on the wallet file to the Oracle services with the commands below:
$ACL = Get-ACL -Path "C:\app\Oracle19c\data\wallet\ewallet.p12"
$AccessRule = New-Object System.Security.AccessControl.FileSystemAccessRule("NT SERVICE\OracleServiceORCL","Read","Allow")
$ACL.SetAccessRule($AccessRule)
$AccessRule = New-Object System.Security.AccessControl.FileSystemAccessRule("NT SERVICE\OracleOraDB19Home1TNSListener","Read","Allow")
$ACL.SetAccessRule($AccessRule)
Step 9 - Grant read access on the wallet auto login file to the Oracle services with the commands below:
$ACL = Get-ACL -Path "C:\app\Oracle19c\data\wallet\cwallet.sso"
$AccessRule = New-Object System.Security.AccessControl.FileSystemAccessRule("NT SERVICE\OracleServiceORCL","Read","Allow")
$ACL.SetAccessRule($AccessRule)
$AccessRule = New-Object System.Security.AccessControl.FileSystemAccessRule("NT SERVICE\OracleOraDB19Home1TNSListener","Read","Allow")
$ACL.SetAccessRule($AccessRule)
Step 10 - Verify the read access has been applied with the commands below:
(Get-ACL -Path "C:\app\Oracle19c\data\wallet\ewallet.p12").Access | select IdentityReference,FileSystemRights,AccessControlType,IsInherited,InheritanceFlags
(Get-ACL -Path "C:\app\Oracle19c\data\wallet\cwallet.sso").Access | select IdentityReference,FileSystemRights,AccessControlType,IsInherited,InheritanceFlags
Step 11 - Shut down the generic listener started earlier with the command below:
lsnrctl stop
Step 12 - Create a listener configuration file with the commands below, SSL_CLIENT_AUTHENTICATION needs to be disabled because the client certificate is not getting installed in the database server and this requires creating a new user identified externally, SECURE_PROTOCOL_LISTENER is to enable local listener configuration, WALLET_LOCATION specifies the location of the database secure certificates, the entry in the LISTENER with IPC allows service registration, and the entry in the LISTENER with TCPS allows TLS communication:
$content=@"
SSL_CLIENT_AUTHENTICATION = FALSE
SECURE_PROTOCOL_LISTENER = (IPC)
WALLET_LOCATION =
  (SOURCE =
    (METHOD = FILE)
    (METHOD_DATA =
      (DIRECTORY = C:\app\Oracle19c\data\wallet)))
LISTENER =
  (DESCRIPTION_LIST =
    (DESCRIPTION =
      (ADDRESS = (PROTOCOL = IPC)(KEY = EXTPROC1))
      (ADDRESS = (PROTOCOL = TCPS)(HOST = 0.0.0.0)(PORT = 2484))))
"@
Add-Content C:\app\Oracle19c\network\admin\listener.ora $content
Step 13 - Create a network configuration file with the commands below, SQLNET.AUTHENTICATION_SERIVCES=(NTS) is to allow connecting as sysdba locally (it was already present in the file), the other parameters are the same as for the listener configuration, note you can limit the SSL_CIPHER_SUITES but if you don't then this is performed automatically by the database from the strongest to the weakest:
Clear-Content C:\app\Oracle19c\network\admin\sqlnet.ora
$content=@"
SQLNET.AUTHENTICATION_SERVICES = (NTS)
SSL_CLIENT_AUTHENTICATION = FALSE
WALLET_LOCATION =
  (SOURCE =
    (METHOD = FILE)
    (METHOD_DATA =
      (DIRECTORY = C:\app\Oracle19c\data\wallet)))
"@
Add-Content C:\app\Oracle19c\network\admin\sqlnet.ora $content
Step 14 - Start the new listener with the command and see its output below:
lsnrctl start
Output:
LSNRCTL for 64-bit Windows: Version 19.0.0.0.0 - Production on 20-MAR-2022 00:09:48
Copyright (c) 1991, 2019, Oracle.  All rights reserved.
Starting tnslsnr: please wait...
TNSLSNR for 64-bit Windows: Version 19.0.0.0.0 - Production
System parameter file is C:\app\Oracle19c\network\admin\listener.ora
Log messages written to c:\app\diag\tnslsnr\b7c811d170be\listener\alert\log.xml
Trace information written to c:\app\diag\tnslsnr\b7c811d170be\listener\trace\ora_1644_1448.trc
Listening on: (DESCRIPTION=(ADDRESS=(PROTOCOL=ipc)(PIPENAME=\\.\pipe\EXTPROC1ipc)))
Listening on: (DESCRIPTION=(ADDRESS=(PROTOCOL=tcps)(HOST=0.0.0.0)(PORT=2484)))
Connecting to (DESCRIPTION=(ADDRESS=(PROTOCOL=IPC)(KEY=EXTPROC1)))
STATUS of the LISTENER
------------------------
Alias                     LISTENER
Version                   TNSLSNR for 64-bit Windows: Version 19.0.0.0.0 - Production
Start Date                20-MAR-2022 00:09:51
Uptime                    0 days 0 hr. 0 min. 6 sec
Security                  ON: Local OS Authentication
SNMP                      OFF
Listener Parameter File   C:\app\Oracle19c\network\admin\listener.ora
Listener Log File         c:\app\diag\tnslsnr\b7c811d170be\listener\alert\log.xml
Listening Endpoints Summary...
  (DESCRIPTION=(ADDRESS=(PROTOCOL=ipc)(PIPENAME=\\.\pipe\EXTPROC1ipc)))
  (DESCRIPTION=(ADDRESS=(PROTOCOL=tcps)(HOST=0.0.0.0)(PORT=2484)))
The listener supports no services
The command completed successfully
Step 15 - Modify the database initialization configuration file with the commands below to be able to register with the new listener:
$content=@"
LOCAL_LISTENER='(ADDRESS=(PROTOCOL=IPC)(KEY=EXTPROC1))'
"@
Add-Content C:\app\Oracle19c\database\INITORCL.ORA $content
Step 16 - Restart the database and register with the listener by connecting as sysdba and running the commands below:
sqlplus / as sysdba
SQL> SHUTDOWN IMMEDIATE
SQL> STARTUP
SQL> ALTER SYSTEM REGISTER;
Step 17 - When you run the command below you will see the service has been registered and can accept remote connections:
lsnrctl services
Output:
LSNRCTL for 64-bit Windows: Version 19.0.0.0.0 - Production on 20-MAR-2022 00:26:21
Copyright (c) 1991, 2019, Oracle.  All rights reserved.
Connecting to (DESCRIPTION=(ADDRESS=(PROTOCOL=IPC)(KEY=EXTPROC1)))
Services Summary...
Service "ORCL" has 1 instance(s).
  Instance "orcl", status READY, has 1 handler(s) for this service...
    Handler(s):
      "DEDICATED" established:0 refused:0 state:ready
         LOCAL SERVER
The command completed successfully
Step 18 - At this point you can test your local connection to the database using TLS with the command below, replacing <SystemPassword> with your own, host can be 0.0.0.0 or the local IP or the hostname assigned by Docker:
sqlplus SYSTEM/<SystemPassword>@'(DESCRIPTION=(ADDRESS=(PROTOCOL=TCPS)(HOST=b7c811d170be)(PORT=2484))(CONNECT_DATA=(SERVER=DEDICATED)(SERVICE_NAME=ORCL)))'
When you query the protocol you can see it is TCP with SSL (TCPS):
col network_protocol for a16
col authentication_method for a21
SELECT sys_context('USERENV', 'NETWORK_PROTOCOL') as network_protocol, sys_context('USERENV', 'AUTHENTICATION_METHOD') as authentication_method FROM dual;
Output:
NETWORK_PROTOCOL AUTHENTICATION_METHOD
---------------- ---------------------
tcps             PASSWORD
Step 19- Outside of the container (in your host machine) you need to perform a full Oracle Client installation, but if you don't have rights or want a slim version of it, download Oracle Instant Client Basic, SQL*Plus and SQL CL from the links below, then unzip them in your host machine, and install Java separately:
https://www.oracle.com/database/technologies/instant-client/winx64-64-downloads.html
instantclient-basic-windows.x64-19.14.0.0.0dbru.zip 76.6 MB
instantclient-sqlplus-windows.x64-19.14.0.0.0dbru.zip 951 KB

https://www.oracle.com/tools/downloads/sqlcl-downloads.html
sqlcl-21.4.1.17.1458.zip  38.1 MB

https://www.java.com/es/download/ie_manual.jsp
JavaSetup8u321.exe  2.14 MB
Step 20 - Follow the instructions in this link to create the files "mkstore.bat" and "orapki.bat" using Java and the location where you extracted SQL CL.
Step 21 - Create your host machine wallet with the command below, replacing <WalletPassword> with your own and using the files created in the previous step:
& "C:\temp\orapki.bat" wallet create -wallet c:\temp -auto_login -pwd <WalletPassword>
Step 22 - Import the database server certificate with the command below, indicating to trust this auto-signed server certificate and specifying the certificate exported earlier:
& "C:\temp\orapki.bat" wallet add -wallet c:\temp -pwd <WalletPassword> -trusted_cert -cert c:\temp\rootcertificate.crt
Step 23 - Start a network packet sniffer like Wireshark Portable (42.2 MB) in your host machine to capture the TLS protocol used.
Step 24 - Connect to the database with the command below, running sqlplus from the location where you extracted it alongside with instant client basic, replacing <SystemPassword> with your own, host can be 0.0.0.0 or its IP or the hostname assigned by Docker, and MY_WALLET_DIRECTORY is where you set up your wallet:
& "C:\Program Files\instantclient_19_14\sqlplus.exe" SYSTEM/<SystemPassword>@'(DESCRIPTION=(ADDRESS=(PROTOCOL=TCPS)(HOST=B7C811D170BE)(PORT=2484))(CONNECT_DATA=(SERVER=DEDICATED)(SERVICE_NAME=ORCL))(SECURITY=(MY_WALLET_DIRECTORY=C:\temp)))'
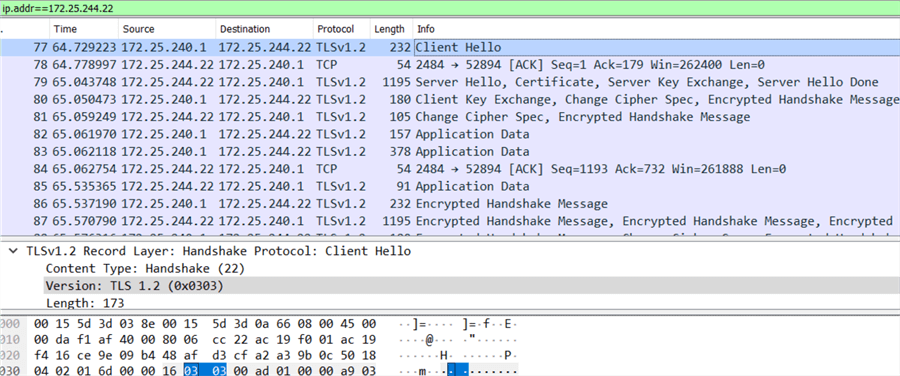
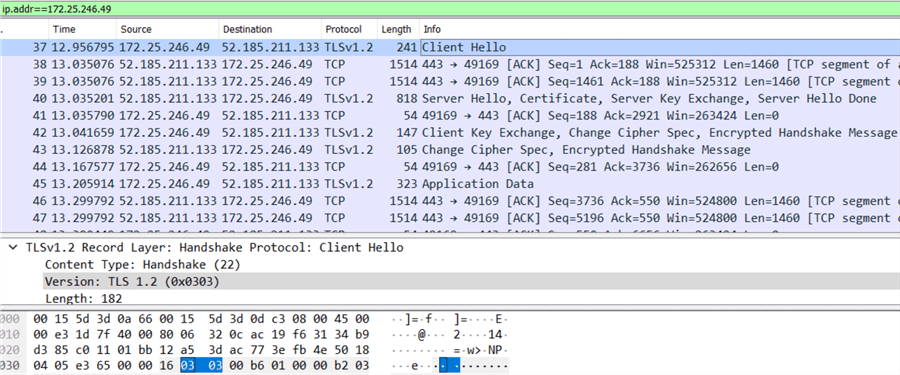
Now you can review the network packet sniffer results and confirm TLS 1.2 was used:
You can't connect from SQL Developer to Oracle with TLS 1.2 using a normal connection, you either need to change the program configuration files or use Oracle Client Installation (OCI) to do that, due to that you need to specify the wallet with the database server certificate in it.
Connect to SQL Server using TLS 1.2
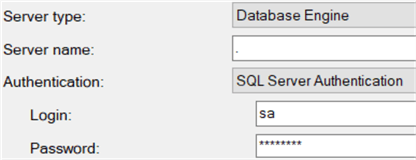
Remember when you install the software you assign a password for the SysAdmin (sa) user. Then, from your local machine you can connect using SQL Server Management Studio (SSMS) to the database as follows:
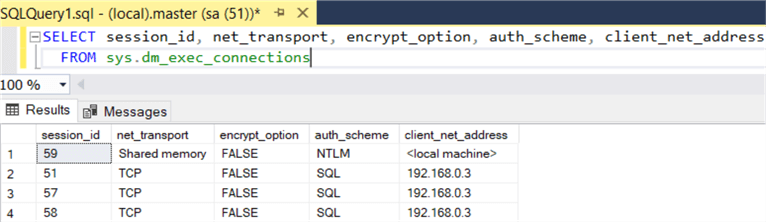
Once connected, you can query if the connections are encrypted or not with the following query:
SELECT session_id, net_transport, encrypt_option, auth_scheme, client_net_address
FROM [sys].[dm_exec_connections]
In my case the output is as follows, note the column "encrypt_option" indicates all are unencrypted:
To enable TLS 1.2, the steps I followed are described below:
Step 1- Create a self-signed Windows certificate with the command below, it is grabbed from here and the documentation can be found here, but note there are other methods to generate it, see this link, this link, and this link:
New-SelfSignedCertificate -Type SSLServerAuthentication `
    -Subject "CN=$env:COMPUTERNAME" -FriendlyName 'Database RSA2048 G1' `
    -DnsName "$env:COMPUTERNAME",'localhost.' `
    -KeyAlgorithm 'RSA' -KeyLength 2048 -Hash 'SHA256' `
    -TextExtension '2.5.29.37={text}1.3.6.1.5.5.7.3.1' `
    -NotAfter (Get-Date).AddMonths(36) `
    -KeyExportPolicy NonExportable -KeySpec KeyExchange `
    -Provider 'Microsoft RSA SChannel Cryptographic Provider' `
    -CertStoreLocation Cert:\LocalMachine\My `
| fl -Property Thumbprint,FriendlyName,DnsNameList,NotAfter,PrivateKey,SerialNumber,Subject,Issuer
The output is as follows:
Thumbprint   : 555631F62602FADB2F7FD78252168CE2E84365FF
FriendlyName : Database RSA2048 G1
DnsNameList  : {0A34B75A0BEC, localhost.}
NotAfter     : 2/26/2025 8:29:11 PM
PrivateKey   : System.Security.Cryptography.RSACryptoServiceProvider
SerialNumber : 7D2C7B64420786834321C345481BF072
Subject      : CN=0A34B75A0BEC
Issuer       : CN=0A34B75A0BEC
Step 2 - See which certificates are installed with the command below, the ouput is the same as before:
Get-ChildItem -path cert:\LocalMachine\My | fl -Property Thumbprint,FriendlyName,DnsNameList,NotAfter,PrivateKey,SerialNumber,Subject,Issuer
Step 3- Get the SQL Server services running the database with the command and see its output below:
Get-Service -name *sql*
Output:
Status   Name               DisplayName
------   ----               -----------
Stopped  SQLBrowser         SQL Server Browser
Stopped  SQLSERVERAGENT     SQL Server Agent (MSSQLSERVER)
Running  SQLTELEMETRY       SQL Server CEIP service (MSSQLSERVER)
Running  SQLWriter          SQL Server VSS Writer
Step 4 - Get the OS user running the database with the command an see its output below:
Get-CimInstance -Query "select * from win32_service where name='MSSQLSERVER'" | fl StartName
Output:
StartName : NT Service\MSSQLSERVER
Step 5- Grant read access to the certificate with the command below grabbed from here:
$userName="NT Service\MSSQLSERVER"
$permission="read"
$certStoreLocation="\LocalMachine\My"
$certThumbprint="555631F62602FADB2F7FD78252168CE2E84365FF"
# check if certificate is already installed
$certificateInstalled = Get-ChildItem cert:$certStoreLocation | Where thumbprint -eq $certThumbprint
# download & install only if certificate is not already installed on machine
if ($certificateInstalled -eq $null)
{
    $message="Certificate with thumbprint:"+$certThumbprint+" does not exist at "+$certStoreLocation
    Write-Host $message -ForegroundColor Red
    exit 1;
}else
{
    try
    {
        $rule = new-object security.accesscontrol.filesystemaccessrule $userName, $permission, allow
        $root = "c:\programdata\microsoft\crypto\rsa\machinekeys"
        $l = ls Cert:$certStoreLocation
        $l = $l |? {$_.thumbprint -like $certThumbprint}
        $l |%{
            $keyname = $_.privatekey.cspkeycontainerinfo.uniquekeycontainername
            $p = [io.path]::combine($root, $keyname)
            if ([io.file]::exists($p))
            {
                $acl = get-acl -path $p
                $acl.addaccessrule($rule)
                echo $p
                set-acl $p $acl
            }
        }
    }
    catch
    {
        Write-Host "Caught an exception:" -ForegroundColor Red
        Write-Host "$($_.Exception)" -ForegroundColor Red
        exit 1;
    }
}
exit $LASTEXITCODE
Step 6 - Verify the read access has been applied with the command and see its output below:
$acl | fl *
Output:
PSPath                  : Microsoft.PowerShell.Core\FileSystem::C:\programdata\microsoft\crypto\rsa\machinekeys\c3dd1ca63647
                          16db36cf7468ea27d2ad_896cd94f-f75c-40f4-bcb4-100e7631f2fa
PSParentPath            : Microsoft.PowerShell.Core\FileSystem::C:\programdata\microsoft\crypto\rsa\machinekeys
PSChildName             : c3dd1ca6364716db36cf7468ea27d2ad_896cd94f-f75c-40f4-bcb4-100e7631f2fa
PSDrive                 : C
PSProvider              : Microsoft.PowerShell.Core\FileSystem
CentralAccessPolicyId   :
CentralAccessPolicyName :
Path                    : Microsoft.PowerShell.Core\FileSystem::C:\programdata\microsoft\crypto\rsa\machinekeys\c3dd1ca63647
                          16db36cf7468ea27d2ad_896cd94f-f75c-40f4-bcb4-100e7631f2fa
Owner                   : User Manager\ContainerAdministrator
Group                   : User Manager\ContainerAdministrator
Access                  : {System.Security.AccessControl.FileSystemAccessRule,
                          System.Security.AccessControl.FileSystemAccessRule,
                          System.Security.AccessControl.FileSystemAccessRule,
                          System.Security.AccessControl.FileSystemAccessRule}
Sddl                    : O:S-1-5-93-2-1G:S-1-5-93-2-1D:PAI(A;;FA;;;SY)(A;;FA;;;BA)(A;;FA;;;S-1-5-93-2-1)(A;;FR;;;S-1-5-80-3
                          880718306-3832830129-1677859214-2598158968-1052248003)
AccessToString          : NT AUTHORITY\SYSTEM Allow  FullControl
                          BUILTIN\Administrators Allow  FullControl
                          User Manager\ContainerAdministrator Allow  FullControl
                          NT SERVICE\MSSQLSERVER Allow  Read, Synchronize
AuditToString           :
AccessRightType         : System.Security.AccessControl.FileSystemRights
AccessRuleType          : System.Security.AccessControl.FileSystemAccessRule
AuditRuleType           : System.Security.AccessControl.FileSystemAuditRule
AreAccessRulesProtected : True
AreAuditRulesProtected  : False
AreAccessRulesCanonical : True
AreAuditRulesCanonical  : True
Step 7 - Set the database certificate and force encryption in the registry with the commands below, replacing the certificate thumbprint with the one returned from the previous command:
$certThumbprint="555631F62602FADB2F7FD78252168CE2E84365FF"
Set-ItemProperty -Path $(get-ItemProperty -Path "HKLM:\SOFTWARE\Microsoft\Microsoft SQL Server\*\MSSQLServer\SuperSocketNetLib").PsPath -Name "Certificate" -Type String -Value "$certThumbprint"
Set-ItemProperty -Path $(get-ItemProperty -Path "HKLM:\SOFTWARE\Microsoft\Microsoft SQL Server\*\MSSQLServer\SuperSocketNetLib").PsPath -Name "ForceEncryption" -Type DWord -Value "1"
Step 8 - Restart the database with the commands below:
net stop MSSQLSERVER
net start MSSQLSERVER
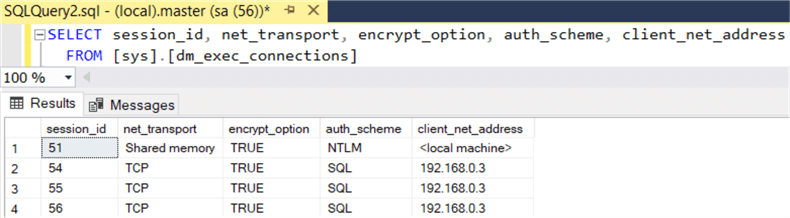
Step 9 - At this point you can test again and see the connection is encrypted, but at this point you're not yet forcing TLS 1.2:
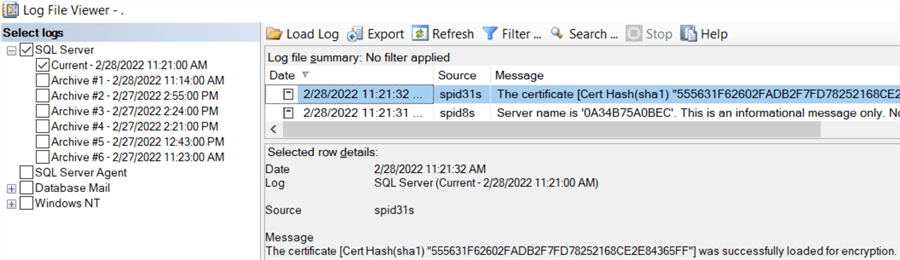
You can also see in the log file the certificate is being used for encryption:
Step 10 - Get from the registry the available protocols when communicating with SQL Server with the command below:
Get-ChildItem -Path "HKLM:\SYSTEM\CurrentControlSet\Control\SecurityProviders\SCHANNEL\Protocols\" -Recurse
Set the preferred SSL/TLS protocol as specified in this guide (remember to always backup your Registry before making any changes to it), in my case there were no protocols defined, so I create the TLS 1.2 entries with the commands below; you can use a similar approach to disable SSL 2.0, SSL 3.0, TLS 1.0, and TLS 1.1 as needed, and to do it for WinHTTP, Internet Explorer, and .NET Framework when connecting to SQL Server:
New-Item -Path "HKLM:\SYSTEM\CurrentControlSet\Control\SecurityProviders\SCHANNEL\Protocols\TLS 1.2\"
New-Item -Path "HKLM:\SYSTEM\CurrentControlSet\Control\SecurityProviders\SCHANNEL\Protocols\TLS 1.2\Client\"
New-Item -Path "HKLM:\SYSTEM\CurrentControlSet\Control\SecurityProviders\SCHANNEL\Protocols\TLS 1.2\Server\"
Set-ItemProperty -Path "HKLM:\SYSTEM\CurrentControlSet\Control\SecurityProviders\SCHANNEL\Protocols\TLS 1.2\Client\" DisabledByDefault -Type DWORD -Value 0 -Force
Set-ItemProperty -Path "HKLM:\SYSTEM\CurrentControlSet\Control\SecurityProviders\SCHANNEL\Protocols\TLS 1.2\Client\" Enabled -Type DWORD -Value 1 -Force
Set-ItemProperty -Path "HKLM:\SYSTEM\CurrentControlSet\Control\SecurityProviders\SCHANNEL\Protocols\TLS 1.2\Server\" DisabledByDefault -Type DWORD -Value 0 -Force
Set-ItemProperty -Path "HKLM:\SYSTEM\CurrentControlSet\Control\SecurityProviders\SCHANNEL\Protocols\TLS 1.2\Server\" Enabled -Type DWORD -Value 1 -Force
Step 11 - Start a network packet sniffer like Wireshark Portable (42.2 MB) in your host machine to capture the TLS protocol used.
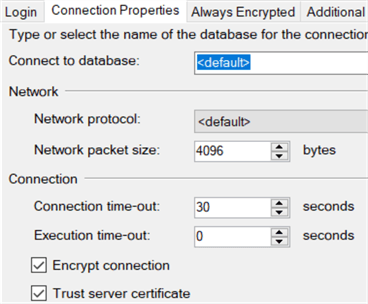
Step 12 - Connect to the database using SQL Server Management Studio but specifying in the advanced options to "encrypt connection" and "trust server certificate" (as it's not certified by an authority) as below:
Now you can review the network packet sniffer results and confirm TLS 1.2 was used:
Conclusion
You can see both processes are very similar, both require a certificate, require you to grant read access on the certificate, and can be verified with a network packet sniffer. Enabling basic encryption in Oracle is similar to enabling TLS in SQL Server without forcing encrypt connection at the client: it will be TLS but not version 1.2. In Oracle the encryption is totally independent from the OS and the certificate is generated by an Oracle tool, but it also needs to be installed in each client Oracle wallet. In SQL Server the process has fewer steps but involves changing the windows registry.
Next Steps
- Learn how to install the software using Docker in this tip.
- See comparison of creating databases in both Oracle and SQL Server.


About the author
 Pablo Echeverria is a talented database administrator and C#.Net software developer since 2006. Pablo wrote the book "Hands-on data virtualization with Polybase". He is also talented at tuning long-running queries in Oracle and SQL Server, reducing the execution time to milliseconds and the resource usage up to 10%. He loves learning and connecting new technologies providing expert-level insight as well as being proficient with scripting languages like PowerShell and bash. You can find several Oracle-related tips in his LinkedIn profile.
This author pledges the content of this article is based on professional experience and not AI generated.
View all my tips
Article Last Updated: 2022-04-26
