By: Jan Potgieter | Updated: 2022-06-09 | Comments | Related: More > Integration Services Development
Problem
SSIS is working fine by extracting data from a SQL Server and exporting the data to a csv file but now your customer needs the file to be encrypted when you send the file via email or when you drop the file on a SFTP location.
It is easy to use the Microsoft Namespace: System.Security.Cryptography to encrypt the file as was explained in my previous tip, but the customer is using GnuPG to decrypt files.
Solution
In this tip I will explain GnuPG (or GPG) encryption, how to install it and get it going and show some basic commands. Next, I will show you how to create a SSIS package that will encrypt the file before you can send it via email or drop it in a SFTP location.
What is GnuPG or GPG or Gpg4win?
Gpg4win enables users to securely transport emails and files with the help of encryption and digital signatures. Encryption protects the contents against an unwanted party reading it. Digital signatures make sure that it was not modified and comes from a specific sender. Read more about it: https://www.gpg4win.org/about.html
The working pieces of public-key cryptography are public keys and private keys. They work together to encrypt and decode data that is stored or moved across a network. The public key is actually public and can be distributed freely, whereas the owner's private key should be kept private.
In this tip, we will get a public key from the recipient of the encrypted file and use it to encrypt the csv file.
Once the csv file is encrypted, it can be sent to the recipient who will then use his private key to decrypt the file.
The file can be sent via email or it can be dropped in a secure SFTP folder for the recipient to pick up.
1 - Installing the GPG software
- Download the installation file from here. You will be asked to pay a donation for the download, you can opt to pay 0$ or more if you want.
- Once the file is downloaded, run the gpg4win-4.0.0.exe, or the executable suitable for your operating system. I am doing the installation for Windows 10.
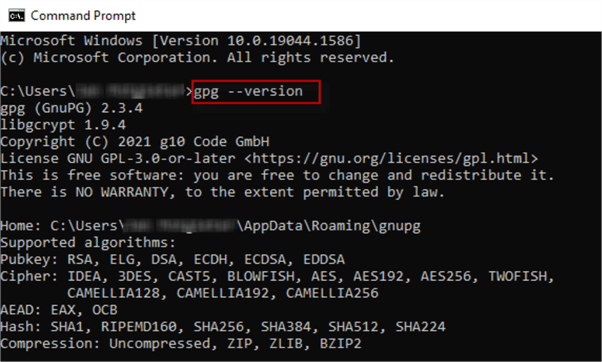
- When the installation is finished, you can check it as follows on a command
window:
- "C:\Program Files (x86)\GnuPG\bin\gpg.exe" --version
- Or, after you have rebooted your system: gpg --version
- Or, get a list of commands explained: gpg --help
2 - Create a Public key that will be used to Encrypt the file
Now we will be playing the role of the Recipient.
You will be creating the public key now and as in the description of the GPG software above, the public key is the key that the recipient will give to the Encryptor to encrypt the data.
On the command line, type the following command:
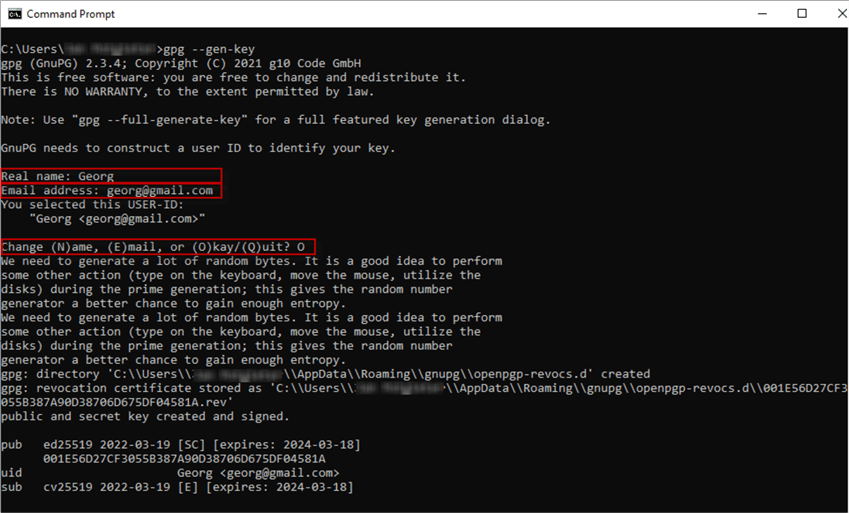
- gpg --gen-key
You will be asked the following (and see my responses, also see in the image below):
- Real name: Georg
- Email address:[email protected]
- Change (N)ame, (E)mail, or (O)kay/(Q)uit? O
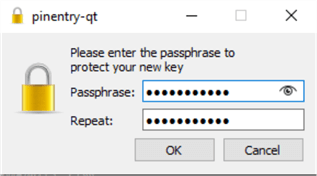
Next, you will be presented with a pop-up box to type in a Passphrase which is your private key.
When this task is finished, you will see information about your public and secret key that was created. See the outcome below.
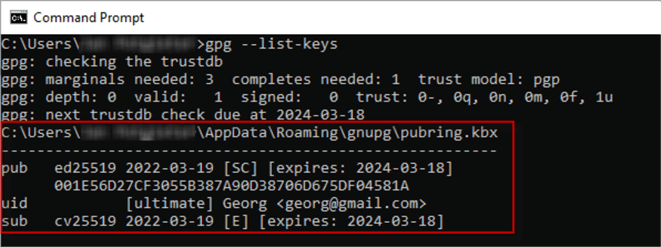
To check the Public and Secret key, just type the following command:
- gpg --list-keys
Now, you are ready to export the public key to a file and send it to the Encryptor.
To export your public key, type the following command:
- gpg --armor --export [email protected]
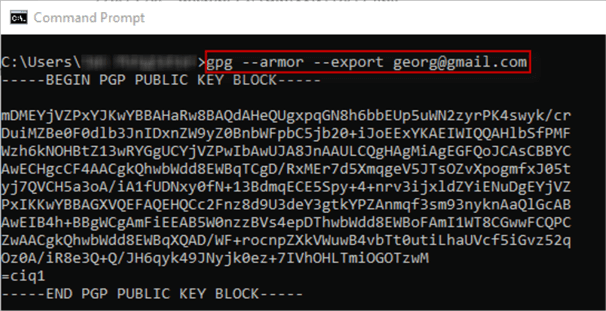
The --armor option of the gpg command is: create ascii armored output, see below.

You can see the help options by typing: gpg --help
The Public Key is the data that the Recipient should provide to the Encryptor to encrypt the csv file. As you can see in the image above, the Public Key start with:
- -----BEGIN PGP PUBLIC KEY BLOCK-----
and it ends with:
- -----END PGP PUBLIC KEY BLOCK-----
And plenty of data in-between!
Copy and paste the public key and send it to your Encryptor in an email or in a text file.
The Public Key as above do not have to be a secret and can actually be loaded on some Public Key servers where anybody can get hold of your public key.
See some examples of Public Key servers, see below:
- https://keyserver.ubuntu.com/
- https://keyserver.pgp.com/vkd/GetWelcomeScreen.event
- https://keys.openpgp.org/
The Private Key is the key that you want to keep secret because when the Private Key is compromised, the above Public Key is also worthless.
3 - Import the Public key to do the encryption
Now we will be playing the role of the Encryptor.
You have a csv file that your customer wants in encrypted format.
Open a text editor and copy and paste the text below and then save the file as a csv file.
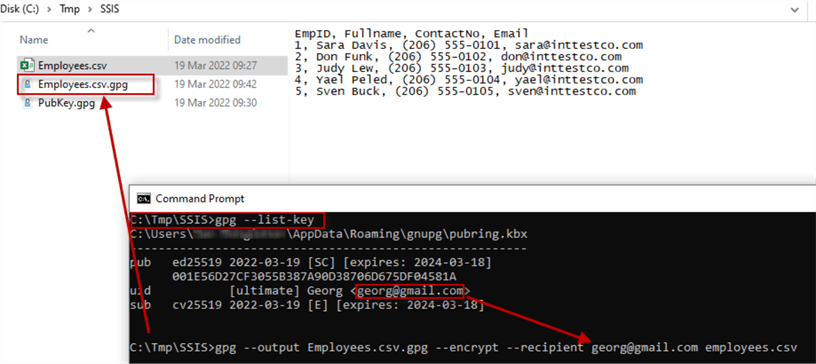
EmpID, Fullname, ContactNo, Email
1, Sara Davis, (206) 555-0101, [email protected]
2, Don Funk, (206) 555-0102, [email protected]
3, Judy Lew, (206) 555-0103, [email protected]
4, Yael Peled, (206) 555-0104, [email protected]
5, Sven Buck, (206) 555-0105, [email protected]
Your customer has provided you with his public key.
After receiving the Public Key from your customer, save it in a file and call the file anything with a .gpg extension on a directory on your computer. In this case I will call the file: PubKey.gpg as in the image below.
In my case, I will be working in the following directory: C:\Tmp\SSIS\
See the 2 files on my hard drive, in the above location in the image below.

4 - Do the encryption on a Command window
You will now continue your role as the Encryptor.
Open a Command window, if you do not have it open yet.
Change directory to the location where your csv and gpg file are (in my case: C:\Tmp\SSIS\) to avoid having to type in long file-paths in your commands.
To encrypt the Employees.csv file with the PubKey.gpg file, just type in the following command:
- gpg --output Employees.csv.gpg --encrypt --recipient [email protected] employees.csv
Now if you open the encrypted file with a text editor, you should get unreadable data as in the image below.
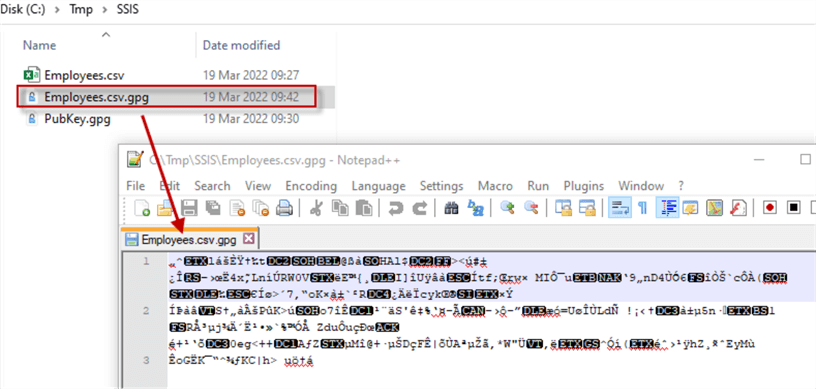
This file can now be sent to the Recipient or dropped in a SFTP folder where the recipient can pick it up.
5 - Decrypt the file to be able to view the data
Now we will be playing the role of the Recipient again.
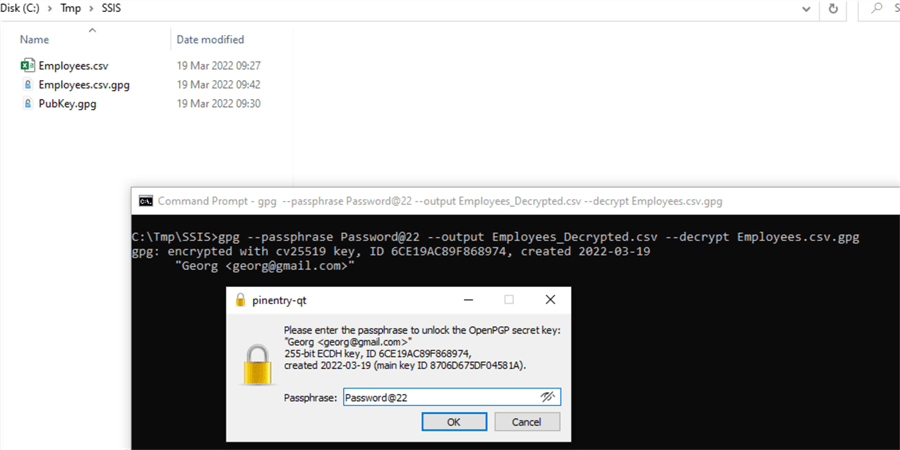
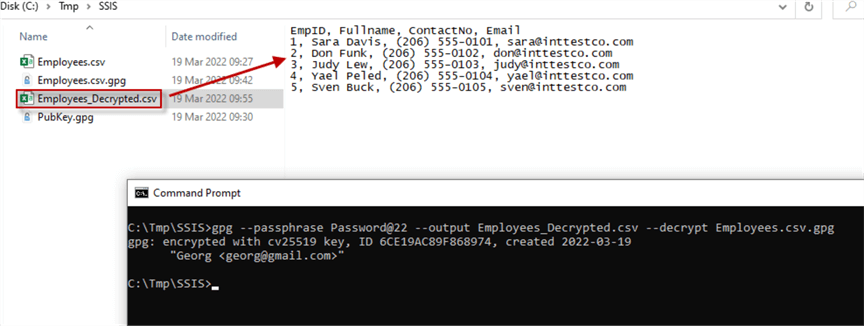
You have received the encrypted file from the Encryptor and you have saved it in a location on your hard drive as in this case: C:\Tmp\SSIS
Now you should use a command window again and change directory to above location.
Just use the following command to decrypt the received (and encrypted) file:
- gpg --passphrase Password@22 --output Employees_Decrypted.csv --decrypt Employees.csv.gpg
Explain above command:
- passphrase: the private key of the Recipient, in this case: Password@22
- output: the filename of the decrypted file (Employees_Decrypted.csv)
- decrypt: the file that need to be decrypted (Employees.csv.gpg)
You will be presented with a pop-up box asking for your Passphrase (again). Type in your Passphrase and click on the OK button. See the image below.
Next, you will see that your decrypted file will show up in the File Explorer in the location where you are working in, in this case: C:\Tmp\SSIS\. See the image below.
See the decrypted text on the right-side in the preview of the File Explorer.
6 - Implement encryption of a csv file in a SSIS package
You will now play the role of the Encryptor again.
Open the solution created in the previous tip: How to use SSIS to encrypt a csv file with Visual Studio, in my case it was created with VS 2019.
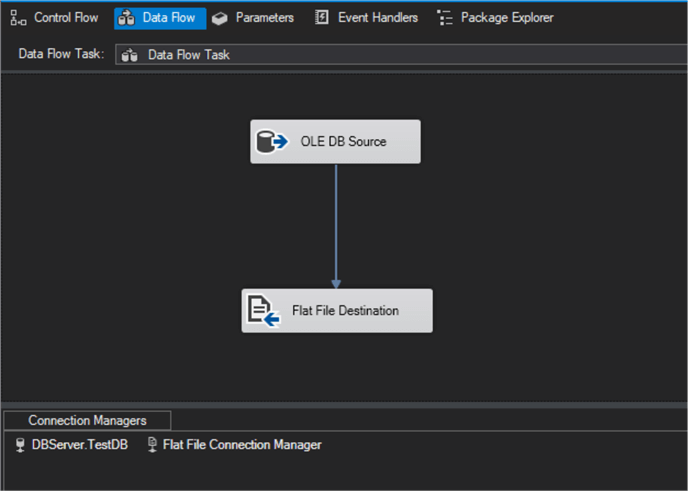
On the Control Flow tab, there is a Data Flow Task, which if you double-click on its icon will open the Data Flow tab.
On the Data Flow tab, you will find an OLE DB Source which is extracting the data from a MS SQL Server.
Also on the Data Flow tab, you will find a Flat File Destination which is using the Flat File Connection Manager to save the data in a csv file on a location on your hard drive, in the example: C:\Tmp\SSIS\
We will be working mainly in the Control Flow tab of the package.
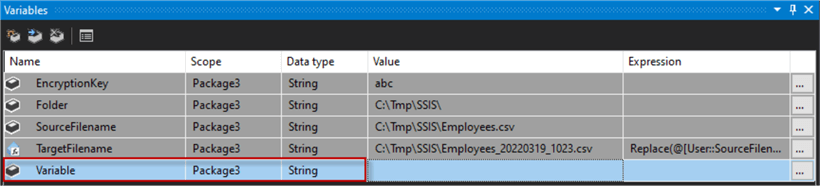
Create a new empty string Variable and call it Variable. See below image.
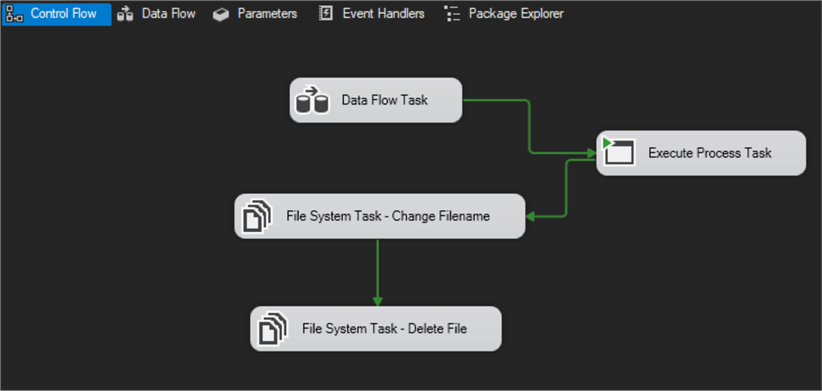
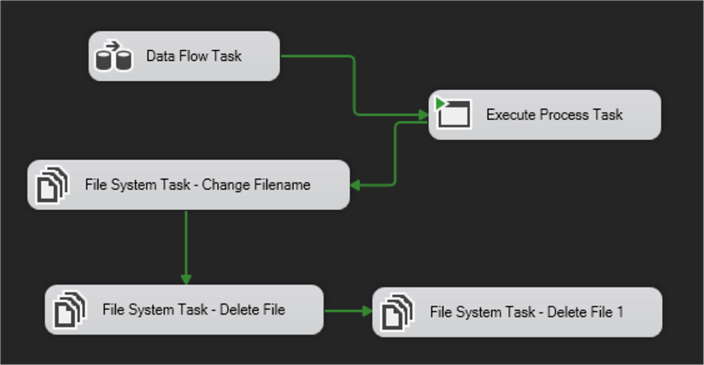
Drag and drop an Execute Process Task onto the designer area. Change the flow of the data to go from the Data Flow Task to the Execute Process Task to the File System Task - Change Filename.
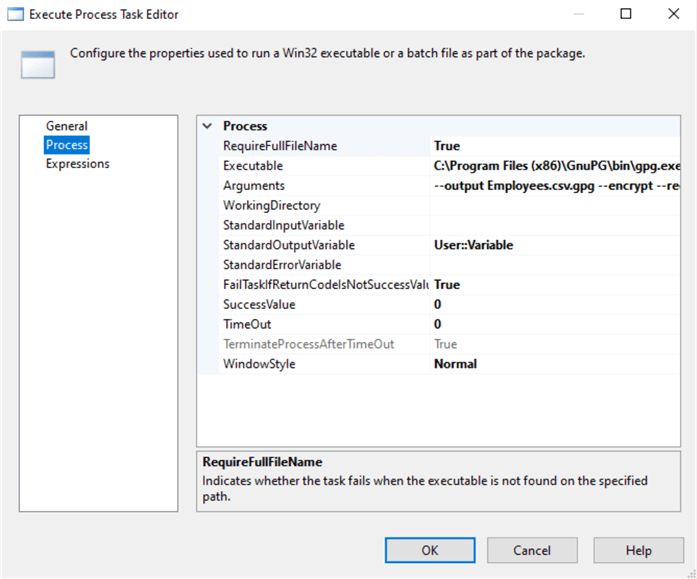
Double-click on the Execute Process Task to open the Execute Process Task Editor and do the changes as in the image below and click on the OK button.
- Executable: C:\Program Files (x86)\GnuPG\bin\gpg.exe
- Arguments: --output C:\TMP\SSIS\Employees.csv.gpg --encrypt --recipient [email protected] C:\TMP\SSIS\employees.csv
- StandardOutputVariable: User::Variable
See the image of the Control Flow window below after above changes.
Add another string variable:
- SourceFilenameEncrypted: C:\Tmp\SSIS\Employees.csv.gpg
- TargetFilenameEncrypted:
- With Expression:
Change the File System Task - Change Filename in its editor as follows:

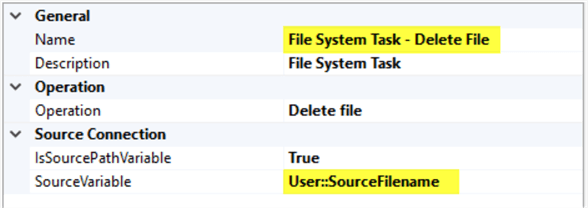
Copy and Paste the File System Task - Delete Fileand name it with a suitable name, in this case I just added a 1 at the end of the name.
Make the following changes to it as follows:
- File System Task - Delete File:
- SourceVariable: User::SourceFilename
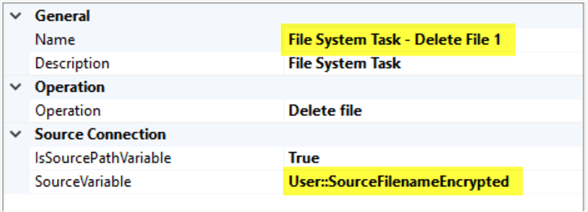
- File System Task - Delete File
1:
- SourceVariable: User::SourceFilenameEncrypted
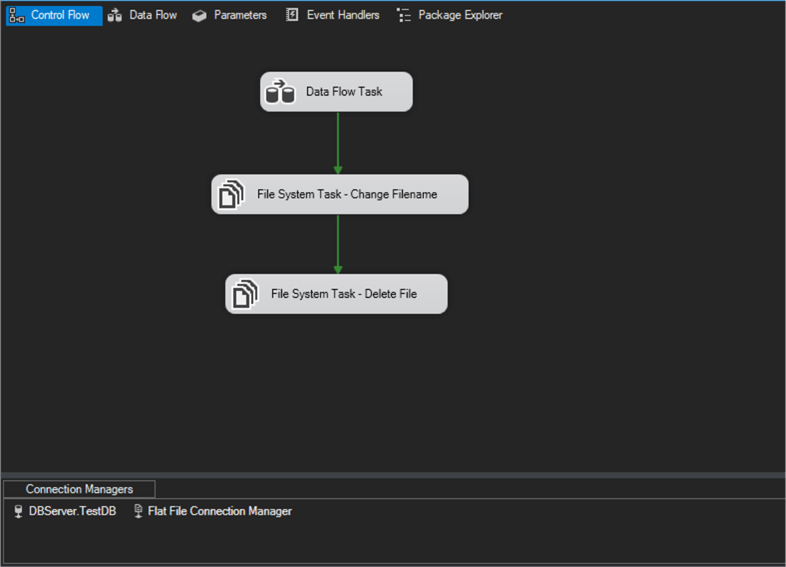
The completed Control Flow will look as in the image below.
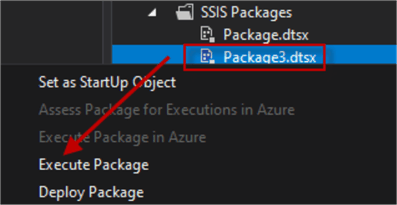
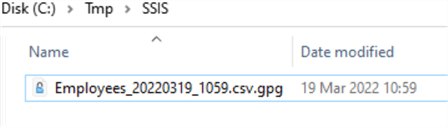
You are ready to execute the package and see the result in the File Explorer as in the image below.
Conclusion
In this tip, we worked through the following steps:
- Installed the GnuPG software
- Create a Public key that will be used to Encrypt the file
- Import the Public key to do the encryption
- Do the encryption on a Command window
- Decrypt the file to be able to view the data
- Implement encryption of a csv file in a SSIS package
Next Steps
- Encrypting a file is easy when you know what the customer wants and you follow the steps outlined in this tip.
- You can work through a complete SSIS Tutorial on the MSSQTips.com website.


About the author
 Jan Potgieter has more than two decades of expertise in the database industry as a Certified Microsoft SQL Server Administrator and Database Developer.
This author pledges the content of this article is based on professional experience and not AI generated.
View all my tips
Article Last Updated: 2022-06-09
