By: Levi Masonde | Updated: 2022-11-08 | Comments (3) | Related: > Python
Problem
As a developer, it is never a good idea to rely on third-party software to handle sensitive data, industries like financial services and healthcare are subject to strict data protection regulations and thus require a CMS that protects effectively from unauthorized third-party data access. Say you are tasked to create an internally managed web application and give users CRUD functionality.
There are a lot of options when it comes to CMS tools to help with the process of creating a CMS along with APIs, but they also generally have restrictions and limits as to what coding languages they work with and which data sources they support.
Nowadays, for you to create a CMS, it is either you learn a third-party CMS like WordPress or Joomla, even after learning them, you will only be exposed to basic free templates and expensive advanced templates which are not required to be maintained for you and you get to pay for training and support.
Solution
Create your own Content Management System using Python flask with SQL Server providing the database and use the good old HTML to handle your views. Having your own CMS is very liberating because you have absolute control of the whole system. You have direct and secure access to your data. You get to adhere to the requirements of your task and have a flexible web development process.
Creating a Database
Step 1: Open Microsoft SQL Server Management Studio.
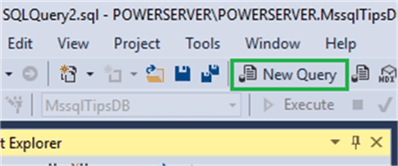
Step 2: Click on New Query and add the SQL code as shown below.
CREATE DATABASE MssqlTipsDB
Step 3: Select Tables under MssqlTipsDB and click on New Query to write your SQL statement.
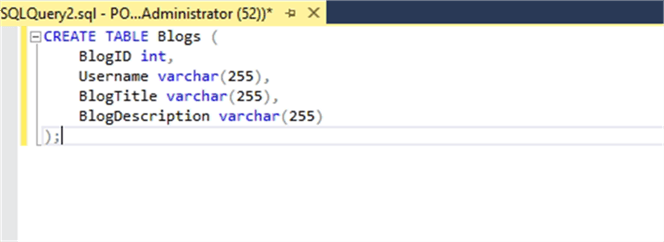
Step 4: Use the SQL code below to create a simple table Blogs with the following columns: "Blogid", "Username", "BlogTitle", "BlogDescription".
CREATE TABLE Blogs (
   BlogID int,
   Username varchar(255),
   BlogTitile varchar(255),
   BlogDescription varchar(255)
);
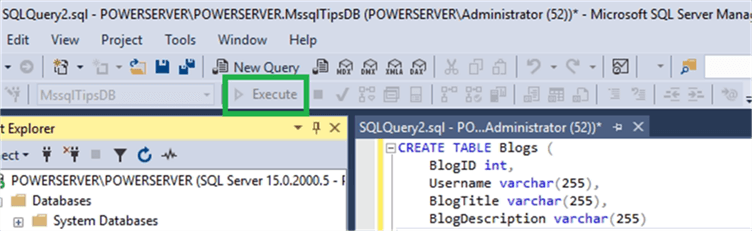
Click on execute once done to apply the changes.
You should be able to see the newly created table. If not, right click and select Refresh.
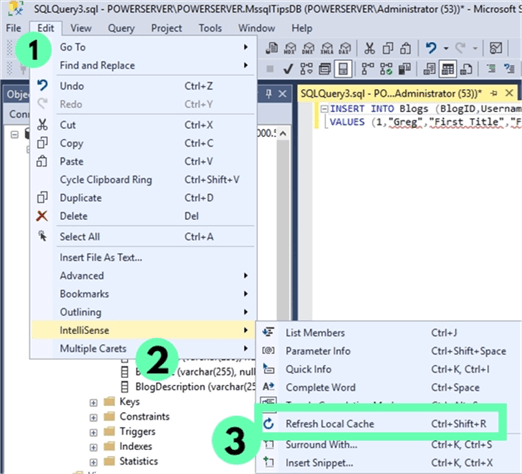
Step 5: Refresh your local cache.
Step 6: Create another Query to add sample data to the database using the SQL code below.
INSERT INTO Blogs (BlogID,Username,BlogTitle,BlogDescription)
VALUES (1, 'Greg', 'First Title', 'First Description');
INSERT INTO Blogs (BlogID,Username,BlogTitle,BlogDescription)
VALUES (2, 'Jeremy', 'Second Title', 'Second Description');
INSERT INTO Blogs (BlogID,Username,BlogTitle,BlogDescription)
VALUES (3, 'Bob', 'Third Title', 'Third Description');
Creating a Data Connection
Step 1: Create a Python file named connection.py and write the code shown below.
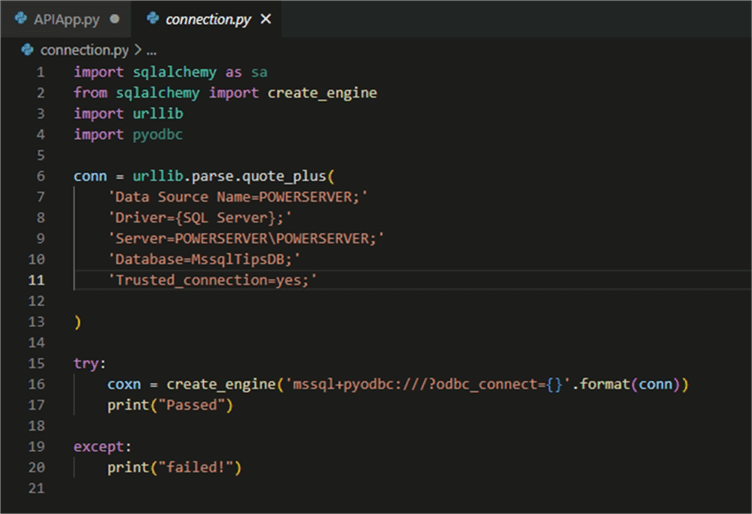
This will be the connection string you will refer to later. Make sure you use your server's Data Source Name and Server Name.
Create a Flask Application
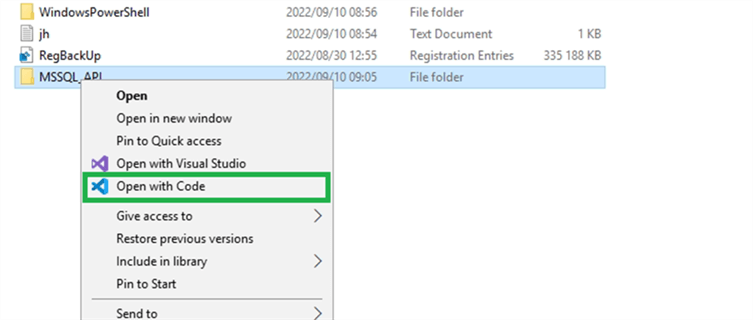
Step 1: Open your documents in Windows File Explorer and create a folder to host your API project.
Step 2: Right Click on the folder and click "Open with Code".
Step 3: Once in Visual Studio, press ctrl + shift + ` to open the cli terminal.
Step 4: On the terminal, use the npm command npm init -y to initialize a node project.
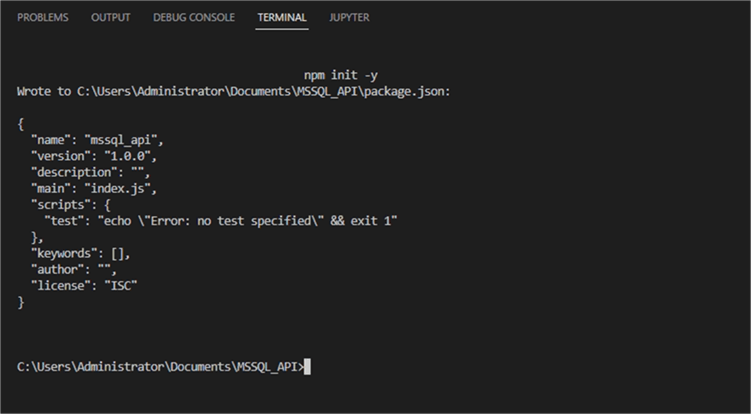
This command will create a package.json file under your folder.
Step 5: Use the pip command pip install flask to install flask on your machine.

Step 6: Create a file APIApp.py and write the code as shown below to define your Flask app.
from flask import Flask, render_template, redirect, request
from connection import coxn
from sqlalchemy import text

blogs = Flask(__name__)

if(__name__ == "__main__"):
    blogs.run()
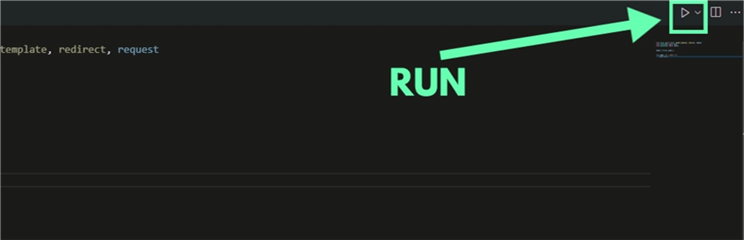
Step 7: Click the RUN button on Visual Studio to run this script.
Step 8: The terminal will show the output as shown below.
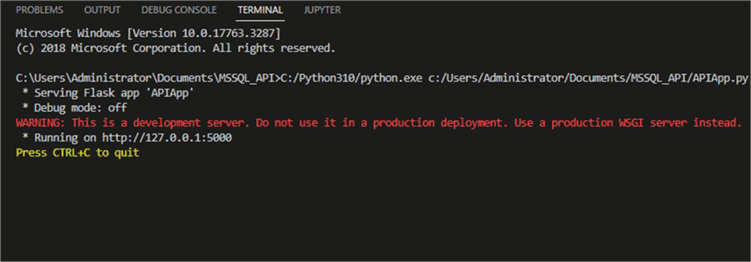
Step 9: Run the server on your browser by holding CTRL and clicking http://127.0.0.1:5000 or go to your browser and manually enter http://127.0.0.1:5000 on the URL.
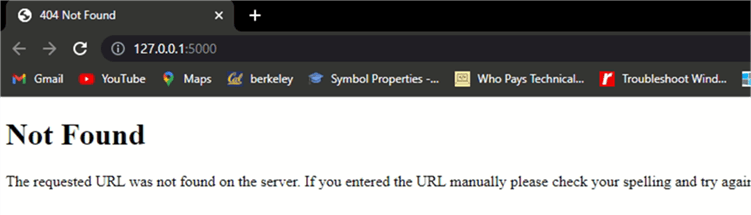
Even if you receive the 404 error, you also just got a confirmation that Flask has handled Setting up the server. It is time to create the HTML file for the View and create Routing for our pages.
Creating HTML Templates and Routes
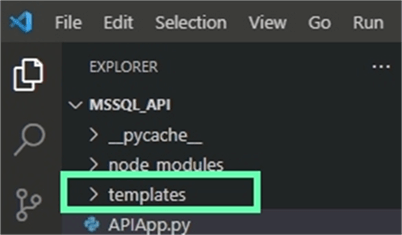
Step 1: Create a new folder named templates under your main MSSQL_API folder.
Step 2: Create an HTML file named BlogList.html under the newly created templates folder and the code shown below.
<!DOCTYPE html>
<html lang="en-US" dir="ltr">
<head>
    <title>Blogs List</title>
    <link rel="stylesheet" crossorigin="anonymous"
   href="https://cdn.jsdelivr.net/npm/[email protected]/dist/css/bootstrap.min.css" >

   <script crossorigin="anonymous"
   src="https://cdn.jsdelivr.net/npm/[email protected]/dist/js/bootstrap.bundle.min.js" >
   </script>
</head>

<body>
    <table class="table">
        <thead>
            <tr>
            <th scope="col">BlogId</th>
            <th scope="col">UserName</th>
            <th scope="col">Titile</th>
            <th scope="col">Desc</th>
            </tr>
        </thead>
        <tbody>
            {% for tip in mssqltips %}
                <tr>
                    <td>{{ tip.BlogId }}</th>
                    <td>{{ tip.Username }}</td>
                    <td>{{ tip.BlogTitle }}</td>
                    <td>{{ tip.BlogDescription }}</td>
                </tr>
            {% endfor %}
        </tbody>
    </table>

</body>
Step 3: Open the APIApp.py file and add the code shown below.
from flask import Flask, render_template, redirect, request
from connection import coxn
from sqlalchemy import text

blogs = Flask(__name__)

@blogs.route("/") #For default route
def main():
    mssqltips = []
    result = coxn.execute(text("SELECT * FROM dbo.Blogs"))
    for row in result.fetchall():
         mssqltips.append({"BlogId": row[0], "Username": row[1], "BlogTitle": row[2], "BlogDescription": row[3]})

    return render_template("BlogList.html",  mssqltips =  mssqltips)

if(__name__ == "__main__"):
    blogs.run()
Great! You created the first HTML file and routed it.
Step 4: Run the Script again.
If you still have the previous session running on Visual Studio Code, press CTRL+C to close the session before running the script again.
Step 5: Run the server on your browser by holding CTRL and clicking http://127.0.0.1:5000 or go to your browser and manually enter http://127.0.0.1:5000 on the URL to run.
Nice! You can now see the database content we created in the first section.
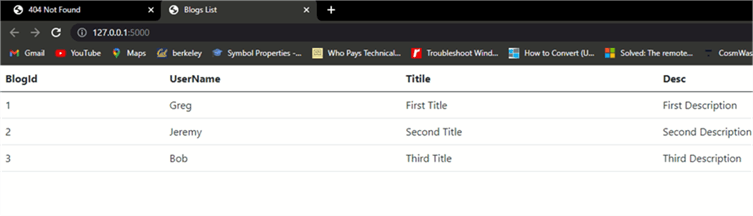
This covers the GET ALL aspect of your API. Next, you will create a template to update the content in your database from an HTML page.
Update Database Content from HTML Page
Step 1: Create a file named AddBlog.HTML under your templates folder and write the code shown below.
<!DOCTYPE html>
<html lang="en-US" dir="ltr">
<head>
    <title>Blog Details</title>

    <link rel="stylesheet" crossorigin="anonymous"
   href="https://cdn.jsdelivr.net/npm/[email protected]/dist/css/bootstrap.min.css" >

   <script crossorigin="anonymous"
   src="https://cdn.jsdelivr.net/npm/[email protected]/dist/js/bootstrap.bundle.min.js" >
   </script>

</head>

<body>
    <h2>Blog Details</h2>

    <form action="" method = "POST">
        <div class="form-group row">
          <label for="id">Id</label>
          <input type="text" class="form-control" name="BlogId" id="BlogId" >
        </div>
        <div class="form-group row">
            <label for="name">UserName</label>
            <input type="text" class="form-control" name="Username" id="Username" >
        </div>
        <div class="form-group row">
            <label for="title">Title</label>
            <input type="text" class="form-control" name="BlogTitle" id="BlogTitle" >
        </div>
        <div class="form-group row">
            <label for="desc">Description</label>
            <input type="text" class="form-control" name="BlogDescription" id="BlogDescription" >
        </div>
        <button type="btnAdd" class="btn btn-primary">Submit</button>
        <a href="/" class="btn btn-primary">Cancel</a>
      </form>
</body>
</html>
Step 2: Open the APIApp.py file and the code shown below to route your AddBlog.html template.
from flask import Flask, render_template, redirect, request
from connection import coxn
from sqlalchemy import text

blogs = Flask(__name__)

@blogs.route("/") #For default route
def main():
    mssqltips = []
    result = coxn.execute(text("SELECT * FROM dbo.Blogs"))
    for row in result.fetchall():
         mssqltips.append({"BlogId": row[0], "Username": row[1], "BlogTitle": row[2], "BlogDescription": row[3]})

    return render_template("BlogList.html",  mssqltips =  mssqltips)

@blogs.route("/addblog", methods = ['GET','POST'])
def addblog():
    if request.method == 'GET':
        return render_template("AddBlog.html")
    if request.method == 'POST':
        BlogId = int(request.form["BlogId"])
        Username = request.form["Username"]
        BlogTitle = request.form["BlogTitle"]
        BlogDescription =request.form["BlogDescription"]
        conn = coxn.raw_connection()
        cursor = conn.cursor()
        cursor.execute("INSERT INTO dbo.Blogs (BlogId, Username, BlogTitle, BlogDescription) VALUES          (?, ?, ?, ?)", BlogId, Username, BlogTitle, BlogDescription)
        cursor.commit()

        return redirect('/')

if(__name__ == "__main__"):
    blogs.run()
Step 3: Close the previous session by pressing CTRL+C and run the script again. Go to your browser and insert http://127.0.0.1:5000/addblog and enter.
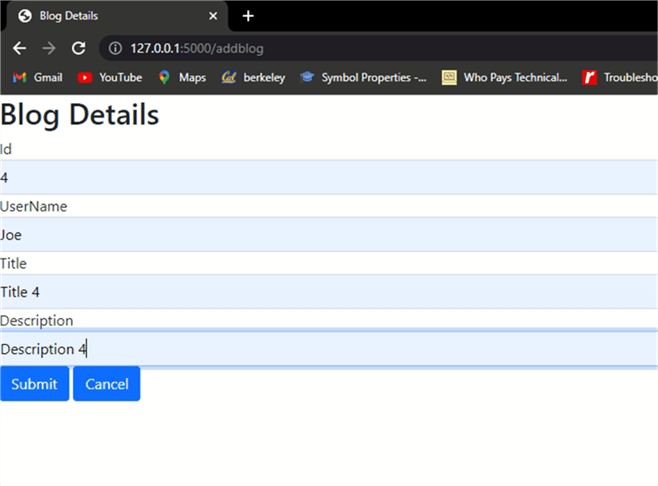
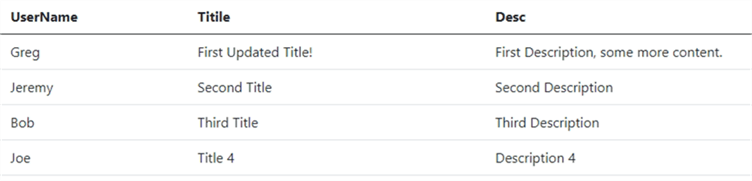
Great! The addblog route is working! Insert details for a blog post and click Submit.
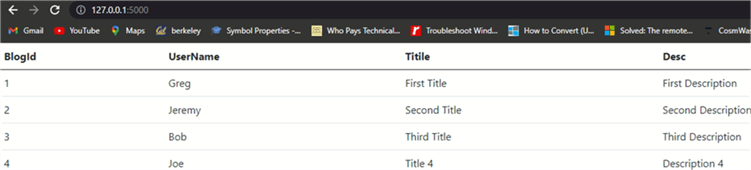
After submitting, you will get redirected to the home page with the newly added entries included in the list.
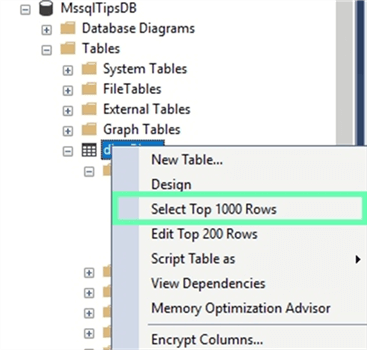
Step 4: Go to SSMS to verify this entry on the database. Right-click on the table used and refresh and then click Select Top 1000 Rows.
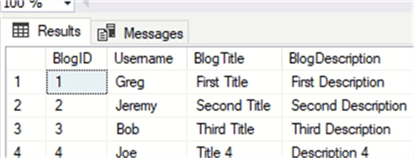
As you can see, the entry is in the database.
You can now view and add content to your database. You only need to include updates and deletion of content.
Updates and Deletion of Content via Web App
Step 1: Add a link for updating and deleting on your BlogList.html file as shown below.
<!DOCTYPE html>
<html lang="en-US" dir="ltr">
<head>
    <title>Blogs List</title>
    <link rel="stylesheet" crossorigin="anonymous"
   href="https://cdn.jsdelivr.net/npm/[email protected]/dist/css/bootstrap.min.css" >

   <script crossorigin="anonymous"
   src="https://cdn.jsdelivr.net/npm/[email protected]/dist/js/bootstrap.bundle.min.js" >
   </script>
</head>

<body>
    <table class="table">
        <thead>
            <tr>
            <th scope="col">BlogId</th>
            <th scope="col">UserName</th>
            <th scope="col">Titile</th>
            <th scope="col">Desc</th>
            </tr>
        </thead>
        <tbody>
            {% for tip in mssqltips %}
                <tr>
                    <td>{{ tip.BlogId }}</th>
                    <td>{{ tip.Username }}</td>
                    <td>{{ tip.BlogTitle }}</td>
                    <td>{{ tip.BlogDescription }}</td>
         <td><a href='updateBlog/{{ tip.BlogId}}'>Edit</a></td>
                    <td><a href='deleteBlog/{{ tip.BlogId }}'>Delete</a></td>
                </tr>
            {% endfor %}
        </tbody>
    </table>
   <button><a href="/addblog">ADD BLOG</a></button>
</body>
Note: The links have the BlogId parameter to identify the individual Blog to be deleted or updated.
Step 2: Create an HTML file named updateBlog.html and write the code as shown below.
<!DOCTYPE html>
<html lang="en-US" dir="ltr">
<head>
    <title>updateBlog</title>

    <link rel="stylesheet" crossorigin="anonymous"
   href="https://cdn.jsdelivr.net/npm/[email protected]/dist/css/bootstrap.min.css" >

   <script crossorigin="anonymous"
   src="https://cdn.jsdelivr.net/npm/[email protected]/dist/js/bootstrap.bundle.min.js" >
   </script>

</head>

<body>
    <h2>Update Blog</h2>

    <form action="" method = "POST">
        <div class="form-group row">
          <label for="id">Id</label>
          <input type="text" class="form-control" name="BlogId" id="BlogId" value="{{ tip.BlogId }}">
        </div>
        <div class="form-group row">
            <label for="name">UserName</label>
            <input type="text" class="form-control" name="Username" id="Username" value="{{ tip.Username }}">
        </div>
        <div class="form-group row">
            <label for="title">Title</label>
            <input type="text" class="form-control" name="BlogTitle" id="BlogTitle" value="{{ tip.BlogTitle }}">
        </div>
        <div class="form-group row">
            <label for="desc">Description</label>
            <input type="text" class="form-control" name="BlogDescription" id="BlogDescription" value="{{ tip.BlogDescription }}">
        </div>
        <button type="btnAdd" class="btn btn-primary">Submit</button>
        <a href="/" class="btn btn-primary">Cancel</a>
      </form>
</body>
</html>
The input has values tied to the current data row using the row's ID.
Step 3: Open your APIApp.py file and add the code shown below to add your update logic.
from flask import Flask, render_template, redirect, request
from connection import coxn
from sqlalchemy import text

blogs = Flask(__name__)

@blogs.route("/") #For default route
def main():
    mssqltips = []
    result = coxn.execute(text("SELECT * FROM dbo.Blogs"))
    for row in result.fetchall():
         mssqltips.append({"BlogId": row[0], "Username": row[1], "BlogTitle": row[2], "BlogDescription": row[3]})

    return render_template("BlogList.html",  mssqltips =  mssqltips)

@blogs.route("/addblog", methods = ['GET','POST'])
def addblog():
    if request.method == 'GET':
        return render_template("AddBlog.html")
    if request.method == 'POST':
        BlogId = int(request.form["BlogId"])
        Username = request.form["Username"]
        BlogTitle = request.form["BlogTitle"]
        BlogDescription =request.form["BlogDescription"]
        conn = coxn.raw_connection()
        cursor = conn.cursor()
        cursor.execute("INSERT INTO dbo.Blogs (BlogId, Username, BlogTitle, BlogDescription) VALUES          (?, ?, ?, ?)", BlogId, Username, BlogTitle, BlogDescription)
        cursor.commit()

        return redirect('/')

@blogs.route('/updateBlog/<int:id>',methods = ['GET','POST'])
def updateBlog(id):
    cr = []
    conn = coxn.raw_connection()
    cursor = conn.cursor()
    if request.method == 'GET':
        cursor.execute("SELECT * FROM dbo.Blogs WHERE BlogId = ?", id)
        for row in cursor.fetchall():
            cr.append({"BlogId": row[0], "Username": row[1], "BlogTitle": row[2], "BlogDescription": row[3]})
        conn.close()
        return render_template("updateBlog.html", tip = cr[0])
    if request.method == 'POST':

        Username = request.form["Username"]
        BlogTitle = request.form["BlogTitle"]
        BlogDescription =request.form["BlogDescription"]
        cursor.execute("UPDATE dbo.Blogs SET Username = ?, BlogTitle = ?, BlogDescription = ? WHERE BlogId = ?", Username, BlogTitle, BlogDescription, id)
        conn.commit()
        conn.close()
        return redirect('/')

if(__name__ == "__main__"):
    blogs.run()
Step 4: Run the Script again.
If you still have the previous session running on Visual Studio Code, press CTRL+C to close the session before running the script again and open your browser to add 127.0.0.1:5000 to run.
Step 5: The List page should have the edit and delete links.

Click the Edit link. It will direct you to updateBlog/{{ tip.BlogId}}. This opens the updateBlog.html file and passes the Id value to the updateBlog funct.
Step 5: Edit rows and click submit.
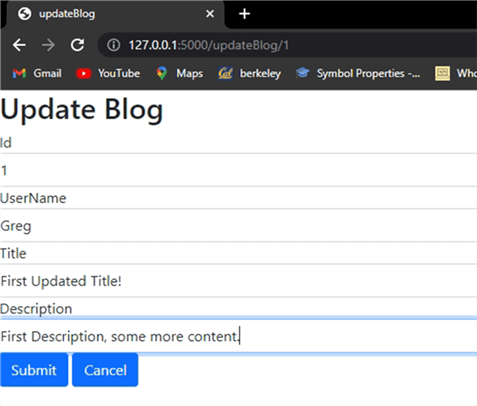
After submission, you should be redirected to the main list with your edits applied.
Great! Updates done! Now, it is time to implement the delete logic.
Delete Logic Implementation via Web App
Step 1: Open the APIApp.py file and add the code shown below to add the delete logic to your script.
from flask import Flask, render_template, redirect, request
from connection import coxn
from sqlalchemy import text

blogs = Flask(__name__)

@blogs.route("/") #For default route
def main():
    mssqltips = []
    result = coxn.execute(text("SELECT * FROM dbo.Blogs"))
    for row in result.fetchall():
         mssqltips.append({"BlogId": row[0], "Username": row[1], "BlogTitle": row[2], "BlogDescription": row[3]})

    return render_template("BlogList.html",  mssqltips =  mssqltips)

@blogs.route("/addblog", methods = ['GET','POST'])
def addblog():
    if request.method == 'GET':
        return render_template("AddBlog.html")
    if request.method == 'POST':
        BlogId = int(request.form["BlogId"])
        Username = request.form["Username"]
        BlogTitle = request.form["BlogTitle"]
        BlogDescription =request.form["BlogDescription"]
        conn = coxn.raw_connection()
        cursor = conn.cursor()
        cursor.execute("INSERT INTO dbo.Blogs (BlogId, Username, BlogTitle, BlogDescription) VALUES          (?, ?, ?, ?)", BlogId, Username, BlogTitle, BlogDescription)
        cursor.commit()

        return redirect('/')

@blogs.route('/updateBlog/<int:id>',methods = ['GET','POST'])
def updateBlog(id):
    cr = []
    conn = coxn.raw_connection()
    cursor = conn.cursor()
    if request.method == 'GET':
        cursor.execute("SELECT * FROM dbo.Blogs WHERE BlogId = ?", id)
        for row in cursor.fetchall():
            cr.append({"BlogId": row[0], "Username": row[1], "BlogTitle": row[2], "BlogDescription": row[3]})
        conn.close()
        return render_template("updateBlog.html", tip = cr[0])
    if request.method == 'POST':

        Username = request.form["Username"]
        BlogTitle = request.form["BlogTitle"]
        BlogDescription =request.form["BlogDescription"]
        cursor.execute("UPDATE dbo.Blogs SET Username = ?, BlogTitle = ?, BlogDescription = ? WHERE BlogId = ?", Username, BlogTitle, BlogDescription, id)
        conn.commit()
        conn.close()
        return redirect('/')

@blogs.route('/deleteBlog/<int:id>')
def deleteBlog(id):
    conn = coxn.raw_connection()
    cursor = conn.cursor()
    cursor.execute("DELETE FROM dbo.Blogs WHERE BlogId = ?", id)
    conn.commit()
    conn.close()
    return redirect('/')

if(__name__ == "__main__"):
    blogs.run()
Step 2: Run the Script again.
If you still have the previous session running on Visual Studio Code, press CTRL+C to close the session before running the script again and open your browser to add 127.0.0.1:5000 to run.
Step 3: Click on the Delete link to delete an entry.

The Second blog entry should be deleted.

Fantastic Work! You now have a fully functional CRUD API built on node, flask, Python, and SQL.
Conclusion
With so many third-party options for web applications content management systems, some companies require a simple and secure CMS, building a system internally boosts the security of the system.
This tutorial shows a very basic, but functional CMS you can use as a template to create even bigger projects. The tutorial did not include CSS styling.
Next Steps
- How to build a Secure SQL Server REST API: Build a Secure SQL Server REST API in Minutes
- Want to use Django Python instead? Check out Create a Python Django Website with a SQL Server Database


About the author
 Levi Masonde is a developer passionate about analyzing large datasets and creating useful information from these data. He is proficient in Python, ReactJS, and Power Platform applications. He is responsible for creating applications and managing databases as well as a lifetime student of programming and enjoys learning new technologies and how to utilize and share what he learns.
This author pledges the content of this article is based on professional experience and not AI generated.
View all my tips
Article Last Updated: 2022-11-08
