By: Daniel Farina | Updated: 2022-11-09 | Comments | Related: > SQL Server 2022
Problem
As a Microsoft SQL Server database professional, you oversee a project requiring that the customers' data be available to the right people on a need-to-know basis due to regulations and good practices. For example, a customer's phone number should be available for the phone sales team, but this information is out of scope for the marketing team, which sends the product catalog by mail. At first, using views to hide the sensitive data is a good solution, but it will require time and development effort to be ready. This tip will show how to solve a situation like this by using Dynamic Data Masking with granular permissions, a new feature added to SQL Server 2022.
Solution
The first reason to use Dynamic Data Masking is that it doesn't modify your data, but is a valuable security feature. You don't have to deal with encryption keys or anything like that because it works on the schema metadata. This makes it easy to implement and roll back in case something goes wrong as compared to encryption.
Dynamic Data Masking allows the use of different types of masks in your production database. This is helpful in case the application code expects values of a special kind. For instance, let's look at email addresses. It could be the case that your application validates that email addresses have a format like [email protected]. If you create a mask using the email() type function, SQL Server will show the column contents masked like [email protected], where D is the first letter of the column, and [email protected] is the mask. The user will see this mask even if the underlying text does not contain an email address.
Five types of masks correspond to a masking function:
| Masking Function | Description |
|---|---|
| Default() |
Masks the full content of the column. The
output will depend on the column's underlying data type:
String types: XXXX Numeric types: 0 Date and time: 01.01.1900 00:00:00.0000000 |
| Email() | This function will return a mask with the pattern of an email address where only the first letter of the text will be visible. The output looks like this: [email protected]. |
| Random(Start, End) | It only works with columns of numeric data type. You provide an interval of values by specifying a start and end range. The function will mask the numbers showing any value between that interval. |
| Partial(Prefix, Padding, Suffix) | This function allows you to build a custom masking pattern by showing the first number of characters specified as "Prefix", followed by a mask pattern and the number of characters you want to make visible at the end of the string. |
| Datetime(datepart) | With this function, you can mask specific parts of a datetime column, like the hours, month, day, etc., or even a combination. |
Granular Permissions and Dynamic Data Masking
Before SQL Server 2022 introduced the possibility to grant or revoke the UNMASK permission at the column level, we were limited to either show all masked columns or show none. In case you need to show specific columns to different user roles, as we will do in this tip, you cannot escape from using a view.
With SQL Server 2022, you only need to create the security roles in the database and assign the unmask permission on the column you want to make visible to a specific role as follows with the SQL command:
GRANT UNMASK ON Schema.Table(Column) TO Role;
Sample Implementation
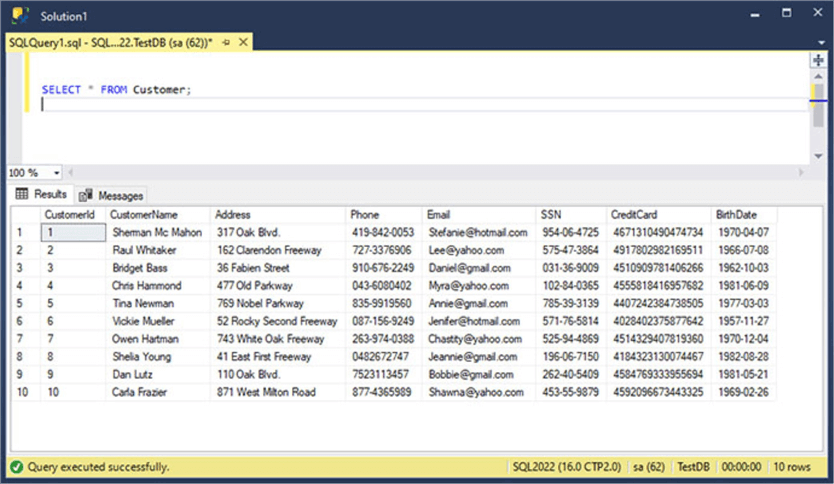
Let's start by defining what we want to mask and how we want it. Suppose we have a Customers table whose SQL Server data looks like this:
We need the Telemarketing team to access the customer's phone number. Also, we need the Advertising team to be able to query the email addresses to send the promotions to the customers. And finally, the Payments Processing team needs access to the credit card and SSN information.
Let's create the table in T-SQL with the masked columns and masking rules.
CREATE DATABASE [TestDB];
GO
USE [TestDB];
GO
CREATE TABLE dbo.Customer
(
    CustomerId   INT IDENTITY(1, 1) PRIMARY KEY,
    CustomerName VARCHAR(50) NOT NULL,
    [Address]    VARCHAR(50) NOT NULL,
    Phone        VARCHAR(50) MASKED WITH (FUNCTION = 'default()') NOT NULL,
    Email        VARCHAR(50) MASKED WITH (FUNCTION = 'email()') NOT NULL,
    SSN          VARCHAR(11) MASKED WITH (FUNCTION = 'partial(1,"XX-XX-XXX",1)') NOT NULL,
    CreditCard   VARCHAR(16) MASKED WITH (FUNCTION = 'default()') NOT NULL,
    BirthDate    DATE MASKED WITH (FUNCTION = 'datetime("Y")') NOT NULL
);
Now we insert the test data with the following INSERT INTO commands.
USE [TestDB]
GO
INSERT [dbo].[Customer] ([CustomerName], [Address], [Phone], [Email], [SSN], [CreditCard], [BirthDate])
VALUES (N'Sherman Mc Mahon', N'317 Oak Blvd.', N'419-842-0053', N'[email protected]', N'954-06-4725', N'4671310490474734', CAST(N'1970-04-07' AS Date))
GO

INSERT [dbo].[Customer] ([CustomerName], [Address], [Phone], [Email], [SSN], [CreditCard], [BirthDate])
VALUES (N'Raul Whitaker', N'162 Clarendon Freeway', N'727-3376906', N'[email protected]', N'575-47-3864', N'4917802982169511', CAST(N'1966-07-08' AS Date))
GO

INSERT [dbo].[Customer] ([CustomerName], [Address], [Phone], [Email], [SSN], [CreditCard], [BirthDate])
VALUES (N'Bridget Bass', N'36 Fabien Street', N'910-676-2249', N'[email protected]', N'031-36-9009', N'4510909781406266', CAST(N'1962-10-03' AS Date))
GO

INSERT [dbo].[Customer] ([CustomerName], [Address], [Phone], [Email], [SSN], [CreditCard], [BirthDate])
VALUES (N'Chris Hammond', N'477 Old Parkway', N'043-6080402', N'[email protected]', N'102-84-0365', N'4555818416957682', CAST(N'1981-06-09' AS Date))
GO

INSERT [dbo].[Customer] ([CustomerName], [Address], [Phone], [Email], [SSN], [CreditCard], [BirthDate])
VALUES (N'Tina Newman', N'769 Nobel Parkway', N'835-9919560', N'[email protected]', N'785-39-3139', N'4407242384738505', CAST(N'1977-03-03' AS Date))
GO

INSERT [dbo].[Customer] ([CustomerName], [Address], [Phone], [Email], [SSN], [CreditCard], [BirthDate])
VALUES (N'Vickie Mueller', N'52 Rocky Second Freeway', N'087-156-9249', N'[email protected]', N'571-76-5814', N'4028402375877642', CAST(N'1957-11-27' AS Date))
GO

INSERT [dbo].[Customer] ([CustomerName], [Address], [Phone], [Email], [SSN], [CreditCard], [BirthDate])
VALUES (N'Owen Hartman', N'743 White Oak Freeway', N'263-974-0388', N'[email protected]', N'525-94-4869', N'4514329407819360', CAST(N'1970-12-04' AS Date))
GO

INSERT [dbo].[Customer] ([CustomerName], [Address], [Phone], [Email], [SSN], [CreditCard], [BirthDate])
VALUES (N'Shelia Young', N'41 East First Freeway', N'0482672747', N'[email protected]', N'196-06-7150', N'4184323130074467', CAST(N'1982-08-28' AS Date))
GO

INSERT [dbo].[Customer] ([CustomerName], [Address], [Phone], [Email], [SSN], [CreditCard], [BirthDate])
VALUES (N'Dan Lutz', N'110 Oak Blvd.', N'7523113457', N'[email protected]', N'262-40-5409', N'4584769333955694', CAST(N'1981-05-21' AS Date))
GO

INSERT [dbo].[Customer] ([CustomerName], [Address], [Phone], [Email], [SSN], [CreditCard], [BirthDate])
VALUES (N'Carla Frazier', N'871 West Milton Road', N'877-4365989', N'[email protected]', N'453-55-9879', N'4592096673443325', CAST(N'1969-02-26' AS Date))
GO
Also, let's create a database user (TestUser) without an associated login and assign it to the db_datareader role to test the permissions without any security risks.
Use TestDB;
GO

CREATE USER [TestUser] WITHOUT LOGIN;

ALTER USER [TestUser] WITH DEFAULT_SCHEMA=[dbo];

ALTER ROLE [db_datareader] ADD MEMBER [TestUser];
GO
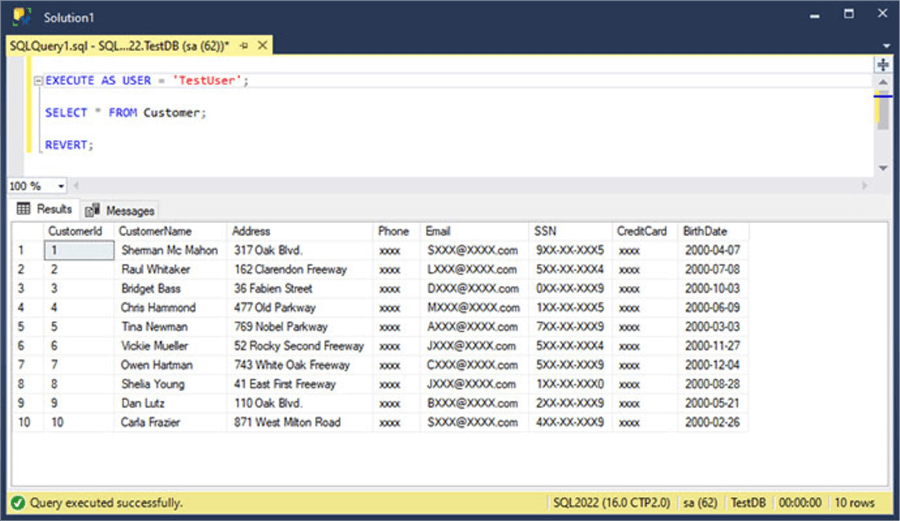
Let's execute a SELECT statement in the context of that user. For this purpose, we will use the EXECUTE AS instruction. In case you don't know about this instruction, don't worry. The Next Steps section at the end of this tip provides a link to an article about EXECUTE AS.
EXECUTE AS USER = 'TestUser';

SELECT * FROM Customer;

REVERT;
In the following image, you will see the masked data as the result set.
Now let's create the roles in the database that will grant the granular unmasking permissions.
CREATE ROLE PhoneSales;
CREATE ROLE MailAdCampagins;
CREATE ROLE PaymentProcessing;
CREATE ROLE Manager;
GO
With the roles created, now let's assign the UNMASK permission to each role.
GRANT UNMASK ON  dbo.Customer(Phone) TO PhoneSales

GRANT UNMASK ON  dbo.Customer(Email) TO MailAdCampagins

GRANT UNMASK ON  dbo.Customer(CreditCard) TO PaymentProcessing

GRANT UNMASK ON  dbo.Customer(SSN) TO PaymentProcessing

GRANT UNMASK ON  dbo.Customer TO Manager
GO
The following screenshot shows the execution of the previous two scripts.

Now it's time to test how each role will see the table's data. To do so, we have to ALTER each role and add the TestUser user as a member. Then we have to switch to the context of the TestUser user by using the EXECUTE AS instruction to run a SELECT statement on the Customer table. Finally, we execute the REVERT instruction to return to the context of our Login and remove the TestUser user from the assigned role, so it's ready to run the next test.
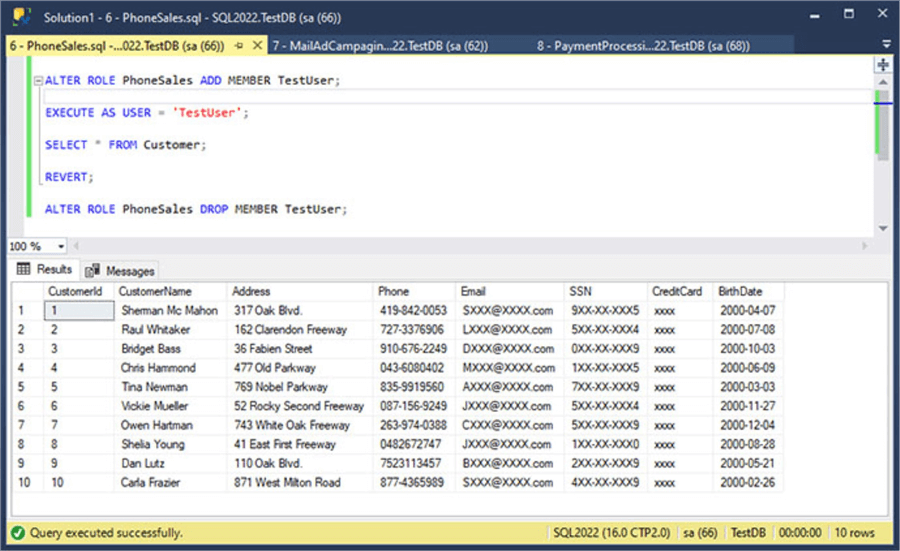
In the following script, we can test the PhoneSales role.
ALTER ROLE PhoneSales ADD MEMBER TestUser;

EXECUTE AS USER = 'TestUser';

SELECT * FROM Customer;

REVERT;

ALTER ROLE PhoneSales DROP MEMBER TestUser;
In the following image, you can see the execution of the previous code.
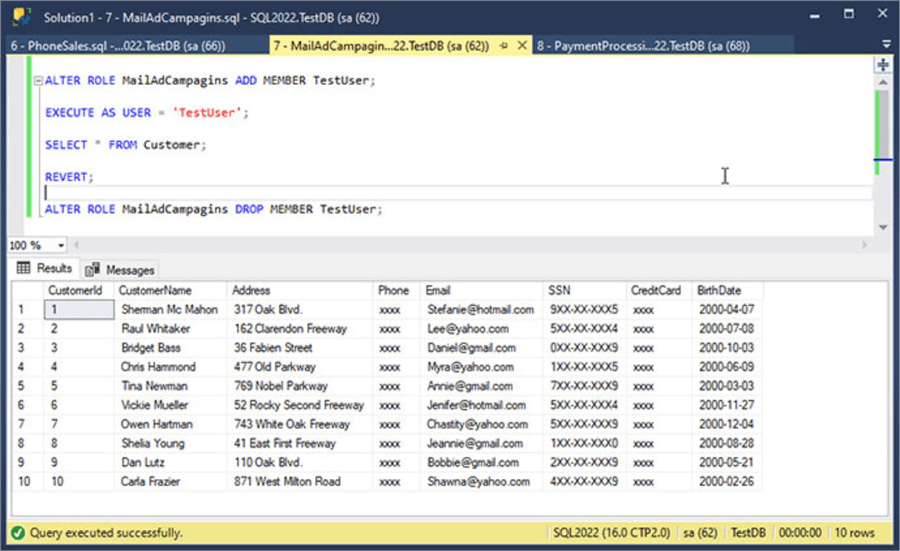
To test the MailAdCampagins role, run the following script.
ALTER ROLE MailAdCampagins ADD MEMBER TestUser;

EXECUTE AS USER = 'TestUser';

SELECT * FROM Customer;

REVERT;

ALTER ROLE MailAdCampagins DROP MEMBER TestUser;
Look at the following screenshot to see the execution of the script above.
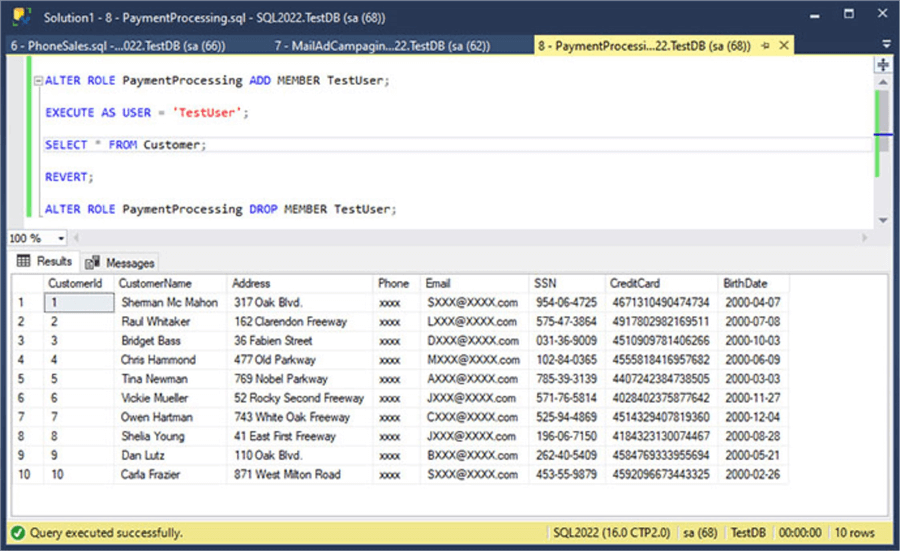
The following script shows how a user with the PaymentProcessing role will see the table's data.
ALTER ROLE PaymentProcessing ADD MEMBER TestUser;

EXECUTE AS USER = 'TestUser';

SELECT * FROM Customer;

REVERT;

ALTER ROLE PaymentProcessing DROP MEMBER TestUser;
In the following image, you can see the execution of the previous code.
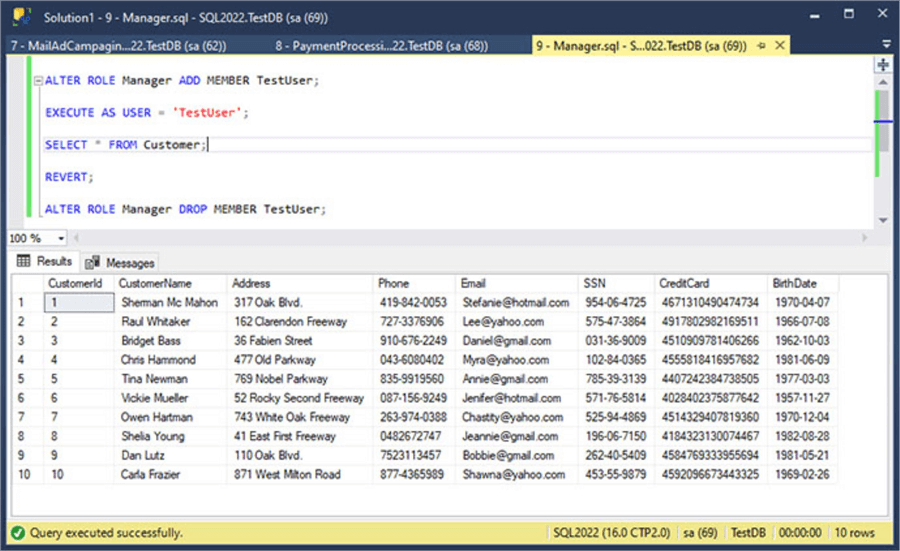
Finally, we test the less restrictive Manager role.
ALTER ROLE Manager ADD MEMBER TestUser;

EXECUTE AS USER = 'TestUser';

SELECT * FROM Customer;

REVERT;

ALTER ROLE Manager DROP MEMBER TestUser;
Look at the following screenshot to see its execution.
Next Steps
- You can download your SQL Server 2022 copy today for evaluation here: https://go.microsoft.com/fwlink/?linkid=2162126.
- For more information about Dynamic Data Masking, take a look at this tip: Use Dynamic Data Masking in SQL Server 2016 CTP 2.1.
- Maybe you need to identify which tables will benefit from Dynamic Data Masking. Take a look at this tip: SQL Server Dynamic Data Masking Discovery and Implementation.
- If you want to expand your knowledge about the EXECUTE AS syntax, you can look at this tip: SQL Server EXECUTE AS.
- Need to implement Row and Cell level security with previous SQL server versions? Then look at this tip: Implementing SQL Server Row and Cell Level Security.
- You can also use nested database roles when implementing Dynamic Data Masking. For more information about nested database roles, look at this tip: Nesting Database Roles in SQL Server.
- Stay tuned to the SQL Server 2022 Tips category for more SQL Server 2022 tips and tricks.


About the author
 Daniel Farina was born in Buenos Aires, Argentina. Self-educated, since childhood he showed a passion for learning.
This author pledges the content of this article is based on professional experience and not AI generated.
View all my tips
Article Last Updated: 2022-11-09
