By: Nai Biao Zhou | Updated: 2023-12-13 | Comments | Related: More > Big Data
Problem
With the introduction of Apache Hadoop, we can store, manage, and process large datasets inexpensively and at scale. Hadoop is becoming a popular tool for working with big data in this new world of large-scale advanced analytics. Furthermore, data scientists love Hadoop because some fundamental attributes facilitate research activities (Mendelevitch et al., 2016). However, some people may have an issue accessing a Hadoop cluster environment when they want to learn about Hadoop and mining big data. How can these people set up an affordable Apache Hadoop Cluster and run a program?
Solution
Cloud computing makes learning new techniques and testing new ideas easy without hardware limitations. As of this writing, over 100 AWS products are available on AWS Free Tier (AWS, 2023). This tip describes the required steps for setting up a Hadoop multi-node cluster on AWS EC2. A small Hadoop cluster includes a single master and multiple worker nodes. In this tip, we build a four-node cluster using four EC2 t2.micro instances. One works as a master node, while the other three are worker nodes. We use all AWS free tier eligible products.
We should have an AWS account to create the cluster. We recommend creating a billing alarm to monitor the estimated AWS charges (Media, 2023). We then log into the AWS Management Console to create four t2.micro instances. These instances share the same security group. Then, we connect to the master node to install Python on the node.
Next, we install Hadoop on the master node. Then, we set up an SSH passwordless login to enable communication between these nodes. In addition, we install Java Runtime Environment (JRE) on each node (Rocha, 2020). After setting up the worker nodes, we run a Hadoop MapReduce example on this cluster.
The exercise employs the Amazon Linux 2023 AMI and uses Apache Hadoop 3.3.6. We also install java-1.8.0 and java-1.8.0-devel to each instance. We access the AWS EC2 terminal window using the Microsoft Edge browser Version 119.0.2151.58 (Official build) (64-bit).
1 – Creating Four EC2 t2.micro Instances
Log into the AWS Management Console, a web application, through the URL: https://console.aws.amazon.com/. We then land on the Console Home page, which provides access to the information we need to perform AWS-related tasks. Click the Services button on the top to expand a pull-down menu, as shown in Figure 1 (Guduru, 2021).
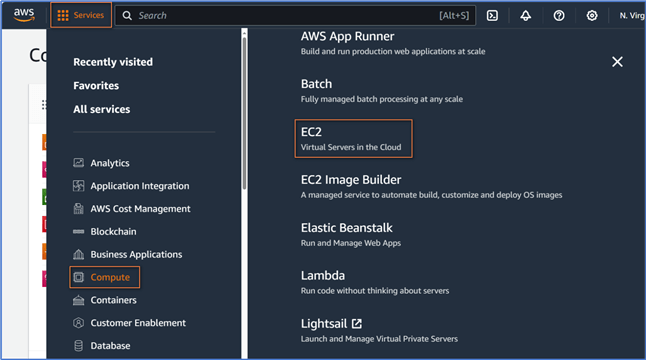
Figure 1 The pull-down menu on the Console Home page
Select Services -> Compute -> EC2 menu item to open the EC2 Dashboard, as shown in Figure 2. We can find lists of resources and a button for launching an instance. We want to launch EC2 instances quickly; therefore, we do not explore alternative options.
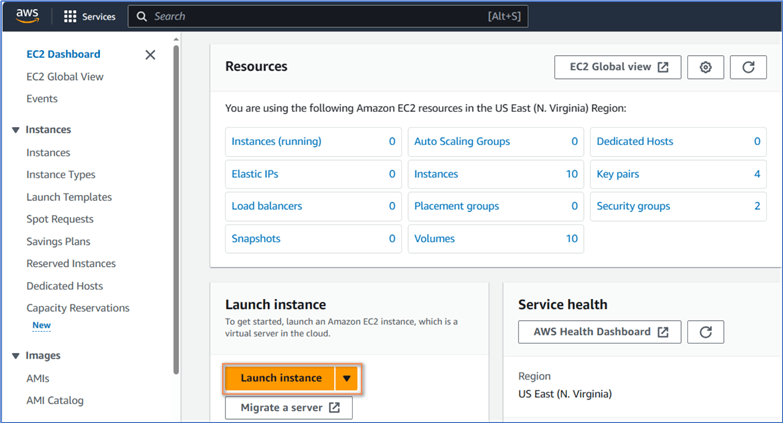
Figure 2 The EC2 Dashboard
Click Launch instance on the dashboard to land on the Launch an instance page.
1.1 The Name and Tags Section
As shown in Figure 3, there is a Name and tags section on the Launch an instance page. We give the name "Worker" to the new instance. The name is not a DNS name, but it helps us identify the instance (Sridhar, 2017).
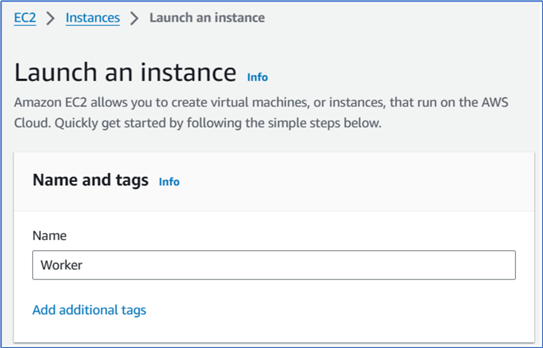
Figure 3 The Name and tags section on the Launch an instance page
1.2 The Application and OS Images Section
Figure 4 exhibits the Application and OS images section on the page. We choose Amazon Machine Image (AMI), which is free tier eligible.
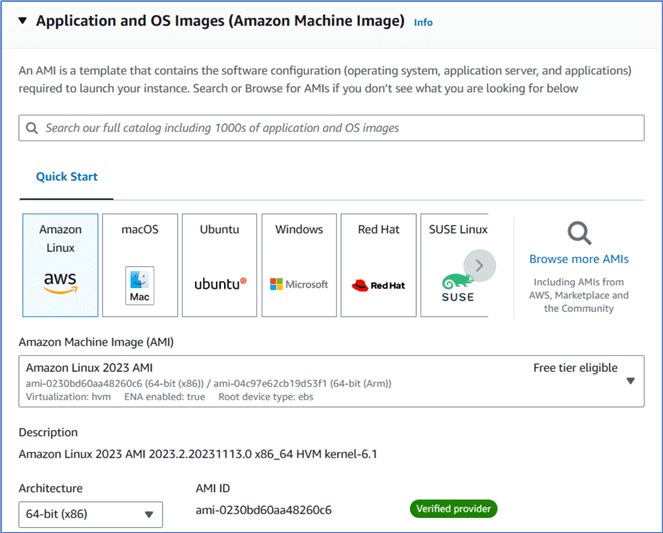
Figure 4 The Application and OS images section on the Launch an instance page
1.3 The Instance Type Section
The next Instance type section allows us to choose the hardware configuration. We select the default t2.micro type of instance. This specific type of instance is free tier eligible.
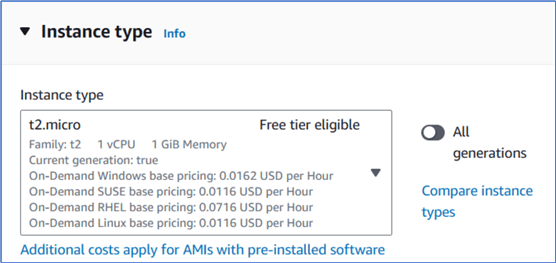
Figure 5 The Instance type section on the Launch an instance page
1.4 The Key Pair (Login) Section
Since we plan to use SSH for communication in the cluster, we must specify a key pair consisting of a public key and a private key. Amazon EC2 stores the public key on our instances. We must store the private key securely. There is a Create new key pair button in the Key pair (login) section, as shown in Figure 6.
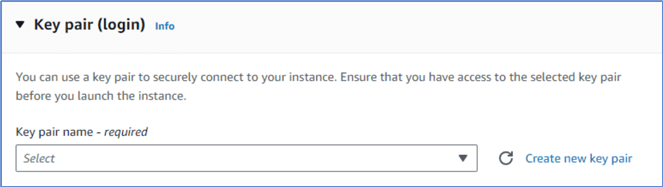
Figure 6 The Create new key pair button.
Click Create new key pair to open the Create key pair window. We name the key pair MSSQLTips and select RSA type. We select .ppk as the private key file format, as shown in Figure 7. This way, we can use the PuTTY pscp command to transport files between local and remote servers (Waingankar, 2021).
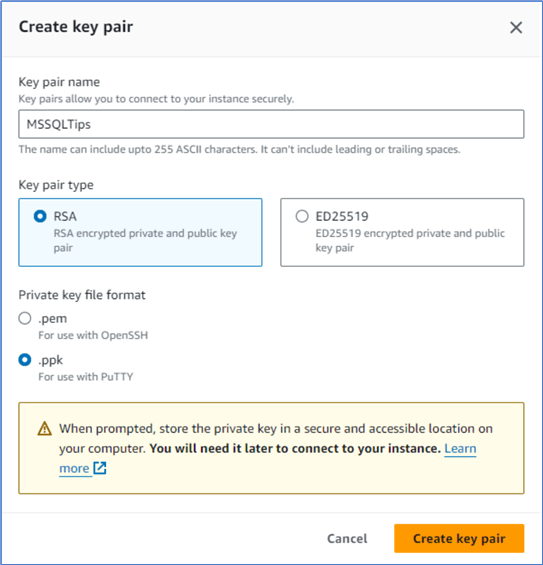
Figure 7 The Create key pair window.
Click the Create key pair button to accept the setup and create a key pair for a secure connection. The Key pair (login) section should look like Figure 8. The process creates the private key file MSSQLTips.ppk, and the web browser automatically downloads this file to our local machine.
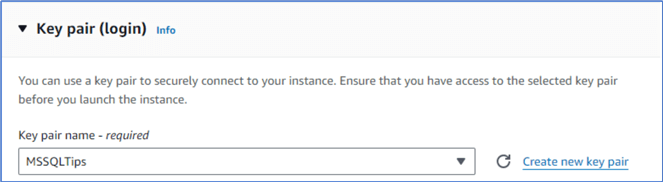
Figure 8 Create a new key pair for secure connections.
1.5 The Summary Section
We use the default settings in the Network settings and Configure storage sections. In the Summary section on the right pane, we enter 4 in the Number of instances box. The Summary section should look like Figure 9.
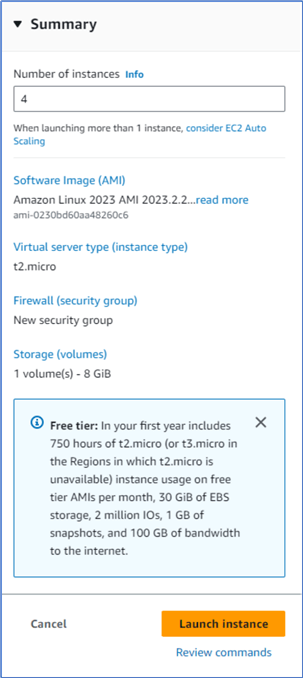
Figure 9 The Summary section
1.6 The Creation of Four Instances
Click the Launch instance button to create four instances. Figure 10 shows the confirmation of the successful creation of four instances.
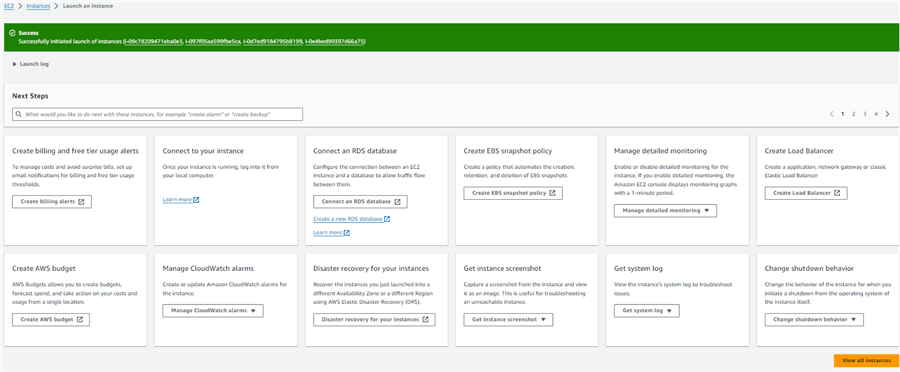
Figure 10 The confirmation of the successful creation of four instances
Click the View all instances button to view all new instances, as shown in Figure 11.
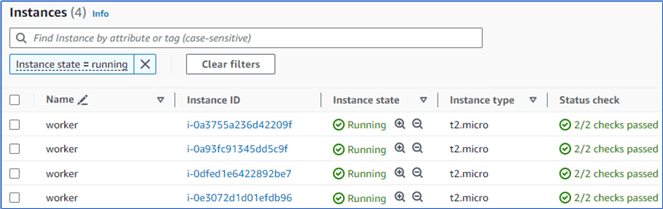
Figure 11 The created four instances
Select an instance and rename the instance by editing the Name tag. Figure 12 illustrates the four instances in the cluster.
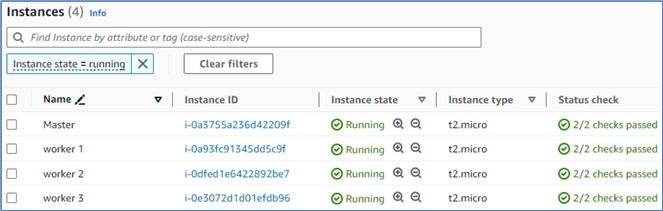
Figure 12 The four instances in the cluster
2 – Configure Security Group
A security group acts as a virtual firewall for our EC2 instances. All four nodes in the cluster should use the same security group. We set up inbound rules to control the incoming traffic to the instances. Since we launched four instances with the same configuration, they have already shared the same security group. We want to change the security group settings to open firewall access. When we modify the rules for the security group on one node, all other instances automatically employ the new or modified rules.
2.1 Access the Inbound Rules
Select the master node in the instance list to display the configurations, as shown in Figure 13. The interface may change over time. The purpose is to find the entry point to access the security group settings.
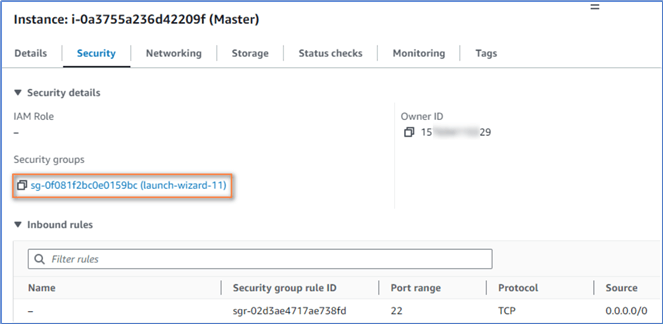
Figure 13 The Security configurations
Click the security group highlighted in Figure 13 to view the inbound rules, as shown in Figure 14.
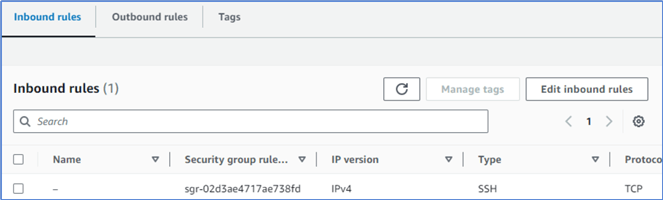
Figure 14 The Security group configurations
Click the Edit inbound rules button to open the Edit inbound rules form, as illustrated in Figure 15. The first rule is the default port 22 required for regular SSH connections.
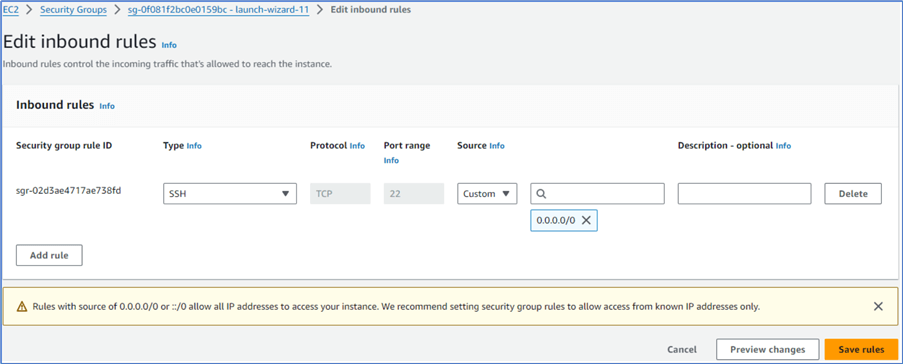
Figure 15 Edit Inbound rules.
2.2 Open Port 9870 to the Web Interface
Click the Add rule button to add a new rule as the second line of Figure 16. This way, we open port 9870 for the web interface in order to check the cluster status via a web browser.
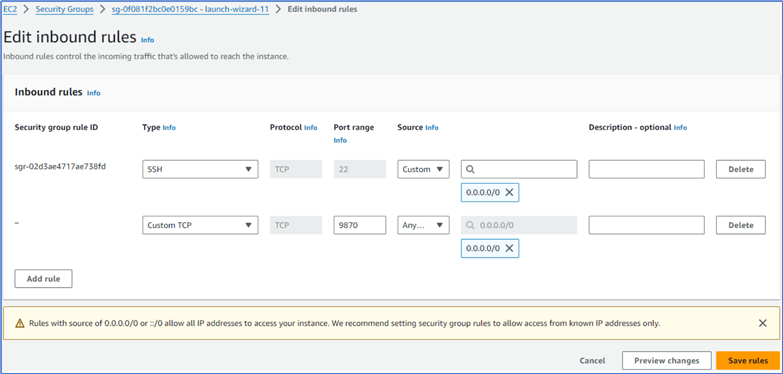
Figure 16 Open port 9870 for the web interface.
2.3 Open All Ports Only for the Same Security Group
We added another new inbound rule that sets 0-64000 to open all ports to the same security group. As shown in Figure 17, we should add the same security group we set for the node. Without this limitation, the cluster has a severe security issue.
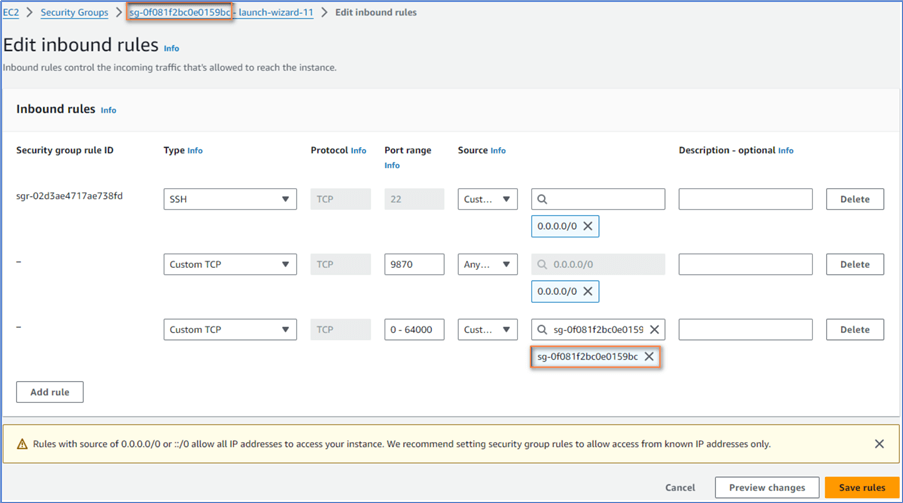
Figure 17 Opens all ports only for the Same Security Group
Click on the Save Rules button to accept all the changes. The modified inbound rules should look like Figure 18.
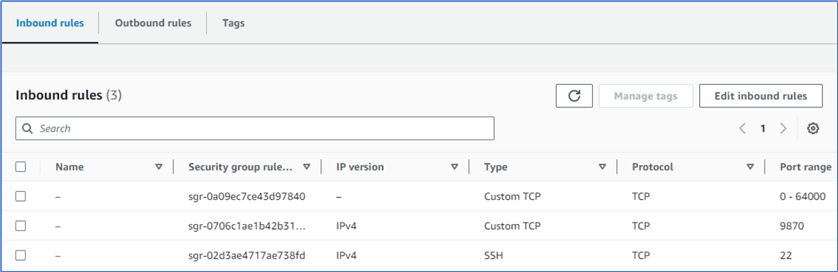
Figure 18 The modified inbound rules
3 – Installing Hadoop on the Master Node
We only need to set up Hadoop on the master node. We then copy the Hadoop installation on the master node to the other three worker nodes. The exercise uses Hadoop 3.3.6. We use the EC2 console to connect an instance.
3.1 The Master Node Connection
Choose the Instances menu item in the navigation pane illustrated in Figure 2. We land on a page that shows all instances we created, as shown in Figure 12. Select the master instance and click the Connect button on the top of the list to land on the Connect to instance page. The page should look like Figure 19.
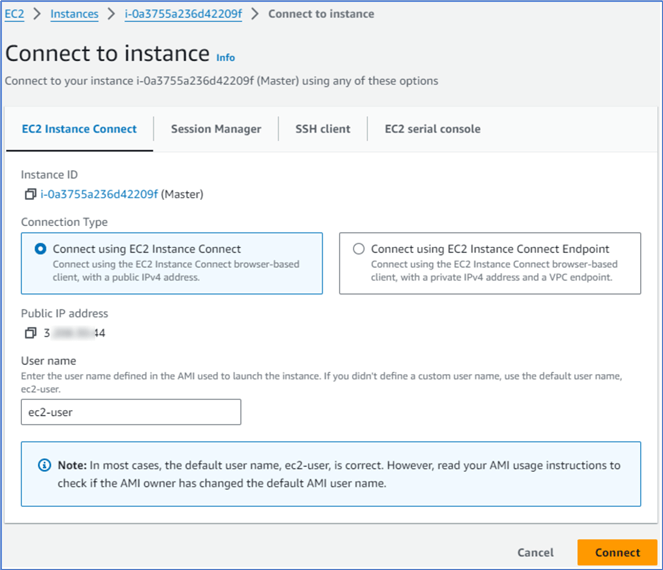
Figure 19 The Connect to instance page.
Select the Connect using EC2 instance Connect option on the page and click the Connect button to open the terminal window, as shown in Figure 20.
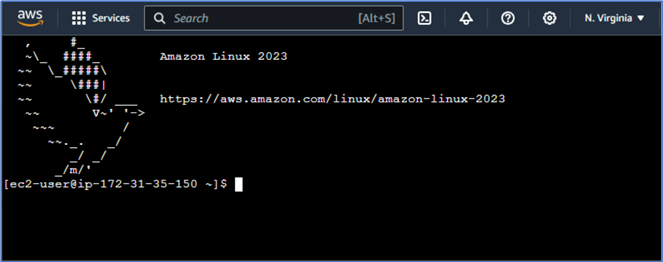
Figure 20 Connect the master node using the Amazon EC2 console.
3.2 Python Installation
Python is a popular computer programming language. People may want to use Python code to implement MapReduce tasks. Fortunately, we can run Python programs on the Hadoop framework (Noll, 2012). Let us create a Python environment on the cluster. Run the following command to install Python on the master node:
$ sudo yum install python
When installing new software using yum, we may get the option of "Is this ok [y/N]." We enter "y" to install the software.
Total download size: 11 k
Installed size: 23
Is this ok [y/N]: y
3.3 Java Installation
Hadoop requires Java Runtime Environment (JRE) 1.6 or higher (Rocha, 2020). We run these two commands to install Java on the master node:
$ sudo yum install java-1.8.0
$ sudo yum install java-1.8.0-devel
When getting the yum prompt "Is this ok [y/N]," We enter "y" to continue the installation.
3.4 Hadoop Installation
Installing the Hadoop framework on a multi-node cluster is an excellent way for us to learn Hadoop. Let us go through a step-by-step process to deploy Hadoop on the master instance. We first download and install Hadoop. We then configure Hadoop.
3.4.1 Hadoop 3.3.6 Installation
We run the following command to download the Hadoop 3.3.6 installation package to the master node:
$ wget https://dlcdn.apache.org/hadoop/common/hadoop-3.3.6/hadoop-3.3.6.tar.gz
Then, we use the following command to unpack the installation package:
$ tar xzf hadoop-3.3.6.tar.gz
3.4.2 JAVA_HOME Configuration
Next, we use the readlink command to determine the location of the Java installation:
$ readlink -f $(which java)
The command returns the following path:
/usr/lib/jvm/java-1.8.0-amazon-corretto.x86_64/jre/bin/java
We remove the string "bin/java" from the path and use the modified path as the JAVA_HOME configuration:
/usr/lib/jvm/java-1.8.0-amazon-corretto.x86_64/jre
With the path, we modify the conf/hadoop-env.sh to set the JAVA_HOME configuration. We first use the nano text editor to open the hadoop-env.sh file:
$ nano hadoop-3.3.6/etc/hadoop/hadoop-env.sh
After finding the line "# export JAVA_HOME=" in the editor, we add the configuration line below the original line, as shown in Figure 21. We can hit Ctrl + O, then the Entry key to save the changes. Next, we hit Ctrl + x to exit the editor.
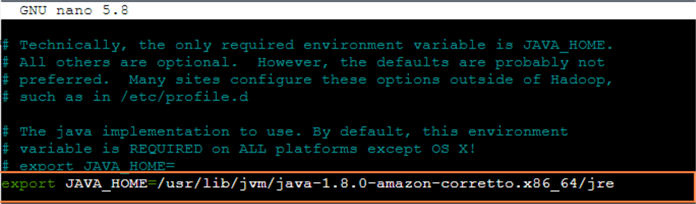
Figure 21 Set the JAVA_HOME configuration in the conf/hadoop-env.sh file.
3.4.3 Environment Settings
We use the nano ~/.bashrc command to modify the .bashrc file. We add these two lines:
export HADOOP_HOME=~/hadoop-3.3.6
export PATH=$PATH:$HADOOP_HOME/bin:$HADOOP_HOME/sbin
The text editor should look like Figure 22.
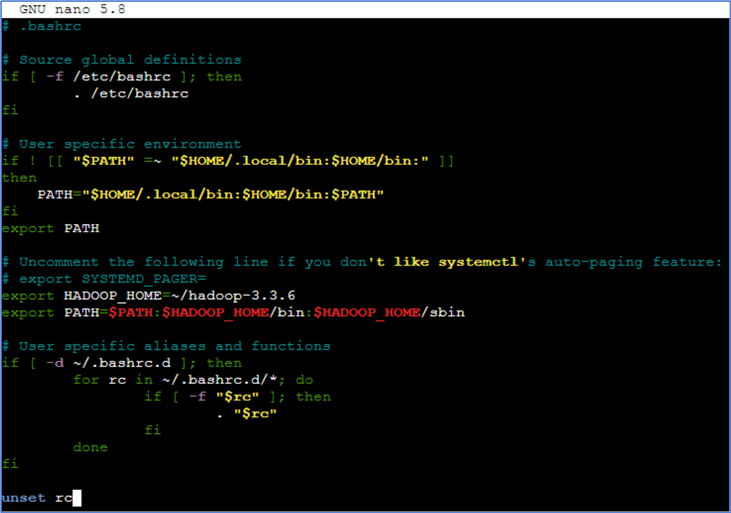
Figure 22 Modify the environment settings.
After saving the changes and exiting the text editor, we run the following command to refresh the settings:
$ source ~/.bashrc
Next, we find the IP address of each node from the Networking tab shown in Figure 13. Here are four Private IP addresses used in this exercise:
- Master: 172.31.35.150
- Worker 1: 172.31.34.82
- Worker 2: 172.31.33.70
- Worker 3: 172.31.34.132
We use these IP addresses to build some configuration files. The IP addresses should differ from this exercise whenever we create a new cluster. Therefore, we should change the IP addresses in the configuration files accordingly.
3.4.4 The core-site.xml File
Run the following command to open the core-site.xml file:
% nano hadoop-3.3.6/etc/hadoop/core-site.xml
We add the following XML elements into the file. Note that the IP address is the private IP address of the master node (Malik, 2023). The file in the text editor should look like Figure 23.
<configuration>
    <property>
         <name>fs.defaultFS</name>
         <value>hdfs://172.31.35.150/</value>
    </property>
</configuration>
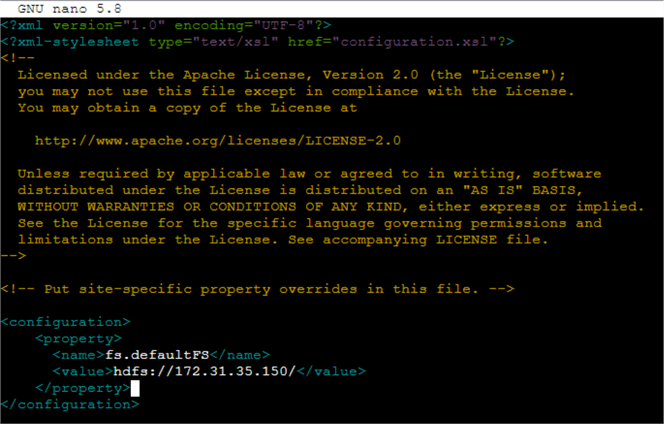
Figure 23 The core-site.xml file
3.4.5 The hdfs-site.xml File
We use the following command to open the hdfs-site.xml file:
$ nano hadoop-3.3.6/etc/hadoop/hdfs-site.xml
We add the following settings to the XML file:
<configuration>
   <property>
    <name>dfs.replication</name>
    <value>2</value>
   </property>
   <property>
     <name>dfs.name.dir</name>
     <value>file:///home/ec2-user/dfs/name</value>
   </property>
   <property>
     <name>dfs.data.dir</name>
     <value>file:///home/ec2-user/dfs/data</value>
   </property>
</configuration>
3.4.6 The mapred-site File
Open the mapred-site.xml file in the nano text editor:
$ nano hadoop-3.3.6/etc/hadoop/mapred-site.xml
We add the following settings to the XML file (Holmes, 2016):
<configuration>
   <property>
      <name>mapreduce.framework.name</name>
      <value>yarn</value>
   </property>
   <property>
      <name>mapreduce.map.memory.mb</name>
      <value>2048</value>
   </property>
   <property>
      <name>mapreduce.reduce.memory.mb</name>
      <value>4096</value>
   </property>
   <property>
      <name>mapreduce.map.java.opts</name>
      <value>-Xmx1638m</value>
   </property>
   <property>
      <name>mapreduce.reduce.java.opts</name>
      <value>-Xmx3278m</value>
   </property>
   <property>
      <name>yarn.app.mapreduce.am.env</name>
	  <value>HADOOP_MAPRED_HOME=$HADOOP_HOME</value>
    </property>
    <property>
       <name>mapreduce.map.env</name>
	    <value>HADOOP_MAPRED_HOME=$HADOOP_HOME</value>
    </property>
    <property>
        <name>mapreduce.reduce.env</name>
        <value>HADOOP_MAPRED_HOME=$HADOOP_HOME</value>
    </property>
</configuration>
3.4.7 The yarn-site.xml File
We use the text editor to add settings to the yarn-site.xml file.
$ nano hadoop-3.3.6/etc/hadoop/yarn-site.xml
We use the private IP address of the master node in this configure file:
<configuration>
   <property>
      <name>yarn.resourcemanager.hostname</name>
      <value>172.31.35.150</value>
   </property>
   <property>
      <name>yarn.nodemanager.aux-services</name>
      <value>mapreduce_shuffle</value>
   </property>
</configuration>
3.4.8 The workers File
We should list all worker hostnames or IP addresses in the etc/hadoop/workers file, one per line. Therefore, the last step is to edit the file and add the private IP addresses of the three worker nodes to the file.
$ nano hadoop-3.3.6/etc/hadoop/workers
By default, the file only contains one hostname: localhost. We remove the default hostname and add these private IP addresses:
- 172.31.34.82
- 172.31.33.70
- 172.31.34.132
4 – Setting Up SSH Passwordless Login
After configuring the master node, we must copy the Hadoop installation on the master node to the three worker nodes. The SSH (Secure Shell) protocol can provide secure access for automated processes. We use this protocol to enable multiple computers to communicate. We generate and store the public key on the master node. We then copy the public key to the worker nodes to achieve passwordless SSH access across the cluster.
4.1 Generate a Pair of Public Key and Private Key on the Master Node
Run the following command on the master node to generate a key pair:
$ ssh-keygen -t rsa
The command prompts us for a file name and passphrase. We hit the Enter key to accept the default. We should know that adding a passphrase is essential for securing the private key (Smith, 2023). Since we want to create an environment for studying, we enter an empty value for the passphrase.
Enter file in which to save the key (/home/ec2-user/.ssh/id_rsa):
Enter passphrase (empty for no passphrase):
Enter same passphrase again:
The command generates these two files:
- id_rsa: contains the private key.
- id_rsa.pub: contains the public key.
4.2 Add the Public Key to the Master Node
Run the following command on the master node to add the public key to the node:
$ cat ~/.ssh/id_rsa.pub >> ~/.ssh/authorized_keys
4.3 Copy the Public Key to Each Worker Node
On the master node terminal window, we run the following command to view the public key of the node:
$ cat .ssh/id_rsa.pub
We want to copy the key in the .ssh/id_rsa.pub file and append it to the ~/.ssh/authorized_keys file on each worker node. Let us open a worker node terminal window and run the following command to open the authorized_keys in a text editor on the node:
$ nano ~/.ssh/authorized_keys
Then, we select and copy the public key on the master terminal window and then paste the key into the worker terminal window. Note that the public key should be in a single line. We may accidentally introduce a line break that prevents the key from matching its private key pair. Figure 24 exhibits the authorized_keys file on the worker terminal window. The first line is the public key of the .pem Amazon half (Malik, 2023). The second line is the public key we just copied from the master node terminal window. We should save the changes to the authorized_keys file.

Figure 24 The authorized_keys file on the worker nodes
We repeat the process and append the public key of the master node to all the worker nodes.
4.4 Access All the Worker Nodes from the Master Node
We need to make sure we can ssh to all worker nodes from the master node. Run the following command to access worker 1 from the master node:
$ ssh 172.31.34.82
We receive a command prompt that asks if we want to continue connecting. We enter yes to continue.
This key is not known by any other names
Are you sure you want to continue connecting (yes/no/[fingerprint])? yes
We enter the exit command to exit the connection. We repeat the steps to connect the other two worker nodes:
$ ssh 172.31.33.70
$ ssh 172.31.34.132
5 – Setting Up the Worker Nodes
After setting up Hadoop on the master node, we copy the settings to the three worker nodes. First, we pack up the hadoop-3.3.6 folder on the master node. We then copy the package to the worker nodes. Next, we access each worker node, unpack the package, and install Java.
5.1 Creating a Hadoop Installation Package and Copy it to All Worker Nodes
Assuming we are in the root home directory, i.e., /home/ec2-user/. If not, we can run the cd command to change the current directory to the root directory. We then run the following command to pack up the entire hadoop-3.3.6 folder into a single file:
$ tar cvf Hadoop_Master.tar hadoop-3.3.6
Next, we run the following three commands to copy the file to the three worker nodes:
$ scp Hadoop_Master.tar [email protected]:/home/ec2-user/Hadoop_Master.tar
$ scp Hadoop_Master.tar [email protected]:/home/ec2-user/Hadoop_Master.tar
$ scp Hadoop_Master.tar [email protected]:/home/ec2-user/Hadoop_Master.tar
5.2 Unpacking the Hadoop Installation Package and Installing Java on Each Worker Node
We first use the ssh command to access worker 1 node:
$ ssh 172.31.34.82
We then run the following commands sequentially to unpack the Hadoop package and install Java on each node:
$ tar xvf Hadoop_Master.tar
$ sudo yum install java-1.8.0
$ sudo yum install java-1.8.0-devel
After completing the setting on one node, we run the exit command to exit the node. We then repeat these steps on the other two nodes. Here are all the commands to complete setting up the other two nodes:
$ ssh 172.31.33.70
$ tar xvf Hadoop_Master.tar
$ sudo yum install java-1.8.0
$ sudo yum install java-1.8.0-devel
$ exit
$ ssh 172.31.34.132
$ tar xvf Hadoop_Master.tar
$ sudo yum install java-1.8.0
$ sudo yum install java-1.8.0-devel
$ exit
6 – Running the Hadoop MapReduce Example on the Cluster
We start the Hadoop cluster and then run an example the Hadoop framework provides. The example is a simple MapReduce application that counts the number of occurrences of each word in a file.
6.1 Hadoop Startup
When using it for the first time, we must format Hadoop's distributed filesystem (HDFS) via the NameNode (Noll, 2011). Here is the command to format the new distributed file system:
$ hdfs namenode -format
This command creates a dfs folder in each node according to the settings in the hdfs-site.xml configure file. If, for some reason, we need to format the distributed file system again, we should delete the dfs folder in each node.
We then use this utility script to start all the HDFS processes:
$ start-dfs.sh
Next, we use the following utility script to start all the YARN processes:
$ start-yarn.sh
We use the jps command to verify that all processes start correctly. Figure 25 exhibits the output from these steps.
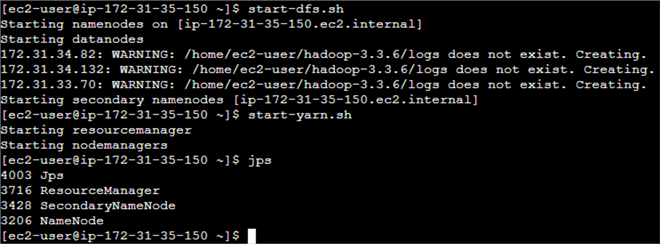
Figure 25 The output from the Hadoop startup process
We can also use the following command to verify that all three worker nodes started successfully:
$ hdfs fsck / -files -blocks
The output of the command should look like Figure 26.

Figure 26 Check filesystem
In addition, we can find the public IP address of the master node and access the web interface through this URL:
http://public IP address:9870
When switching to the Datanode tab, we find a list of worker nodes in the cluster.
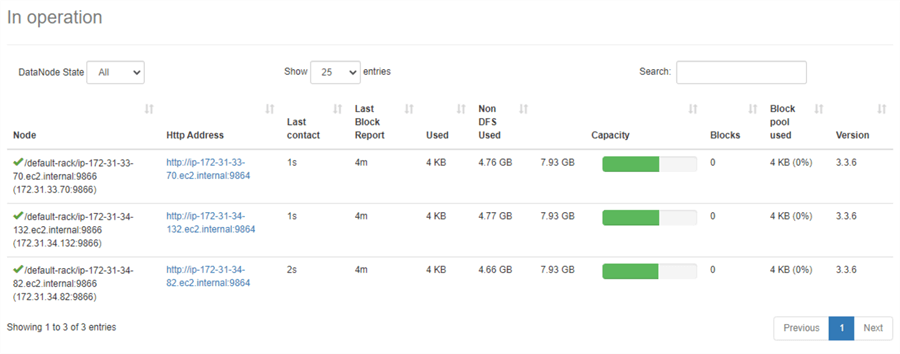
Figure 27 Datanode information
6.2 Running a MapReduce Example on the Cluster
We copy text from the web page https://www.mssqltips.com/about/ to the nano text editor. Then, we save the text file on the master node. Here is the command we used:
$ nano MSSQLTips
Next, we create a folder in the HDFS using this command:
$ hdfs dfs -mkdir /data
Then, we copy the local text file to HDFS for processing:
$ hdfs dfs -put MSSQLTips /data/
Finally, we run the wordcount application:
$ time hadoop jar hadoop-3.3.6/share/hadoop/mapreduce/hadoop-mapreduce-examples-3.3.6.jar wordcount /data/MSSQLTips /data/wordcount1
We can use this command to view the output:
$ hadoop fs -cat /data/wordcount1/part-r-00000 | more
6.3 Hadoop Shutdown
We use this utility script to stop all the HDFS processes:
$ stop-dfs.sh
Then, we use the following utility script to stop all the YARN processes:
$ stop-yarn.sh
After installing and running Apache Hadoop on an AWS EC2 cluster, we can use the cluster to study many different approaches to modeling data. Generally, we can categorize these approaches into two groups (Leskovec et al., 2019):
- Summarization: Summarizing the data succinctly and approximately, for example, PageRank and clustering.
- Feature Extraction: Extracting the most prominent features of the data, for example, frequent item sets and similar Items.
Summary
With the advent of extremely large datasets, distributed computing, and cloud computing, we tend to partition big datasets across several separate machines and bring computation to the data. People may want an affordable learning environment to study big data techniques and tools. This article provides step-by-step instructions to create a multi-node Apache Hadoop cluster that allows for the distributed processing of large data sets across multiple computers using simple programming models.
We first demonstrated how to create four free tier-eligible instances. We specified a key pair to use SSH for the communication in the cluster. We then set up inbound rules that control the incoming traffic to the instances. We emphasized that all nodes in the cluster should share the same security group, and we open all ports only for that security group. Without this limitation, the cluster has severe security threats.
Next, we install Java on every node in the cluster. Java is a prerequisite to installing Hadoop. We also demonstrated the installation of Python to the master node. Then, we installed Hadoop on the master node, including changing environment settings and modifying configuration files.
After setting up SSH Passwordless Login, we packed up the installation folder. We deployed the installation package to other worker nodes. All nodes had duplicate files in the Hadoop installation folder after we unpacked the package in all worker nodes.
Finally, we started the Hadoop cluster and ran a MapReduce application. We introduced several ways to check all the HDFS processes. We covered some HDFS commands to perform Hadoop HDFS file operations. After viewing the MapReduce application output, we use two utility scripts to stop all the HDFS processes.
References
Apache (2022). Hadoop Cluster Setup. https://hadoop.apache.org/docs/r3.2.4/hadoop-project-dist/hadoop-common/ClusterSetup.html.
AWS (2023). AWS Free Tier. https://aws.amazon.com/free/.
Guduru., D. (2021). Setting up Multi-Node Apache Hadoop Cluster on AWS EC2 from scratch. https://awstip.com/setting-up-multi-node-apache-hadoop-cluster-on-aws-ec2-from-scratch-2e9caa6881bd.
Hadoop (2018). Hadoop: YARN Resource Configuration. https://hadoop.apache.org/docs/r3.1.0/hadoop-yarn/hadoop-yarn-site/ResourceModel.html.
Holmes, A. (2016). Configuring Memory for MapReduce Running on YARN. https://dzone.com/articles/configuring-memory-for-mapreduce-running-on-yarn.
Leskovec, J., Rajaraman, A. & Ullman, D. J. (2019). Mining of Massive Datasets. http://www.mmds.org/.
Malik, T. (2023). CSC555 - Mining Big Data Lecture Notes. Chicago, IL: DePaul University.
Mendelevitch, O., Stella, C. & Eadline, D. (2016). Practical Data Science with Hadoop® and Spark: Designing and Building Effective Analytics at Scale. Boston, MA: Addison-Wesley Professional.
Media, T. (2023). Getting Started With AWS Cloud | Step-by-Step Guide. https://www.youtube.com/watch?v=CjKhQoYeR4Q.
Noll, G. M. (2011). Running Hadoop On Ubuntu Linux (Multi-Node Cluster). https://www.michael-noll.com/tutorials/running-hadoop-on-ubuntu-linux-multi-node-cluster/.
Noll, G. M. (2012). Writing An Hadoop MapReduce Program In Python. https://www.michael-noll.com/tutorials/writing-an-hadoop-mapreduce-program-in-python/.
Radtka, Z. & Miner, D. (2015). Hadoop with Python. Sebastopol, CA: O'Reilly Media.
Rocha, B. (2020). Setting up Hadoop with 2 workers. https://bernardosr1.medium.com/setting-up-hadoop-with-2-workers-linux-aa5870a63af.
Smith, J. (2023). How to Set Up SSH Passwordless Login (Step-by-Step Tutorial). https://www.strongdm.com/blog/ssh-passwordless-login.
Sridhar, J. (2017). How to Setup an Apache Hadoop Cluster on AWS EC2. https://www.novixys.com/blog/setup-apache-hadoop-cluster-aws-ec2/.
Waingankar, A. (2021). Copy files from/to remote server using PuTTY pscp. https://akshay-waingankar95.medium.com/copy-files-from-to-remote-server-using-putty-pscp-7567a0631c9d
White, T. (2015). Hadoop: The Definitive Guide, 4th Edition. Sebastopol, CA: O'Reilly Media.
Next Steps
- The Author provides a quick way to set up a multi-node cluster for learning Hadoop and mining massive datasets. The setup process introduced in this tip is not for building a production environment. The tip gives instructions without many explanations. Readers can access the website https://hadoop.apache.org/docs/r3.3.6/ for more information. In addition, the Stanford Computer Science course, CS246 Mining Massive Data Sets, is available on YouTube. We can download the associated book through http://www.mmds.org/. We can also read the concise book Hadoop with Python by Zachary Radtka and Donald Miner (Radtka & Miner, 2015) and White's book Hadoop: The Definitive Guide (White, 2015).
- Check out these related tips:
- Use Sqoop to Load Data from a SQL Server Table to a Hadoop Distributed File System
- Big Data Basics - Part 1 - Introduction to Big Data
- Big Data Basics - Part 2 - Overview of Big Data Architecture
- Big Data Basics - Part 3 - Overview of Hadoop
- Big Data Basics - Part 4 - Introduction to HDFS
- Big Data Basics - Part 5 - Introduction to MapReduce
- Big Data Basics - Part 6 - Related Apache Projects in Hadoop Ecosystem
- Big Data Basics - Part 7 - Hadoop Distributions and Resources to Get Started
- Data Lake vs. Data Warehouse
- Compare SQL Server Offerings by Top Cloud Providers - Azure, AWS and Google Cloud


About the author
 Nai Biao Zhou is a Senior Software Developer with 20+ years of experience in software development, specializing in Data Warehousing, Business Intelligence, Data Mining and solution architecture design.
This author pledges the content of this article is based on professional experience and not AI generated.
View all my tips
Article Last Updated: 2023-12-13
