By: Edwin Sarmiento | Comments (20) | Related: 1 | 2 | 3 | 4 | > Database Mirroring
Problem
I want to implement database mirroring on my SQL Server 2005 databases, but both the principal and mirror servers are not members of the domain or are members of different Active Directory domains that do not have trust relationships. How do I go about it?
Solution
Database mirroring has become a very popular choice for a high availability solution in SQL Server 2005. And while Microsoft recommends using Windows Authentication for anything accessing SQL Server, there are cases where this is a limitation. A typical example would be a non-Microsoft application running on a non-Microsoft platform accessing a SQL Server database. Another would be SQL Servers spread across different geographical locations with no Active Directory to authenticate user access or member servers on different domains with no trust relationships. SQL Server 2005 enables us to configure database mirroring under mixed mode authentication using SQL Server logins with the added security of using certificates.
We will use the Northwind database to demonstrate the process. Remember to change Northwind's database recovery model to FULL before working through the steps below.
Let's call the principal server testServer1, the mirror server testServer2 and witness server testServer3. You can also do this without the witness although this tip will highlight using one.
1) Backup the principal database and restore it on the mirror server
Perform a FULL and LOG backup for the Northwind database on the principal server.
--Run this on testServer1/principal server
USE master
GO
BACKUP DATABASE Northwind
   TO DISK = N'D:\DBBackup\NorthwindBackup.bak'
   WITH NAME = N'Full Database Backup',
    INIT, STATS = 10
GO

BACKUP LOG Northwind
   TO DISK = N'D:\DBBackup\NorthwindBackupLog.trn'
   WITH NAME = N'Transaction Log Backup',
       STATS = 10
GO
After the backup has completed, restore it on the mirror server using the WITH NORECOVERY option.
--Run this on testServer2/mirror server
RESTORE DATABASE Northwind
FROM DISK = N'D:\DBBackup\NorthwindBackup.bak'
WITH NORECOVERY
GO

RESTORE LOG Northwind
FROM DISK = N'D:\DBBackup\NorthwindBackupLog.trn'
WITH NORECOVERY
GO
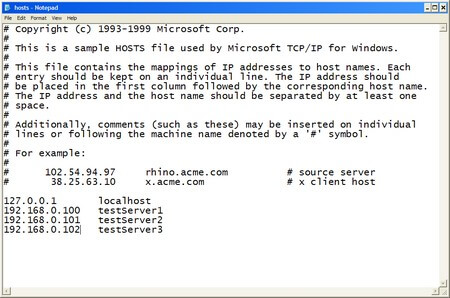
2) Validate your DNS entries
Chances are that you may have your DNS entries for the SQL Server instances properly configured. To validate, do a PING test on both hostnames of the servers running your SQL Server 2005 instances using it's fully qualified domain name (FQDN) in the form hostname.primary DNS suffix. You can retrieve the value of the primary DNS suffix by running an IPCONFIG /ALL in your command line. For servers in workgroups, this could be a bit of a challenge as you might not have a DNS server that would resolve the hostname to their appropriate IP addresses. You would have to modify your hosts file to manually add the IP address-hostname mappings. To do this, open the hosts file on your %systemroot%\system32\drivers\etc\ using any text editor. Enter the IP addresses and hostnames of your principal, mirror and witness servers as shown below
3) Create a database master key on the principal server
--Run this on the principal server/testServer1
USE master

CREATE MASTER KEY ENCRYPTION BY PASSWORD = 'y0ur$ecUr3PAssw0rd';
GO
4) Create the server-based certificate which will be used to encrypt the database mirroring endpoint
--Run this on the principal server/testServer1
CREATE CERTIFICATE testServer1_cert WITH SUBJECT = 'testServer1 certificate for database mirroring'
GO
5) Create the database mirroring endpoint for the principal server using the certificate for authentication
--Run this on the principal server/testServer1
CREATE ENDPOINT Endpoint_Mirroring STATE = STARTED
AS TCP(LISTENER_PORT = 9999, LISTENER_IP = ALL)
FOR DATABASE_MIRRORING (AUTHENTICATION = CERTIFICATE testServer1_cert,
ENCRYPTION = REQUIRED ALGORITHM AES, ROLE = ALL);
GO
This script creates a database mirroring endpoint named Endpoint_Mirroring using port number 9999 and the certificate named testServer1_cert. You can use any encryption algorithm available in SQL Server 2005 a described in this Microsoft TechNet article. I just opted to use AES. You can validate that the endpoint has been created by querying the sys.endpoints catalog view
6) Export the certificate to a file
--Run this on the principal server/testServer1
BACKUP CERTIFICATE testServer1_cert TO FILE = 'C:\testServer1_cert.cer';
GO
7) Copy the certificate file to the mirror and witness server
You need to copy the certificate file to both the mirror and the witness server as we will use this certificate to associate a login for authentication. For this example, all certificates will be copied to the C:\ drive on all servers
Steps #3 to #7 should be repeated on both mirror and witness server, modifying the certificate name while keeping the other configurations.
A complete script for the mirror server is shown below
--Run this on testServer2

--STEP #3:
USE master

CREATE MASTER KEY ENCRYPTION BY PASSWORD = 'y0ur$ecUr3PAssw0rd';
GO

--STEP #4:
CREATE CERTIFICATE testServer2_cert WITH SUBJECT = 'testServer2 certificate for database mirroring'
GO

--STEP #5:
CREATE ENDPOINT Endpoint_Mirroring STATE = STARTED
AS TCP(LISTENER_PORT = 9999, LISTENER_IP = ALL)
FOR DATABASE_MIRRORING (AUTHENTICATION = CERTIFICATE testServer2_cert,
ENCRYPTION = REQUIRED ALGORITHM AES, ROLE = ALL);
GO

--STEP #6:
BACKUP CERTIFICATE testServer2_cert TO FILE = 'C:\testServer2_cert.cer';
GO

--STEP #7: Copy the certificate to the principal and witness servers
A complete script for the witness server is shown below
--Run this on testServer3

--STEP #3:
USE master

CREATE MASTER KEY ENCRYPTION BY PASSWORD = 'y0ur$ecUr3PAssw0rd';
GO

--STEP #4:
CREATE CERTIFICATE testServer3_cert WITH SUBJECT = 'testServer3 certificate for database mirroring'
GO

--STEP #5:
CREATE ENDPOINT Endpoint_Mirroring STATE = STARTED
AS TCP(LISTENER_PORT = 9999, LISTENER_IP = ALL)
FOR DATABASE_MIRRORING (AUTHENTICATION = CERTIFICATE testServer3_cert,
ENCRYPTION = REQUIRED ALGORITHM AES, ROLE = ALL);
GO

--STEP #6:
BACKUP CERTIFICATE testServer3_cert TO FILE = 'C:\testServer3_cert.cer';
GO

--STEP #7: Copy the certificate to the principal and mirror servers
8) Create a login on the principal for the mirror
For simplicity's sake we shall use the same name for the login on all servers to identify that it is used primarily for the database mirroring sessions
--Run this on testServer1

USE master;
CREATE LOGIN login_mirroring WITH PASSWORD = 'y0ur$ecUr3PAssw0rd';
GO
9) Create a user for the login
--Run this on testServer1

CREATE USER login_mirroring
FOR LOGIN login_mirroring
GO
10) Associate the certificate we created in Step #4 with the user
This script will associate the certificate we created for the mirror server - testServer2_cert.cer - to the user login_mirroring
--Run this on testServer1

CREATE CERTIFICATE testServer2_cert
AUTHORIZATION login_mirroring
FROM FILE = 'C:\testServer2_cert.cer'
GO
We'll do the same thing for the certificate we created for the witness server - testServer3_cert.cer - to the user login_mirroring
--Run this on testServer1

CREATE CERTIFICATE testServer3_cert
AUTHORIZATION login_mirroring
FROM FILE = 'C:\testServer3_cert.cer'
GO
11) Grant the CONNECT permission on the login
This script will grant the CONNECT permission to the login login_mirroring for the database mirroring endpoint
--Run this on testServer1

GRANT CONNECT ON ENDPOINT::Endpoint_Mirroring TO [login_mirroring];
GO
Since we used the same name for the logins on all servers, you only need to do this once. If you are using a different name for the logins, you will have to do this for each login. The key thing to remember here is that the logins you use to connect to any of the SQL Server 2005 instances are granted the CONNECT permissions with the appropriate certificates.
We will do the exact same thing on both the mirror and witness servers.
A complete script for the mirror server is shown below
--Run this on testServer2

--STEP #8:
USE master;
CREATE LOGIN login_mirroring WITH PASSWORD = 'y0ur$ecUr3PAssw0rd';
GO

--STEP #9:
CREATE USER login_mirroring
FOR LOGIN login_mirroring
GO

--STEP #10:
CREATE CERTIFICATE testServer1_cert
AUTHORIZATION login_mirroring
FROM FILE = 'C:\testServer1_cert.cer'
GO

CREATE CERTIFICATE testServer3_cert
AUTHORIZATION login_mirroring
FROM FILE = 'C:\testServer3_cert.cer'
GO

--STEP #11:
GRANT CONNECT ON ENDPOINT::Endpoint_Mirroring TO [login_mirroring];
GO
A complete script for the witness server is shown below
--Run this on testServer3

--STEP #8:
USE master;
CREATE LOGIN login_mirroring WITH PASSWORD = 'y0ur$ecUr3PAssw0rd';
GO

--STEP #9:
CREATE USER login_mirroring
FOR LOGIN login_mirroring
GO

--STEP #10:
CREATE CERTIFICATE testServer1_cert
AUTHORIZATION login_mirroring
FROM FILE = 'C:\testServer1_cert.cer'
GO

CREATE CERTIFICATE testServer2_cert
AUTHORIZATION login_mirroring
FROM FILE = 'C:\testServer2_cert.cer'
GO

--STEP #11:
GRANT CONNECT ON ENDPOINT::Endpoint_Mirroring TO [login_mirroring];
GO
12) Prepare the mirror server for the database mirroring session
This script prepares the mirror database for the database mirroring session, specifying testServer1 as the partner. It is important to run this first on the mirror server before running the equivalent script on the principal server. The hostname specified here should be resolved using the approach you used in Step #2
--Run this on testServer2
USE master
GO
ALTER DATABASE Northwind SET PARTNER = 'TCP://testServer1:9999';
GO
13) Prepare the principal server for the database mirroring session
Now that the mirror database has been prepared for the database mirroring session, we will do the same for the principal database specifying testServer2 as the partner.
--Run this on testServer1
USE master
GO
ALTER DATABASE Northwind SET PARTNER = 'TCP://testServer2:9999';
GO
We will also specify testServer3 as the witness.
--Run this on testServer1
USE master
GO
ALTER DATABASE Northwind SET WITNESS = 'TCP://testServer3:9999';
GO
14) Validate the database mirroring configuration using Database Mirroring Monitor
Run the Database Mirroring Monitor to check the status of the database mirroring sessions. This MSDN article on SQL Server Books Online describes how to launch the Database Mirroring Monitor.
Next Steps
- Try configuring database mirroring using certificates by following the procedures outlined above
- Check out this MSDN article on how to setup database mirroring
Related Tips


About the author
 Edwin M Sarmiento is a Microsoft SQL Server MVP and Microsoft Certified Master from Ottawa, Canada specializing in high availability, disaster recovery and system infrastructures.
This author pledges the content of this article is based on professional experience and not AI generated.
View all my tips
