Problem
Modern companies invest efforts in leveraging the data they acquire during their operations. Even more, businesses want to ensure that data-intensive processes receive clean and verified inputs from the get-go. Data quality companies like Melissa Data offer several services that clean, verify, and validate business data. As a data operator or business owner, how can you take advantage of running automated quality checks on your data?
Solution
Recently, the Melissa address experts have taken the data quality services a step further by developing a single, secure, and integrated cloud-based platform that stores and validates data and alerts on data changes. Melissa Alert Service, a brand-new service offering by Melissa Data, is the integrated hub for data storage, validation, and monitoring in one place. Alert Service is a cloud-based database management service (DBMS). By virtue of its built-in integration with the core Melissa data quality services, Alert Service offers the following features:
- Cloud-based data storage.
- Flexible user-defined schemas that accommodate possible data attributes.
- Unlimited tables per user to organize your data as you see fit.
- Web-based portal application with a user-friendly GUI.
- User-scheduled jobs offering a great variety of data validation and monitoring checks.
- User notification of data changes depending on monitoring settings.
- Transaction tracking.
- User data operations (select, match, update, insert, and delete) by web interface or FTP.
- Automated data processing.
In addition to these core features, Alert Service offers an extensive API enabling programmatic interaction and triggering of core data quality operations. These operations include retrieving a table, inserting records, looking up record information, as well as monitoring rule run data. In the first part of this article, we will focus on the Alert Service app, while the second will showcase the Alert Service API.
Melissa Alert Service Core Functionalities
Before moving on to a detailed presentation of the app, let us look at the following table. It maps business needs to service functionalities. This is what a typical data quality scenario looks like on Melissa Alert Service.
| Business Need | Alert Service Functionality | |
|---|---|---|
| 1 | Store data in a secure way with authentication. | Cloud-based storage system with authentication; DBMS-like platform with a friendly user interface that allows table creation and management. |
| 2 | Store different entity attributes (e.g. name, address, zip code). | Create and manage table schemas using standard and custom data types. |
| 3 | Monitor data changes. | Create one or many data monitors that automatically clean, verify, and validate the uploaded data in the Melissa backbone services such as U.S. and Global Address, Identity Validation, etc. |
| 4 | Ensure personal data is up to date. | Monitor and automatically update the data whenever needed according to the predefined table schema using Melissa’s backbone services behind the scenes. |
| 5 | List data quality issues and trigger alerts when they come up. | Results from the Monitor services in Alert Service generate messages. Additionally, the data update results are available for analytical purposes. |
| 6 | Integrate with other Melissa services. | Alert Service is integrated with the backbone Melissa services that provide the core functionality for data cleansing and validation. |
| 7 | Integrate with a proprietary piece of third-party software (e.g., ERP, CRM, or other business system). | There is an extensive and well-documented API available that allows backend integrations using different software frameworks. |
Having established a mapping between the main scenarios and the functionalities, let us proceed with some demos. Keep reading to find out how the app works and what integration scenarios the API enables.
The Alert Service App
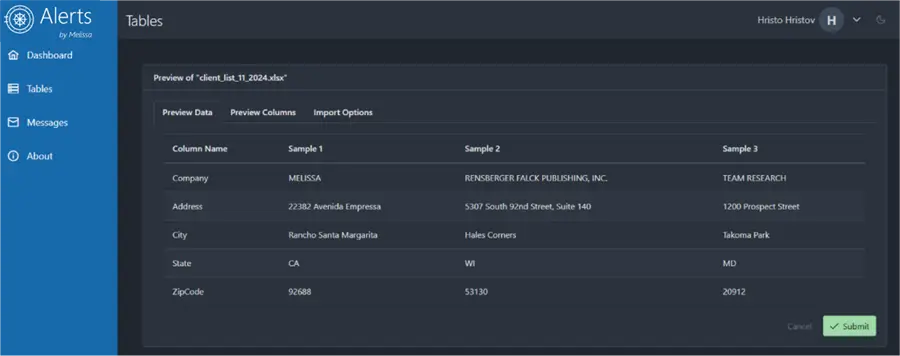
To demonstrate the functionalities of the Alert Service app, I have prepared a list of 1000 business entities in an Excel file. Below is a preview of the data:
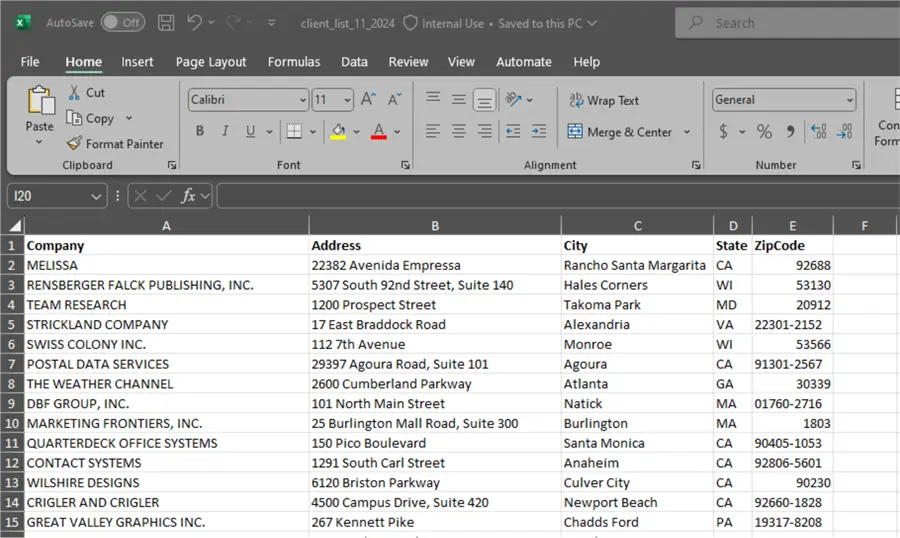
Our goal is to upload these data to Alert Service to find out if we have any data quality issues. To achieve this goal, we must create a table using the data upload option. Then we will verify and monitor the data quality of the records for potential discrepancies.
Create a Table
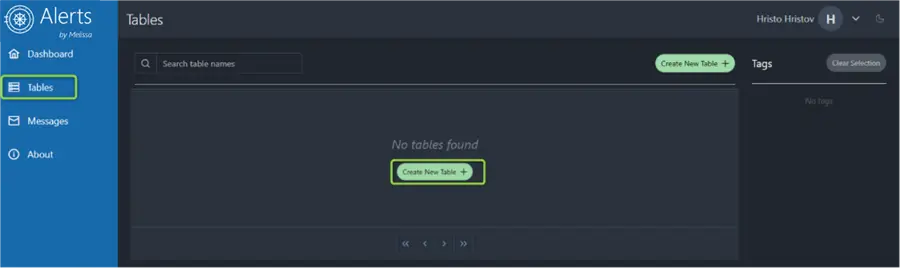
To access Melissa Alert Service, navigate to https://alerts.melissa.com/. After logging in, go to Tables:
Clicking on Create New Table will prompt for a table name:
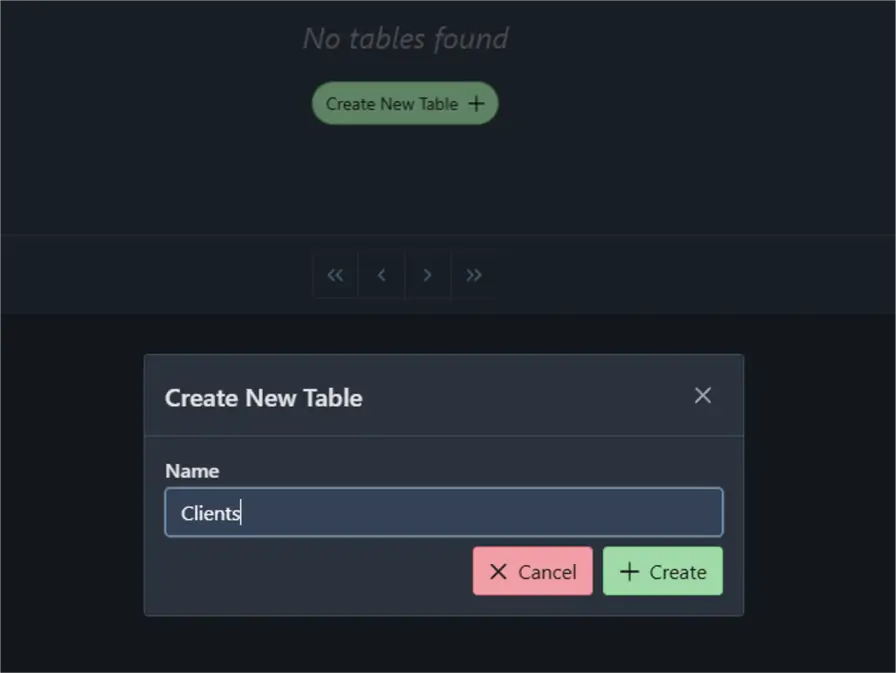
Clicking Create creates an empty, schema-less table. Therefore, the next step is to add some records by using the Upload a File tab:
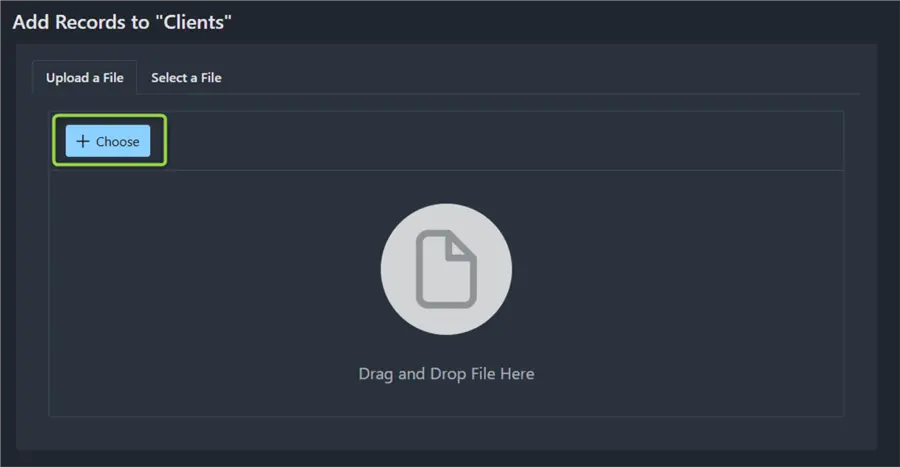
Click Choose to upload the available Excel file:

At this point, Melissa Alert Service will provide the data and column preview as well as some import options:
- Preview Data tab – Provides a sample of the first three rows:
- Preview Columns tab – Provides a list of the columns and their inferred data types:
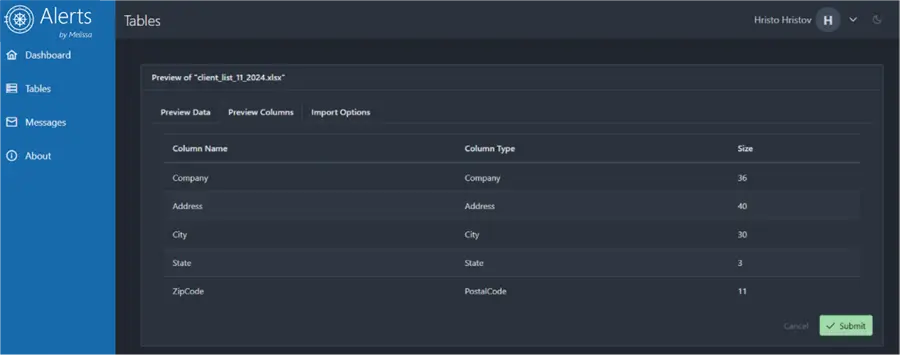
The data types are custom and proprietary to Alert Service. They are engineered for efficiency and compatibility with the backbone Melissa data quality services.
- Import Options tab – Adjust several settings. For example, I will instruct the import agent to ensure that the first row is treated as the column names row:
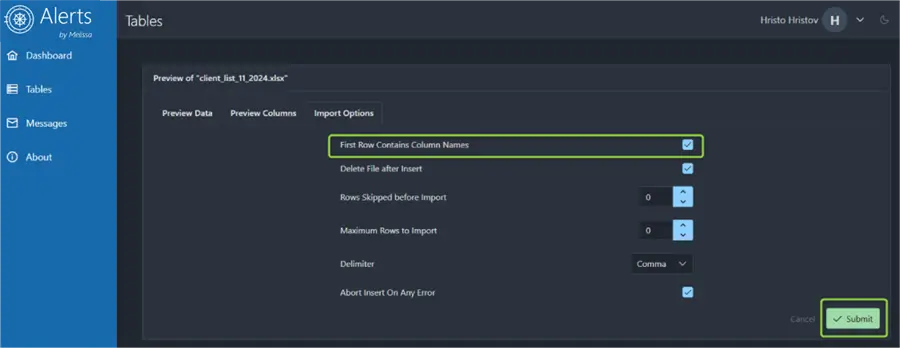
Finally, I will click Submit, which will trigger the upload process. In a short while, depending on the data volume, the table will be available in the list of tables:
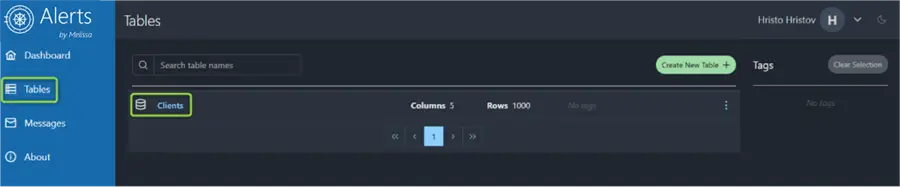
Clicking the table will open a paginated view of the records:
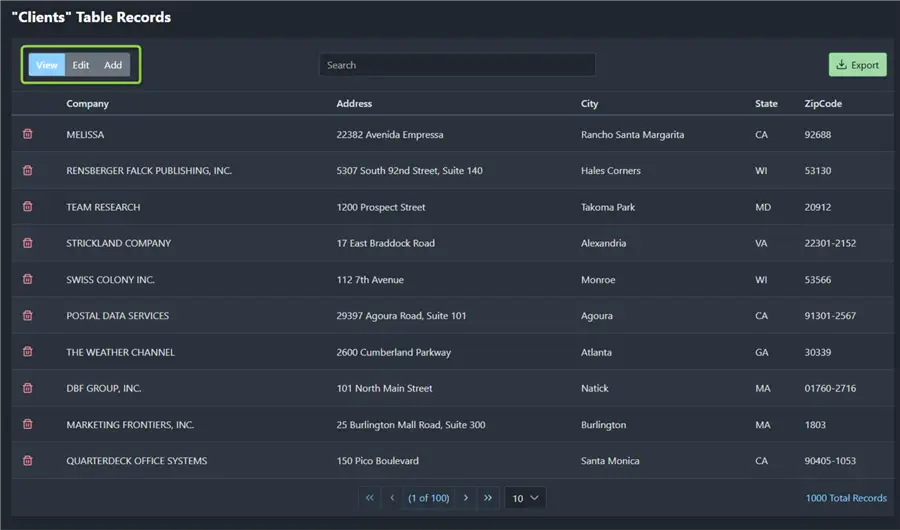
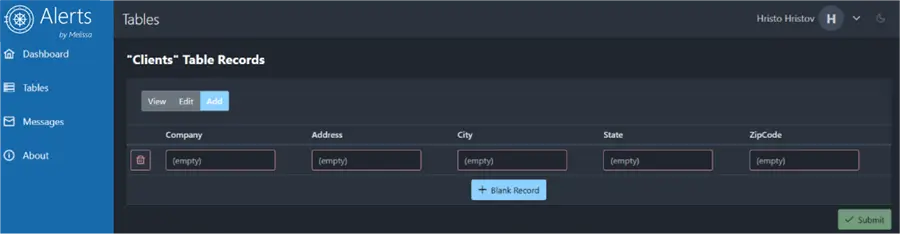
From here, I can browse all the records, edit, or add more records according to the table schema. Having different tables and managing their records could be an efficient way to organize your data and follow up on it. For example, going to the Add tab allows you to add new rows:
Create a Monitor
After uploading our data to Melissa Alert Service, we can configure a Monitor. The Monitor functionality is a critical part of the data cleansing and validation process. Now that we have our data imported in a structured way with their relevant attributes, it is straightforward to run a data quality check.
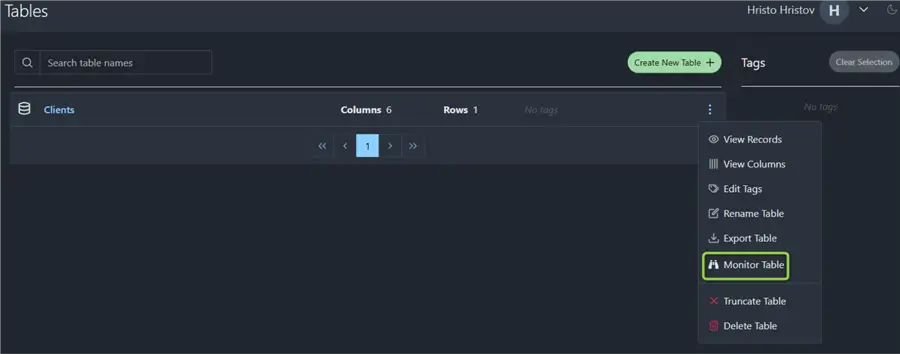
To create a monitor, go to the Table menu and click the three dots next to the target table:
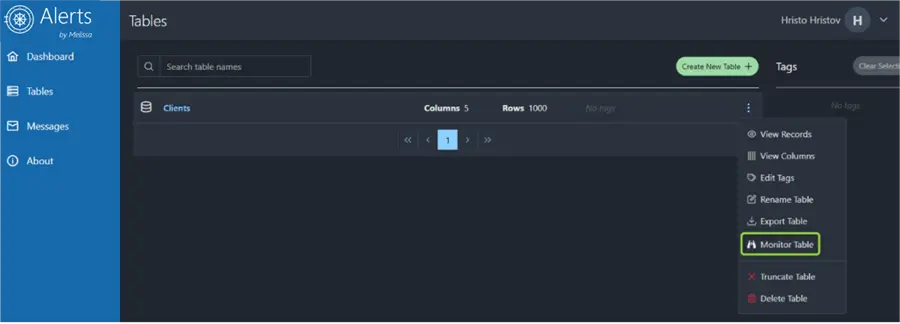
This action takes you to the list of monitoring rules, which is currently empty.
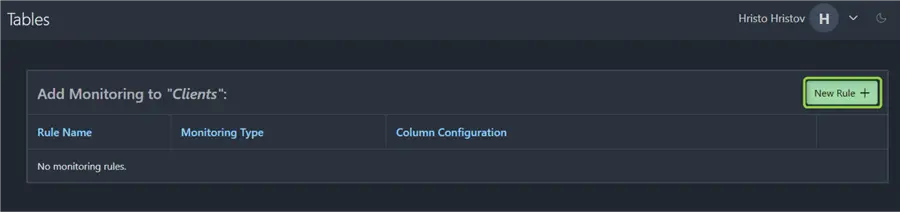
Let us create a New Rule by clicking the button in the top right-hand corner:
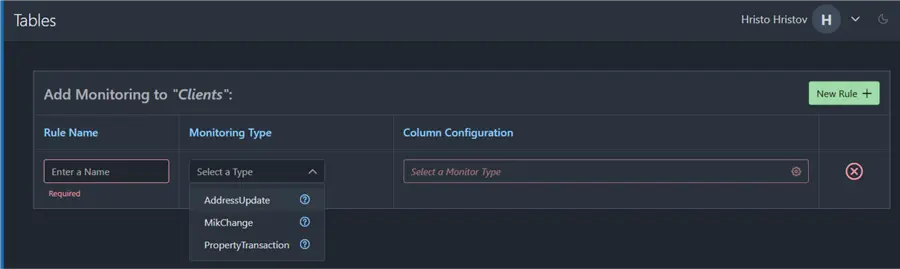
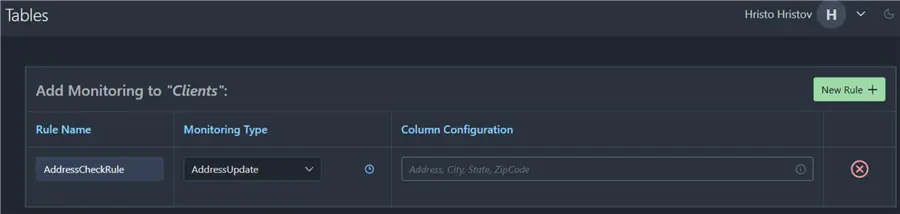
To have a Monitor running on the data, we must configure the following:
- Rule Name: You can have multiple rules monitoring the data. Unique names will help distinguish monitor messages later.
- Monitoring Type: The types of monitoring available are directly correlated with the backbone Melissa services:
- AddressUpdate uses the Address Verification service to clean, validate, and standardize U.S. and global addresses in real-time.
- MIKChange is more suitable for individual entities. MIK is a persistent and unique 11-digit key that Melissa assigns to each U.S. individual.
- PropertyTransaction is designed to provide historical data on properties including (recent) changes of ownership and mortgage data.
- Column Configuration: Depending on the monitoring type, you must map the columns from the imported data to Melissa service attributes.
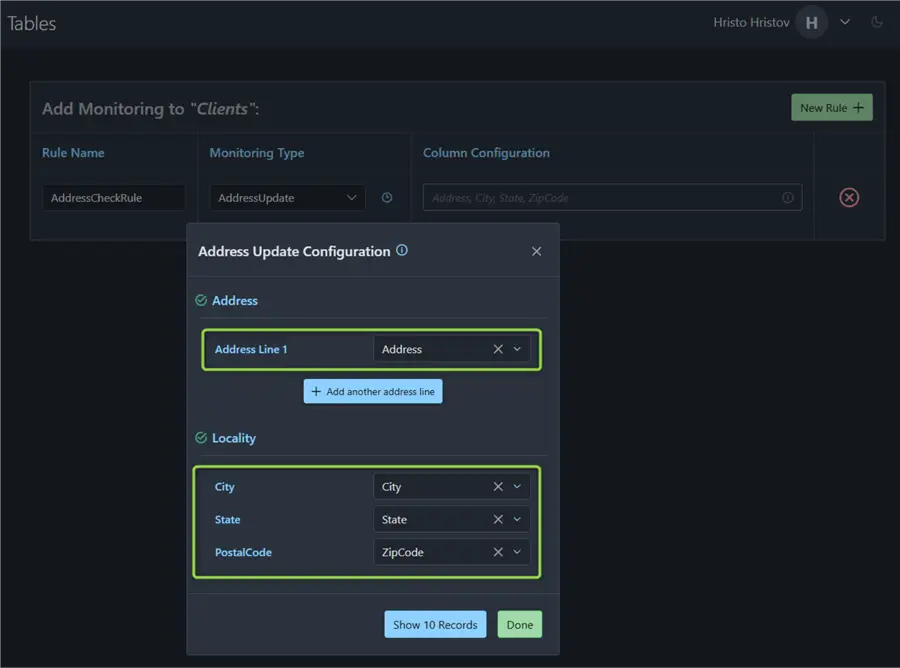
In our case, we want to validate and standardize the addresses we uploaded. Therefore, it is suitable to use the AddressUpdate monitoring type. In terms of the column configuration, we must set the Address Line 1 column (here Address) and map the Melissa expected data attributes to City, State, and PostalCode to our relevant columns (here City, State, and ZipCode):
Finally, click Done and Save Configuration at the bottom of the page. This action will show the Success dialog:
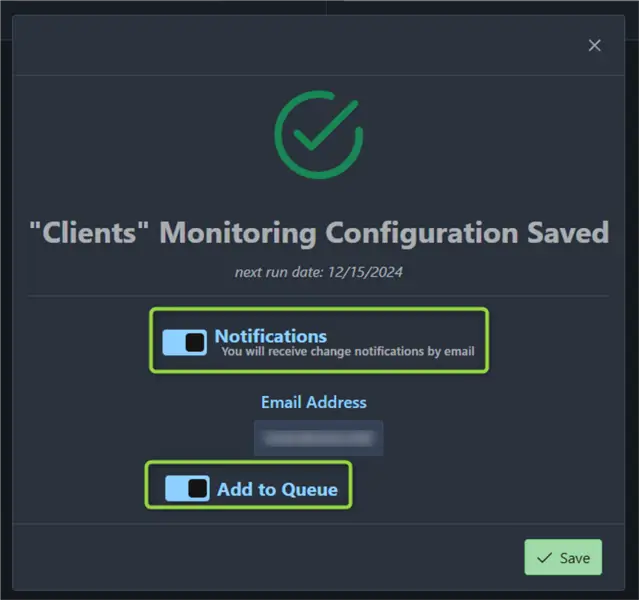
The screenshot above shows the Notifications and Add to Queue toggles. I want to ensure I get notifications and immediately add the rule to the execution queue, respectively. Therefore, I have switched both toggles on.
Monitor Notifications
In a short while, but depending on the data volume, there will be a new message in the Alert Service inbox. In red, I have highlighted the results: all our data needed some corrections! About two-thirds of the data were standardized and a third were corrected. It is interesting to observe such a high number of updates to the data. Everything seemed to be OK in the Excel file, but the reality turned out to be different.
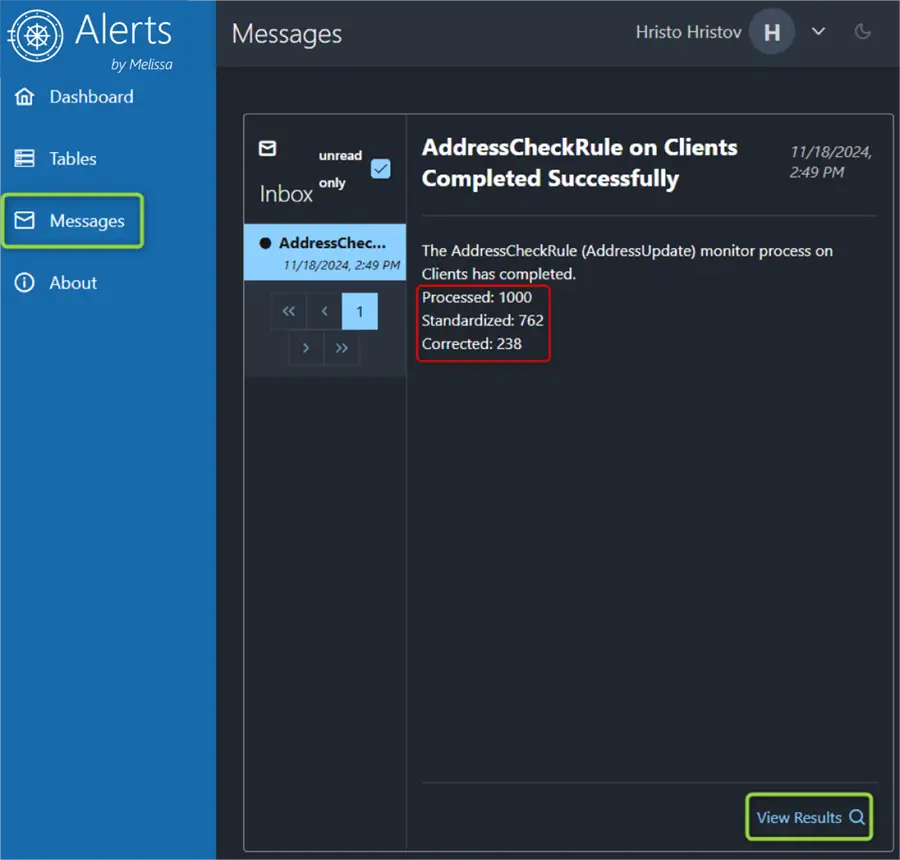
Let us head over to the results by clicking View Results to see what exactly happened.
Data Improvements
On the results subpage, we can observe which records the Melissa Service changed or updated in the background.
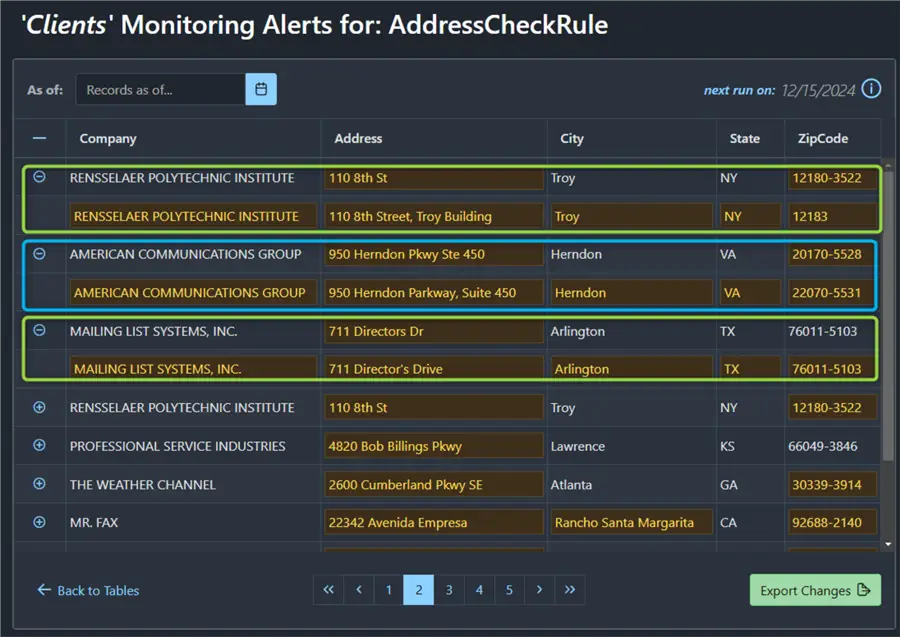
I have highlighted three records: Rensselaer Polytechic Institute, American Communications Group, and Mailing List Systems, Inc. Every first row of each record is the current and updated row, while every second row is the data that I inserted earlier. For example, American Communications Group had its address standardized, and its ZIP code updated. As a result, we have cleaner, validated, and more structured data: 1) we have ensured the data are up to date, and 2) we have cleansed and authenticated these data via the Melissa backbone services. What is even more helpful about this setup is that this standardization rule can run regularly and automatically, keeping your new data up to date.
While the three examples above are relatively easy to figure out on your own, we can also unravel some records that would have failed in a potential mailing or communications campaign. For example, Direct Marketing Systems had a wrong city:

In the case of SmartTarget Marketing, the address was almost completely misspelled:

With the help of Melissa Alert Service and the integration with the global address verification databases, we have ensured our list of clients has stayed up to date with only a few clicks. Additionally, we have received a timely update of the results and a handy overview of the changes.
Seeing Alert Service in action is helpful. However, what about automation and integration scenarios? Let us pull back the curtain on some of the most important API actions supported.
The Alert Service API
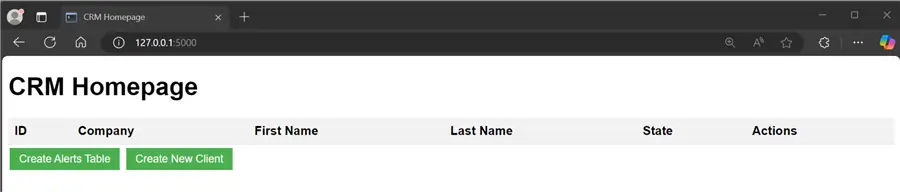
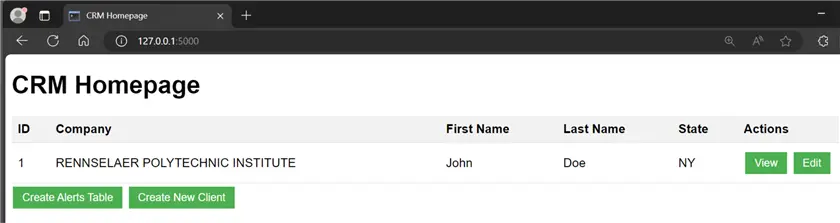
Melissa Alert Service offers a secure API allowing programmatic interaction with the platform. The API supports most of the actions available via the GUI with more supported actions coming soon. To see the Alert Service API in action, I have developed a simple web app that partially simulates CRM software. This is my synthetic home screen that will display a list of clients:
Create a Table
I have two buttons: Create Alert Service Table and Create New Client. First, I must create an Alert Service table that will mimic the clients’ table in my database. Clicking the Create Alerts Table button will invoke the following piece of code:
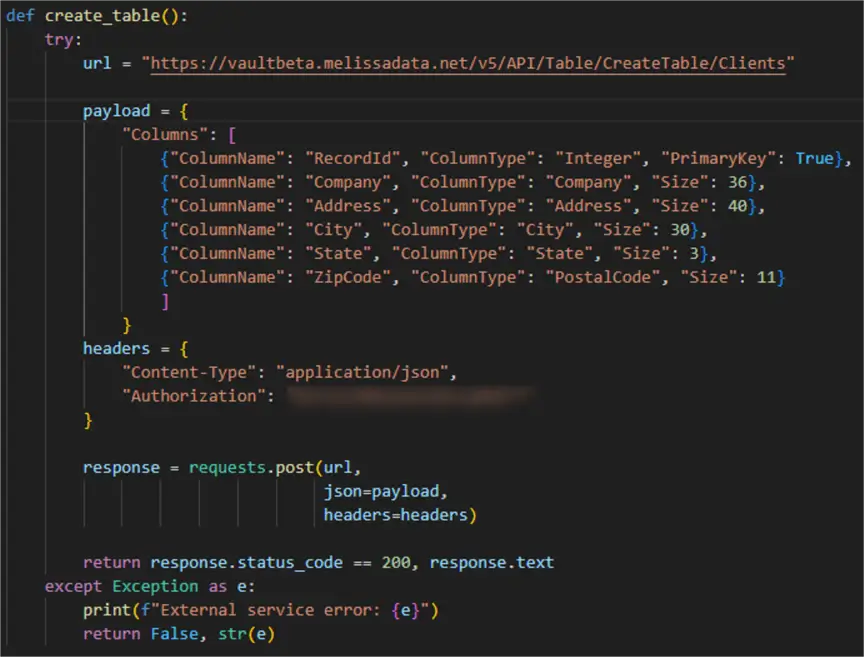
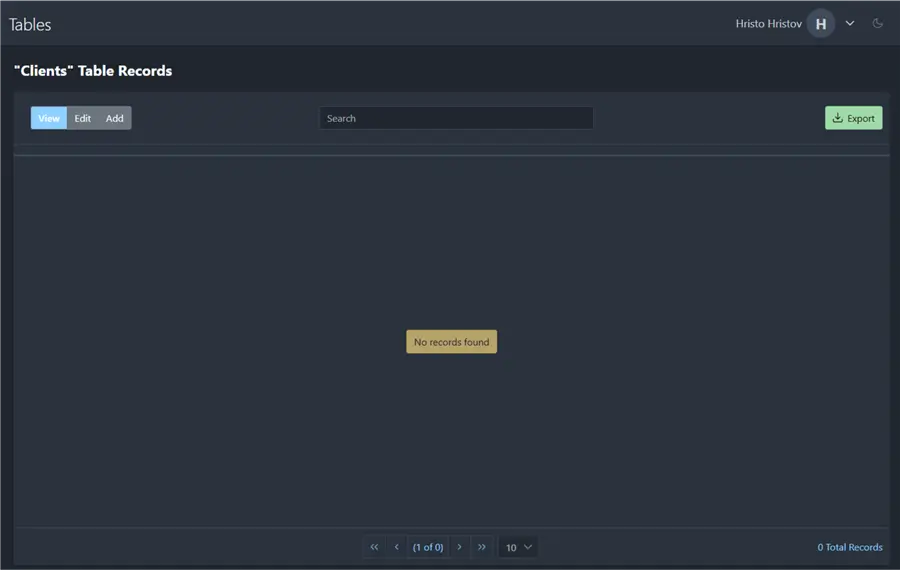
With this method, we issue a post request to the CreateTable endpoint in the Alert Service API. As a result, a table with the predefined schema in the request payload will be created. In terms of the schema, I have added a RecordId column to act as a primary key. The rest of the fields represent a core set of attributes that I will fill in and validate for each of our clients. The table will become immediately available after executing the API request:
Create a Record
Having a table both in my database and Alert Service, I can proceed with adding data for a client:
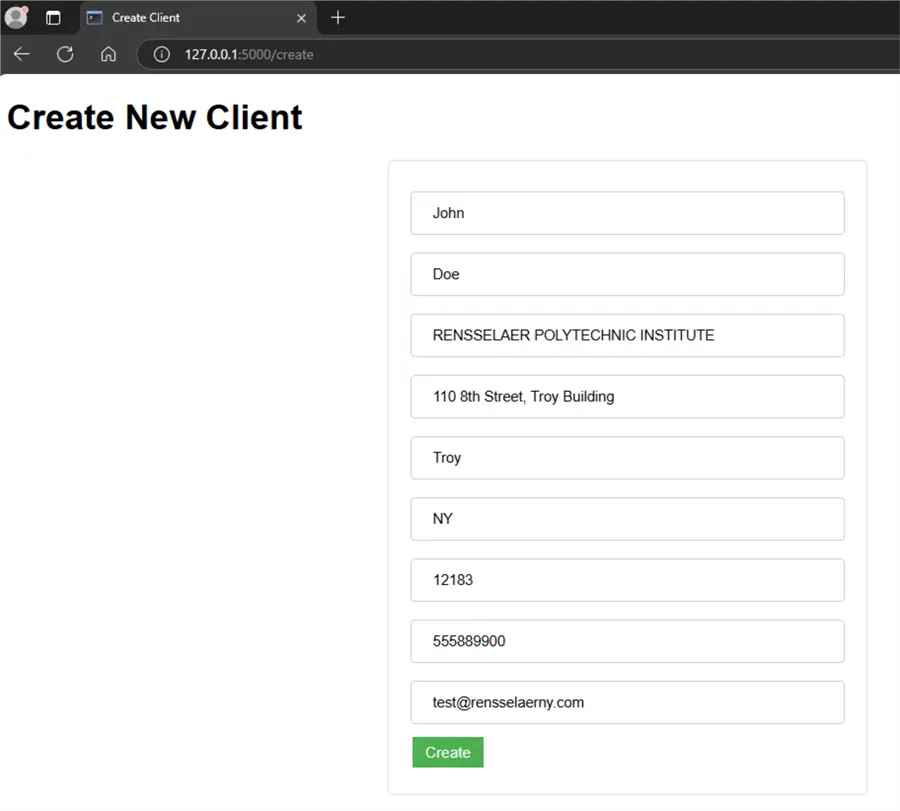
The last two fields represent the contact phone number and email, respectively. In this demo, they are not part of the validation we perform against Alert Service though they can be added to the model for additional cleansing and verification. After I click on Create, the client’s data will be stored in my system and Melissa Alert Service:
- CRM app:
- Melissa Alert Service:

Create a Monitor
Much like what we did in the previous demo, the next task is to create a monitor, run it, and get results. Creating a monitor rule and running it will soon also be part of the API functionality. Therefore, I need to repeat the process of creating the monitor manually:
Step 1: Go to the Monitor Table menu.
Step 2: Create a New Rule.
Step 3: Lastly, add the monitor to the queue:
Data Validation
After the monitor has run, I can validate my client entry. I have fully integrated the validation check on the CRM view client page where I have a Validate button:

This action makes an API request in the Alert Service Monitor rule that we ran previously:
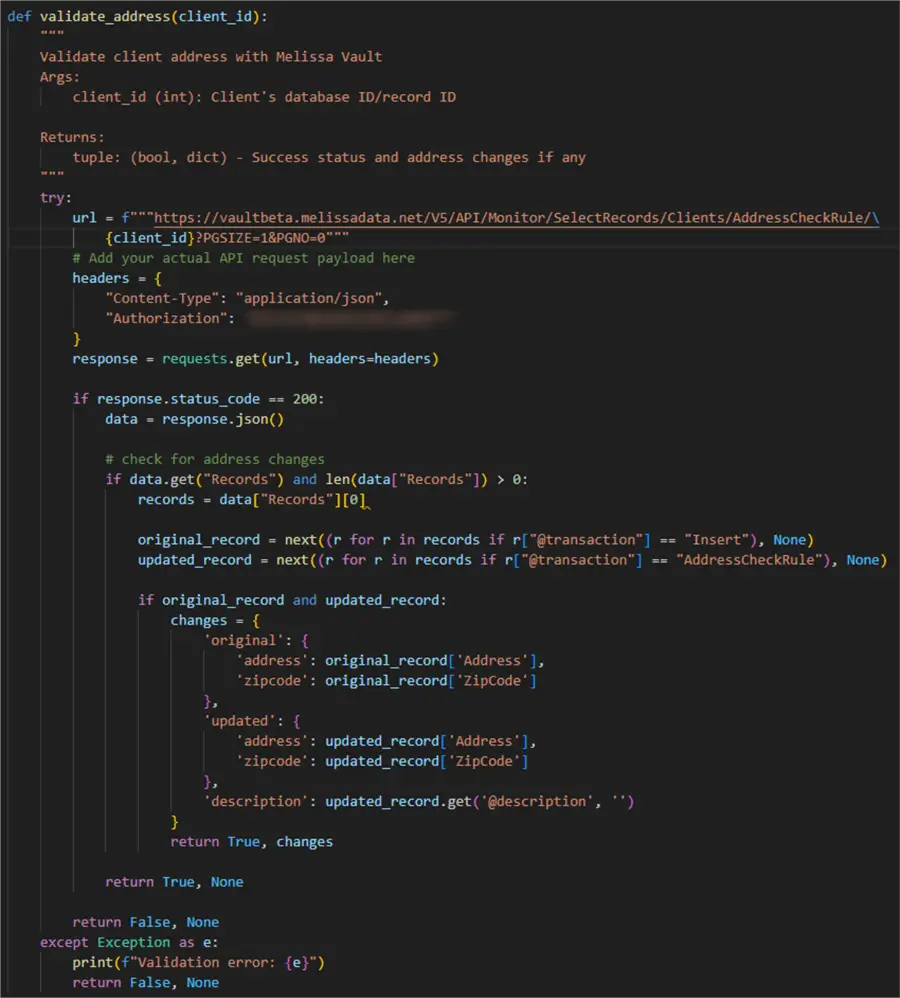
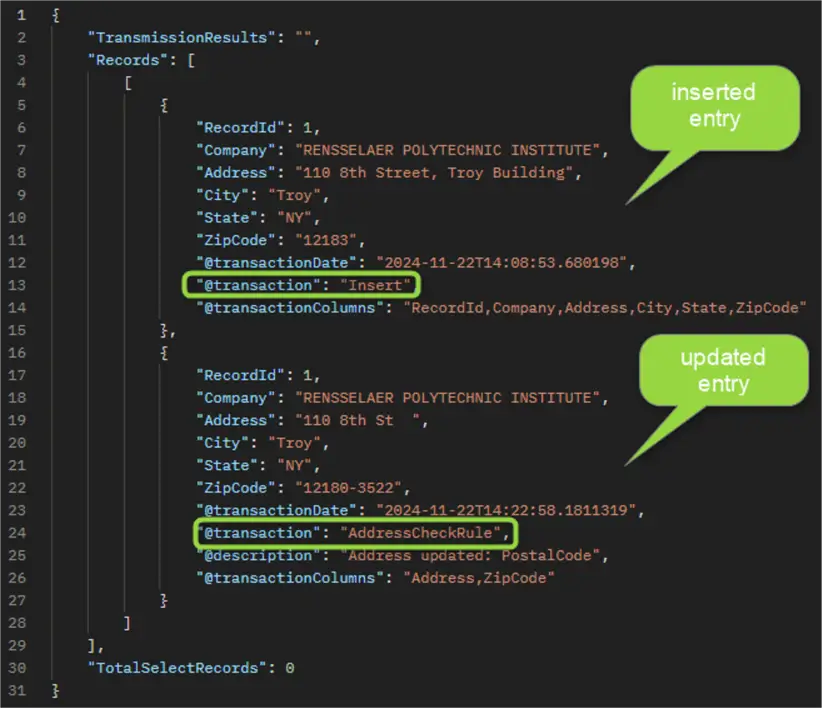
The raw response I handle consists of two JSON records showing the entry that we inserted and the entry that the service updated:
In my interface, I can parse this result in a clear, concise way to make sure the user is aware that there is a proposed change:
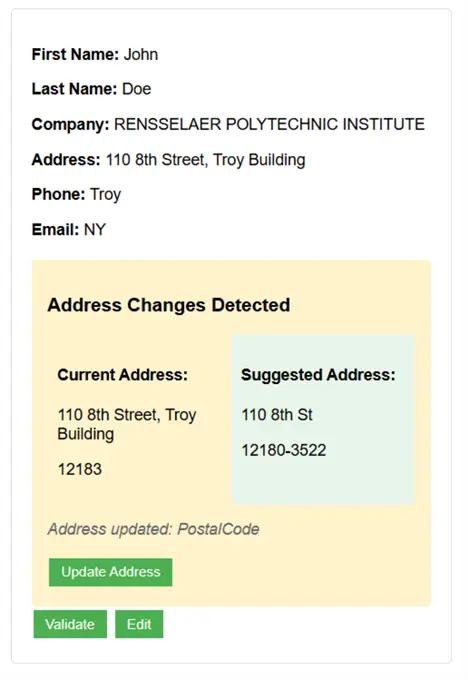
Additionally, I have included an Update Address button. When clicked, it will overwrite the current client data with the updated data coming from the service. Thus, we ensure that we can validate our client’s data in real-time and as many times as needed to immediately reflect any possible changes.
Conclusion
Melissa Alert Service is the brand-new platform offering by Melissa Data. In this article, we presented two possible ways to work with it:
- User-friendly GUI: The platform offers a GUI that allows the data operator to structure their records in different tables with flexible schemas, and then one or many validation rules can run recurrently.
- Melissa Alert Service API Layer. We integrated a simulated CRM app to store data in both places, execute data validation checks, and get validated data back. The Alert Service API provides many ways to automate data quality checks.
Finally, while Melissa Alert Service is a new service, Melissa Data has previously released Unison – a prior customer data validation platform for enhanced master data management. The difference between Unison and Alert Service is that Unison is a self-hosted service with some extra analytics functionalities, while Alert Service is a cloud-based DBMS. As of the time of writing this article, Alert Service is only in a beta release. When the first major version is released, we are looking forward to additional functionalities to enhance your data quality operations. In the meantime, please reach out to your Melissa representative to find out more.
Next Steps