Problem
Customer data is acquired from a variety of sources impacting data quality. You may collect contacts at trade shows or from your web site. You may purchase lists of contacts. In many cases, the contact data quality may be incomplete and not in a standardized format. Cleaning, validating, and standardizing the contact data is definitely a challenge.
In a SQL Server Data Warehouse, the Contact dimension may include existing customers as well as prospects. The goal of the Contact dimension is to have clean, valid and up-to-date data which can be used to communicate with contacts via email, mail and phone, as well as perform analysis on the contacts based on demographics. Unfortunately, the built-in SSIS components do not provide the kind of data cleansing, validating and enhancing of demographic data that you need. SSIS does provide the ability for you to create script components using .NET code to do these kinds of tasks.
How can we clean, validate, and enhance our Contact dimension without writing code?
Solution
Melissa has a variety of data management tools available to clean, validate and enhance the Contact dimension in your SQL Server data warehouse. Specifically, Melissa’s suite of SSIS Data Quality Components can be leveraged for this task. The Melissa SSIS components are plug and play; you simply drag and drop the components onto the Data Flow, configure the component properties, and you are ready to go. There is no coding required. The Melissa SSIS components provide a wealth of enhancements including:
- Properly parsing names and address verification (USPS and global address verification for 240+ countries)
- Email verification and validating phone numbers
- Detecting duplicate contacts
- Delivering enhanced contact information including geocoding latitude/longitude coordinates and demographic data, which is not natively available in SSIS
In this article, I will demonstrate how to clean, validate and enhance the Contact dimension in real-time by using various Melissa SSIS data quality solutions.
Demo Solution
To set the stage, I will introduce the demo solution that I will use to show the Melissa SSIS components in action. The following is a simplified on-premises data warehouse; I will only focus on inserting and updating the Contact dimension.

Data Warehouse Design
The following are the main points for this hypothetical data warehouse:
- This is a simple star schema
- The CALENDAR table is a basic time dimension
- The CAMPAIGN table is a dimension that defines specific marketing campaigns
- The CAMPAIGN_ACTIVITY table is the fact table that tracks emails and letters sent to contacts for specific marketing campaigns
- Ultimately, I want to measure the effectiveness of the communications for each marketing campaign
SSIS Workflow
I will use the following SSIS package to insert and update Contacts:

The following are the main points about the SSIS package:
- This is an example of a “master” package where each task is an Execute Package Task
- Contacts are received in a comma-separated values (CSV) file
- The IMPORT CONTACT CSV task inserts the records from the CSV file into a SQL Server table
- The CLEAN, VALIDATE AND ENHANCE task uses the Melissa Personator SSIS component to prepare the Contacts for loading into the Contact dimension
- The CHECK FOR DUPLICATE CONTACTS task uses the Melissa Fuzzy Match SSIS component to determine which Contacts already exist in the Contact dimension and which Contacts are new
- The UPDATE CONTACT DIMENSION task performs the inserts and updates for the Contact dimension
I will focus on the CLEAN, VALIDATE AND ENHANCE and CHECK FOR DUPLICATE CONTACTS tasks as these are the ones that use the Melissa SSIS components. I will touch on the UPDATE CONTACT DIMENSION task; this is just an Execute SQL task that inserts or updates rows in the Contact dimension.
Before drilling into the details of these tasks, I want to briefly discuss the Melissa SSIS data quality tools.
Melissa SSIS Data Quality Suite
The Melissa SSIS components are placed in the SSIS Data Flow. They accept input from any SSIS data source and they output results to any SSIS data destination. The components have very robust configuration capabilities. You can select the capabilities that you need and fine tune the many options available, as you will see in the later sections. You can save your configuration for use in other SSIS packages.
Personator
The Personator SSIS component provides cleaning, validating and enhancing of Contacts. It works on names, addresses, emails and phone numbers. Cleaning involves processes to standardize data – upper/lower case, parsing and formatting. Address validation involves address lookup; e.g. is the address deliverable? Enrichment provides all sorts of demographic data based on the address; e.g. latitude and longitude. Personator can parse full names and full addresses into their individual fields for address management. Where address information is missing, Personator can provide it. For instance, if you have an address line and a ZIP Code, Personator can provide the city and state.
The main point about Personator is that it has domain-specific knowledge of Contact data. It leverages reference data to properly parse names and addresses.
Fuzzy Match
The Fuzzy Match SSIS component can determine whether Contacts are in fact new or already exist in the Contact dimension. It provides a large toolbox of state-of-the-art fuzzy matching algorithms that can be configured with each field comparison. Based on a calculated percentage match, the component can direct Contact inputs to Match, Possible Match and Non-Match outputs. This makes inserting or updating the Contact dimension very straight-forward.
Sample Input File
The following is the sample input file that I will use for the demo:

The sample file has some typical anomalies that we find in Contact data:
- The name should be in standard format with upper and lower case
- The address is an apartment building; the apartment number is missing
- The first name and last name are flipped; the city is missing
- The city and state are missing; this individual has two middle names
- The address is an office building; a suite number is required to deliver to the address
- The address is an office building; the suite number is there but the Ste abbreviation is missing
- How would you parse the address and city? The Personator SSIS component has the knowledge to do it
- Some people intentionally provide incorrect information
In the sections that follow, I will walk through the details of how the Personator SSIS component properly parses and corrects names and addresses. I will also walk through how the Fuzzy Match SSIS component determines duplicate Contacts.
CLEAN, VALIDATE AND ENHANCE Task
The following is the Data Flow for the CLEAN, VALIDATE AND ENHANCE task:

The following are the main points about the above Data Flow:
- Import CONTACT retrieves the Contact data to be processed from the SQL Server table import.CONTACT
- Multicast directs the Contact rows to the Melissa Personator SSIS components (NAME AND ADDRESS and EMAIL AND PHONE)
- NAME AND ADDRESS and EMAIL AND PHONE are instances of the Personator component that clean, validate and enhance the Contact data
- Stage CONTACT_NAME_AND_ADDRESS and stage EMAIL_AND_PHONE are SQL Server tables that store the output from the Melissa Personator components
In the next section, I will walk through the details to configure the Personator SSIS component. After that, I will review the results from executing the CLEAN, VALIDATE AND ENHANCE task.
Personator Configuration
The Personator SSIS component has very robust configuration capabilities to improve data quality. There are many options available. To start off, the following options are available from the File menu for saving and reusing your configuration:

I will walk through the following tabs and discuss how it works:
- Input
- Output
- Pass-Through Columns
- Output Filter
Input
The Input tab is used to map the fields in your Contact input to the pre-defined fields in the Personator component. It is shown below:

The following are the main points for the Input tab:
- Map whatever fields you have in your input to the pre-defined ones
- In my case, I want to parse the name and address from a single field so I check Apply Free Form Input and map the FULL_NAME_AND_ADDRESS field to the Free Form field
- When you choose Apply Free Form Input, the rest of the fields are disabled
Output
The Output tab allows you to specify which of the available fields from the Personator component that you want to retrieve. It is shown below:

The following are the main points for the Output tab:
- There are many fields available in the Output Groups/Columns list box; you simply check the ones you want
- I am selecting from the Name Details fields which are parsed from the FULL_NAME_AND_ADDRESS input field
- Gender and Salutation are examples of the additional demographic data that is available
- Personator is able to parse two names; for my demo, I am only specifying one name
- The Geocode Details are another example of additional data available; based on the address, you can retrieve the Latitude and Longitude
Pass-Through Columns
The Pass-Through Columns allow you to specify which of the fields in your input you want to include in the output from Personator. It is shown below:

The following are the main points for the Output tab:
- The CONTACT_KEY is the primary key for the import.CONTACT table; when inserting or updating the Contact dimension, I want to include the CONTACT_KEY in order to identify the source of the Contact data
- I want to include the FULL_NAME_AND_ADDRESS in the output so I can compare it to the output from the Personator component
- The IMPORT_FILE_KEY is the primary key for a table that has a single row for each CSV file that I import
Output Filter
The Output Filter tab is the final tab in the Personator component configuration and has the options for the output you want from the component. It is shown below:
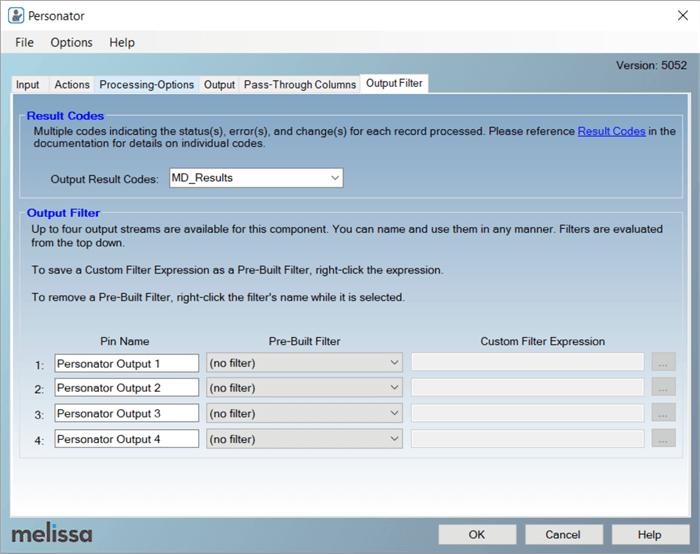
The following are the main points for the Output Filter tab:
- The Personator component reports one or more “Result Codes” for each input record that it processes. The result codes provide the details on success or failure, and many other conditions. I will review the Result Codes in later sections
- Take a look at Result Codes for the details
- The Personator component has 4 outputs available to direct the Contact rows based on conditions; you can choose from the Pre-Built Filter or create your own Custom Filter Expression
- By default, all Contact rows will be directed to Output 1 unless you specify a filter
- In my demo, I went with the default
The Pre-Built Filter options are shown below:

When you select Custom… from the Pre-Built Filter, the Custom Filter Expression options are available and are shown below:

Next, I will review the results from executing the CLEAN, VALIDATE AND ENHANCE task.
CLEAN, VALIDATE AND ENHANCE Results
The CLEAN, VALIDATE AND ENHANCE data quality task calls on the Personator component to clean, validate and enhance the Contact input. The Personator component outputs the results to the stage CONTACT_NAME_AND_ADDRESS and stage EMAIL_AND_PHONE SQL Server tables. The last step in the Data Flow is to combine the CONTACT_NAME_AND_ADDRESS and EMAIL_AND_PHONE tables into the stage FULL_CONTACT table.
I will review the following:
- Full Name results
- Full Address results
- Email and Phone results
- Combine tables
Full Name Results
The following shows the results for the full names:

The following are the main points:
- The MD_Results column provides the details from the Personator component; it includes a comma-separated list of result codes for the name and address
- The full name gets parsed into the individual columns; salutation is an example of the additional data that is available
- NS01 tells us that name parsing was successful
- NS05 confirms that the FirstName was found in the census table of names and it is very likely to be a real first name
- NS06 confirms that the LastName was found in the census table of names and it is very likely to be a real last name
Full Address Results
The following shows the results for the full addresses:

The following are the main points:
- The address is an apartment building; AE09 means the apartment number is missing
- The city is missing; AC03 means the city or municipality name was added or changed
- The city and state are missing; AC02 means the state or province was added or changed
- The address is an office building; AE09 means the suite is missing
- The address and city are properly parsed; Personator uses reference data to get the cities within the state and the streets within the cities
- Latitude is an example of additional data available
The AS01 result code means the address is valid and deliverable according to official postal agencies.
Phone and Email Results
The following shows the results for the email and phone:

There are quite a few different result codes. The following are a sample of result codes and descriptions:
- ES01 is confirmed to be a valid email
- ES02 is confirmed to be an invalid email
- ES07 is an accept all server; every email is reported to be valid
- EE01 is a syntax error in the email address
- EE04 is an invalid mailbox
- PS01 is a valid phone
- PS08 was designated as a land line when activated
- PS11 is a business number
The level of detail in the email and phone result codes is really impressive.
Combine Tables
The final step in the CLEAN, VALIDATE AND ENHANCE task is to combine the CONTACT_NAME_AND_ADDRESS and EMAIL_AND_PHONE tables into the stage FULL_CONTACT table. There is no visual for this one; it is just an Execute SQL task.
The following is an abbreviated listing of the T-SQL:

The following are the main points:
- The rows from the CONTACT_NAME_AND_ADDRESS and EMAIL_AND_PHONE tables are joined by the CONTACT_KEY column
- The rows are filtered by the WHERE clause so that only rows that have a successful name parse, a valid address and a valid email are inserted into the FULL_CONTACT table; this is a very conservative approach but I wanted to demonstrate how to only load good Contacts
CHECK FOR DUPLICATES Task
Now that we have cleaned, validated and enhanced our Contacts and loaded them to the FULL_CONTACT table, we need to check for duplicates as a final data quality step. We do not want to add any Contact that is already in the Contact dimension. I will use the Fuzzy Match component to perform the duplicate check.
The following is the Data Flow with the Fuzzy Match SSIS component:

The following are the main points:
- The Fuzzy Match component take two inputs; they are referred to as the source and compare
- The source is the FULL_CONTACT table which has the Contacts that have just been run through the Personator component
- The compare is the existing Contact dimension
- The Fuzzy Match component compares every row in the source with every row in the compare
- Based on the component configuration (I will walk through that next) the Fuzzy Match directs rows to the three outputs shown above
- Each output is a SQL Server table in my example
- Stage NEW_CONTACT has the combination of source and compare rows that do not match; these are new Contacts
- Stage NOTSURE_CONTACT has the rows where the component is not sure whether the Contact matches or does not match an existing row in the Contact dimension
- Stage UPDATE_CONTACT has the rows where the Contact matches a row in the Contact dimension
I will walk through the configuration of the following tabs in the Fuzzy Match component:
- Matches
- Advanced Options
- Source-Pass Through Columns
- Compare Pass-Through Columns
Matches Tab
The following is the Matches tab:

The following are the main points for the Matches tab:
- Select the fields to compare from the source (FULL_CONTACT table) and compare (Contact dimension)
- Select a Match Type for each comparison; choose from the available Fuzzy Match algorithms as shown above
- I am using the same algorithm for each; you are free to select different ones if you like
- Specify the Upper and Lower confidence values; I went with the defaults
- Check WS to ignore whitespace in the comparison
Advanced Options Tab
The following is the Advanced Options tab:

The following are the main points for the Advanced Options tab:
- The Output Match Percentage column will have the overall calculated match percentage for all of the specified comparisons (on the Matches tab); it will appear in every output row
- I chose Match if every comparison meets its threshold for the Threshold Logic; this is the most conservative approach; there are other options available
- The Match Percentage column will have the match percentage for each comparison; it will also appear in every output row
- The Source Columns Contents and Compare Column Contents send the value of the comparison columns to the output
Source Pass-Through Columns Tab
The following is the Source Pass-Through Columns tab:

The following are the main points for the Source Pass-Through Columns tab:
- Select the columns from the source (FULL_CONTACT) to include in the output
- I chose the CONTACT_KEY so that I can insert or update the Contact dimension with this value and be able to trace any row in the Contact dimension back to the input
Compare Pass-Through Columns Tab
The following is the Compare Pass-Through Columns tab:

The following are the main points for the Compare Pass-Through Columns tab:
- Select the columns from the compare (Contact dimension) to include in the output
- I chose the CONTACK_SK which is the primary key in the Contact dimension; I use this to update the Contact dimension when a row matches an existing row in the Contact dimension
Next, I will review the results from executing the CHECK FOR DUPLICATES task.
CHECK FOR DUPLICATES Results
To review the results from the CHECK FOR DUPLICATES task, I will show the partial contents of the NEW_CONTACT and UPDATE_CONTACT SQL Server tables. Based on my sample data, the NOTSURE_CONTACT table is empty. The UPDATE_CONTACT table is also empty but only on the initial run.
The following are the partial results in the NEW_CONTACT table from the initial run of the CHECK FOR DUPLICATES data quality task:

The following are the main points for the results:
- I started out with one row in the Contact dimension to highlight the fact that the Fuzzy Match component matches every row in the source with every row in the compare
- There were only four rows that were valid in the source; each source row gets compared with the one row in the Contact dimension as shown above
- The mdMatchPercentage is the overall match percentage for the three comparisons
- Based on the mdMatchPercentage, no row in the source matches a row in the compare so all rows are new Contacts
Update Contact Dimension Task
The final step in the sample SSIS package is the UPDATE CONTACT DIMENSION task. This is simply an Execute SQL task that inserts new Contacts in the Contact dimension and updates matching Contacts in the Contact dimension. Before reviewing the T-SQL in the UPDATE CONTACT DIMENSION task, I’m going to execute the entire SSIS package a second time. This second run will determine that every valid Contact matches an existing row in the Contact dimension.
Remember I mentioned earlier that the Fuzzy Match component compares every row in the source with every row in the compare. In my simplified example, this means that every valid Contact in the source will be a match for one row in the compare (i.e. the Contact dimension) but it will NOT match every other row in the Contact dimension. So, we will have matching rows in the UPDATE_CONTACT table but those same Contacts will appear in the NEW_CONTACT table because they do not match any other row in the Contact dimension.
The following shows the rows in the UPDATE_CONTACT table after running the sample SSIS package a second time:

The following are the main points for the results:
- The mdMatchPercentage for every row is 100%; this is expected since I ran the same input a second time
- Each row in the input is an exact match to one of the rows in the Contact dimension
Next, I will review the T-SQL in the UPDATE CONTACT DIMENSION task.
UPDATE CONTACT DIMENSION Task
This task inserts new Contacts into the Contact dimension and updates matching Contacts in the Contact dimension. For context, assume we are talking about the second run of the sample SSIS package where every Contact matches an existing row in the Contact dimension.
I have a stored procedure named UPSERT_CONTACT to implement this logic. The abbreviated INSERT T-SQL is shown below:

Code Summary
The following are the main points for the above T-SQL:
- I use a common table expression to get the list of CONTACT_KEY values to be inserted into the Contact dimension
- I get the DISTINCT list of CONTACT_KEY values from the NEW_CONTACT table; remember every Contact in the source is compared to every Contact in the compare so each CONTACT_KEY value will occur in as many rows as there are rows in the Contact dimension that it does NOT match
- I get the list of CONTACT_KEY values from the UPDATE_CONTACT table; these are the source rows that match a row in the compare table; i.e. these are the matching Contacts
- I use EXCEPT to remove each matching CONTACT_KEY value from the DISTINCT list of CONTACT_KEY values from the NEW_CONTACT table that is also in the UPDATE_CONTACT table
- I select every row from the FULL_CONTACT table that matches a CONTACT_KEY value from the common table expression and INSERT it into the Contact dimension
- CONTACT_KEY is in the NEW_CONTACT table because I specified it in the output pass-through columns in the Fuzzy Match component
I can tell you that it took a little bit of testing to figure this one out.
The abbreviated UPDATE T-SQL is shown below:

Code Summary
The following are the main points for the above T-SQL:
- I use a common table expression to get the rows from the FULL_CONTACT table that have a 100% match percentage in the UPDATE_CONTACT table
- I update the CONTACT dimension by joining to the common table expression results on CONTACT_SK
- CONTACT_SK is the primary key value in the Contact dimension
- CONTACT_SK is in the UPDATE_CONTACT table because I specified it in the output pass-through columns in the Fuzzy Match component
The last thing to look at are the results from executing the UPDATE CONTACT DIMENSION task.
UPDATE CONTACT DIMENSION Results
The following is the list of rows in the Contact dimension (partial list of columns):

The following are the main points for the results:
- The SOURCE_KEY is the CONTACT_KEY from the input
- The initial value of the SOURCE_KEY is the CONTACT_KEY value from the input row that was inserted into the Contact dimension
- When a row in the Contact dimension is updated, the SOURCE_KEY value changes to the CONTACT_KEY value from the input row that updated the Contact dimension
Summary
I hope that I have presented a compelling data quality option for cleaning, validating and enhancing your Contact data. I think the biggest takeaway is that you really want a solution that includes domain-specific knowledge of Contact data, yet is easy to implement in SQL Server Integration Services (SSIS) packages and does not require writing any code.
Interested in learning more about Melissa’s SSIS solution?
Click here to learn more about the Melissa SSIS Solutions or request a demo.
Next Steps
- To experiment with the demo code, you can download the SSIS Solution here.
- Request a demo of Melissa’s SSIS Solutions from Melissa.com
- Check out other Melissa data quality content on MSSQLTips.com in the links below:
MSSQLTips.com Product Spotlight sponsored by Melissa, makers of SSIS Data Quality Components.

Ray is a Principal Architect at IT Resource Partners focused on SQL Server and Business Intelligence. He is a Microsoft Certified Solutions Expert (MCSE) in Business Intelligence, a MSSQLTips.com BI Expert and Ambassador. He is also a co-author of the book: SharePoint 2010 Business Intelligence Unleashed.
- MSSQLTips Awards: Champion (100+ tips)