By: John Miner | Comments | Related: > Compression
Problem
Several bitmap images of nebulas are stored in a Azure SQL database table in a compressed g-zip format. How can we extract the images from the cloud database service to our on-premises file system?
Solution
Microsoft SQL Server 2016 was released to manufacturing on June 1st. Please see this SQL Server Team BLOG for the full details. This product release contains a new function called DECOMPRESS() that uncompresses any data saved in a g-zip format. We can use this function to solve our business problem. The following MSDN entry has full details on the function.
Microsoft has adopted a cloud first software release strategy. It is not surprising that this function is already available for Azure SQL Database.
Business Problem
This tip assumes you know how to create a Azure SQL Server and Azure SQL Database. You should be familiar with PowerShell since we will be leveraging this language to craft the business solution.
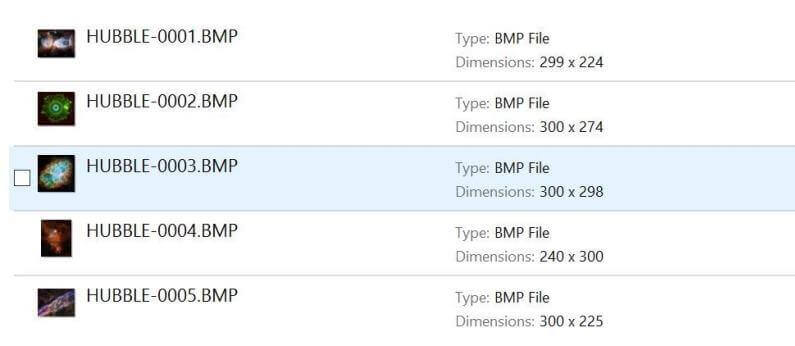
We will be continuing the NASA theme with this article. The Hubble Telescope was launched into low order space in 1990 and still remains in operation today. Many stunning images have been taken from the telescope. Today, we will be looking at the angel, cat eye, crab, lion and veil nebulas.
Our task is to extract five compressed image files from a Azure SQL Database using the PowerShell ISE. The stretch goal is to save the files to disk in the most efficient manner.
Azure Objects
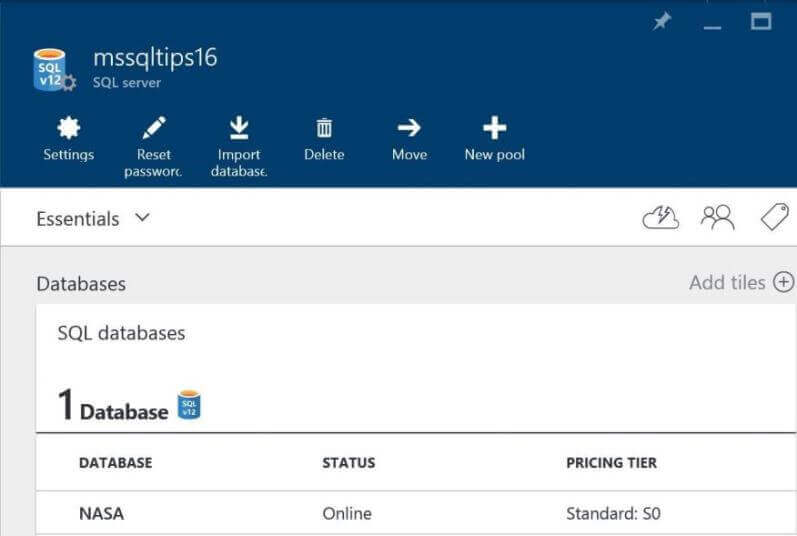
We will be reusing the Azure SQL Server that I created last time. The server name is mssqltips2016, the administrator login name is jminer, the firewall rule name is MyLaptop, the database named is NASA and the table name is [DBO].[HUBBLE_TELESCOPE].
If you do not have these objects, please follow the steps my previous tip to get to this point.
Get Image By Id
Before we can actually do work, we need to build a custom PowerShell (PS) function. The .Net Library is wide open to the PS language to leverage. We are going to use the SqlClient library to communicate with our Azure SQL Database.
The Get-Image-By-Id-SqlDb custom function takes a connection string and the image id as input parameters. Additionally, it accepts a reference (input/output) parameter to a byte array which is updated with the uncompressed image.
The following algorithm is used by the function.
- Create and open SQL client connection object.
- Create T-SQL query to decompress the image for a given row id.
- Create a SQL client command object.
- Create a SQL client data adapter object.
- Create a local data table object.
- Call the fill function to load data table.
- Update the byte array with image data.
It is important to note that the DECOMPRESS() function is being called in the T-SQL query. A data table can return multiple images in one database call. A design decision was made to return only one image at a time to conserve memory used by PowerShell.
#
# Name:      Get-Image-By-Id-SqlDb
# Purpose:   Execute a DELETE, INSERT, UPDATE or DDL statement.
#

function Get-Image-By-Id-SqlDb {
    [CmdletBinding()]

    param(
        [Parameter(Mandatory = $true)]
        [String] $ConnStr,

        [Parameter(Mandatory = $true)]
        [int32] $MyId,

        [Parameter(Mandatory = $false)]
        [ref] $MyImage
    )

    # Create & open connection object
    $Conn = New-Object -TypeName System.Data.SqlClient.SqlConnection
    $Conn.ConnectionString = $ConnStr
    $Conn.Open()

    # Create Sql Statement
    [string]$SqlQry = "SELECT [MY_ID] AS MyId, DECOMPRESS([MY_IMAGE]) as MyImage
 FROM [dbo].[HUBBLE_TELESCOPE] WHERE [MY_ID] = " + $MyId.ToString() + ";"

    # Create command object
    $Cmd = New-Object System.Data.SqlClient.SqlCommand
    $Cmd.Connection = $Conn
    $Cmd.CommandTimeout = 300
    $Cmd.CommandText = $SqlQry

    # Create data adapter
    $Adapter = New-Object System.Data.SqlClient.SqlDataAdapter
    $Adapter.SelectCommand = $Cmd

    # Fill data table
    $DatTbl = New-Object System.Data.DataTable
    $Count = $Adapter.Fill($DatTbl)

    <#

    # Display data types (debug code)
    $DatTbl.Columns[0].DataType
    $DatTbl.Columns[1].DataType

    #>

    # Grab the image bytes by ref
    $MyImage.Value +=  $DatTbl.rows[0].MyImage

    # Close the connection
    $Conn.Close()

}
First Solution
The Get-Image-By-Id-SqlDb cmdlet will retrieve an image from the Azure SQL database table by row id into a variable. We just need to write the variable in memory that contains the image to our on premise file. The Set-Content cmdlet can be used to save this variable to a binary file.
Again, we are going to use the Set-Location cmdlet. This cmdlet is used to set the working directory. All of the images are going to be stored under the COPY sub-directory. A call to the Get-Location cmdlet is leveraged in the creation of the final file name. Because we know our data set, we can use a for loop to grab images 1 to 5. Please note, the ToString method accepts format strings. In our case, the D4 tells PowerShell to return a four digit number that is zero prefixed.
Everything is in place for our unit test of our code. Please see Step 1 that puts all the pieces together in one PowerShell solution.
#
# Step 1 - Save each image from database to file
#

# Set the path
Set-Location "C:\MSSQLTIPS\MINER2016\ARTICLE-2016-04-DECOMPRESS"

# Set connection string
[string]$ConnStr = 'Server=mssqltips16.database.windows.net;Database=NASA;
    Uid=JMINER;Pwd=MS#tips$2016;'


# Dump five images
For ($i=1; $i -lt 6; $i++)
{

    # Read image from database to buffer in memory
    [byte[]]$Buff = @()
    Get-Image-By-Id-SqlDb -ConnStr $ConnStr -MyId $i -MyImage ([ref]$Buff)

    # Create final file name
    $Path = (Get-Location).Path + '\COPY\HUBBLE-' + $i.ToString("D4") + '.BMP'

    # Write memory buffer to disk file
    Set-Content $Buff -Path $Path -Encoding byte -Force
}
Before running the unit test, the COPY sub-directory is empty. After testing, the original five nebulas are stored in our on premise file system to be viewed.
During testing, you should not only determine if the code solves the business problem, but also ensure the code runs efficiently. I noticed that the Get-Content cmdlet used in the previous tip is slow. Let's look at this performance problem.
Performance Testing
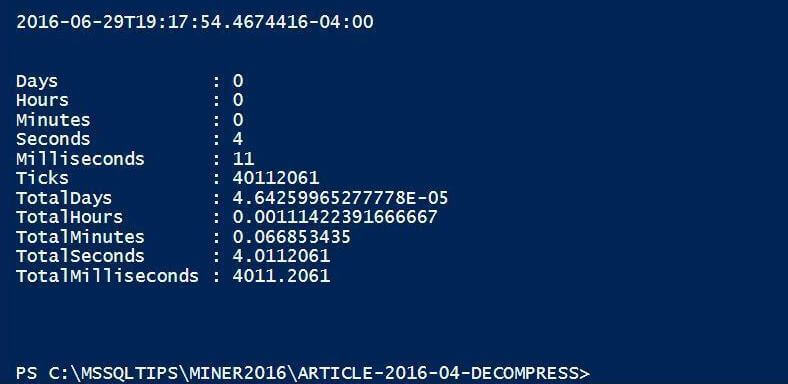
The most basic way to measure performance is to save both the start time before executing the code and the end time after the code has completed execution. Taking the difference of these two values is the total time in some unit of measure. Since this code is running relatively fast, we want to calculate total elapsed milliseconds.
The Get-Date cmdlet can return a very precise date and time value. We will save this information in a variable called $Start. The New-TimeSpan takes the start date and time variable as input and returns total elapsed timed using many different units of measure. The PowerShell script below is a sample use of these functions wrapping the Get-Content cmdlet call to read the image file.
# Show full date with time zone info
Get-Date -Format o

# Save start time
$Start = Get-Date -Format o

# Create file path
$Path = "C:\MSSQLTIPS\MINER2016\ARTICLE-2016-04-DECOMPRESS\COPY\HUBBLE-0001.BMP"

# Read image into array
[byte[]]$Bytes = Get-Content $Path -Encoding byte

#Calculate elapsed time
New-TimeSpan -Start $Start
The output below shows the Get-Date cmdlet returning the date, time zone, and time as one value with the seconds measured with 7 digits of precision. The New-TimeSpan cmdlet shows a sample reading of the first image taking over 4011 milliseconds to accomplish the task.
Native PowerShell Cmdlets
The code below calls the Get-Content and Set-Content cmdlets to read and write image files from disk. We will use the timing technique above to capture total run times of each task.
Don Jones wrote a great article for TechNet Magazine on the different ways to create a custom PS object. It is a best practice to return objects when dealing with larger amounts of data. If we do not create a PS Object, we cannot leverage the Group-Object cmdlet to create our final statistics. I am using the hash table technique below to save the image id, file action and total elapsed time as an object. The $Time1 variable will be an array of these custom objects.
In our unit test below, we want to calculate an average of five different reads and writes for each of the five different images from the Hubble Telescope. There is a total of 50 data points. The Measure-Object cmdlet is great for performing simple math such as minimum, maximum, count and average.
Step 2 puts all the code together in one nice PowerShell script calling the appropriate cmdlets.
#
# Step 2 - Get timings for Get & Set Content
#


# Set the path
Set-Location "C:\MSSQLTIPS\MINER2016\ARTICLE-2016-04-DECOMPRESS"

# Capture total time
$Time1 = @()
Clear-Host

# Run test 5 times
For ($x=1; $x -lt 6; $x++)
{

# Read and write 5 images
For ($i=1; $i -lt 6; $i++)
{


# PowerShell - Read
$Start = Get-Date -Format o
$Path = (Get-Location).Path + '\COPY\HUBBLE-' + $i.ToString("D4") + '.BMP'
[byte[]]$Bytes = Get-Content $Path -Encoding byte
$Span = New-TimeSpan -Start $Start

# Make object & add to array
$Properties = @{'Image'=$i.ToString("D4"); 'Action'='Read'; 'Total'=$Span.TotalMilliseconds}
$Object = New-Object –TypeName PSObject –Prop $Properties
$Time1 += $object


# PowerShell - Write
$Start = Get-Date -Format o
$Path = (Get-Location).Path + '\COPY\TEMP1-' + $i.ToString("D4") + '.BMP'
Set-Content $Bytes -Path $Path -Encoding byte -Force
$Span = New-TimeSpan -Start $Start

# Make object & add to array
$Properties = @{'Image'=$i.ToString("D4"); 'Action'='Write'; 'Total'=$Span.TotalMilliseconds}
$Object = New-Object –TypeName PSObject –Prop $Properties
$Time1 += $object


# Show progress
$Line = "Run {0}, Image {1}" -f $x, $i
Write-Host $Line

}

}


# Show top 10 entries
$Time1 | Select-Object -First 12

# Show average timings group by image/action
$Time1 | Group-Object Image, Action | %{
    New-Object psobject -Property @{
        Item = $_.Name
        Count = ($_.Group | Measure-Object -property Total -Minimum).Count
        Avg = ($_.Group | Measure-Object -property Total -Average).Average
    }
}
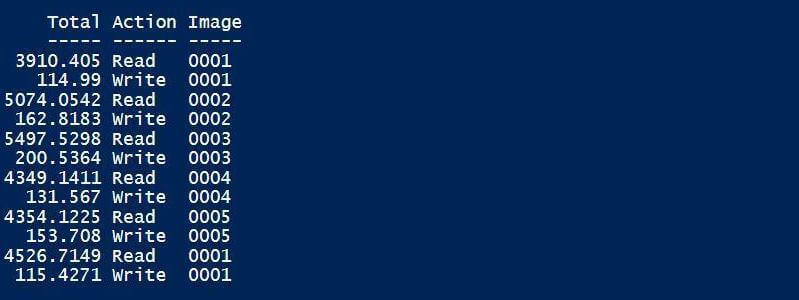
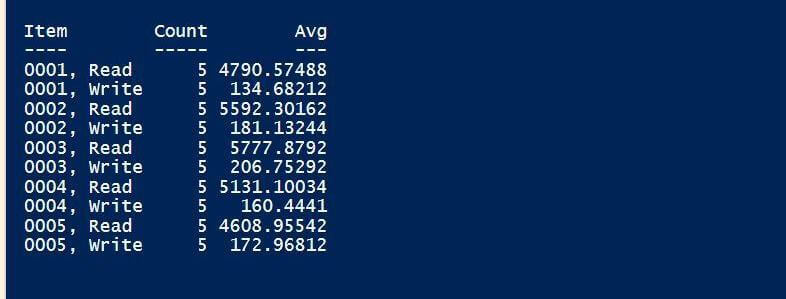
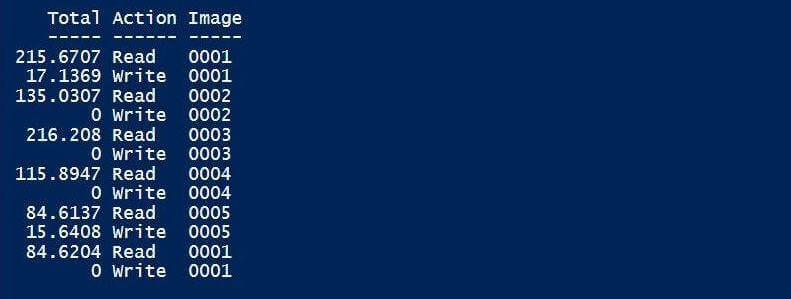
The output below shows the first 12 timings that are stored in the $Time1 custom object array. Check out the Select-Object cmdlet that has some positional parameters that return sub-sets of data.
The last block of code in the PowerShell script really shows off its ability to pass objects down the pipeline and dynamically create an object from separate cmdlet calls. In a nutshell, the time data is grouped by Image and Action. For each combination, we want to know the sample size and the average execution time.
In this coding example, the ForEach-Object alias % is used to make the final statement more readable. Please see the Get-Alias entry on MSDN for more details. This cmdlet will list all the active aliases in your shell session.
Our statistics show a performance issue with reading the images from disk.
Read and Write Binary Files
How can we speed up reading and writing binary files?
Again, the .Net library can be easily called from any PowerShell script. I am leveraging the [System.IO.FileAccess] library to create faster cmdlets to read and write binary files.
The Read-Binary-File cmdlet accepts the fully qualified file path as input and returns as output an updated reference variable containing image file bytes.
#
# Name:      Read-Binary-File
# Purpose:   Read in a binary file in memory.
#

function Read-Binary-File {
    [CmdletBinding()]

    param(
        [Parameter(Mandatory = $true)]
        [String] $Path,

        [Parameter(Mandatory = $true)]
        [ref] $Buffer
    )

    # Open file stream
    $objFS = New-Object System.IO.FileStream ($Path, [System.IO.FileMode]'Open',
     [System.IO.FileAccess]'Read', [System.IO.FileShare]'ReadWrite')

    # Create buffer
    $objTmp = new-object byte[] -ArgumentList ($objFS.Length)

    # Read the whole file
    $Count = $objFS.Read($objTmp, 0, $objTmp.Length)

    # Close file stream
    $objFS.Close()

    # Return the buffer
    $Buffer.Value += $objTmp

}
The Write-Binary-File cmdlet takes the fully qualified file path and reference to the image file bytes as input. It writes the bytes to the specified location.
#
# Name:      Write-Binary-File
# Purpose:   Write memory to binary file.
#

function Write-Binary-File {
    [CmdletBinding()]

    param(
        [Parameter(Mandatory = $true)]
        [String] $Path,

        [Parameter(Mandatory = $true)]
        [ref] $Buffer
    )


    # Create buffer
    $objTmp = new-object byte[] -ArgumentList $Buffer.Length
    $objTmp = $Buffer.Value

    # Open file stream
    $objFS = New-Object System.IO.FileStream ($Path, [System.IO.FileMode]'Create',
     [System.IO.FileAccess]'Write', [System.IO.FileShare]'Write')

    # Write the whole array to file
    $Count = $objFS.Write($objTmp, 0, $objTmp.Length)

    # Close file stream
    $objFS.Close()

}
Custom PowerShell Cmdlets
During performance testing, you want to run almost exactly the same code. Thus, you are comparing apples to apples instead of apples to oranges. Small changes in the experimental code are the best to keep track of cause and effect. I am using almost the same code base as Step 2; however, the actual calls to read and write images are using our new custom cmdlets.
Please see Step 3 script below for full details.
#
# Step 3 - Get timings for Read & Write .Net calls
#
# Set the path
Set-Location "C:\MSSQLTIPS\MINER2016\ARTICLE-2016-04-DECOMPRESS"
# Capture total time
$Time2 = @()
Clear-Host
# Run test x times
For ($x=1; $x -lt 6; $x++)
{
# Read and write 5 images
For ($i=1; $i -lt 6; $i++)
{
# Work space
[byte[]]$Buff = @()
# .Net Library - Read
$Start = Get-Date -Format o
$Path = (Get-Location).Path + '\COPY\HUBBLE-' + $i.ToString("D4") + '.BMP'
Read-Binary-File -Path $Path -Buffer ([ref]$Buff)
$Span = New-TimeSpan -Start $Start
# Make object & add to array
$Properties = @{'Image'=$i.ToString("D4"); 'Action'='Read'; 'Total'=$Span.TotalMilliseconds}
$Object = New-Object –TypeName PSObject –Prop $Properties
$Time2 += $Object
# .Net Library - Write
$Start = Get-Date -Format o
$Path = (Get-Location).Path + '\COPY\TEMP2-' + $i.ToString("D4") + '.BMP'
Write-Binary-File -Path $Path -Buffer ([ref]$Buff)
$Span = New-TimeSpan -Start $Start
# Make object & add to array
$Properties = @{'Image'=$i.ToString("D4"); 'Action'='Write'; 'Total'=$Span.TotalMilliseconds}
$Object = New-Object –TypeName PSObject –Prop $Properties
$Time2 += $Object
# Show progress
$Line = "Run {0}, Image {1}" -f $x, $i
Write-Host $Line
}
}
# Show top 10 entries
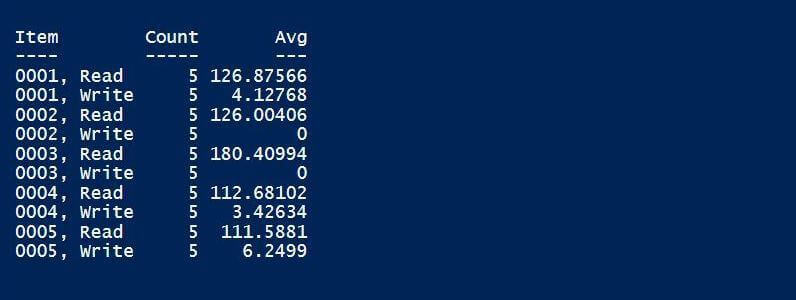
$Time2 | Select-Object -First 12
# Show timings
$Time2 | Group-Object Image, Action | %{
New-Object psobject -Property @{
Item = $_.Name
Count = ($_.Group | Measure-Object -property Total -Minimum).Count
Avg = ($_.Group | Measure-Object -property Total -Average).Average
}
}
The output below shows the first 12 timings that are stored in the $Time2 custom object array. I was surprised to find out that the write actions are blinding fast. I can only conclude that my solid state drive is using some type of caching since we are reading and writing the same image five times. Changing the destination file to a unique file name did not change the actual results.
As a homework assignment, I leave it to you to capture processor ticks instead of milliseconds. A processor tick is 100 nanoseconds. Those zero millisecond values might convert to some number of ticks. The code will have to be changed to mathematical equations since the New-TimeSpan cmdlet cannot be used.
The output shows the time data grouped by Image and Action. For each grouped combination, sample size and the average execution time are returned.
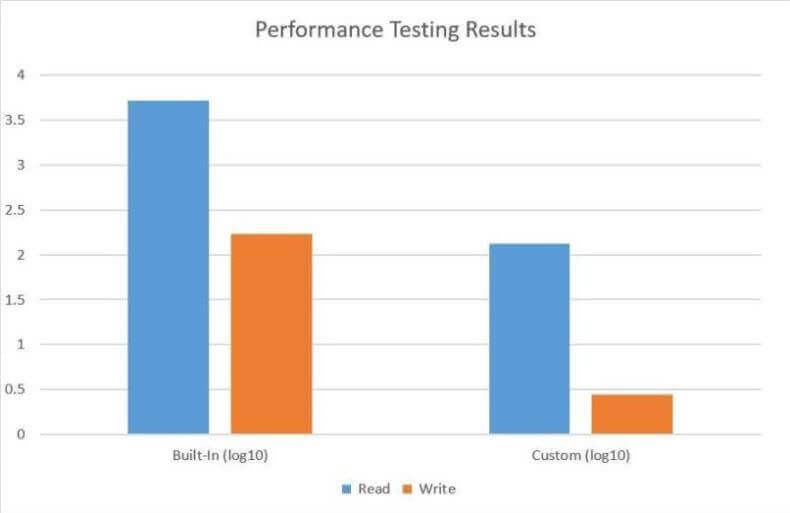
To see the big picture, it is always helpful to graph the data. I used Microsoft Excel to average all the read and writes by custom or built-in cmdlet calls. The data varies from 5180 all the way down to 2.8 milliseconds. To fit the data onto a nice bar graph, I am going to apply the log 10 function to the averages. This will give us an order of magnitude chart.
Now we can see that built-in writes are performing at the same speed at custom reads. However, custom writes are blinding fast and built-in reads are crying slow. Therefore, we should be using the custom cmdlets in our final production code.
Summary
The new DECOMPRESS() function can be used to unpackage COMPRESS() data stored in a SQL database. These two functions go together like yin and yang.
When designing solutions in any programming language, you should always look out for performance problems. In our case, I noticed that the Get-Content function was slow. I showed you how to gather timing evidence given some test cases. Just remember, if something does not perform quickly enough in PowerShell, please check out the .Net library functions.
After crafting two new custom functions to read and write binary files, we gathered more timing evidence with our test cases. Graphing this information clearly shows that the custom cmdlets perform way better than the built in cmdlets.
Next Steps
- Read my tip on the COMPRESS function
- More SQL Server 2016 tips


About the author
 John Miner is a Data Architect at Insight Digital Innovation helping corporations solve their business needs with various data platform solutions.
This author pledges the content of this article is based on professional experience and not AI generated.
View all my tips
