By: Nat Sundar | Comments | Related: 1 | 2 | 3 | > Integration Services Administration
Problem
The previous tips, Tip 1 and Tip 2 helped you to deploy SQL Server Integration Services (SSIS) projects to a target server. In those tips, we hardcoded the name of the server and SSIS project file path in the Windows application. However, a deployment utility is expected to deploy SSIS projects to many target servers (Dev, SIT, UAT and other test environments). So how do we enhance the Windows application to deploy multiple SSIS projects to different servers? Also, how do I create a SSIS environment with the variables using the Windows deployment utility?
Solution
In this tip, I will showcase a method to extend the capability of the Windows application to use command line arguments. Once the Windows application has been compiled, we can execute the application with arguments. We can pass the name of the server as an argument to the Windows application, so the Windows application can read the argument and use the supplied value as a target server name and the SSIS projects can be deployed to the target server. In addition, I will show case how to create SSIS environments using the Windows application.
Prerequisite
It is assumed that the reader has already gone thru the previous tips Tip 1 and Tip 2 and is familiar with the basics about developing a Windows application for SSIS deployment.
SSIS Command Line Arguments
The Windows application can be designed to accept command line arguments. Once the application has been developed, it is assumed that you will be executing the application from command line. While doing so, you can pass command line arguments. You might have noticed that the main function accept string array "args" as a parameter. This mean you can pass "n" number of arguments to the application.
In the below code, I am passing four arguments to the application.
- First Parameter - Target Server Name
- Second Parameter - SSIS Catalog Name
- Third Parameter - SSIS Catalog Password
- Fourth Parameter - SSIS Project File Path
The values of the arguments have been assigned to a few variables and these variables are used within the code to deploy the SSIS project. This way the supplied argument values have been passed to the application.
The C# code to pass arguments is below:
// Declare and assign values to Variables
static void Main(string[] args)
{
// Declare and assign values to Variables
string SSISServerName = args[0];
string SSISCatalogName = args[1];
string SSISCatalogPassword = args[2];
string SSISProjectFilePath = args[3];
string SSISFolderName = "";

// Creating a connection
string sqlConnectionString = "Data Source=" + SSISServerName +
";Initial Catalog=master;Integrated Security=SSPI;";
SqlConnection sqlConnection = new SqlConnection(sqlConnectionString);

// Creating a SSIS object
IntegrationServices integrationServices = new IntegrationServices(sqlConnection);
Catalog catalog;

if (integrationServices.Catalogs.Count > 0)
{
// Creating a object for existing SSIS Catalog
catalog = integrationServices.Catalogs["SSISDB"];
Console.WriteLine("About to delete existing SSIS Catalog, all the SSIS Projects will be deleted !!!:");
//Deleting SSIS Catalog !!!
catalog.Drop();
Console.WriteLine("SSIS Catalog successfully deleted !");
}
//Creating SSIS Catalog using the Catalog name and the Password
catalog = new Catalog(integrationServices, SSISCatalogName, SSISCatalogPassword);
catalog.Create();
Console.WriteLine("SSIS Catalog has been successfully created ");

CatalogFolder folder;

string[] fileList = Directory.GetFiles(SSISProjectFilePath, "*.ispac", SearchOption.AllDirectories);
foreach (string file in fileList)
{
Console.WriteLine("ISPAC File Name" + file);
SSISFolderName = Path.GetFileNameWithoutExtension(file);

// Creating a object for SSIS folder
folder = new CatalogFolder(catalog, SSISFolderName, SSISFolderName);
folder.Create();
Console.WriteLine("SSIS Catalog folder " + SSISFolderName + " has been created !!!:");

Console.WriteLine("Deploying " + SSISFolderName + " project.");

byte[] projectFile = File.ReadAllBytes(file);
folder.DeployProject(SSISFolderName, projectFile);
Console.WriteLine("SSIS Project has been successfully deployed !");
}
}
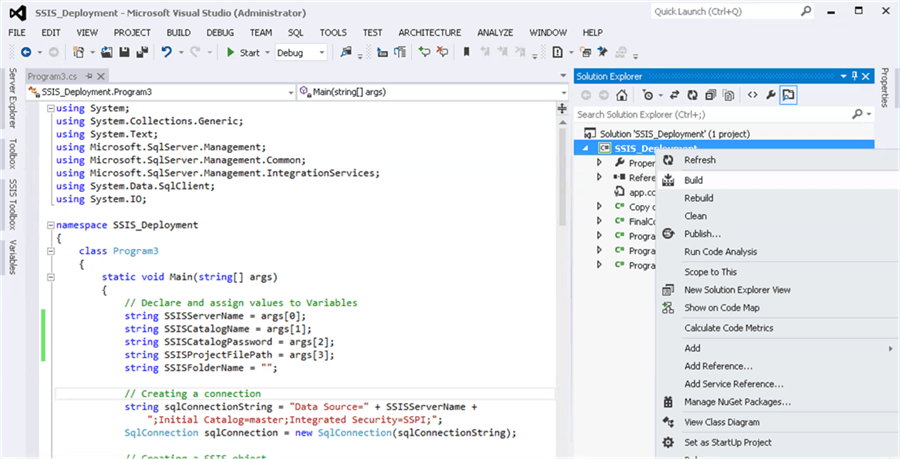
Once the code has been enhanced as per the above instructions, we need to build the project. This "Build" process will compile the project and create a Windows command line application.
To build the application, select the project and click on the "Build" menu as mentioned in the picture below.
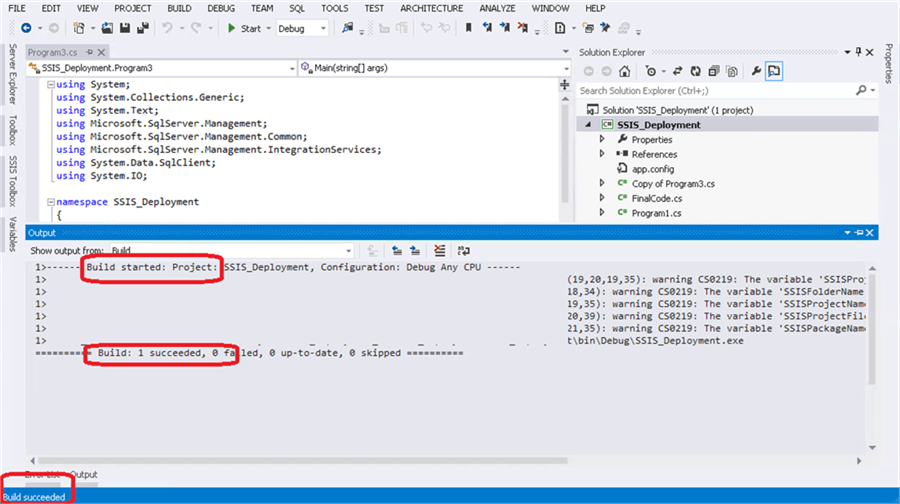
The build process can also be invoked from the "Build" menu as well. Once the build has completed successfully, you are expected to see the messages in the output window. Also, you can see the overall status in the status bar. If there are any failures you may need to investigate and resolve those issues.
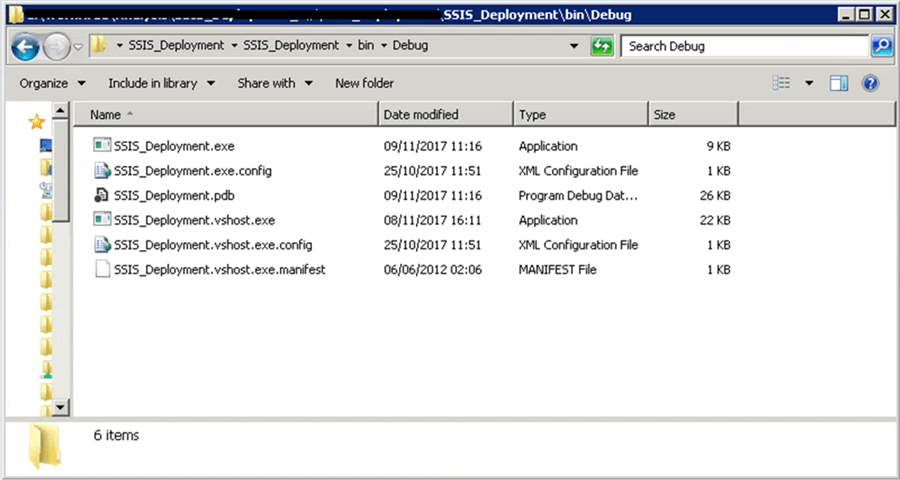
Once the build has successfully completed, you will be able to see the output of the build in the ..\bin\Debug folder. This folder contains the executable (Windows console application) and a configuration file.
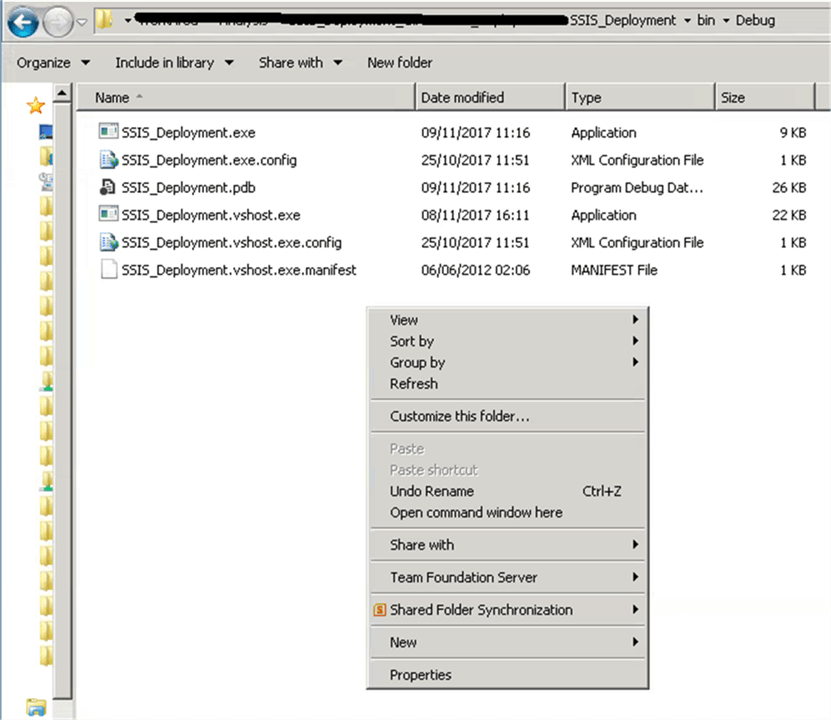
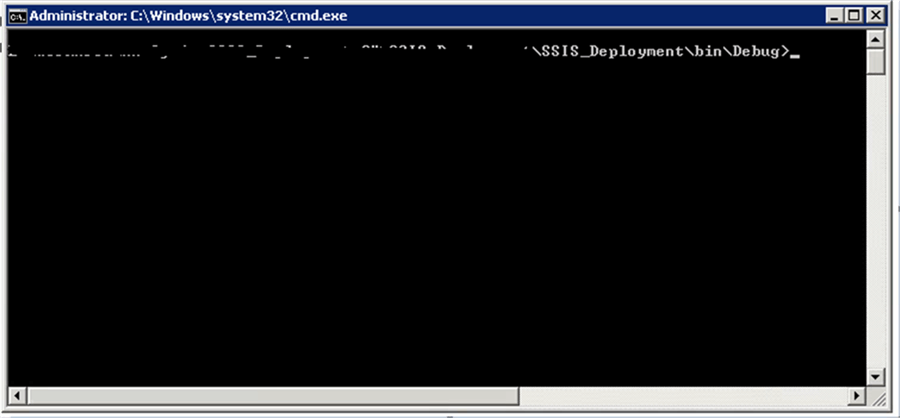
Now the executable is ready to be tested in the command window. You will see the menu "Open Command window here" by holding-down the shift key and a right click. This will open a command window as shown in the picture below.
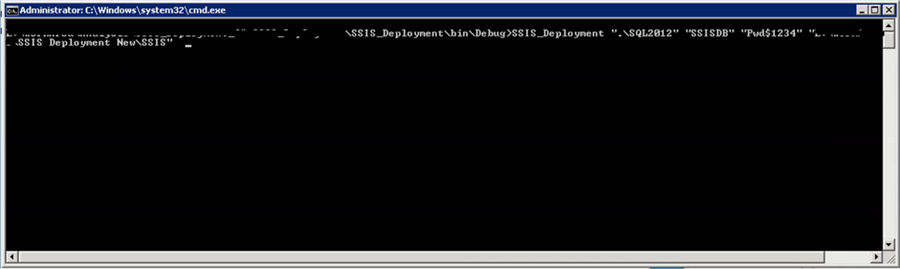
Now type or paste the below in the command window.
SSIS_Deployment ".\SQL2012" "SSISDB" "Pwd$1234" "C:\SSIS Deployment New\SSIS"
The "SSIS_Deployment" indicates the name of the application and rest of the values are arguments (Parameters) for the application. The application has been designed to accept 4 parameters.
- First Parameter Value - ".\SQL2012" - Target Server Name
- Second Parameter Value - "SSISDB" - SSIS Catalog Name
- Third Parameter Value - "Pwd$1234" - SSIS Catalog Password
- Fourth Parameter Value - "C:\SSIS Deployment New\SSIS" - SSIS Project File Path
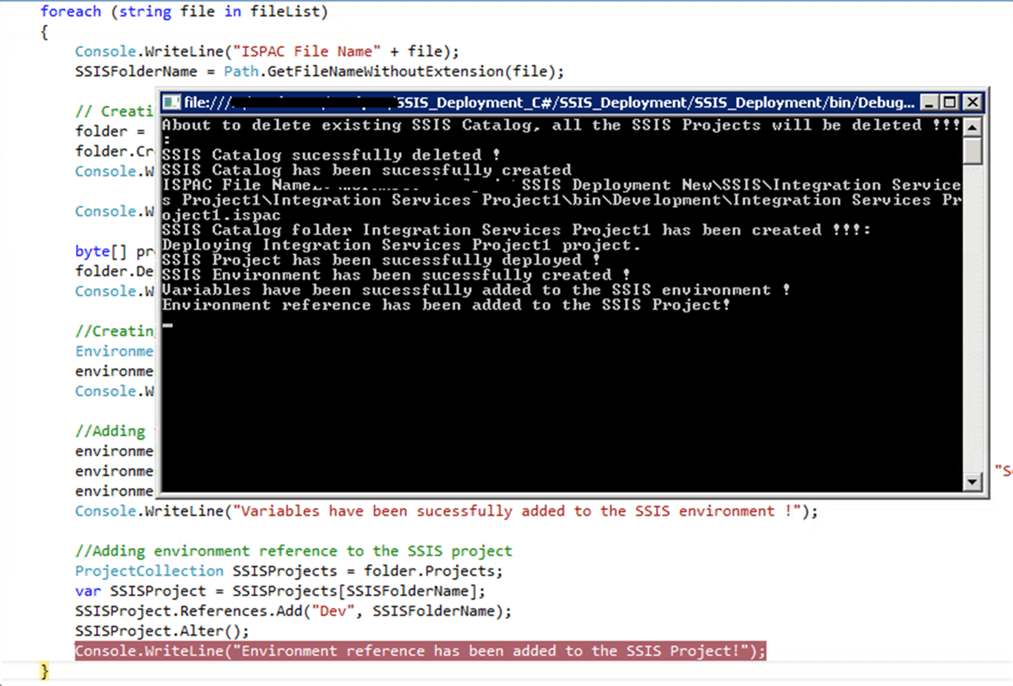
Once the application has been executed with these parameters, the application will start deploying all the SSIS packages and you expect to see the output messages in the console as per the below image.

Creating SSIS Environments
Let’s extend the capability of the code to create a new SSIS environment. A SSIS environment can be created in the catalog using the “EnvironmentInfo” class by passing the Name, Description and the name of the folder. The “Create” method in the SSIS environment object will create the environment. Once the environment has been created, now we need to add the variables. Variables can be added by invoking the function “Variables.Add” in the environment object, by passing the arguments such as Name, data type, Value and Description of the variable.
The C# code to create the SSIS environment is below.
static void Main(string[] args)
{
// Declare and assign values to Variables
string SSISServerName = args[0];
string SSISCatalogName = args[1];
string SSISCatalogPassword = args[2];
string SSISProjectFilePath = args[3];
string SSISFolderName = "";
// Creating a connection
string sqlConnectionString = "Data Source=" + SSISServerName +
";Initial Catalog=master;Integrated Security=SSPI;";
SqlConnection sqlConnection = new SqlConnection(sqlConnectionString);
// Creating a SSIS object
IntegrationServices integrationServices = new IntegrationServices(sqlConnection);
Catalog catalog;
if (integrationServices.Catalogs.Count > 0)
{
// Creating a object for existing SSIS Catalog
catalog = integrationServices.Catalogs["SSISDB"];
Console.WriteLine("About to delete existing SSIS Catalog, all the SSIS Projects will be deleted !!!:");
//Deleting SSIS Catalog !!!
catalog.Drop();
Console.WriteLine("SSIS Catalog successfully deleted !");
}
//Creating SSIS Catalog using the Catalog name and the Password
catalog = new Catalog(integrationServices, SSISCatalogName, SSISCatalogPassword);
catalog.Create();
Console.WriteLine("SSIS Catalog has been successfully created ");
CatalogFolder folder;
string[] fileList = Directory.GetFiles(SSISProjectFilePath, "*.ispac", SearchOption.AllDirectories);
foreach (string file in fileList)
{
Console.WriteLine("ISPAC File Name" + file);
SSISFolderName = Path.GetFileNameWithoutExtension(file);
// Creating a object for SSIS folder
folder = new CatalogFolder(catalog, SSISFolderName, SSISFolderName);
folder.Create();
Console.WriteLine("SSIS Catalog folder " + SSISFolderName + " has been created !!!:");
Console.WriteLine("Deploying " + SSISFolderName + " project.");
byte[] projectFile = File.ReadAllBytes(file);
folder.DeployProject(SSISFolderName, projectFile);
Console.WriteLine("SSIS Project has been successfully deployed !");
//Creating a environment for the SSIS project
EnvironmentInfo environment = new EnvironmentInfo(folder, "Dev", "Development");
environment.Create();
Console.WriteLine("SSIS Environment has been successfully created !");
//Adding two variables to the environment
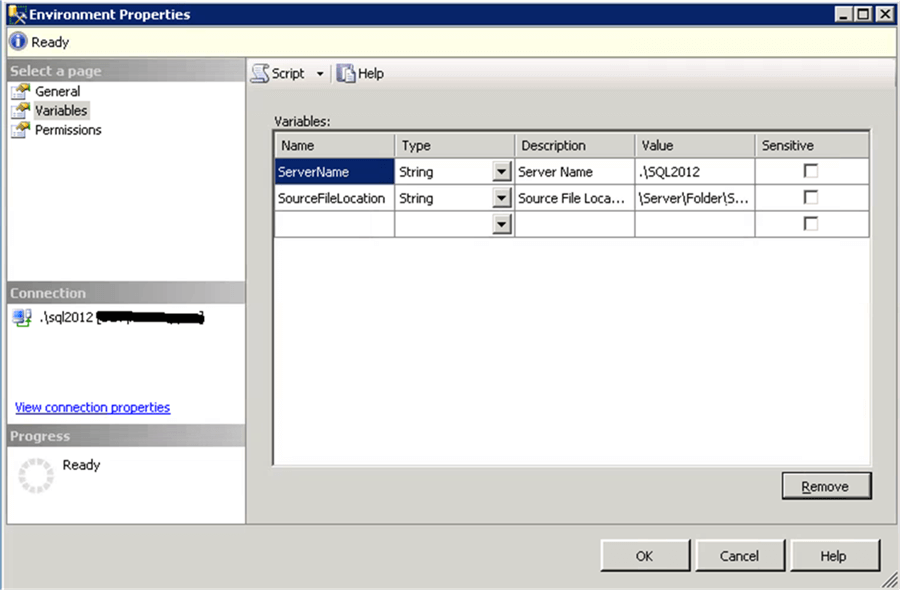
environment.Variables.Add("ServerName",TypeCode.String,".\\SQL2012",false,"Server Name");
environment.Variables.Add("SourceFileLocation", TypeCode.String, "\\Server\\Folder\\SourceFiles", false, "Source File Location");
environment.Alter();
Console.WriteLine("Variables have been successfully added to the SSIS environment !");
}
}
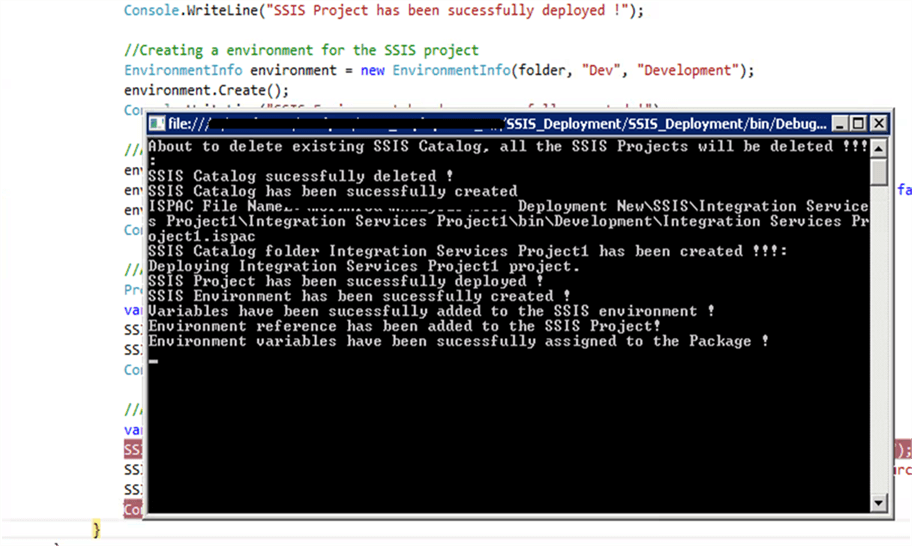
After executing with the suitable parameters, you are expected to see the output like the below image.
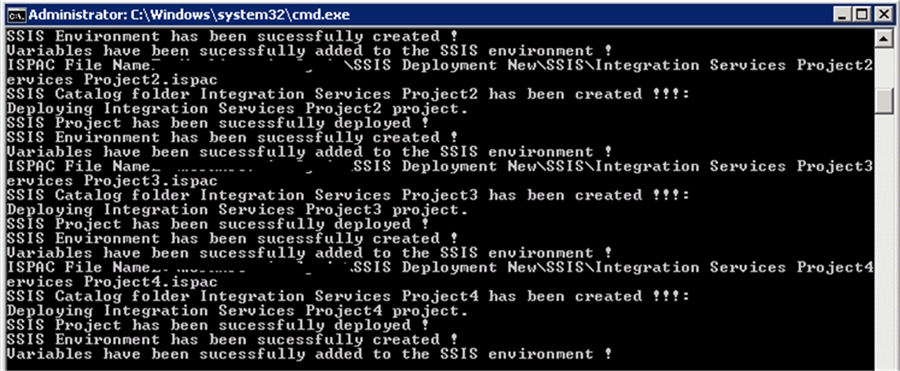
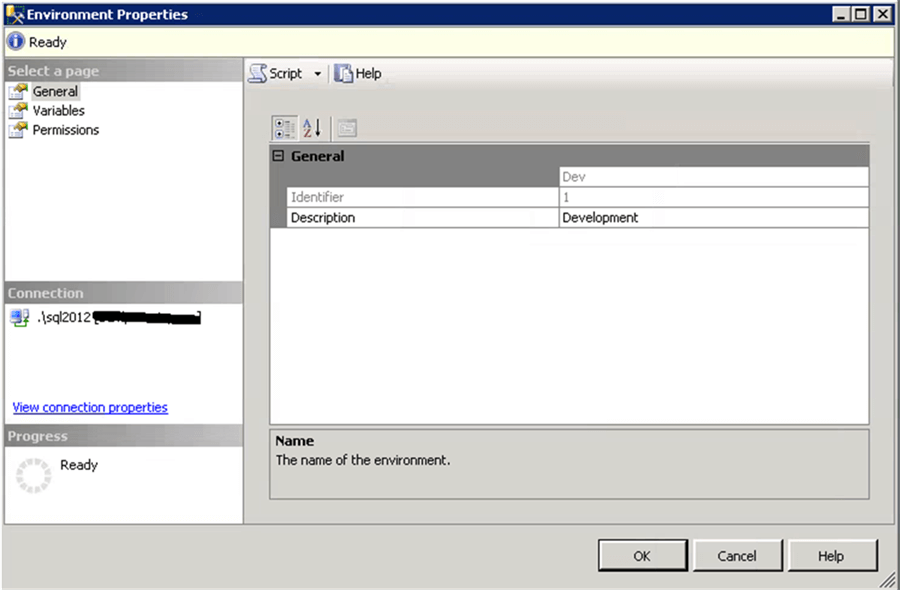
It has been confirmed that the environment “Dev” has been created for the deployed SSIS projects.
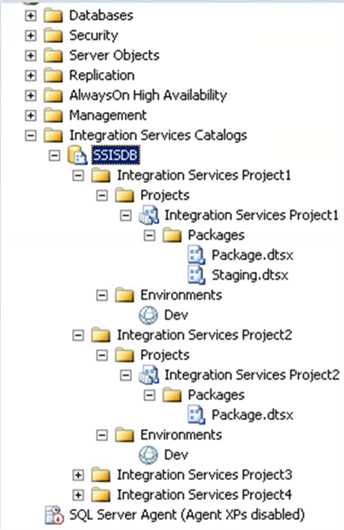
The newly created SSIS environment and its properties can be seen below.
Adding an Environment Reference to an SSIS Project
As a next step, we need to add the SSIS environment reference to the deployed SSIS project. Once the reference has been added, the environment variables values will be visible for the SSIS project. This can be achieved by creating an object for SSISProject using the function “folder.Projects”. SSIS Project references can be added by passing the name of the environment and the folder name.
The C# code to add reference to SSIS environment is below.
static void Main(string[] args)
{
// Declare and assign values to Variables
string SSISServerName = args[0];
string SSISCatalogName = args[1];
string SSISCatalogPassword = args[2];
string SSISProjectFilePath = args[3];
string SSISFolderName = "";

// Creating a connection
string sqlConnectionString = "Data Source=" + SSISServerName +
";Initial Catalog=master;Integrated Security=SSPI;";
SqlConnection sqlConnection = new SqlConnection(sqlConnectionString);

// Creating a SSIS object
IntegrationServices integrationServices = new IntegrationServices(sqlConnection);
Catalog catalog;

if (integrationServices.Catalogs.Count > 0)
{
// Creating a object for existing SSIS Catalog
catalog = integrationServices.Catalogs["SSISDB"];
Console.WriteLine("About to delete existing SSIS Catalog, all the SSIS Projects will be deleted !!!:");
//Deleting SSIS Catalog !!!
catalog.Drop();
Console.WriteLine("SSIS Catalog successfully deleted !");
}
//Creating SSIS Catalog using the Catalog name and the Password
catalog = new Catalog(integrationServices, SSISCatalogName, SSISCatalogPassword);
catalog.Create();
Console.WriteLine("SSIS Catalog has been successfully created ");

CatalogFolder folder;

string[] fileList = Directory.GetFiles(SSISProjectFilePath, "*.ispac", SearchOption.AllDirectories);
foreach (string file in fileList)
{
Console.WriteLine("ISPAC File Name" + file);
SSISFolderName = Path.GetFileNameWithoutExtension(file);

// Creating a object for SSIS folder
folder = new CatalogFolder(catalog, SSISFolderName, SSISFolderName);
folder.Create();
Console.WriteLine("SSIS Catalog folder " + SSISFolderName + " has been created !!!:");

Console.WriteLine("Deploying " + SSISFolderName + " project.");

byte[] projectFile = File.ReadAllBytes(file);
folder.DeployProject(SSISFolderName, projectFile);
Console.WriteLine("SSIS Project has been successfully deployed !");

//Creating a environment for the SSIS project
EnvironmentInfo environment = new EnvironmentInfo(folder, "Dev", "Development");
environment.Create();
Console.WriteLine("SSIS Environment has been successfully created !");

//Adding two variables to the environment
environment.Variables.Add("ServerName",TypeCode.String,".\\SQL2012",false,"Server Name");
environment.Variables.Add("SourceFileLocation", TypeCode.String, "\\Server\\Folder\\SourceFiles", false, "Source File Location");
environment.Alter();
Console.WriteLine("Variables have been successfully added to the SSIS environment !");

//Adding environment reference to the SSIS project
ProjectCollection SSISProjects = folder.Projects;
var SSISProject = SSISProjects[SSISFolderName];
SSISProject.References.Add("Dev", SSISFolderName);
SSISProject.Alter();
}
}
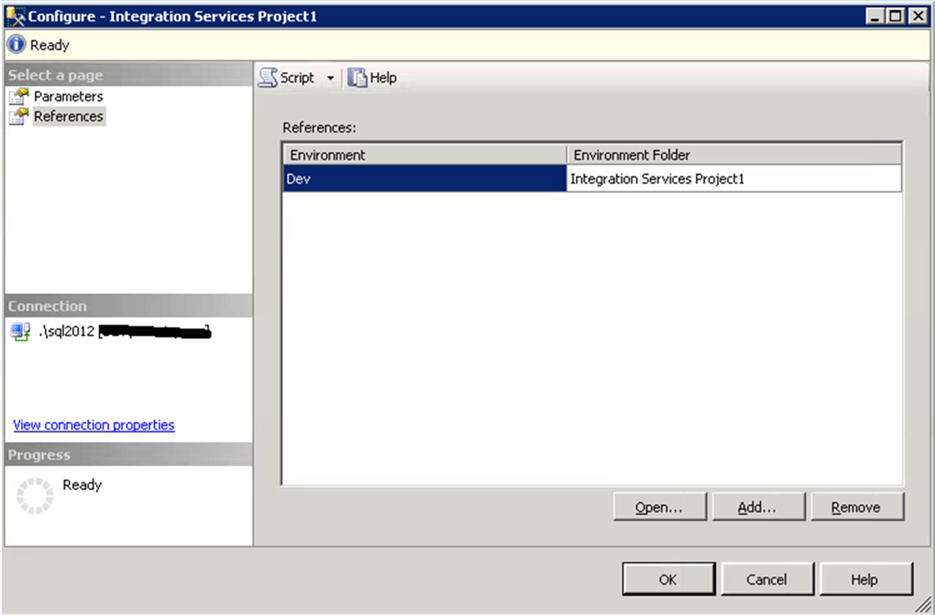
After the successful execution of the code, you are expected to see the environment reference in the SSIS reference.
The below image confirms the SSIS environment has been added to the project.
Adding Environment Variables to SSIS Package Parameters
Once the environment has been referenced to the SSIS project, all the environment variables are visible to all the packages in the SSIS project. So the environment variables values can be passed to the package parameters.
In the below examples, the Server Name and SourceFileLocation environment variables will be assigned to the package parameters.
static void Main(string[] args)
{
// Declare and assign values to Variables
string SSISServerName = args[0];
string SSISCatalogName = args[1];
string SSISCatalogPassword = args[2];
string SSISProjectFilePath = args[3];
string SourceFileLocation = args[4];
string SSISFolderName = "";

// Creating a connection
string sqlConnectionString = "Data Source=" + SSISServerName +
";Initial Catalog=master;Integrated Security=SSPI;";
SqlConnection sqlConnection = new SqlConnection(sqlConnectionString);

// Creating a SSIS object
IntegrationServices integrationServices = new IntegrationServices(sqlConnection);
Catalog catalog;

if (integrationServices.Catalogs.Count > 0)
{
// Creating a object for existing SSIS Catalog
catalog = integrationServices.Catalogs["SSISDB"];
Console.WriteLine("About to delete existing SSIS Catalog, all the SSIS Projects will be deleted !!!:");
//Deleting SSIS Catalog !!!
catalog.Drop();
Console.WriteLine("SSIS Catalog successfully deleted !");
}
//Creating SSIS Catalog using the Catalog name and the Password
catalog = new Catalog(integrationServices, SSISCatalogName, SSISCatalogPassword);
catalog.Create();
Console.WriteLine("SSIS Catalog has been successfully created ");

CatalogFolder folder;

string[] fileList = Directory.GetFiles(SSISProjectFilePath, "*.ispac", SearchOption.AllDirectories);
foreach (string file in fileList)
{
Console.WriteLine("ISPAC File Name" + file);
SSISFolderName = Path.GetFileNameWithoutExtension(file);

// Creating a object for SSIS folder
folder = new CatalogFolder(catalog, SSISFolderName, SSISFolderName);
folder.Create();
Console.WriteLine("SSIS Catalog folder " + SSISFolderName + " has been created !!!:");

Console.WriteLine("Deploying " + SSISFolderName + " project.");

byte[] projectFile = File.ReadAllBytes(file);
folder.DeployProject(SSISFolderName, projectFile);
Console.WriteLine("SSIS Project has been successfully deployed !");

//Creating a environment for the SSIS project
EnvironmentInfo environment = new EnvironmentInfo(folder, "Dev", "Development");
environment.Create();
Console.WriteLine("SSIS Environment has been successfully created !");

//Adding two variables to the environment
environment.Variables.Add("ServerName",TypeCode.String,".\\SQL2012",false,"Server Name");
environment.Variables.Add("SourceFileLocation", TypeCode.String, "\\Server\\Folder\\SourceFiles", false, "Source File Location");
environment.Alter();
Console.WriteLine("Variables have been successfully added to the SSIS environment !");

//Adding environment reference to the SSIS project
ProjectCollection SSISProjects = folder.Projects;
ProjectInfo SSISProject = SSISProjects[SSISFolderName];
SSISProject.References.Add("Dev", SSISFolderName);
SSISProject.Alter();
Console.WriteLine("Environment reference has been added to the SSIS Project!");

//Assign environment variables to package parameters
PackageInfo SSISPackage = SSISProject.Packages["Package.dtsx"];
SSISPackage.Parameters["ServerName"].Set(ParameterInfo.ParameterValueType.Referenced, "ServerName");
SSISPackage.Parameters["SourceFileLocation"].Set(ParameterInfo.ParameterValueType.Referenced, "SourceFileLocation");
SSISPackage.Alter();
Console.WriteLine("Environment variables have been successfully assigned to the Package !");

}
}
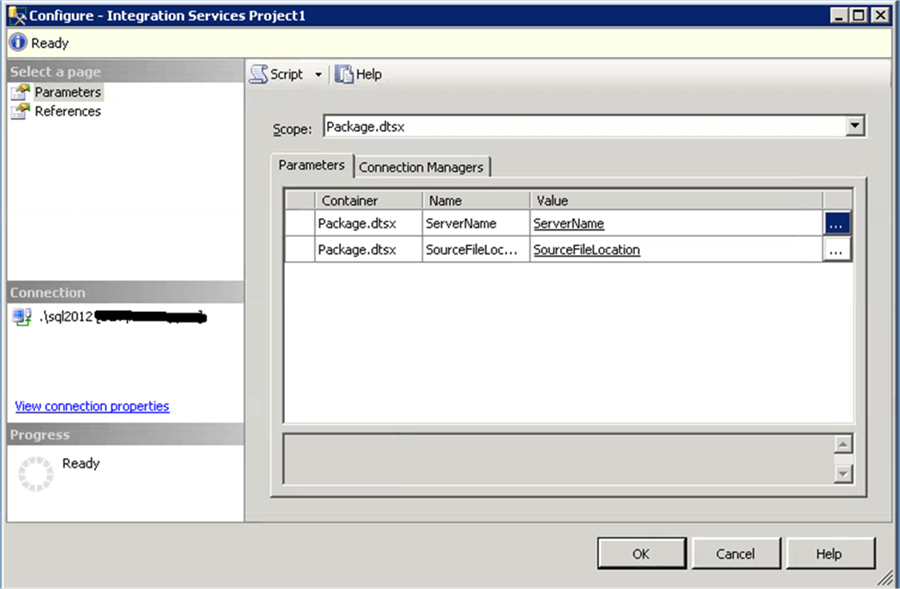
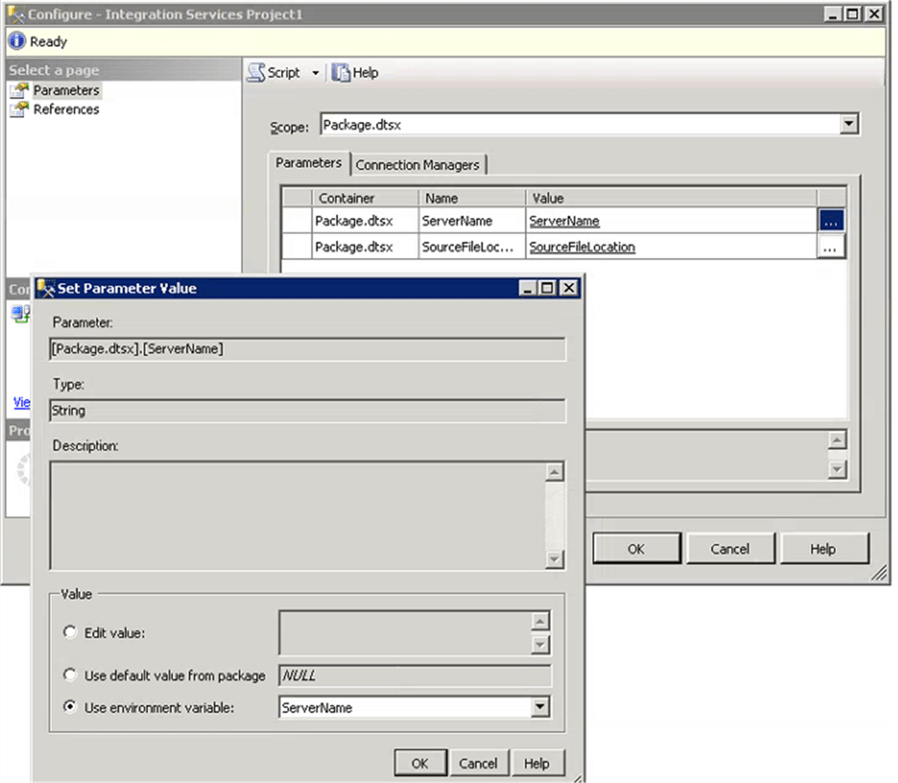
After the successful execution of the code, the environment variables will be mapped with the package parameters.
The below image confirms that both the package parameters have been set to receive the values from the “Dev” environment variables.

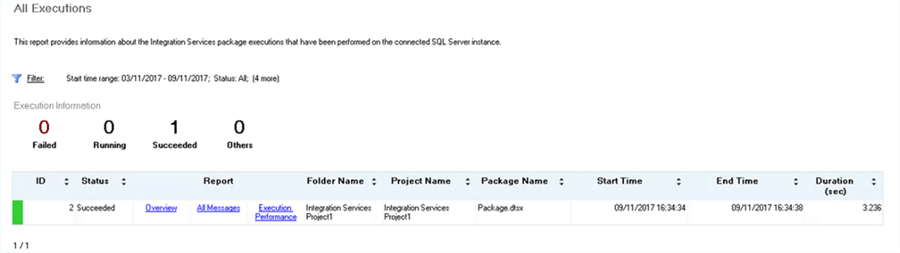
The status of the SSIS package execution can be identified using the Reports > Standard Reports > All Executions as shown below.
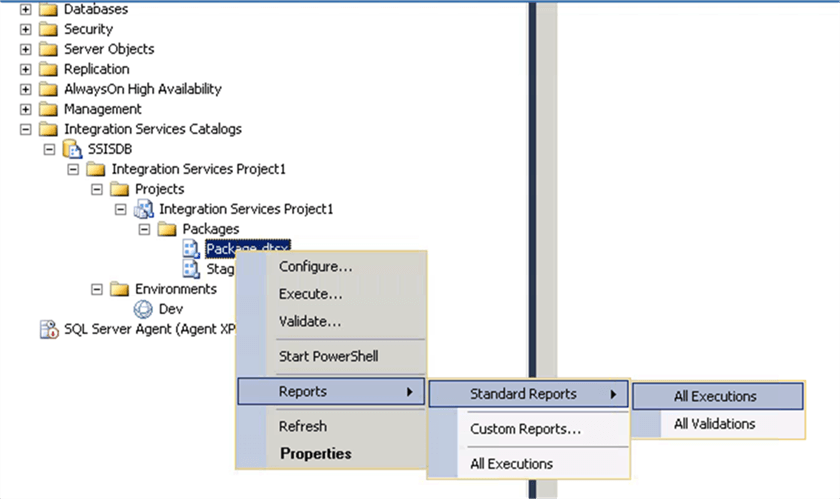
It is confirmed that the deployed package has been successfully executed with the assigned environment variables.
Summary
In this tip we have learned how to enhance the windows application to deploy SSIS projects from the command line. In addition we have learned that the deployed SSIS projects can also be mapped to environment variables. Also, we have learned to execute the package using the C# application.
Next Steps
- Read other SSIS Tips here.
- Read about SSIS Project Deployment Basics here.
- Read Tip 1 and Tip 2 of this tip series.


About the author
 Nat Sundar is working as an independent SQL BI consultant in the UK with a Bachelors Degree in Engineering.
This author pledges the content of this article is based on professional experience and not AI generated.
View all my tips
