By: Pinakin Patel | Comments | Related: > Amazon AWS RDS
Problem
We are planning to migrate an on-premises SQL Server database to Amazon Relational Database Service (Amazon RDS), what are the options we have for migrating databases to RDS.
Solution
This tip will help all technology professionals, DBA Managers and IT Directors build an enterprise level environment in Amazon RDS. Amazon RDS is a cloud-based, managed, hosted solution for relational databases. This tip is intended for anyone who doesn’t want to build or manage an on-premises data center or infrastructure.
Migrating to Amazon RDS
Amazon Web Service Relational Data Service (RDS) is a cloud-based, managed, hosted solution for relational databases. Amazon RDS provides many RDS instance options to migrate any database to Amazon RDS. With RDS you can automate the software patching, backups, multi-AZ deployment and its cost effective pay as you use model. You have two options to migrate databases to RDS:
1) Homogeneous – In the case of homogeneous migration, migrating from SQL Server to RDS SQL server, we will use SQL Server native backup and restore.
2) Heterogeneous – For a heterogeneous migration, use the Amazon database migration service (DMS) when you migrate from different SQL Server versions or from Oracle to SQL Server without having down time. Whenever you have an issue with downtime or minimal downtime is available then the heterogeneous migration is the best option to migrate on-premises database to Amazon RDS.
Edition and Version
Amazon RDS does provide express, web, standard and enterprise editions. In standard and enterprise editions you will get options to select production, Dev/Test purposes and some features will automatically be added to your instance, but if you want to you can change the configuration. Amazon offers an option to use your own license, but you need to complete the license mobility agreement within 10 days of migrating.
Amazon RDS Limitations
Amazon RDS has some limitations compared to on-premises or EC2 server options – if your requirements are met with RDS you can migrate the database to RDS, but here are some limitations.
- You can create up to 30 databases per RDS instance; if you have more than 30 databases then you need to create another instance.
- You cannot rename the database.
- You cannot restore the same backup file with a different database name on any given instance.
- SQL Server native backup and restore for SQL Server is not supported on the db.t1.micro DB instance family.
- Server roles are not supported.
- High availability options like replication, Always On, log shipping, etc. is not supported in RDS however there is multi-AZ provisioning in RDS for production databases.
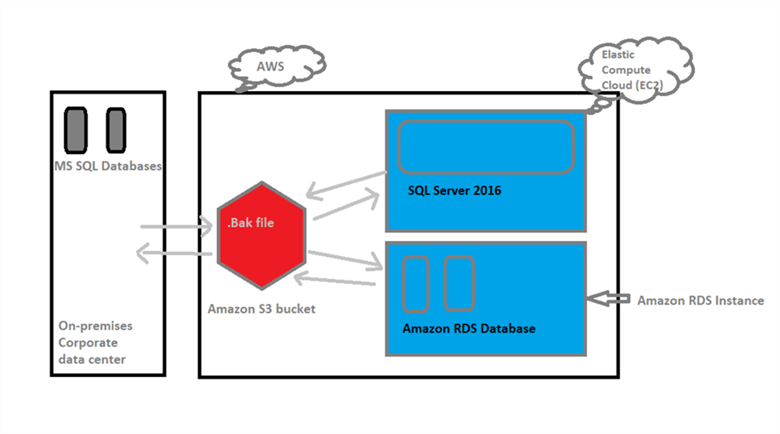
- Amazon Relational Database Service (Amazon RDS) supports native backup and restore for Microsoft SQL Server databases using full backup files. You can create a full on-premises database backup, store it on Amazon Simple Storage Service (Amazon S3) and then restore the backup file onto an Amazon RDS instance or you can do vice versa to an EC2 instance.
The following scenarios support a database move to and from RDS.
First you need to create a VPC, subnet, etc. in Amazon AWS. In my last tip I explained how to build an enterprise environment in AWS, click here for more information.
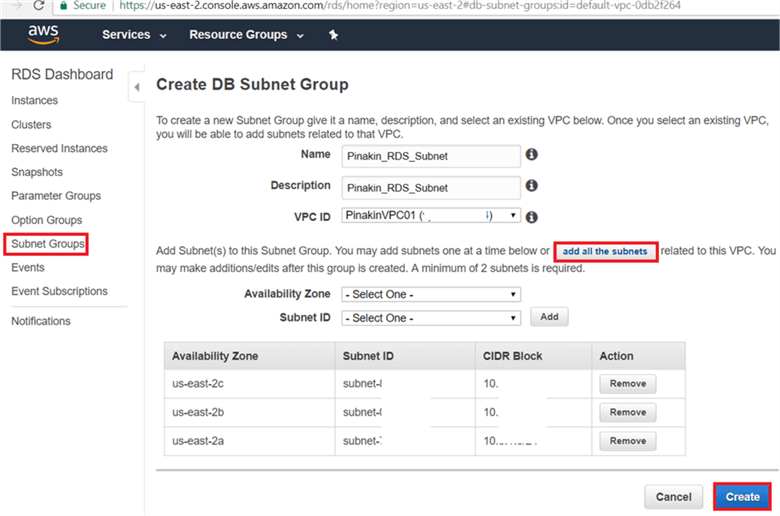
Step # 1 – How to create RDS subnets groups
When you create a VPC it spans all availability zones within the region. After creating a VPC you can add one or multiple subnets in one or more availability zones. When you create an RDS SQL Server instance in a VPC you need to add the subnet group along with availability zone which will use an IP address within the subnet. If your primary RDS instance of a multiple-AZ deployment fails then the Amazon RDS instance will failover to a secondary RDS instance in a different subnet group within the availability zone. You will get an option to select availability zones or you can leave as no preference and AWS will assign it.
On the subnet groups page; enter the name, description and select your VPC – if there is more than one VPC then select the correct one from the drop-down menu. Select an Availability Zone from the drop-down list and the subnet id or click on “add all the subnets” which will add all subnets along with the CIDR block and then click the Create button.
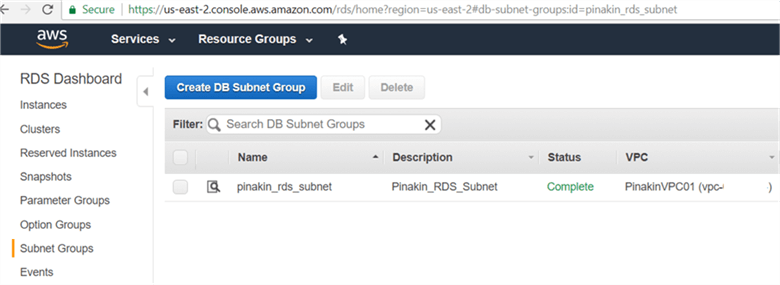
On the Subnet Groups page, the newly created subnet groups will appear and the status is shown as complete.
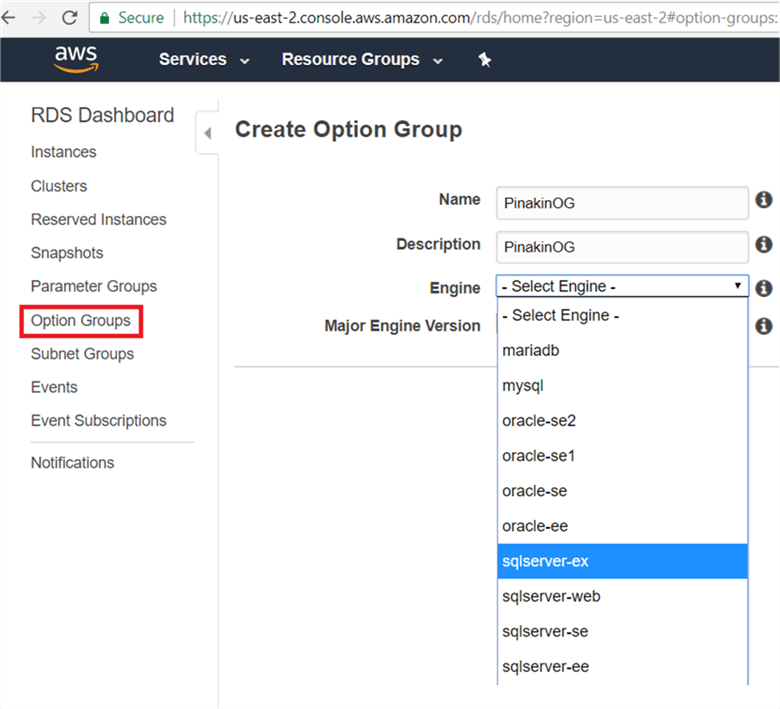
Step # 2 – How to create RDS Option Group
Some database engines such as MS SQL, Oracle, MySQL, etc. offer additional features that will help to manage the data and database, using these additional features you can migrate a SQL Server database with native backup and restore. To enable the additional feature you need to follow some additional steps.
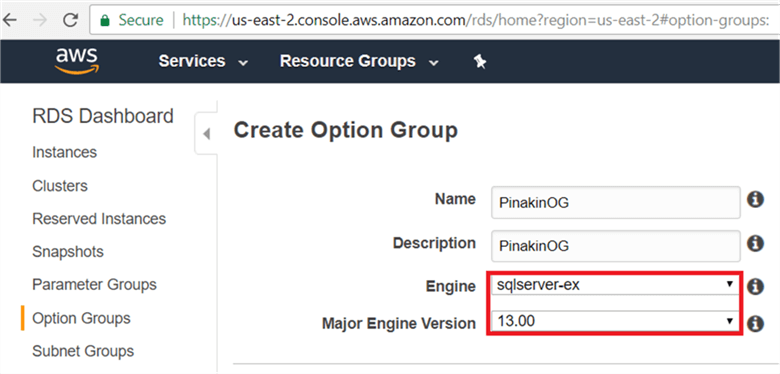
On the Create Option Group page, enter the option group name, discretion and select your database engine along with edition from the engine drop down menu. Here I am configuring the SQL Server Express edition so we have selected sqlserver-ex.
On the Create Option Group page, select the major engine version, here I am configuring SQL Server 2016 so we have selected 13.00.
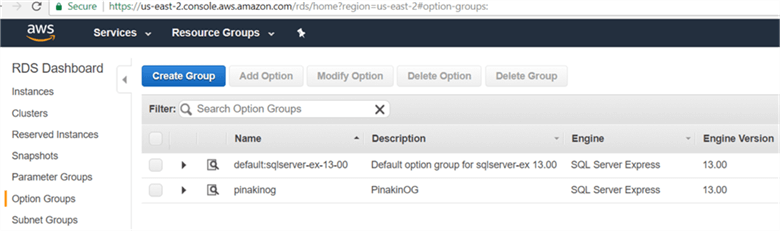
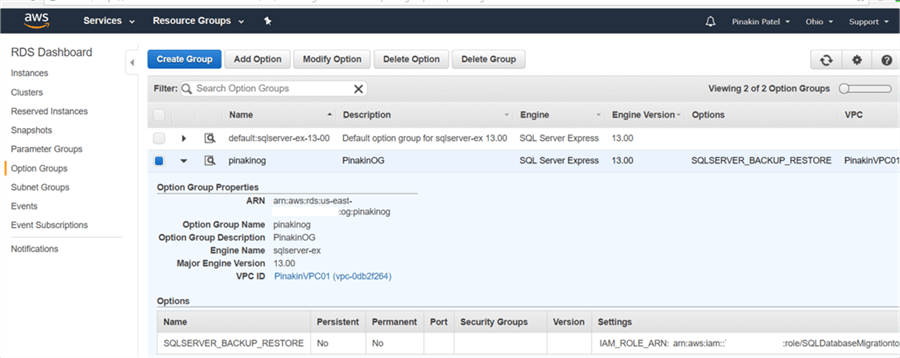
On the Option Groups page, the newly created option groups will appear as shown below.
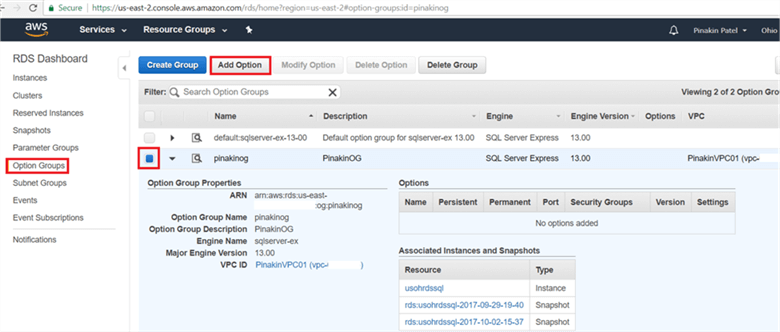
On the Create Option Group page, select the option group and click on Add Option.
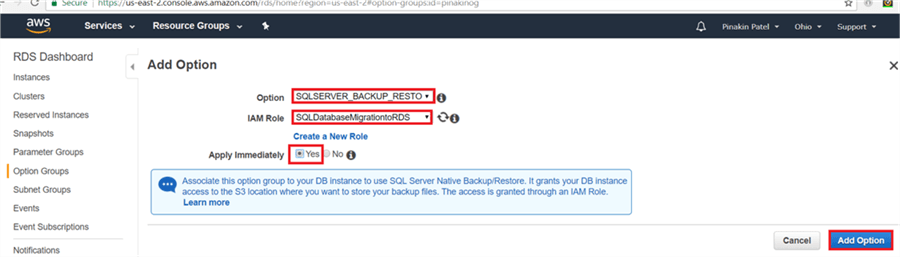
On the Add option dialog box, select SQLServer_Backup_Restore from the drop-down menu and select the IAM role and check Yes for apply immediately, to apply the changes immediately and click on the Add option.
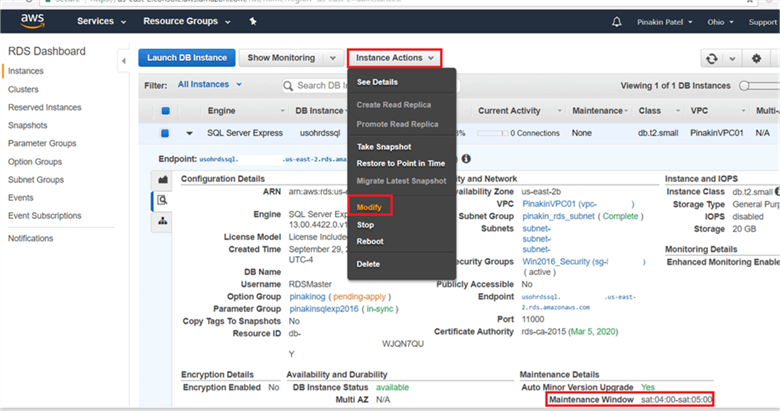
Note – If you check the No option then the option changes will not take effect until the next maintenance window, during the maintenance window the changes will be implemented. Until that time, the backup and restore option won’t be enabled.
On the option Groups page, the newly added option feature will appear as shown below.
If you didn’t check Yes for apply immediately, then you can modify the instance and apply immediately by selecting the RDS instance, go to the Instance Actions and click on Modify as shown below in the maintenance window.
Step # 3 – How to create RDS Parameter Groups
All database engine configurations are managed using the parameters in the parameter group. The database parameter groups act as a container for the engine configuration values. If you create an RDS instance without specifying the custom created parameter group then the default parameter group will get created automatically using default values of the Amazon RDS system, database engine and compute class. If you want to tune the RDS instance database configuration then create your own parameter group and change the values in the group. The most important part is if you do not want to change the values on all of the RDS instances then you need to create separate parameter groups for each instance or else you will use the same parameter group for all RDS instances and all instances will get updated.
Below are some points you should be aware of when working with parameter groups:
- The dynamic parameter values apply immediately once you save the database parameter group.
- The static parameter values apply when you save the parameter group followed by a manual RDS instance reboot.
- When you change the RDS instance parameter group you need to reboot the instance before it will take effect to use the newly changed parameter group.
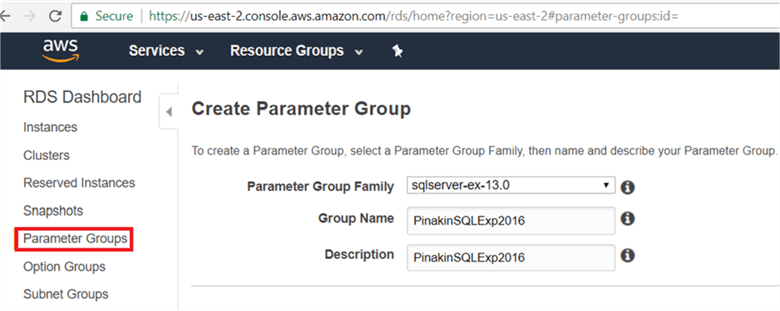
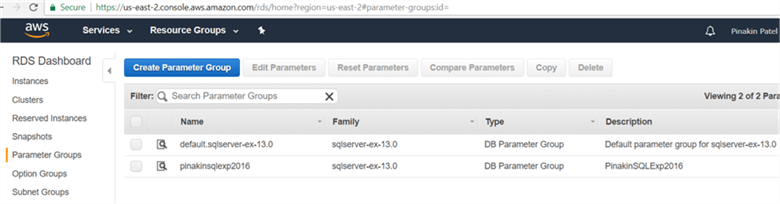
On the Parameter Group page, select the parameter group family from the drop down menu, enter the group name and description and click Create.
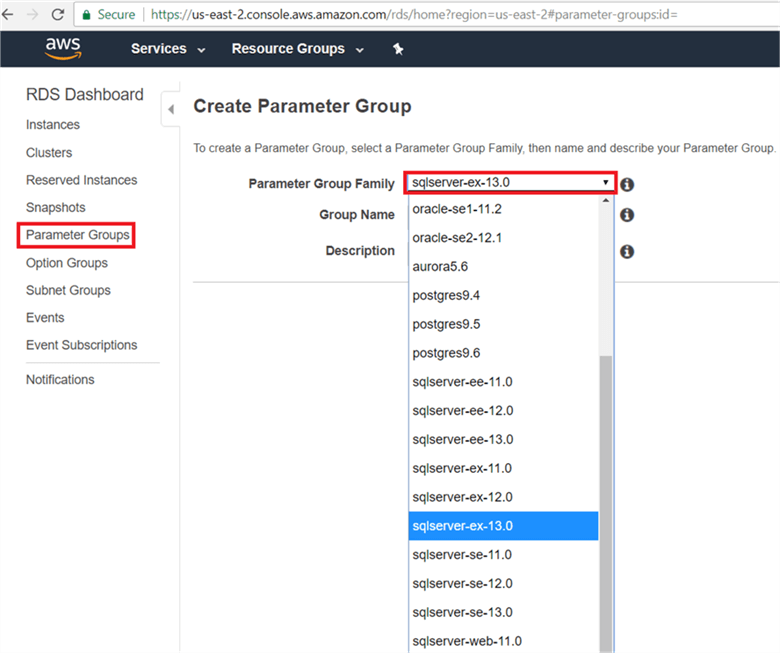
On the Parameter Group page, I have selected sqlserver-ex-13 (SQL server 2016 express edition).
On the Parameter Groups page, the newly created parameter group will appear as shown below.
Step # 4 – How to create an IAM Policy
Using an IAM you can create and manage users, groups and permissions to allow access to the AWS resources and create policies to manage the access and create and manage the encryption key.
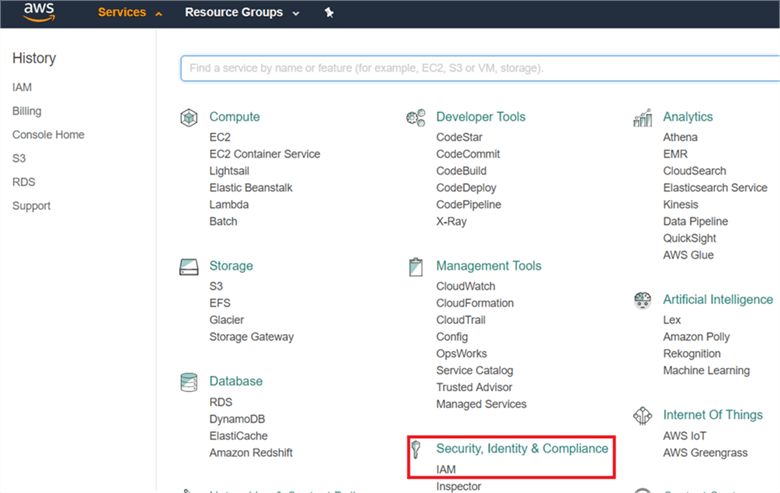
Click on Services on the top left and under Security, Identity & compliance select IAM
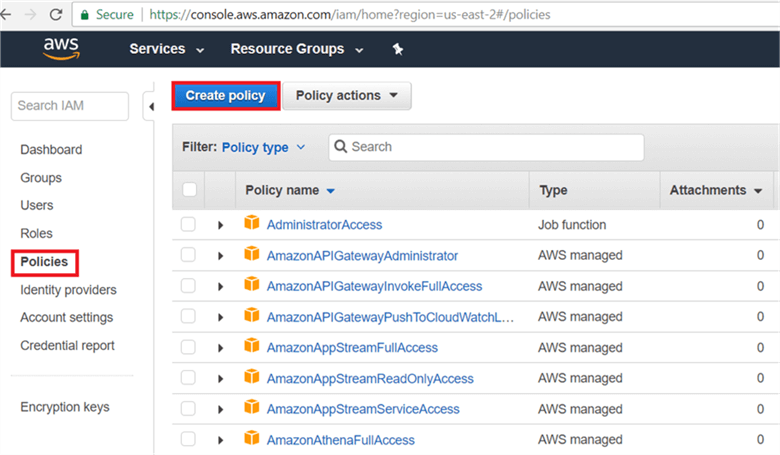
On the Policies page, click Create Policy.
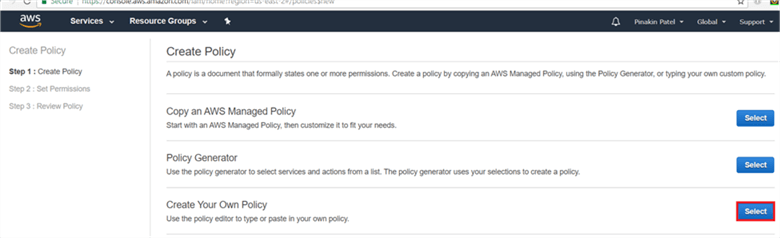
On the Create Policy dialog box, click on Select to create your own policy.
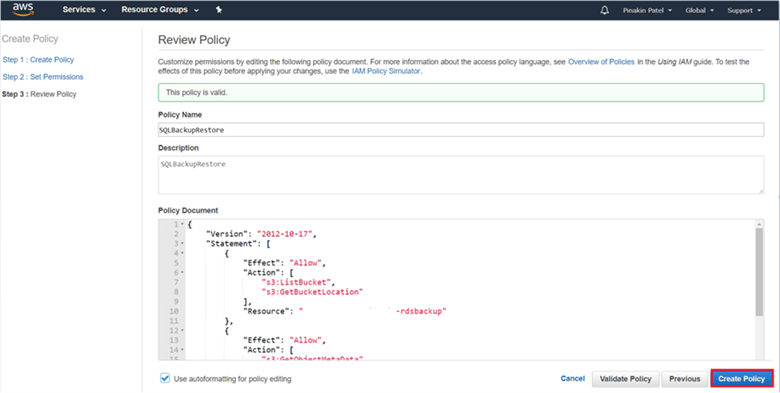
On the Review Policy dialog box, enter the policy name, description and in the policy document use the policy code or you can copy the items below and change the S3 bucket name in yellow.
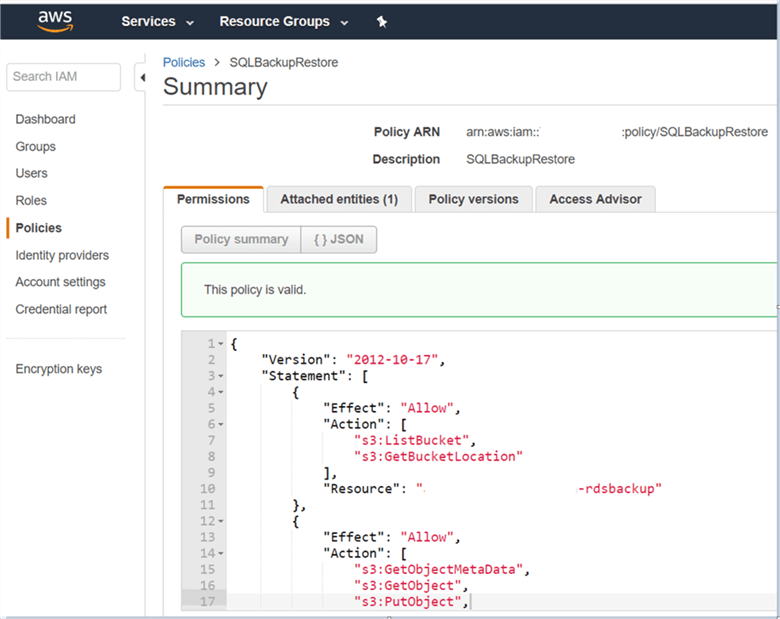
On the Review Policy dialog box, validate the policy and click on Create Policy.
Code
{
    "Version": "2012-10-17",
    "Statement": [
        {
            "Effect": "Allow",
            "Action": [
                "s3:ListBucket",
                "s3:GetBucketLocation"
            ],
            "Resource": "xxx:xxx:xx:::xxxxxxx-rdsbackup"
        },
        {
            "Effect": "Allow",
            "Action": [
                "s3:GetObjectMetaData",
                "s3:GetObject",
                "s3:PutObject",
                "s3:ListMultipartUploadParts",
                "s3:AbortMultipartUpload"
            ],
            "Resource": "xxx:xxx:xx:::xxxxxxx -rdsbackup/*"
        }
    ]
}
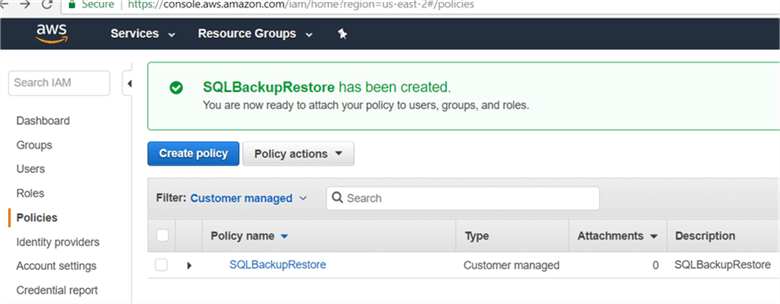
On the Policies page, the new custom managed policy will appear as shown below.
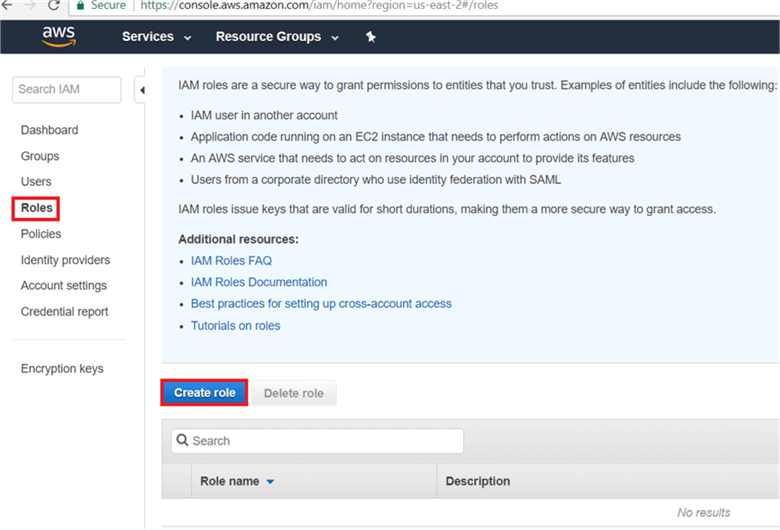
Step # 5 – How to create IAM Role
IAM roles contain sets of users and policies; you can grant access thru policies to users, applications or services that do not have access to your AWS resources.
On the Roles page, click on Create role.
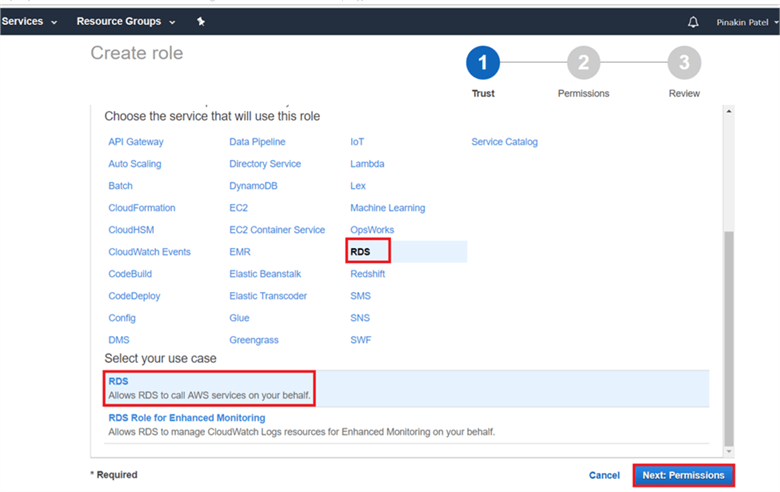
On the Create Role dialog box, select the service that uses the role and select your use case and click on Next: Permission.
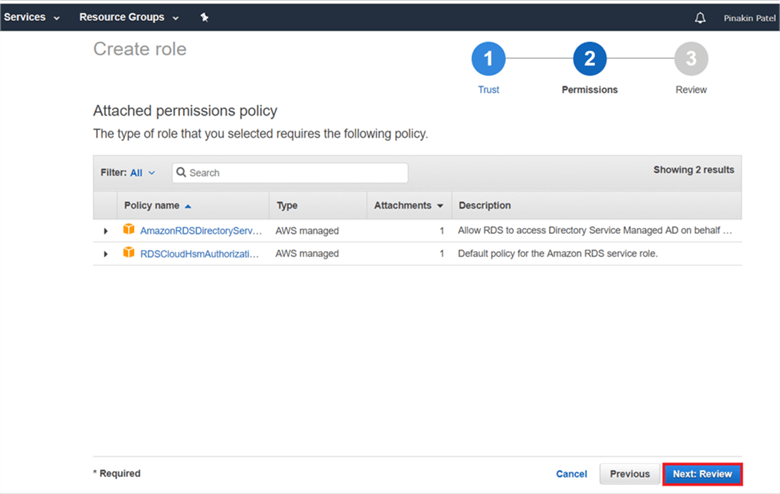
On the Attached permission policy dialog box, click Next: Review.
Note – Since a custom created policy is not available, we will attach the policy after creating the role.
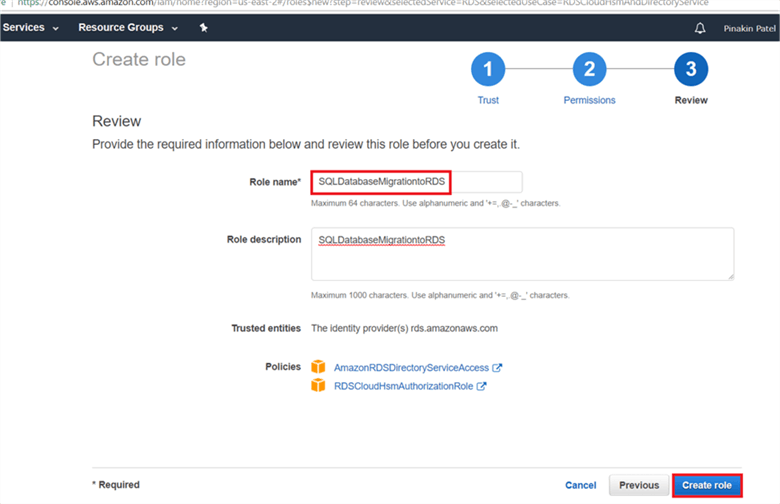
On the Review dialog box, enter the role name, description and Create role.
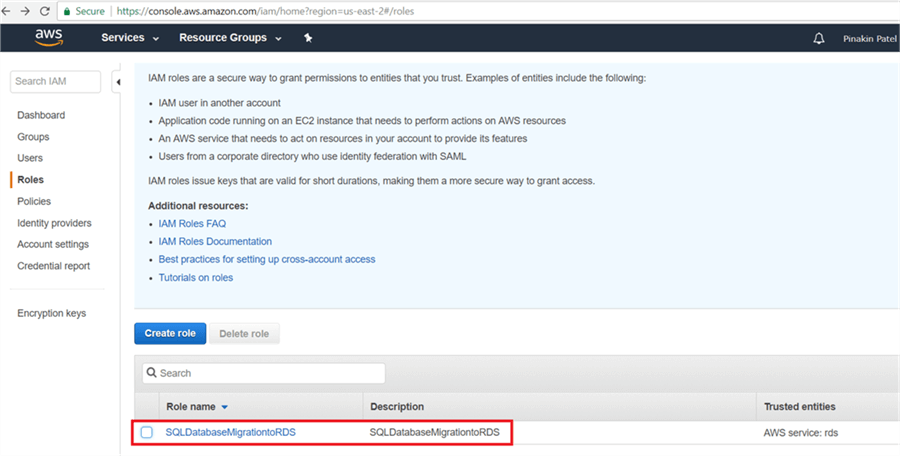
On the Role page the new created custom role will appear as shown below.
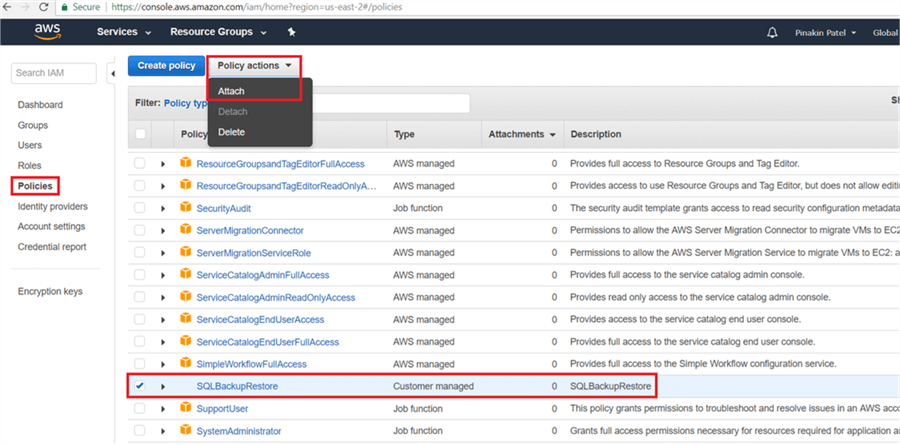
On the Polices page attach the role with the policy by selecting the policy and going to the Policy Actions and click on Attach.
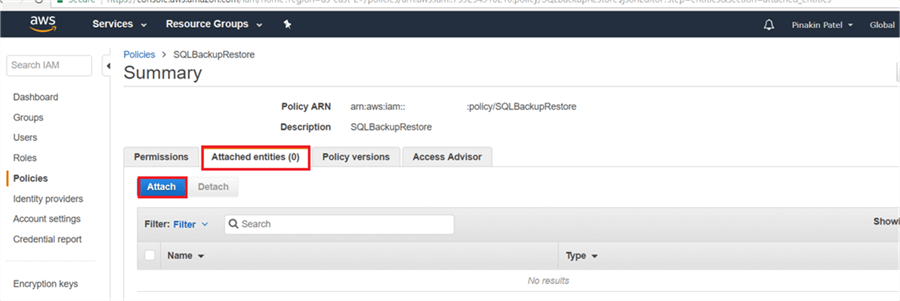
On the Polices dialog box, go to the Attached entities tab and click on Attach.
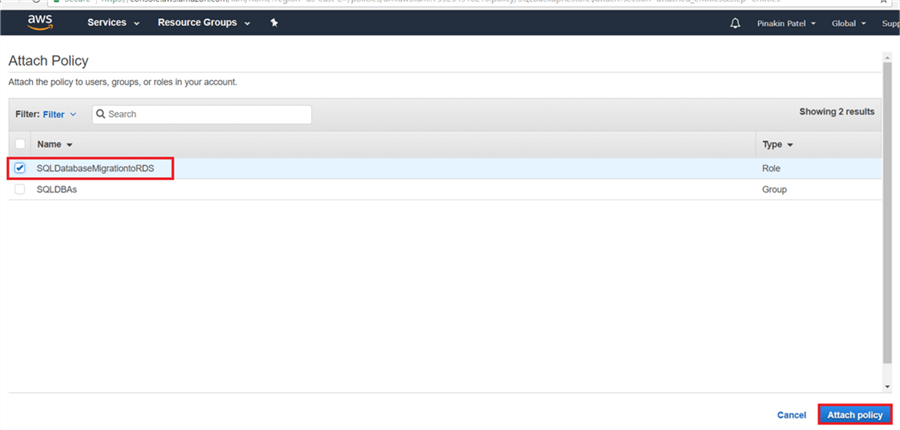
On the Attach Policy dialog box, select your custom role and click Attach policy.
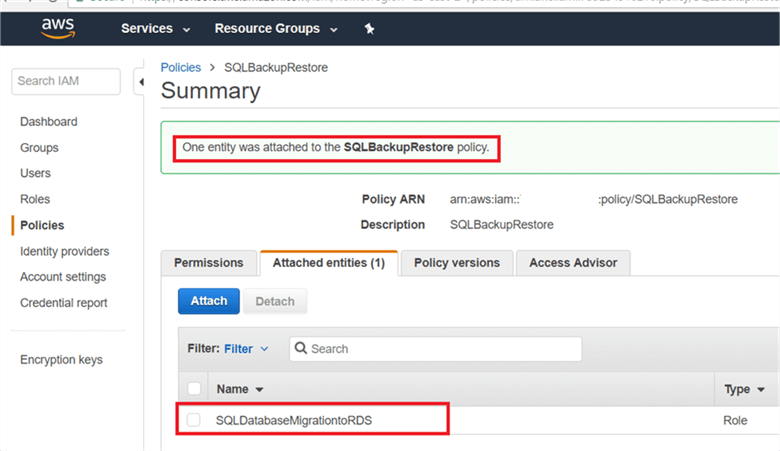
On the Polices page, the newly attached custom role will appear as shown below.
Step # 6 - How to create Amazon RDS Instance
Amazon Web Service Relational Data Service (RDS) is a cloud-based, managed, hosted solution for relational databases. Amazon RDS provides different options to migrate any database to Amazon RDS. With RDS you can automate the software patching, backups, multi-AZ deployment and use a cost-effective pay as you go use model. In RDS you can create Web edition RDS instance (free tier) or you can pay as you use on hourly basis.
You can build your RDS instance with few clicks as per your requirement. Amazon offers a wide selection of RDS instance types to best fit your requirement. Amazon RDS has two types of instances; on-demand instance and reserved instance, you can compare various types of instance combinations of memory, storage capacity, etc.
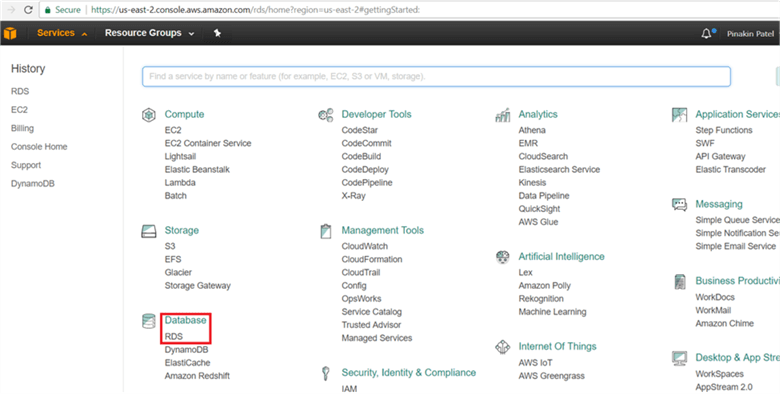
To create a RDS instance, click on Services (top left side) and then under Database select RDS.
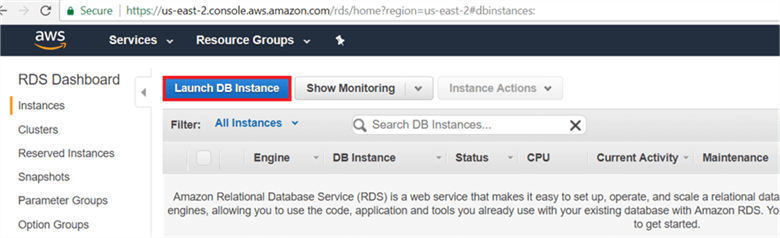
On the Instances dialog box, click on Launch DB Instance.
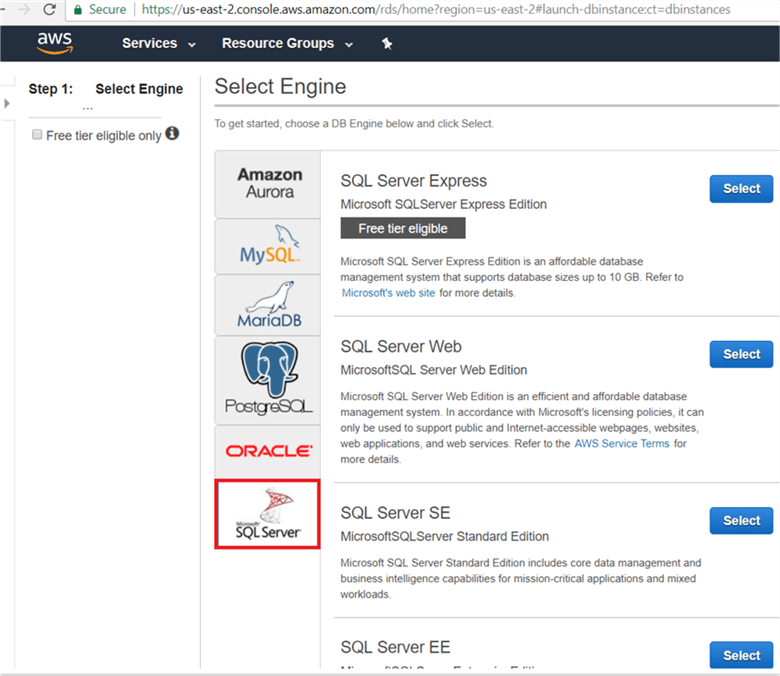
On the Select Engine dialog box, select the appropriate platform along with the SQL Server edition.
Note - You can change the instance type any time when you run the on-demand instance, but you need to migrate all the databases. If you select standard or enterprise edition you will get an option to select a Production or Development instance.
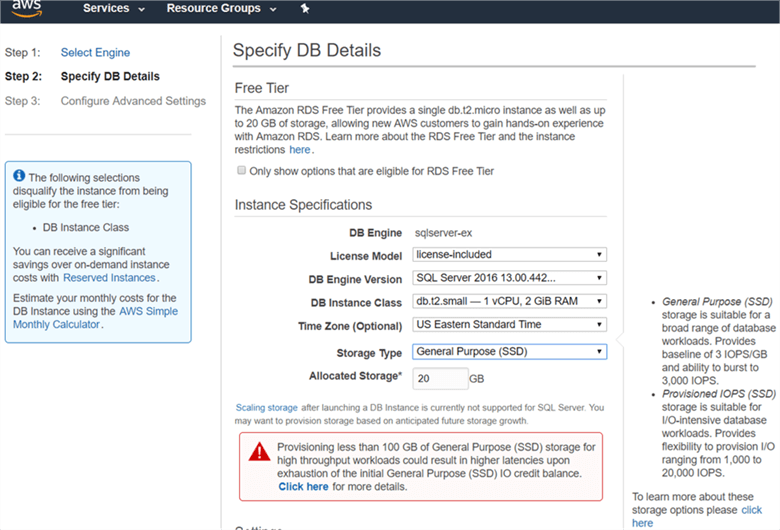
On the Select Engine dialog box, select license model, database engine version and database instance class.
Note – If you need to add more memory or CPU to a RDS instance you need to select the DB Instance Class. Some DB Instance Classes include IOPS, but if you need more IOPS you can get it based on the provisioned IOPS.
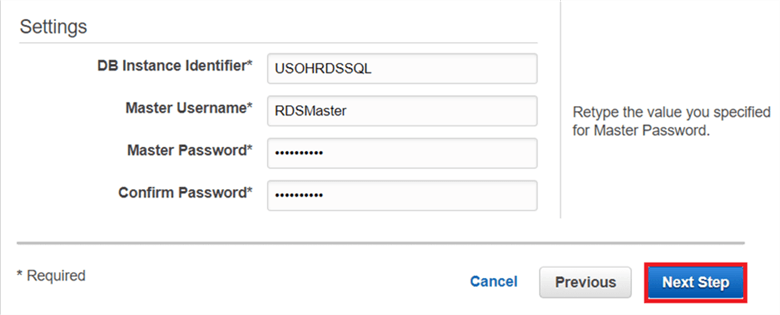
On the Select Engine dialog box, enter the DB Instance Identifier, master username and password and click Next Step.
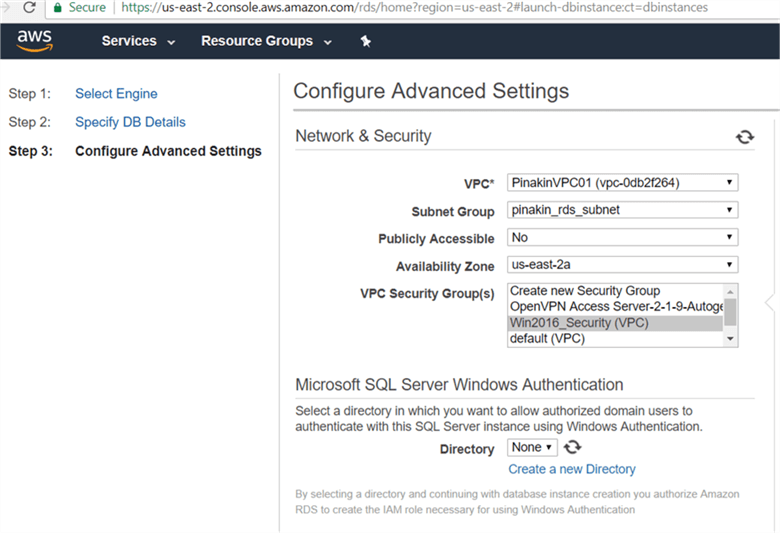
On the Configure Advance setting section, select the VPC, Security group and availability zone.
Note – If you set Publicly Accessible to Yes; then your database will be accessible using a public IP address outside your VPC and security group.
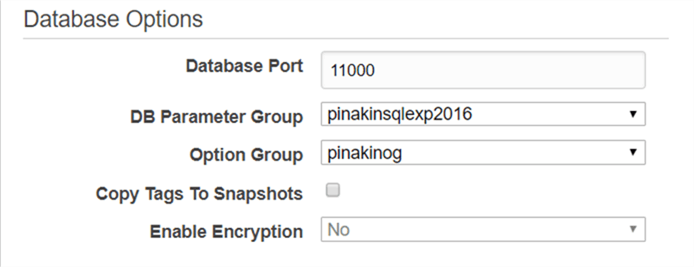
On the Configure Advance setting dialog box, under database option section, enter the RDS database instance port number.
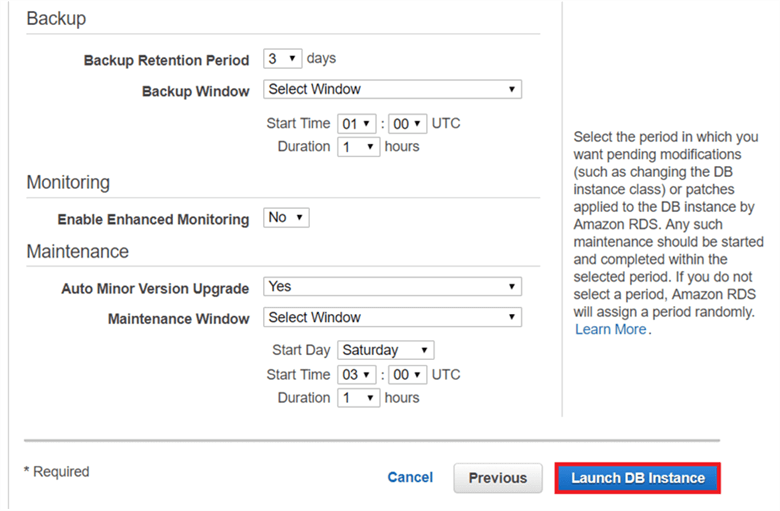
On the Configure Advance setting dialog box, under the backup section, select the number of days for backup retention time, select backup window if you want to perform database backups at a specific time; select the monitoring option if you want to monitor an RDS instance performance. Select the maintenance window as well and click Launch DB Instance.
Here we have a 3-day backup retention on an S3 bucket and if you want more than 3 days you can move to Glacier, if you want to copy a backup from Glacier it will take around 3-5 hours approximately for my test databases. By enabling maintenance, you allow RDS to make minor changes like reboot and patching.
On the Instance page, we will see a message indicating the instance is in a creating state as shown below.

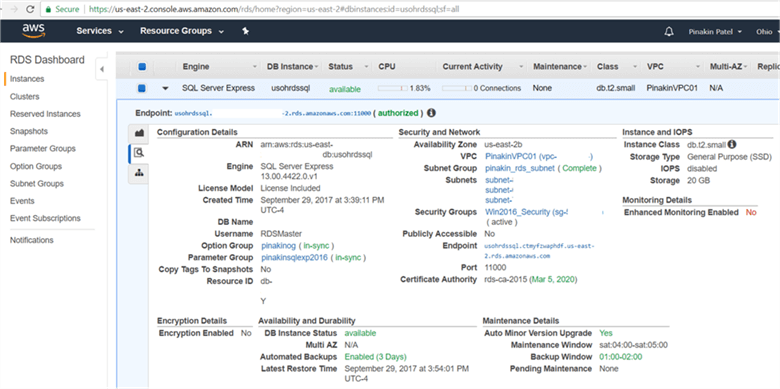
On the Instances page, the status will indicate the instance is available and the AWS instance is up and running.
Conclusion
In this tip we built an enterprise environment and a created an Amazon RDS instance in AWS.
Next Steps
- Check out these other related tips.
- How to build an Enterprise Environment in AWS for SQL Server check here.


About the author
 Pinakin Patel is a SQL Server Admin / AWS Solutions Architect with experience in SQL Server 2000 to 2016.
This author pledges the content of this article is based on professional experience and not AI generated.
View all my tips
