By: John Miner | Comments (1) | Related: > Azure
Problem
There has been a growing trend during the last few years in which companies are moving away from on-premises software to cloud, platform or software as a service (PAAS | SAAS) offerings.
There are five reasons why companies are jumping on this band wagon. First, the initial cost and time to deploy a system is lower. Second, all maintenance such as hardware repairs, software upgrades, backups and restores are provided by the vendor. Third, the ability to scale up or down depending upon the usage patterns is attractive. Fourth, you are always using the latest version of the software. Fifth, the performance of the system is guaranteed with a service level agreement (SLA) between you, the customer, and the vendor. In summary, companies are lowing the total cost of ownership (TCO) by using a PAAS offering.
Microsoft announced the preview version of Analysis Services in October of 2016. The tabular model is completely supported with this release. Many enhancements have been added to the service since its GA release in April of 2017. As a data platform administrator, how do we deploy and manage our models using this Azure service?
Solution
PowerShell has always been the language of choice to automate system deployment and configuration. It is not surprising that we have a series of cmdlets to help us deploy Azure Analysis Services using the resource manager model. Here is an msdn reference to the cmdlets.
Business Problem
One of the business lines in your company is looking at using Azure Analysis Services to create a Business Intelligence (BI) model for their data. They have asked you to get up to speed on how to deploy and test this PAAS service.
Azure Subscription
This article assumes that you have an existing Azure subscription. If you do not, Microsoft offers new customers a 30 day trial subscription with a $200 dollar spending limit. Use this link to sign up now.
List Azure Subscriptions
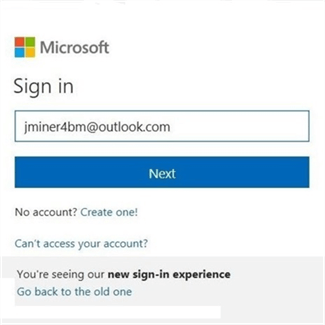
We must log in as a valid subscription owner before we can do any work. The Add-AzureRmAccount cmdlet will prompt you for credentials.
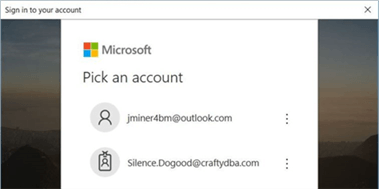
The new sign in process has two dialog boxes. The first box asks for a user name.
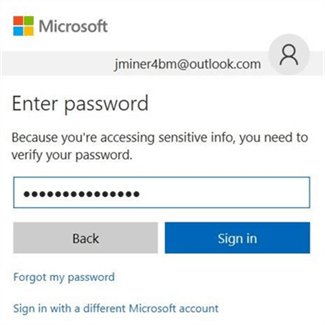
The second dialog box asks for a password.
An account might have several subscriptions associated with it. Use the Get-AzureRmSubscription cmdlet to list the subscriptions associated with [email protected] email address.

The above output from this command shows one Microsoft Partner Network subscription associated with my outlook account. My employer gave me this account for research. If there was more than one account, we could use the Set-AzureRmContext cmdlet to choose the correct subscription.
The PowerShell code below logs into the portal, lists the subscriptions and selects the correct subscription. Of course, manual intervention is needed for the sign on.
#
# Azure Subscriptions
#

# Log in to your Azure account
Login-AzureRmAccount

# Select a subscription
Set-AzureRmContext -SubscriptionId 'cdfb69bf-3533-4c89-9684-1ba6ba81b226'

# Clear the screen
Clear-Host

# List all the subscriptions associated to your account
Get-AzureRmSubscription
Choosing a data center
Not all data centers support each platform as a service (PAAS) offering. Regardless of what service you want to deploy, you should always check for the availability of a service at a particular data center location.
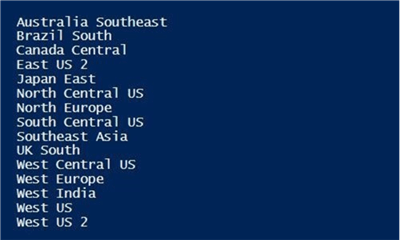
The Get-AzureRmResourceProvider cmdlet can be filtered to list all data centers for a given service. Executing the PowerShell script below identifies which data centers we can deploy Azure Analysis Service to.
#
# Data Centers with my service
#

# Get data centers with Azure Analysis Services
$AzureLocations = (Get-AzureRmResourceProvider -ListAvailable | `
    Where-Object {$_.ProviderNamespace -eq 'Microsoft.AnalysisServices'}).Locations

# Show the results
$ AzureLocations
Output from PowerShell script points out that East US 2 location is the data center closest to Boston, MA.
Resource Group
The concept behind the Resource Manager model is that all Azure components that make up a solution are created or destroyed as a group. Thus, the key object that binds all the items together is a resource group.
When working with resource groups, there are three cmdlets you should know:
- New-AzureRmResourceGroup cmdlet creates a named group in a location that you choose.
- Get-AzureRmResourceGroup cmdlet lists all resource groups defined for an account.
- Remove-AzureRmResourceGroup cmdlet removes a named resource group
The PowerShell script below creates a resource group named rg4tips18 in the East US 2 location.
#
# Create a resource group
#

# New resource group
New-AzureRmResourceGroup -Name "rg4tips18" -Location "East US 2"

# List resource groups
Get-AzureRmResourceGroup
Output for PowerShell script showing newly created resource group.

Azure Analysis Service (AS)
The PowerShell cmdlets for this service take the usual parameters: new service name, resource group name, and location name.
When working with this service, there are three cmdlets you should know:
- New-AzureRmAnalysisServicesServer cmdlet creates a new service.
- Get-AzureRmAnalysisServicesServer cmdlet lists a current service.
- Remove-AzureRmAnalysisServicesServer cmdlet removes a current service.
Just like Azure SQL database, you must choose a service tier. Each tier has a limit on query processing units (QPU) and how much memory the model can use. The pricing of the service is based on these two metrics.
The Developer tier has all the possible modeling features, but can’t be used for production. The Basic tier does not support perspectives, partitions, and direct query. The Standard tier is a fully functional, product ready offering. I am going to select the developer tier for this deployment.
The PowerShell code below deploys our Azure AS server to the East US 2 location.
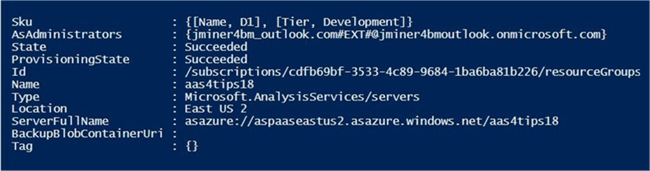
#
# Create the service
#

# New AAS server
New-AzureRmAnalysisServicesServer -ResourceGroupName "rg4tips18" `
   -Name "aas4tips18" -Location "East US 2" -Sku D1

# Clear the screen
Clear-Host

# List Azure AS server
Get-AzureRmAnalysisServicesServer -ResourceGroupName "rg4tips18" -Name "aas4tips18"
Output for PowerShell script showing newly created server.

Choosing an Administrator
Right now, we have successfully deployed the Analysis Services server. However, we have not defined an administrator. I rolled out the server this way to show how tightly bounded the service is to Azure Active directory.
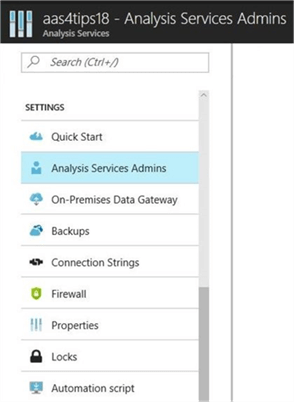
Find the aas4tips18 object in the all resources panel. Double click and open the object in a new panel. Scroll down on the left menu to find the Analysis Services Admins option under the settings group. The image below was taken from the portal. Double click this option to make changes.
The next panel shows the two users that are part of my Azure Active directory. The first user owns the subscription and the second B2B user has been asked to join our domain. Make the [email protected] account a server administrator.
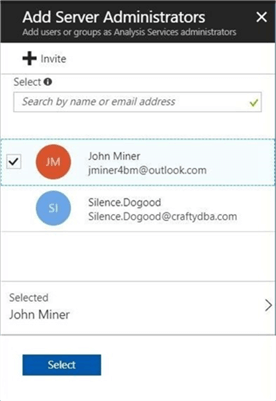
If we take a look at the administrator accounts after the selection, we can see a weird account name showing up. This is due to the fact that the outlook account is external to the domain you defined within your subscription.

Here is my first warning to new users of the service. I have had issues in the past authenticating to the model when an Azure subscription domain was used. I think this occurs when you log into a local Corporate domain and try to use a separate Azure domain at the same time. I have successfully deployed models when the Corporate domain is federated (synchronized) with the Azure domain.
If we execute the Get-AzureRmAnalysisServicesServer cmdlet again, we can see this outlook account listed as an administrator.
Creating a Sample Model
One nifty feature of the Azure Portal is the ability to deploy a sample model. If we navigate to the manage panel and choose new model, we can select sample data.
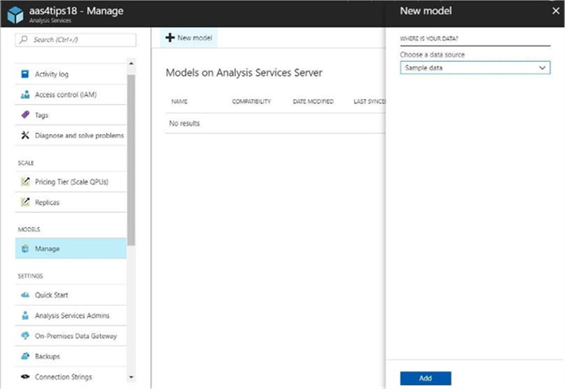
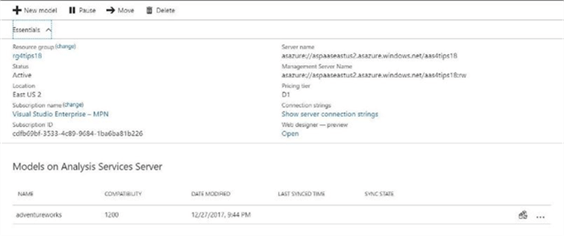
Upon clicking the add button, the adventureworks model is deployed to the server.
Let us start using the new sample model using a familiar tool.
Management Studio (SSMS)
SQL Server Management Studio is the chosen tool of administrators to manage all the following types of servers: database engine, integration services, reporting services and analysis services. Make sure you have the latest release of this tool. As of today, version 17.4 is the latest version that can be downloaded here.
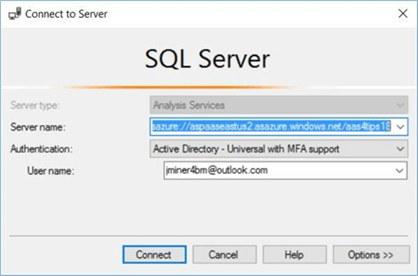
Copy the server name off the overview panel in the Azure Portal. Supply this internet address as the server name. I chose to use Active Directory authentication with MFA support. Enter in the email address and user name at this time
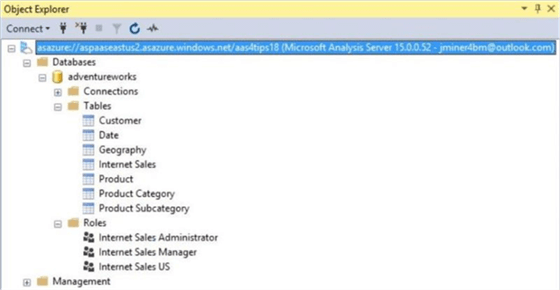
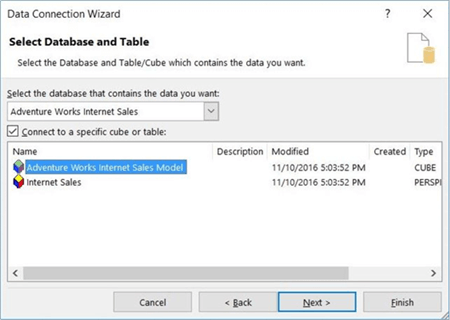
If you successfully connect, you should see the adventureworks model. See image below. This model has seven tables and three different roles. Since we are not doing any management today, please close SQL Server Management Studio at this time.
I usually explore the data inside the model using either Microsoft Excel or Power BI. Let us try both those tools next.
Model exploration with Microsoft Excel
I am going to create a spreadsheet named AdvWrk.xlsx in my local directory. I am using the 32 bit version of Microsoft Office 2016.
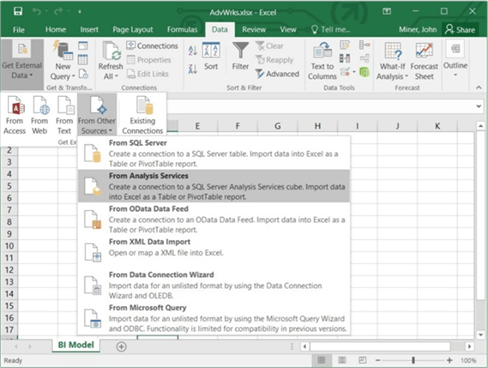
It is suggested that you download and install the latest client drivers from here. There are three client libraries: AMO, ADOMD, and MSOLAP.
The next logical step is to get an external data connection for Azure Analysis services. The image below shows how use the data menu and tool bar to get external data.
Here is my second warning to new users of the service. The new client drivers, MSOLAP 8.0, do not interface correctly with Microsoft Office 2016. There are some forum threads you can look at which suggest a registry hack for a given CLSID. This change should be handled by the client driver install!

If you really need to get this working for your organization, I suggest you put in a support ticket in with Microsoft on day one of your project.
I happen to have a local version of this tabular model installed with SQL Server 2016. I will use windows authentication when connecting since I know I am a local administrator of both my laptop and analysis services.
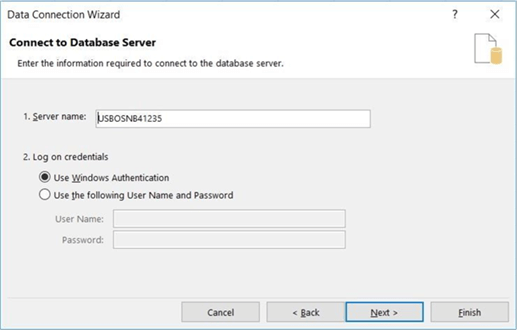
The data connect wizard successfully connects to my local model.
The image below shows a pivot table showing internet sales for various States in the region named United States. If we look real hard at the data, we can identify the top three States that have the most sales.

In short, I wish I could say that the client drivers worked this easily for the cloud service.
Model exploration with Power BI
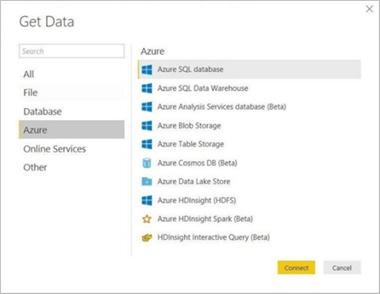
I am going to create a Power BI solution named AdvWrk.pbix in my local directory. I am using the latest version of the desktop tool. Again, we want to use the get data menu option to define our connection. Choose the Azure Analysis Services database option.
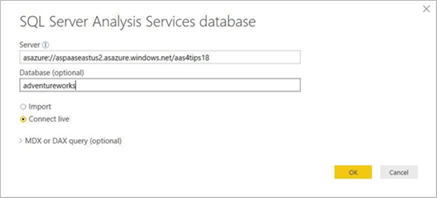
Paste in the internet address that identifies our Azure Analysis server. Choose the adventureworks model as a direct query (connect live).
We need to supply credentials for the connection. I am going to select the Outlook account for my subscription. This account is an administrator of Azure Analysis Services.
I am going to look at the same query that we did for the pivot table in Microsoft Excel. The visuals in Power BI allow the user to gain insight right away from the data. The tree view is a great visual aid for our data. Again, I want to find the US States that have the biggest sales last year.
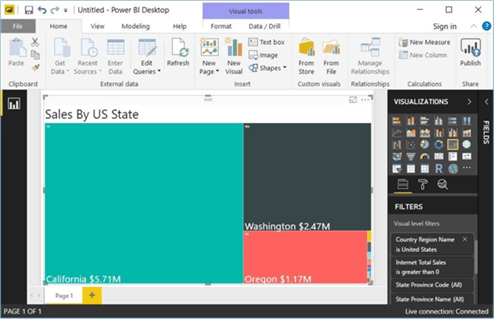
We can see right away that California, Washington and Oregon were the states with the biggest sales numbers.
Next Steps
Today, we deployed an Azure Analysis Service server using the Power Shell cmdlets. The deployment of the service is straight forward. I wished that Microsoft allowed standard security with this service. Why not allow a user name and password over a secured connection? Instead, the service is tightly bound to Azure Active Directory. This may or may not cause your problems.
The Azure Portal allows an administrator to deploy a sample model for testing. The SQL Server Management Studio can be used to manage the model. Other ways to deploy the model are Visual Studio and SQL Server Data Tools. I will leave that discussion for another time.
Two popular tools to explore that data within the tabular model are Microsoft Excel and Power BI. There are issues with the client drivers and Microsoft Office. This is a real disappointment since a majority of the business community uses this tool. Power BI has a beta connection for this service and it works like expected.
In conclusion, Microsoft has released a PAAS offering of Analysis Services that might be of use to your company. There are two perceived defects which might cause issue when you try to deploy your model to the cloud. The overall goal of companies using this service is either to get the model closer to the data or lower the total cost of ownership:
- Pausing and resuming the service to save money.
- Scaling up and down resources to satisfy business requirements.
- Backing up, restoring and processing the model as day-to-day operations.
- Using scale-out to distribute queries across multiple servers.


About the author
 John Miner is a Data Architect at Insight Digital Innovation helping corporations solve their business needs with various data platform solutions.
This author pledges the content of this article is based on professional experience and not AI generated.
View all my tips
