By: Diana Moldovan | Comments (2) | Related: > Microsoft Excel Integration
Problem
Automating a data import routine from Excel to SQL Server can be a bit problematic if the data is not just a simple list. In this tip I'll show how you can import an Excel file into a SQL database using PowerShell when the structure of the data is not a simple set of data.
Solution
I'll describe a few options you can use to import Excel files. I'll use PowerShell for my code examples, but you can also use .NET with C# or VB. You can schedule both PowerShell scripts and .NET console applications using SQL Server Agent or Windows Scheduler.
Your Windows user should have the rights to read / write in the appropriate file locations. Your SQL Server account should be able to insert data in the target database's tables.
Since in most cases you'll need to install software or components on your machine, it would be helpful if you have access to a local administrative account.
In this first tip of the series I'll cover dealing with Excel COM objects.
Working with the Excel COM objects
Let me show you a two-step procedure involving Excel COM objects and a csv bulk import into SQL Server.
- The first step copies Excel data in a .csv file.
- The second step bulk inserts the first step .csv file in a SQL table.
For the first step you'll use the Application interface to generate a new Excel instance and you'll manipulate the workbook and its sheets through code. Obviously, this will require a machine with Excel / Office already installed.
During the MS Office installation, if the .NET Programmability Support feature is enabled, the Office primary interop assemblies will be copied in your Global Assembly Cache and in the Office installation directory, for example in C:\Program Files (x86)\Microsoft Office\root\Office16\DCF and in the directories corresponding to other add-ins, such as PowerPivot. The Visual Studio installation process will also copy these .dll files on disk, to avoid development problems if there are multiple versions of the assemblies copied in GAC. For example, if you've installed VS 2019 you should find Microsoft.Office.Interop.Excel.dll in C:\Program Files (x86)\Microsoft Visual Studio\2019\Community\Common7\IDE\Extensions\Microsoft\ADL Tools\2.4.1000.0.
These assemblies let you manipulate the workbook and its sheets.
I've used this method when I had to work with a heavily processed Excel files having a lot of information that I did not need. The useful data I wanted to import in SQL was situated in a small range of cells which I "picked" and wrote in a text file. The image below shows a section of the file.
Notice that there are a few rows featuring information about data types and lengths on the top of the file. You don't need to import these rows. The yellow cells contain the data you need to import. I could try to save the file as csv and import the csv instead of dealing with Excel. Unfortunately, the hidden cells content showed up in the csv file, and manually pruning the extra information would have been a waste of time.
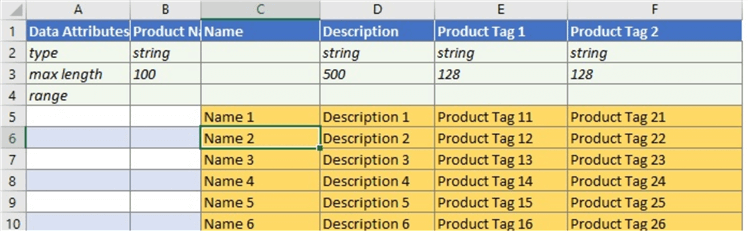
Below you can see the essential steps of the PowerShell script that helped me avoid cumbersome manual processing. The code opens an Excel file from a location specified by the $FilePath variable – it creates a new Excel.Application object, sets its Visible property to false (you don't need to actually see the Excel file) and loads the Products worksheet. Then it goes to the beginning location of the yellow range of data to import, which is C5, and "picks" each cell of data. Each row is copied to an output stream in a do...while loop.
$ErrorActionPreference = "Stop"

[string] $OutFile = <location on disk>
# Specify the path to the Excel file and the WorkSheet Name
[string] $FilePath = <location on disk>
[string] $SheetName = "Products"

try{
# Create an Object Excel.Application using Com interface
$objExcel = New-Object -ComObject Excel.Application
# Disable the 'visible' property so the document won't open in excel
$objExcel.Visible = $false
# Open the Excel file and save it in $WorkBook
$WorkBook = $objExcel.Workbooks.Open($FilePath)
# Load the "Products" worksheet
$WorkSheet = $WorkBook.sheets.item($SheetName)

[string]$RowData = ""
#useful data range (the yellow range in the picture above) begins at the 5th row…
[int] $Row = 5

$Stream = [System.IO.StreamWriter] $OutFile
#read the content of each cell, concatenate the values using a separator and write to the stream
do {[string]$Data = $WorkSheet.Range("C$Row").Text

        $RowData = [string]::Join(",",
                        $WorkSheet.Range("C$Row").Text,     #Name
                        $WorkSheet.Range("D$Row").Text,     #Description
                        $WorkSheet.Range("E$Row").Text,     #Product Tag 1
                        $WorkSheet.Range("F$Row").Text,     #Product Tag 2
                        .
                        .
                        .
                        )
            $Stream.WriteLine($RowData)

            $Row++} while ($Data)
}

catch{
    #error logging code
}
finally{
    $Stream.close()
    $WorkBook.Close()
}
The output will be a .csv file located at $outFile.
If you didn't install Excel on your machine, the New-Object cmdlet will return an error message:
If the Excel worksheets are plain, with nothing you need to "strip off", you can simply save them as a .csv or .txt file. See this tip by Tim Smith.
Instead of writing the values in a text file, you can build INSERT statements and directly insert the data in SQL. However, for large files the bulk insert method of a .csv file (as I'll describe in the next step below) should be faster.
The next step is to import the file(s) into the SQL database. One of the fastest methods to move the data into SQL is to bulk insert the file. In the PowerShell script below, I've used two of Chad Miller's scripts from the TechNet Gallery. Out-DataTable.ps1 uses the file obtained above to create a DataTable. Write-DataTable.ps1 bulk inserts this DataTable into a SQL table. For best performance I've inserted in a staging table with no indexes.
Unfortunately, Microsoft is retiring the TechNet Gallery; therefore, I'm including Chad Miller's scripts in a .zip file for you to download and use. You'll need to use both files. Please download and copy them in a location of your choice on disk.
First of all, the script checks if the sqlps module is already installed and if not, it installs it. This module contains the provider and cmdlets I need to interact with my SQL Server instance.
The $outDataTablePath and $writeDataTablePath variables values are the location of Out-DataTable.ps1 and Write-DataTable.ps1 on disk – you'll have to download the archive and copy the files on your disk.
The first two lines from the try block (.$outDataTablePath and .$writeDataTablePath) dot-source Out-DataTable.ps1 and Write-DataTable.ps1, i.e. load the code from these additional files into the same session scope as the calling / main script; therefore, you'll be able to use the "external" code.
Next, Import-Csv will create an object that will be the input for the Out-DataTable function (see code in Out-DataTable.ps1). You can import only a subset of the columns from the csv source if you specify a Header list. Out-DataTable.ps1 will create a DataTable object that will be bulk-imported into SQL by Write-DataTable.ps1 (see the new-object Data.datatable call in Out-DataTable.ps1 at line 66). The import should be fast because Write-DataTable.ps1 calls the Data.SqlClient.SqlBulkCopy class.
#importing the sqlps module if it is not yet imported
$SQLModuleCheck = Get-Module -ListAvailable -Name sqlps
if ($SQLModuleCheck -eq $null){
    Import-Module -Name sqlps -DisableNameChecking
}

#file locations
$outDataTablePath = <Out-DataTable.ps1 location on disk>
$writeDataTablePath = <Write-DataTable.ps1 location on disk>
$csvPath = <source file location on disk>

#SQL server objects
$serverInstance = <SQL instance name>
$database = <database name>
$tableName = <target table name>

$ErrorActionPreference = "Stop"
try{
#including the Write-DataTable and Out-DataTable functions
.$outDataTablePath
.$writeDataTablePath
#selecting the required columns
 $fileData = Import-Csv -Path $csvPath -Header <comma separated list of column names>
  $DataTable = Out-DataTable -InputObject $fileData
 Write-DataTable -ServerInstance $serverInstance -Database $database -TableName $tableName -Data $DataTable
 }
catch{
    #error handling code
}
Both scripts can be scheduled as PowerShell steps or as command prompt steps running Powershell.exe in the SQL Server Agent as described in the Next Steps link.
Next Steps
- You can schedule a PowerShell script either using the SQL Agent or using the Windows Task Scheduler.
- If you use SQL Agent, please be aware of the error logging issues.


About the author
 Diana Moldovan is a DBA and data centric applications developer with 6 years of experience covering SQL 2000, SQL 2005 and SQL 2008.
This author pledges the content of this article is based on professional experience and not AI generated.
View all my tips
