By: Mohammed Moinudheen | Comments (2) | Related: > Azure
Problem
I have an Azure SQL DB that is growing consistently. As per business requirements, we only need to retain data for 30 days in the Audit tables. We have a similar on-premises database and we perform regular data purges using SQL Server Agent Jobs. Is there any way I can use the existing purge scripts to run on the Azure SQL DB and periodically schedule a purge of old data?
Solution
For on-premises databases, scheduling auto purging is straightforward as we can create new SQL Server Agent Jobs and configure the purge operations as per your schedules. However, on Azure SQL database, we can make use of the Elastic Job agent for this purpose where we can use the features similar to SQL Server Agent. We do not need to use the Elastic Job agent for an Azure SQL managed instance because SQL Server Agent is available and things can be scheduled like an on-premises server.
This tip assumes that you already have resources in your Azure environment and you are familiar with the Azure portal. If you are new to Azure, you can subscribe to a trial account here, which will gives you access to Azure services for a year and a credit of $200 USD.
Using Azure Elastic Job Agents
As mentioned earlier, we can make use of Elastic Job agents for scheduling purposes and we can easily create, update or delete jobs and set up new schedules using this feature. There is this tip by John Martin, where he provides a very good introduction to this feature with sample code. I highly recommend you to read this tip if you are new to this feature and try out the instructions to configure the required steps and set up Elastic Job agents on your subscription.
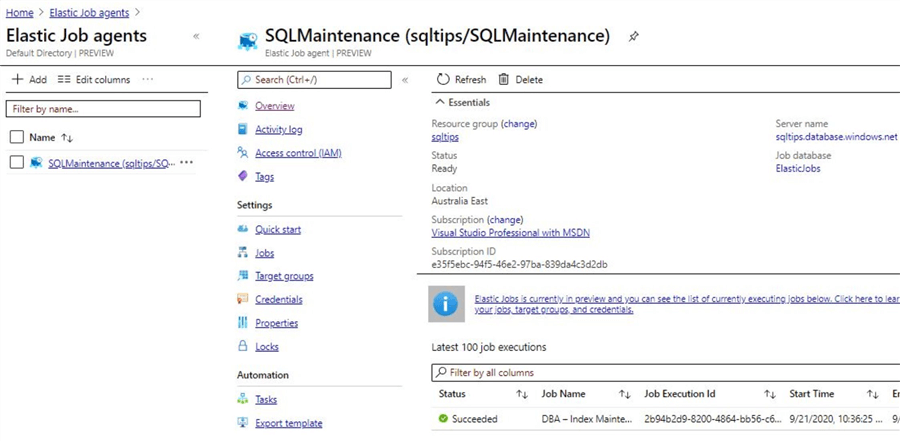
Screenshot of Elastic Job Agents from My Subscription
Once you refer this tip and try out the instructions, you would have created a new database on S0 compute tier or higher along with the configuration for the Elastic Job agent. The screenshot for the Elastic Job agent is shown below. This feature requires you to create an administration database on S0 or higher for all the job related meta data.
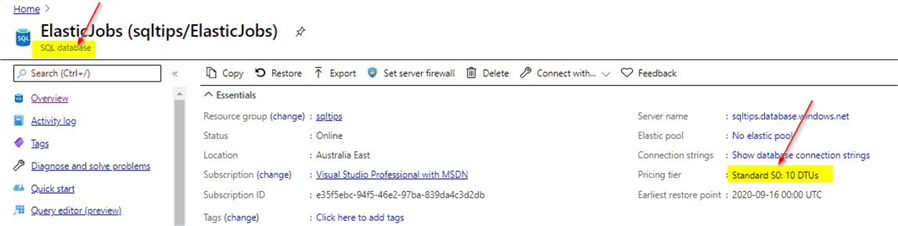
The administration database created for this purpose is as shown. For this demo, it is on the S0 compute tier.
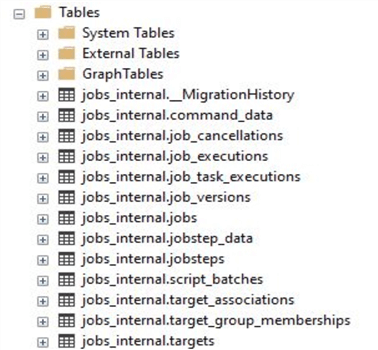
Once you link this database to the Elastic Job agents, you will see the Elastic Jobs database loaded with system objects as shown. You can refer to this tip for linking the database. As you can see, they look similar to the system objects available in the msdb database.
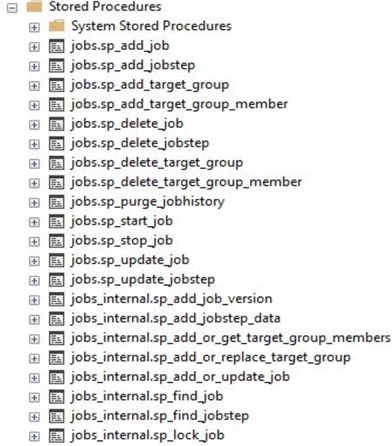
And stored procedures as shown below:
Use Existing Purge Script on an Azure SQL Database
There are a number of good sample scripts that are available online which you can use for purging data from tables. One of them is the script available from this tip shared by Alejandro Cobar. You can refer to the tip where the author has explained in detail the various steps used in the script. You may be able to easily automate the purge operation using the script from the tip on your on-premises SQL Server databases. But in an Azure SQL DB, you could use the scheduling feature that is available in Elastic Job agents. The script can be modified for use on Elastic Job agents so that you can avoid providing the parameters. Assuming that you only want to retain 30 day's worth of data in your table, you could hardcode the values in the purge script to delete anything older than a certain date. For the purpose of this demo, the script from this tip is modified to not accept any parameters and to hardcode the input values.
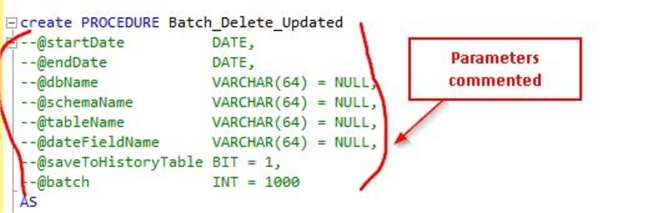
Script modified to avoid inputting parameters
Below is the updated script with the parameters commented out.
IF EXISTS (
   SELECT type_desc, type
    FROM sys.procedures WITH(NOLOCK)
    WHERE NAME = 'Batch_Delete_Updated'
            AND type = 'P'
)
DROP PROCEDURE Batch_Delete_Updated
GO

create PROCEDURE Batch_Delete_Updated
--@startDate          DATE,
--@endDate            DATE,
--@dbName             VARCHAR(64) = NULL,
--@schemaName         VARCHAR(64) = NULL,
--@tableName          VARCHAR(64) = NULL,
--@dateFieldName      VARCHAR(64) = NULL,
--@saveToHistoryTable BIT = 1,
--@batch              INT = 1000
AS
 SET NOCOUNT ON
 DECLARE @startDate          DATE
 DECLARE @endDate            DATE
 DECLARE @dbName             VARCHAR(64)
 DECLARE @schemaName         VARCHAR(64)
 DECLARE @tableName          VARCHAR(64)
 DECLARE @dateFieldName      VARCHAR(64)
 DECLARE @saveToHistoryTable BIT
 DECLARE @batch              INT
 DECLARE @tableExists BIT = 0
 DECLARE @fieldExists BIT = 0
 DECLARE @sqlCommand NVARCHAR(2048)

set @startDate = getdate()-180
set @endDate  =  getdate()-30
set @dbName   = 'mo' -- Replace with your DB name
set @schemaName = 'dbo' -- Replace with correct schema
set @tableName = 'Product_D' -- Replace with correct table name
set @dateFieldName = 'datedetail' -- Replace with correct column name
set @saveToHistoryTable =0 -- Update with 0 or 1 check https://www.mssqltips.com/sqlservertip/6240/script-to-delete-sql-server-data-in-batches/
set @batch = 100 -- Left at 100, update as necessary check above link

  IF(@startDate > @endDate OR @startDate = @endDate)
  BEGIN
   RAISERROR('startDate can''t be higher or equal than endDate!!!', 16, -1)
   RETURN
  END

  IF(@dbName IS NULL OR TRIM(@dbname) = '')
  BEGIN
   RAISERROR('You must specify the source database where the table is hosted!!!', 16, -1)
   RETURN
  END

  IF(@schemaName IS NULL OR TRIM(@schemaName) = '')
  BEGIN
   RAISERROR('You must specify the schema of the table!!!', 16, -1)
   RETURN
  END

  IF(@tableName IS NULL OR TRIM(@tableName) = '')
  BEGIN
   RAISERROR('You must specify the name of the table!!!', 16, -1)
   RETURN
  END

  IF(@dateFieldName IS NULL OR TRIM(@dateFieldName) = '')
  BEGIN
   RAISERROR('You must specify the name of the column that contains the dates for the lookups!!!', 16, -1)
   RETURN
  END

    DECLARE @e AS TABLE([objectID] BIGINT)
  SET @sqlCommand = '
  DECLARE @objectID BIGINT = 0
  SELECT @objectID = OBJECT_ID ('+CHAR(39)+'['+@dbname+'].['+@schemaName+'].['+@tableName+']'+CHAR(39)+',''U'')
  SELECT ISNULL(@objectID,-1)
  '

  INSERT INTO @e
  EXEC sp_executesql @sqlCommand
  SET @tableExists = (SELECT CASE [objectID] WHEN -1 THEN 0 ELSE 1 END FROM @e)
  DELETE FROM @e

  IF(@tableExists <> 1)
  BEGIN
   RAISERROR('The specified table can''t be located, please check and try again!!!', 16, -1)
   RETURN
  END

  DECLARE @f AS TABLE([size] SMALLINT)
  SET @sqlCommand = '
  DECLARE @colSize SMALLINT = 0
  SELECT @colSize = COL_LENGTH ('+CHAR(39)+'['+@dbname+'].['+@schemaName+'].['+@tableName+']'+CHAR(39)+','+CHAR(39)+@dateFieldName+CHAR(39)+')
  SELECT ISNULL(@colSize,-1)
  '
  INSERT INTO @f
  EXEC sp_executesql @sqlCommand
  SET @fieldExists = (SELECT CASE [size] WHEN -1 THEN 0 ELSE 1 END FROM @f)
  DELETE FROM @f

  IF(@fieldExists = 0)
  BEGIN
   RAISERROR('The specified field can''t be located, please check and try again!!!', 16, -1)
   RETURN
  END

  IF(@saveToHistoryTable = 0)
  PRINT 'Be aware that you have invoked the execution of this SP with historical data transfer turned off!!!'

  -- Per Day logic
  DECLARE @currentDate DATE
  DECLARE @startTime   DATETIME
  DECLARE @endTime     DATETIME
  DECLARE @rows        INT
  DECLARE @totalRows   INT
  DECLARE @deletedRows INT

  SET @currentDate = @startDate

  SET @sqlCommand = '
  USE '+'['+@dbname+']
  '
  EXEC(@sqlCommand)

  IF OBJECT_ID ('Delete_Metrics','U') IS NULL
  BEGIN
    CREATE TABLE Delete_Metrics(
      StartDate      DATE NOT NULL,
      EndDate        DATE NOT NULL,
      Records        INT NOT NULL,
      CompletionTime INT NOT NULL
   )
    CREATE NONCLUSTERED INDEX IX_StartDate ON Delete_Metrics(StartDate)
    CREATE NONCLUSTERED INDEX IX_EndDate ON Delete_Metrics(EndDate)
  END

  IF(@saveToHistoryTable = 1)
  BEGIN
   DECLARE @h AS TABLE([rows] INT)
    SET @sqlCommand = '
    SET NOCOUNT ON

    IF OBJECT_ID ('+CHAR(39)+'['+@dbname+'].['+@schemaName+'].['+@tableName+'_historic]'+CHAR(39)+',''U'') IS NULL
    BEGIN
        SELECT TOP 0 * INTO ['+@dbname+'].['+@schemaName+'].['+@tableName+'_historic] FROM ['+@dbname+'].['+@schemaName+'].['+@tableName+']
    END

    INSERT INTO ['+@dbname+'].['+@schemaName+'].['+@tableName+'_historic]
    SELECT * FROM ['+@dbname+'].['+@schemaName+'].['+@tableName+'] WHERE ['+@dateFieldName+'] >= '+CHAR(39)+CONVERT(VARCHAR(20),@startDate)+CHAR(39)+' AND ['+@dateFieldName+'] < '+CHAR(39)+CONVERT(VARCHAR(20),@endDate)+CHAR(39)+'

   SELECT @@ROWCOUNT
   '
   INSERT INTO @h
    EXEC sp_executesql @sqlCommand
    SET @totalRows = (SELECT [rows] FROM @h)
    DELETE FROM @h

   IF(@totalRows > 0)
   RAISERROR ('#Finished transferring records to historic table#', 0, 1) WITH NOWAIT
  END

  WHILE(@currentDate < @endDate)
  BEGIN
   BEGIN TRANSACTION
      BEGIN TRY
            DECLARE @t AS TABLE([rows] INT)
            SET @sqlCommand = '
            DECLARE @tempTotalRows INT = 0
            SELECT @tempTotalRows = COUNT(*) FROM ['+@dbName+'].['+@schemaName+'].['+@tableName+'] WHERE ['+@dateFieldName+'] >= '+CHAR(39)+CONVERT(VARCHAR(20),@currentDate)+CHAR(39)+' AND ['+@dateFieldName+'] < DATEADD(DAY,1,'+CHAR(39)+CONVERT(VARCHAR(20),@currentDate)+CHAR(39)+')
            SELECT @tempTotalRows
            '
            INSERT INTO @t
            EXEC sp_executesql @sqlCommand
            SET @totalRows = (SELECT [rows] FROM @t)
            DELETE FROM @t

         SET @deletedRows = 0
         SET @startTime = GETDATE()
         DECLARE @d AS TABLE([rows] INT)

         WHILE @deletedRows < @totalRows
         BEGIN
             SET @sqlCommand = '
            DELETE TOP ('+CONVERT(VARCHAR(16),@batch)+')
            FROM ['+@dbName+'].['+@schemaName+'].['+@tableName+'] WHERE ['+@dateFieldName+'] >= '+CHAR(39)+CONVERT(VARCHAR(20),@currentDate)+CHAR(39)+' AND ['+@dateFieldName+'] < DATEADD(DAY,1,'+CHAR(39)+CONVERT(VARCHAR(20),@currentDate)+CHAR(39)+')

            SELECT @@ROWCOUNT
                '

                INSERT INTO @d
            EXEC sp_executesql @sqlCommand
            SET @deletedRows += (SELECT [rows] FROM @d)
            DELETE FROM @d

            SELECT l.total_size AS TotalSize,f.free_space AS FreeSpace
            FROM(
               SELECT CONVERT(DECIMAL(10,2),(total_log_size_in_bytes - used_log_space_in_bytes)/1024.0/1024.0) AS [free_space]
               FROM sys.dm_db_log_space_usage
            )AS f,
            (
               SELECT CONVERT(DECIMAL(10,2),size*8.0/1024.0) AS [total_size]
               FROM sys.database_files
               WHERE type_desc = 'LOG'
            )AS l

         END

         IF(@deletedRows > 0)
         BEGIN
            DECLARE @stringDate VARCHAR(10) = CONVERT(VARCHAR(10),@currentDate)
            RAISERROR('Finished deleting records for date: %s',0,1,@stringDate) WITH NOWAIT
            INSERT INTO Delete_Metrics VALUES(@currentDate, DATEADD(DAY,1,@currentDate),@deletedRows,DATEDIFF(SECOND,@startTime,GETDATE()))
         END

         SET @currentDate = DATEADD(DAY,1,@currentDate)

         COMMIT TRANSACTION
      END TRY
      BEGIN CATCH
         ROLLBACK TRANSACTION
         SELECT ERROR_MESSAGE() AS ErrorMessage;
      END CATCH
  END
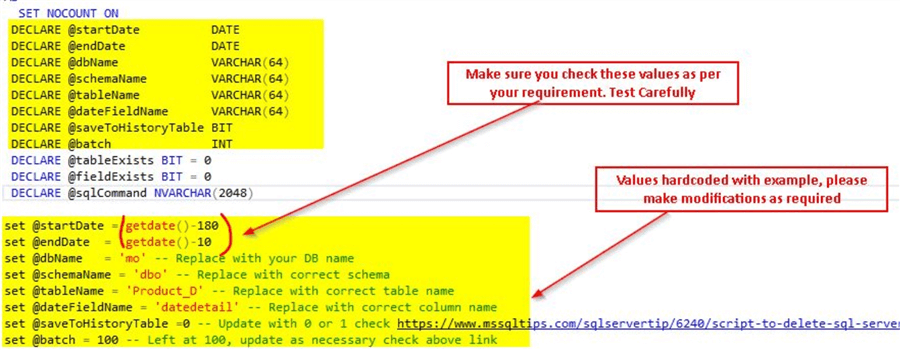
Section of the script updated
For your reference, while comparing the above code from this link, the sections in the code where modifications are done is highlighted as shown.
In the next section, you will see the highlighted sections in yellow where additions were made and you will see that the values are hard coded for the demo. You will need to update the values as per your table details. Ensure you check the values for the @startDate and @endDate parameter. Make sure to test this script on your test environment before implementing in production.
Automating Purge Script Using Elastic Job Agents on an Azure SQL DB
Now, that we have created this procedure [Batch_Delete_Updated] on the Azure SQL DB, the next step is to schedule it periodically using Elastic Job agents. Assuming that you have already configured Elastic Job agent by referring to this tip, the next step will be to schedule the [Batch_Delete_Updated] stored procedure.
In this demo, we will schedule it to run every week on the Azure SQL DB. First, configure the job on the ElasticJobs database by running the below script.
/*Execute below script on (elasticJobs DB)*/
EXEC jobs.sp_add_job @job_name='DBA-WeeklyAutoPurge'
                   , @description='This Job performs weekly purge every Saturday at 10 PM'
Make sure that the [Batch_Delete_Updated] stored procedure script is already configured on the Azure SQL DB where your data resides. Once that is done, execute this script to add the job step to the above job.
/*Execute this script on the agent database (elasticJobs)*/
EXEC jobs.sp_add_jobstep @job_name='DBA-WeeklyAutoPurge',
@command=N' exec [dbo].[Batch_Delete_Updated]',
@credential_name='JobExecuterCred',
@target_group_name='AzureTestServers'
You will see that in the @command parameter, you will be passing the stored procedure [Batch_Delete_Updated] that we created earlier in the Azure SQL DB. For details regarding @credential_name and @target_group_name, refer to the link mentioned earlier.
In the next step, we can schedule this job to purge data every week, say on Saturday’s at 10 PM.
/*Execute this script on the agent database (elasticJobs)*/
EXEC jobs.sp_update_job
    @job_name='DBA-WeeklyAutoPurge',
    @enabled=1,
    @schedule_interval_type='Weeks',
    @schedule_interval_count=1,
    @schedule_start_time= N'20200926 22:00';
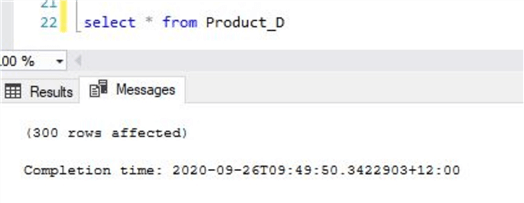
Before you start the job, check the row count of the table where you are performing the purge. Below is a screenshot of the row count for this demo.
You can start the job by running the below script.
/*Execute this script on the agent database (elasticJobs)*/
 exec [jobs].[sp_start_job] 'DBA-WeeklyAutoPurge'
Checking Status of a Job Run on the Elastic Job Agent
You can check the status of the job run by clicking on the 'Overview' blade on the left hand pane of the Elastic Job agent.
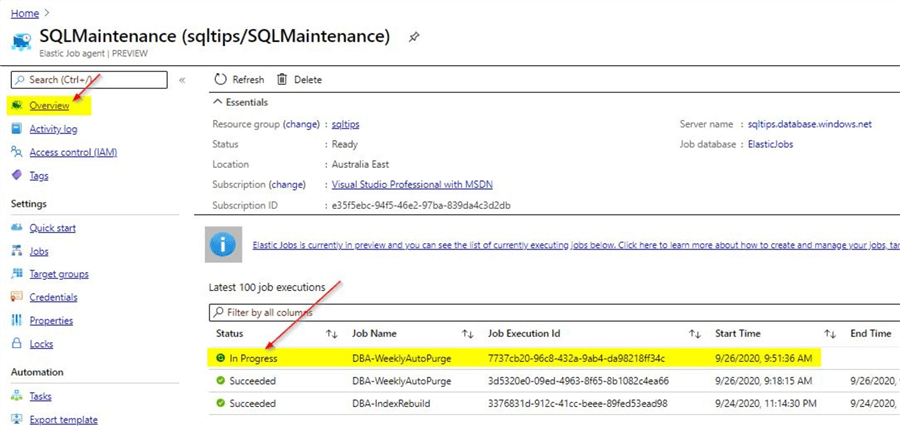
You can see the status as 'In Progress'. Click on the 'Refresh' option to continue to see the current status of the job.
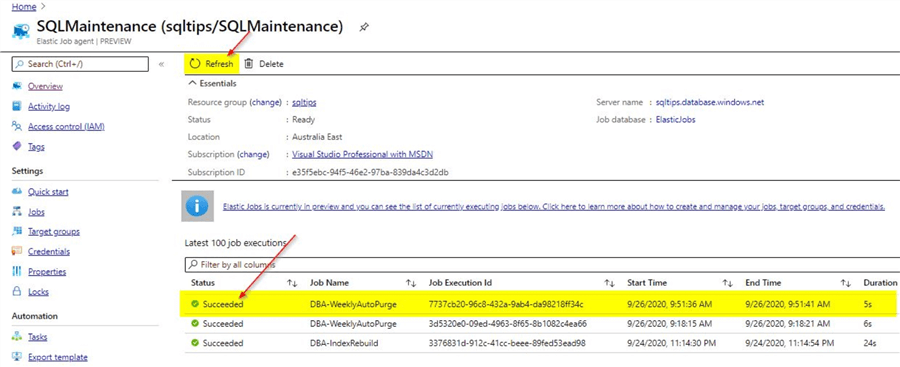
You can see that the purge job completed in around 5 seconds. If you see that the job is taking too long to complete, you may have to check the compute tier of your database and also for the Elastic Jobs database as they may need to be upgraded as required.
Sample Scripts to Load data into Table
For this demo, a simple table was created using the below script:
CREATE TABLE [dbo].[Product_D](
   [ID] [uniqueidentifier] NOT NULL,
   [productname] [varchar](50) NULL,
   [datedetail] [datetime] NULL,
PRIMARY KEY CLUSTERED
(
   [ID] ASC
)WITH (STATISTICS_NORECOMPUTE = OFF, IGNORE_DUP_KEY = OFF) ON [PRIMARY]
) ON [PRIMARY]
GO
ALTER TABLE [dbo].[Product_D] ADD  DEFAULT (newsequentialid()) FOR [ID]
GO
For inserting sample rows, you can use the below script:
declare @i int
set @i=1
while (@i<100)
begin
insert into Product_D
values (default,'@@@',getdate()-50)
set @i=@i+1
end
Summary
Be sure to update the getdate()-50 to something suitable for your test. In this demo, you saw how easily you could make use of existing scripts that are available from the MSSQLTips.com community and schedule the scripts successfully to run on an Azure SQL DB using the Elastic Job agents.
Next Steps
- In this tip, you learned about the Elastic Jobs feature
- In this tip, you learned how to schedule scripts using the Elastic Job agents on an Azure SQL DB
- In this tip, you learned you do not need to use Elastic Job agents for an Azure SQL managed instance as job scheduling is similar to on-premises SQL Server where you can make use of the SQL Agent feature
- You could try this demo on a trial version of Azure SQL DB
- Make sure to test the code provided based on your requirement
- To learn more about Microsoft Azure, refer to this link on MSSQLTips


About the author
 Mohammed Moinudheen is a SQL Server DBA with over 6 years experience managing production databases for a few Fortune 500 companies.
This author pledges the content of this article is based on professional experience and not AI generated.
View all my tips
