By: Aubrey Love | Updated: 2022-03-15 | Comments | Related: > Database Design
Problem
When working with SQL Server, sometimes there is a need to create new tables to accomplish a task. Most of the data you need probably already exists in the database, but you may need to create a new table to import data or create a new table as a subset of other tables. In this article we will cover how to create a new table using TSQL.
Solution
In this SQL tutorial, we will look at a common task of creating a database table. We will look at some do’s and don’ts while creating a simple table as well as adding constraints and schemas. We will also explain the steps that are required in the create table operation, what each step does and some pitfalls to avoid.
Prerequisites
In this tutorial, we will be using a test database and we will call it "MyTestDB". The two simplest ways of creating a database is through the SSMS GUI or by a simple T-SQL script. Below, we will briefly walk through the steps for each option.
Note: unless otherwise stated, all queries below will be written against the "MyTestDB" database.
Option 1. Creating our test database with the SSMS GUI
Open SSMS and connect to your SQL Server instance. Once you are there, look in the "Object Explorer" and right click on "Databases" and select "New Database" from the menu (as shown in figure 1).
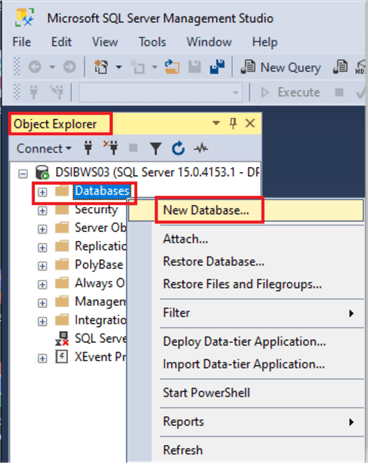
Figure 1
When the New Database dialogue box appears, as shown below in figure 2, type your new database name in the text box and click the "OK" button. For this tutorial, I have created a database named "MyTestDB". You can name yours as you see fit.
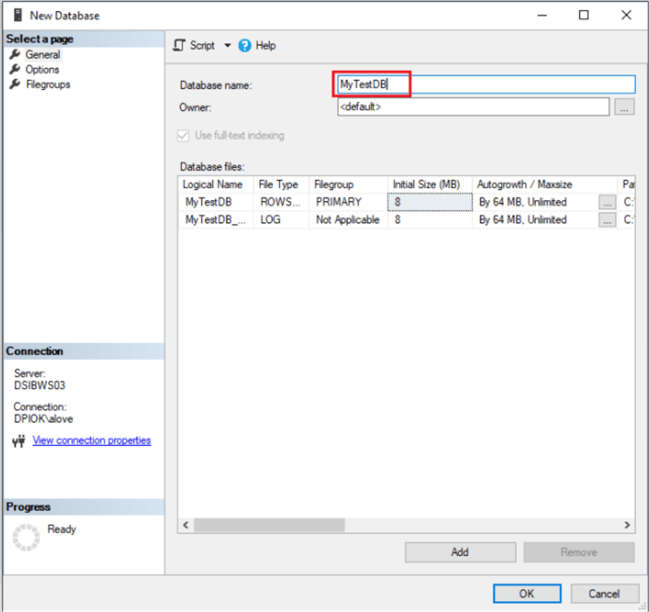
Figure 2
Option 2. Creating our test database with a T-SQL script:
Since this tutorial is primarily focused on working with T-SQL to create tables, we can also use T-SQL to create our test database.
You can use the syntax in the code block below to create your test database.
USE master;
GO
CREATE DATABASE myTestDB;
GO
Okay, now that we have a test database to work with, let’s start learning the fundamentals of the CREATE TABLE statement.
Create Table Example with Simple Syntax
In the code block below, we have the basic syntax for creating a table with 3 columns:
CREATE TABLE TableName(
   columnName1 TYPE,
   columnName2 TYPE,
   columnName3 TYPE
   );
GO
Here is a simple break-down of the syntax:
- The "CREATE TABLE" command does just what it says, it creates a table in a database.
- The "TableName" represents the name we wish to assign to the table.
- "columnName1 – 3" are the names of the columns we want in the table.
- "Type" is the datatype we want assigned to each column. In other words, what kind of data each column will hold. Examples are: character string, numbers, dates, etc. There is a table of datatypes later in this tutorial.
We will discuss each of these in more detail throughout this tutorial.
Create Table Elements
The core elements that make up a database table are Database Name, Schema Name, Table Name, Column Name, and Data Type. The next few sections will cover each of these in more detail.
Database name
This is the name of the database you wish to work with. In this tutorial it we will use the "MyTestDB" database.
Normally, you would want the name of your database to be descriptive of the project you are building. If you need a database that holds tables and data regarding "End of Day" processing, for example, you may want to name your database as "EODprocessing". If your database will be used for a parts store, then perhaps you should name it something like "JimsAutoParts". Likewise, our test database for this tutorial is named "MyTestDB" since we are just using it for test purposes.
Schema name
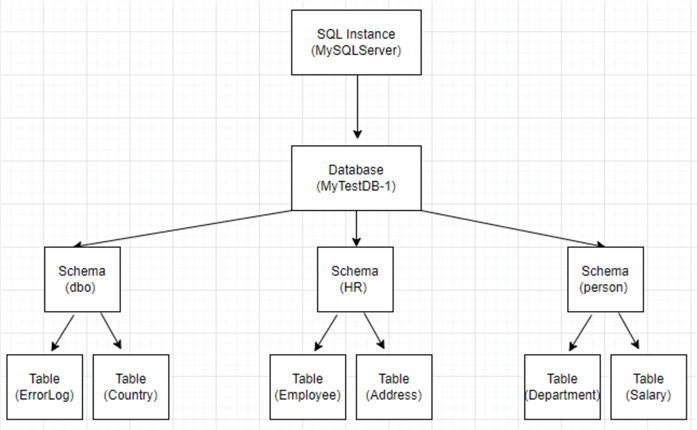
A schema is basically a container. It’s an object that we assign tables and views to. Technically, a schema is a list of logical structures of data. The best way to understand the function of a schema is by looking at the hierarchy of a database to see the role that it plays.
Starting with the outer layer, we have the SQL Server instance. Within that instance we have databases, within those databases we have schemas within the schemas, we have tables, views, etc.
Every table and view must be assigned to a schema. If you do not specify the schema name, then SQL will, by default, assign it to the default schema which is typically the "dbo" schema which is an acronym for DataBase Owner.
You can easily create your own schema and assign your new tables to that schema. If you are going to create a schema for your database objects, you should create the schema prior to creating the tables.
The code block below shows a sample of how to create the "hr" schema within our database.
USE MyTestDB;
GO
CREATE SCHEMA hr AUTHORIZATION dbo;
In the code block above, we are using the authority provided to the "dbo" (DataBase Owner) to create the schema. You can read more about "dbo" here: The Power of the SQL Server Database Owner.
Table name
There are a few naming conventions when assigning a name to your table. The best option is to use a descriptive name based on the data that will be stored in the table.
For instance, if you have a table that holds a list of your employees, you may want to name the table "employees" or "staff". Likewise, a table that holds inventory may be named "products". As mentioned in the "Schema name" section above, you should also consider getting away from the default schema name "dbo" and create a schema that fits your table name and description.
Before you start naming your tables, you must understand some basic rules, below is a list of guidelines for table names:
- Table names should not contain blank spaces.
- Table names should not start with numbers.
- Table names cannot start with most special characters such as @, $, %, etc.
- Note: table names can start with the # symbol, but this creates a "temporary table". More on that later.
- Table names can contain upper and lowercase letters in any combination.
- Table names can contain special characters and/or numbers as long as the name does not start with any special characters and/or numbers.
- Table names should be descriptive of the type of data that will be stored in the table.
- Table names should not be named with reserved keywords or data types.
The table name must be followed with an opening and closing parenthesis. Within those parentheses, you will list the columns that you need along with their data types which we will discuss in the next two sections.
Here is a database diagram that shows the server, database, schema and table hierarchy.
Column Name
Column names, like table names, should also be descriptive in nature. If you have a column that will hold an employees first name, then you would use something like "firstName" or "fName".
![]() If
the column for your employee’s name includes their full name, then do not
use the column name "name". This is a reserved keyword in SQL. You should try using
something like "empName" for the employee’s column name in this scenario.
If
the column for your employee’s name includes their full name, then do not
use the column name "name". This is a reserved keyword in SQL. You should try using
something like "empName" for the employee’s column name in this scenario.
Column names can contain spaces, although it’s not a best practice. When the column name does contain spaces, it must be delimited by opening and closing [] square brackets. Not just during creation, but every time that column name is referenced.
Data Type
SQL Server data types determine what type of data will be populated within a given column. All columns in a table must be associated with a data type, there are no exceptions to this rule. There are several data types available, but often we find ourselves using one of three different categories of data types.
- Character (CHAR, VARCHAR, NVARCHAR, TEXT)
- Numeric (INT, BIT, DECIMAL, MONEY, NUMERIC, FLOAT, etc.)
- Date (DATE, TIME, DATETIME, YEAR, MONTH, etc.)
![]() For
the record, "text", "ntext" and "image" data types will be removed in future versions
of SQL Server. Although you can still use them in versions as late as 2019, it is
not recommended to do so. Also, it’s not recommended that you use the MONEY
data type because of its rounding error. Instead, use the NUMERIC data type.
For
the record, "text", "ntext" and "image" data types will be removed in future versions
of SQL Server. Although you can still use them in versions as late as 2019, it is
not recommended to do so. Also, it’s not recommended that you use the MONEY
data type because of its rounding error. Instead, use the NUMERIC data type.
For character data types, we declare them by appending a desired length to the end of the data type when it is called. For example; VARCHAR(20) and CHAR(20). The (20) represents the maximum number of characters we want to allow in that column. If we wanted an unlimited number of characters, such as in a column that will contain comments from the user, then we can use the VARCHAR(MAX) data type.
Likewise, we can use the DECIMAL data type to represent decimal valued numbers or currency. If we want a column to contain dollar values, we will create the DECIMAL data type as DECIMAL(12, 2). The "12" represents how many characters we want in total (to the right and left of the decimal point) and the "2" represents how many of those characters will be placed to right of the decimal point.
Table 1 shows some of the characteristics of the most common data types.
| Data Type | Range | Storage Size |
|---|---|---|
| BIT | Either 0 or 1 or NULL | 1 Byte |
| INT | -2,147,483,648 to 2,147,483,647 | 4 Bytes |
| BIGINT | -9,223,372,036,854,775,808 to 9,223,372,036,854,775,807 | 8 Bytes |
| SMALLMONEY | - 214,748.3648 to 214,748.3647 | 4 Bytes |
| MONEY | -922,337,203,685,477.5808 to 922,337,203,685,477.5807 | 8 Bytes |
| DATE | 0001-01-01 through 9999-12-31 - 00:00:00.0000000 through 23:59:59.9999999 | 8 Bytes |
| TIME | 00:00:00.0000000 through 23:59:59.9999999 | 5 Bytes |
| DATETIME | 0001-01-01 through 9999-12-31 - 00:00:00.0000000 through 23:59:59.9999999 | 8 Bytes |
| CHAR() | Up to 8,000 characters in Byte pairs | Varies |
| VARCHAR() | Up to 8,000 characters in Byte pairs | Varies |
Table 1
You can read more about data types here and here.
Nullability
So, what is NULL and nullability? NULL simply means that there is a placeholder for a value that may or may not come later. In short, with a NULL constraint you are not required to provide a value for any given row in that column. Nullability is a term used to define the status of whether a column will or will not accept NULL values.
NOT NULL means that a value must be provided for each row of that column.
Like in our employee’s table, we would normally set the "middleName" column to allow NULL since not all people have or are willing to provide a middle name. Our last name column, on the other hand, is one that we need a value for on each employee. For this we would set the column null value to NOT NULL, meaning that this value is required and cannot be omitted or empty.
Since we can easily search for NULLs, it’s a common practice to use them to flag missing data.
Identity
Identity, normally written as "IDENTITY(1, 1)" or simply "IDENTITY" instructs SQL to auto-populate the row with a unique number successively with each new entry.
The (1, 1) tells SQL to start with the number 1 and increase the next row value by 1. The first value is referred to as the "seed" and the second value is the "increment" value. You can set these values to anything you like. For example, you could set the seed at 5 and increment by 5 like this: (5, 5). This would number your rows as: 5, 10, 15, and so on.
Optionally, you can set the seed to 10 and the increment to 1 (10, 1). To save yourself some time when creating database tables, you can omit the (1, 1) and call the IDENTITY command without the parentheses. This will set the default (1, 1) value to the IDENTITY command automatically.
Create a Simple Table Using T-SQL
We will start with a simple two column table with a PRIMARY KEY constraint on one of the columns. You can copy/paste the code into your query window or manually type it in.
Hint: It’s always better to manually type the code found in these samples. It creates "finger memory" and helps you get more practice in typing the code when you need to later in the real world.
CREATE TABLE empDepartment(
   DeptID INT PRIMARY KEY NOT NULL,
   DepartmentName VARCHAR(50) NOT NULL,
   );
In the code block above we are creating a simple two column table. The broad overview of what we are doing is as follows:
- Using the "CREATE TABLE" statement we are naming our table "empDepartment". As you can probably guess, this will list the departments that each employee is a member of. The table name is always followed by an opening and closing parenthesis and ending with a semi-colon.
- Inside the parenthesis we list our columns, their data types, constraints
(if any), and the nullability of each column. Now, let’s define that a
little more.
- The first item in the column definition is the column name. In our "empDepartment" table, we have two columns, "DeptID" and "DepartmentName". Like all column names, table names, database names, etc. they should be descriptive of what type of data they will hold.
- The next line item is the data type. In this table, the data types are "INT" and "VARCHAR(50)". Starting with the "INT" data type, this is an integer or number data type. So, it will hold values such as 1, 2, 3, 4…, etc.
- The second columns data type is "VARCHAR(50)". VARCHAR simply means that this column will hold characters. The "VAR" part is telling us that the number of characters may "vary" in length. The (50) indicates that we cannot have any values that are more than fifty characters long per tuple.
- The "PRIMARY KEY" is a constraint that we are adding to this table. This allows SQL to optimize its search method when scanning through the table to return the results we desire when querying the data.
- Finally, the "NOT NULL" sets the nullability of the column. In short, these two columns must contain a value when a new row is created. Not providing a value will result in an error being returned.
Go ahead and run the script in the code block above to create the table. We will be using it later in this tutorial.
Working with Data in T-SQL
Once you have a table in your database, the next most common task would be to populate it with data. In the three sections below we will show how to insert one row at a time, insert multiple rows at once and then, how to update that data using the alter table command.
Insert data with a single line command
A common practice is adding data to a database with a single line command. Assuming we have a table with three columns, colA, colB, and colDate, we can add a row of data with a simple INSERT INTO command as shown below.
INSERT INTO TestTable1 (colA, colB, colDate) VALUES ('Bob', 'TX', '2018-01-01');
In the same respect, if we need to add more than one row of data, say for example three rows, we could simply repeat the single line command three times with varying data.
INSERT INTO TestTable1 (colA, colB, colDate) VALUES ('Bob', 'TX', '2018-01-01');
INSERT INTO TestTable1 (colA, colB, colDate) VALUES ('Sarah', 'OK', '2018-02-14');
INSERT INTO TestTable1 (colA, colB, colDate) VALUES ('George', 'MN', '2018-04-15');
Although this is a viable process, sometimes it’s not always the best way to accomplish adding multiple rows at once. The sample below shows a quicker, more efficient way of adding the same three rows as shown above but with the use of only one insert statement.
INSERT INTO TestTable1 (colA, colB, colDate)
VALUES ('Bob', 'TX', '2018-01-01')
     , ('Sarah', 'OK', '2018-02-14')
     , ('George', 'MN', '2018-04-15');
Take note that each row of values must be separated by a comma.
Delete data with a single line command
Just as with the insert statement, we can also delete from the table with a single command.
DELETE
FROM TestTable1;
GO
Note: this will delete all rows from the table. Also notice that we do not need the * (asterisk) following the DELETE statement like we did with the SELECT statement.
If you only want to delete certain rows, such as the rows where "colB" contains "TX", then we need to specify what we want to delete in SQL statement.
DELETE
FROM TestTable1
WHERE colB = 'TX';
GO
This will only remove rows where the value "TX" is in colB.
You can read more about the "WHERE" clause in this article SQL WHERE Clause Explained.
Update data with a single line command
Updating rows and columns in the database table requires the "UPDATE" statement. So, if we want to replace all the colB values that contain "OK" with "CA", a simple update statement is all that is needed.
UPDATE TestTable1
SET   colB = 'CA'
WHERE colB = 'OK';
GO
In the code sample above, we are updating TestTable1 by "setting" the value in colB to 'CA', but only WHERE colB contains the value of 'OK'.
Here is a good article explaining the update statement SQL UPDATE Statement.
Related Items (briefly explained)
Primary Key Constraint
A Primary key is a candidate key of the table selected to identify each record uniquely in a table. A Primary key does not allow null values in the column and keeps unique values throughout the column. There can only be one primary key per table, but there can be more than one column assigned to that primary key.
- Here is a great article about Primary Keys: SQL Server Primary Key
Foreign Key Constraint
In its simplest form, a foreign key constraint is a field (or collection of fields) in one table that references a primary key in another table. Foreign keys can have duplicate values within the foreign key column and can also keep null values, only if the column is defined to accept nulls. So, a foreign key links the data in a column from one table to the matching data of a column in another table, and that column must be assigned to a primary key.
- Read more about How to create a SQL Server foreign key
Unique Key
A Unique key is similar to a primary key in that it does not allow duplicate values in the column. A unique key is also called a unique constraint. A unique constraint can be used to ensure rows are unique within the database.
- Read more about SQL Server Constraints Unique and Default
Indexes
An index is a schema object and is similar to the index in the back of a book. It allows SQL to find references to particular data based on location within the table.
- Read this SQL Server Index Tutorial Overview
Importing Data
Importing data into a table is most often done via "import/export" wizards or by using SSIS. This allows you to import data from Excel or csv files. You can also utilize other options such as, bulk insert, open row set, etc.
- Here is a great article on importing data in SQL Server: Different Options for Importing Data into SQL Server
Temporary Tables
Temporary tables are created in "TempDB" and since they are temporary they are deleted when the last connection using the object on the SQL instance is terminated. Temporary tables allow us to store and manipulate results. Use temporary tables to store temporary data for manipulating a script or data.
- More on Temp Tables: Types of SQL Server Temporary Tables
Creating Tables from Existing Tables
Creating a table from an existing table is more common than you might think. You may need to create a copy of a table, but not the entire database. This will allow you to practice manipulating the data in the table without affecting the production table. You may also want to create a new table based on data collected from several other tables.
One option is to create a table from an existing table using the "select into" clause. The code block below shows an example of making a copy of a table.
SELECT *
INTO destTable
FROM sourceTable;
GO
- Read more about SQL SELECT INTO Examples
SQL Create Table Summary
In this tutorial, we learned some of the basics of creating a table in SQL Server. We learned the core elements of a table, a few ways of creating the table, naming conventions for a table, how to insert and modify data in the table and brief overview of some common data types. We also learned how to remove all data from a table as well as how to remove only certain rows in a table.
Next Steps
- Try creating new tables with different data types as listed in the section above, "Data Type".
- Try altering some of the data in your table.
- Try deleting only certain rows of your table.
- Review the following tips and resources:


About the author
 Aubrey Love is a self-taught DBA with more than six years of experience designing, creating, and monitoring SQL Server databases as a DBA/Business Intelligence Specialist. Certificates include MCSA, A+, Linux+, and Google Map Tools with 40+ years in the computer industry. Aubrey first started working on PC’s when they were introduced to the public in the late 70's.
This author pledges the content of this article is based on professional experience and not AI generated.
View all my tips
Article Last Updated: 2022-03-15
