Problem
The Microsoft Azure Cloud contains many different services that you can use as building blocks to solve business problems. For someone new to the Azure ecosystem, how do you combine these services (materials) in the right order to create a secure, highly available, performant, and resilient solution on Azure?
The Azure Solutions Architecture website has predefined diagrams or bill of materials that can guide you when designing a new solution. In fact, the modern data warehouse (platform) architecture can be found on this site.
Many times, there is a need to schedule a task to execute at a particular time of day which is called batch processing. For instance, sliding the partitioned table window by one month is an example of a database task. In addition to the monthly table change, we might want to execute a PowerShell script daily to load data from Azure Data Lake Storage (ADLS) into an Azure SQL database table. This is an example of an ETL task.
How can we automate a business process by scheduling a PowerShell script to run on a periodic basis?
Solution
There are two solutions to this problem. We could create an Azure Virtual Machine to execute our PowerShell script on a given schedule. The first solution is considered infrastructure as a service (IAAS). However, the cost of this solution outweighs the benefits, for small to medium number of tasks. The best solution is to deploy an Azure Automation account and create a PowerShell Runbook. The second solution is considered platform as a service (PAAS).
Business Problem
Our boss has asked us to continue with the modern data platform (MDP) proof of concept for the World Wide Importers Company. Today’s goal is to deploy and configure Azure Automation so that the ETL PowerShell script created in this prior tip will run without any issues.
The image below shows the architectural components of the Azure Automation service. We will be configuring several assets for our Runbook to execute the ETL script successfully. Let us get started by deploying an Automation Account, an Azure Component, to our subscription.

Azure Components
I am re-using the Data Lake Storage account named adls4wwi2, the Azure SQL server named svr4wwi2 and the Azure SQL database named dbs4wwi2. We are going to manually add an Azure Automation Account named aa4wwi2 by using the Azure portal. Yes, there are PowerShell cmdlets that can be used for this deployment. However, I will leave that discussion for another time.
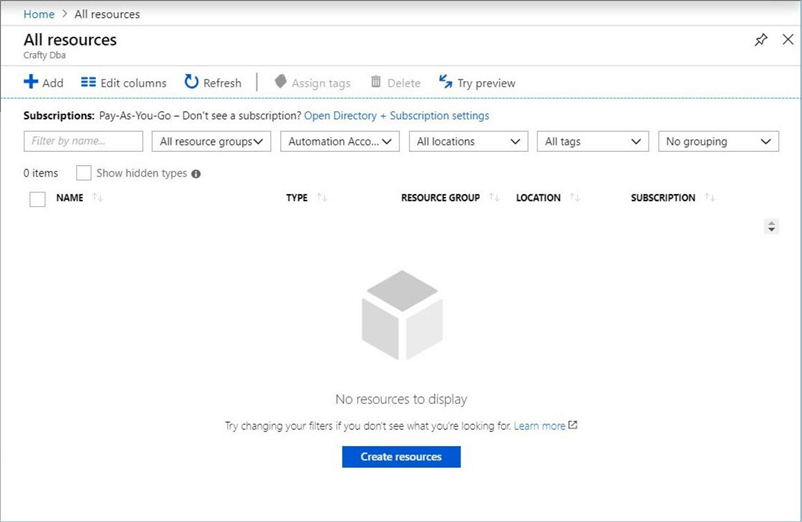
The “all resources” blade from the Azure portal allows us to filter by resource type. The image below shows that we currently have no automation accounts associated with the subscription.
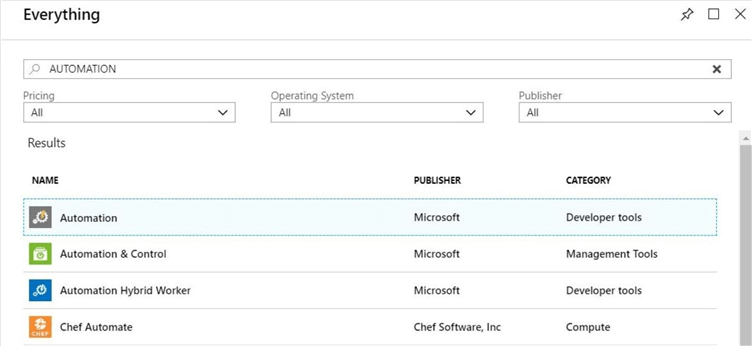
The first step in deploying this new service is to click the create a new resource option on the left-hand menu. This will bring us to the Azure Market place dialog box. If we type in the word “AUTOMATION” in the search box, we will see a bunch of services show up. We want to select the first service which falls under the developer tools category. See image below for details.
If we click on the first line – “automation”, the portal will think we want to deploy the service. The next screen will display information about the service and will ask us to confirm the creation of this component. Click the create button to add the automation account. See the left-hand side of the below image.
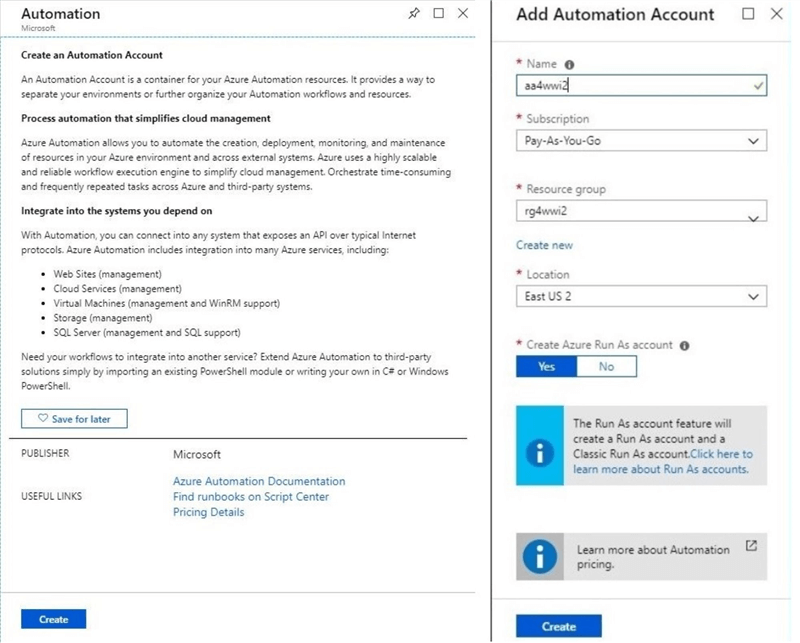
The above image is actually the two separate dialog boxes stitched together to save space in this article. Like most Azure services, we have to select a name, subscription, resource group and location. I am going to create the aa4wwi2 automation account in resource group rg4wwi2 which is located in the East US 2 data center. Please see the right-hand side of the above image.
Please choose to create an “Azure Run As Account”. Details about this account will be explained later. The very last part of this task is to click the create button. After some time, the portal will notify us that the service has been deployed.
If we use the “all resources” blade again to search for an Azure Automation Account, we will see that the account now exists in our subscription. Please see screen shot below.

In short, we have deployed the service. How do we configure the service to execute our ETL PowerShell script is our next task?
Saving Credentials
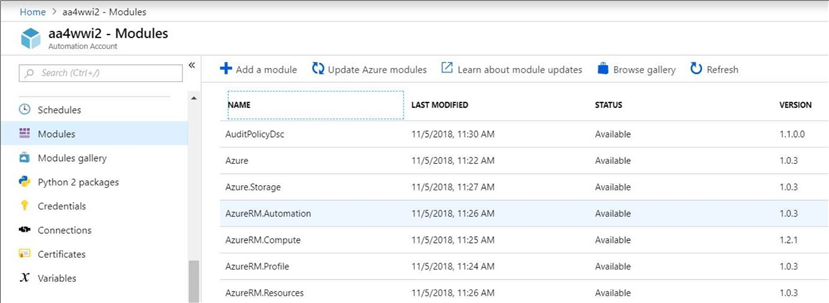
The azure automation service has several menus that are grouped by functionality. The shared resources section of the menu is shown in the left-hand side of the image below. The blades that we can launch for the section create and/or configure resources that can be used between multiple Runbooks.
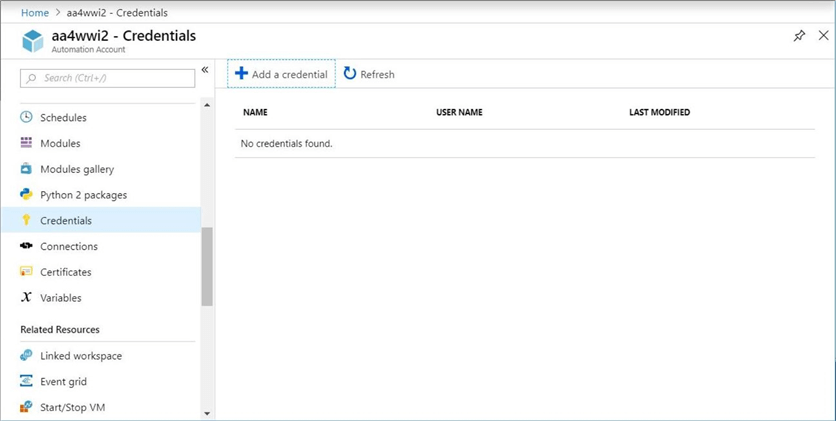
In the past, we had to hard code the connection information for the SQL Server Database user account. This is a security risk since the PowerShell script is plain text. A better solution is to store both the user name and user password as a credential. A single click of the “add credential” button launches the new credential blade.
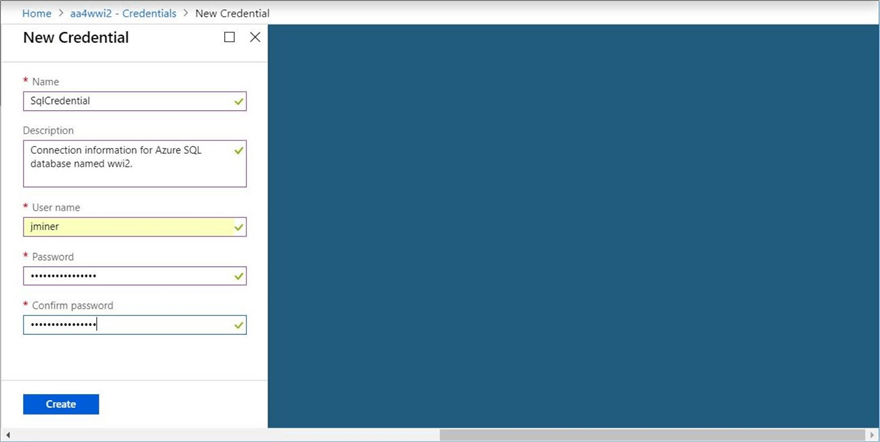
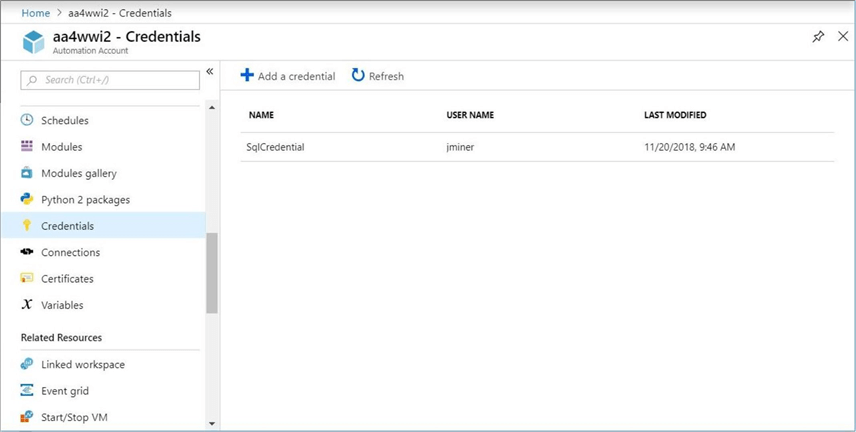
To create a credential, we need to supply a credential name, description, user name and password. The image above shows the requested information as being completely filled in. Clicking the create button saves the information as a shared resource. The image below shows the saved credential.
Before we can do anything meaningful in Azure, we need to connect to the Azure Subscription. This is where the Azure “Run As Account” comes to play. This account is a service principle that has access to the subscription. You can add, modify or remove access control rights that this account has.
The code snippet below uses the Get-AutomationConnection cmdlet to retrieve the hidden information about the run as account such as tenant id, application id and certificate. The Add-AzureRMAccount cmdlet can use this retrieved information to sign into Azure.
The compute variable allows our script to run in both the PowerShell ISE environment or the Azure Automation service. Necessary changes are made to the program using conditional logic to allow this dual functionality.
#
# Retrieve run as account, log into azure
#

# cloud service
if ($compute -eq "automation")
{
    # Grab run as connection
    $Conn = Get-AutomationConnection -Name AzureRunAsConnection;

    # Connect to azure subscription
    Add-AzureRMAccount `
      -ServicePrincipal -Tenant $Conn.TenantID `
      -ApplicationId $Conn.ApplicationID `
      -CertificateThumbprint $Conn.CertificateThumbprint | Out-Null;
};
Now that we are signed into Azure with an account that has rights, we can Get-AutomationPSCredential cmdlet to retrieve the user name and password.
#
# Retrieve user name & password
#

# cloud service
if ($compute -eq "automation")
{
    # Retrieved saved credential
    $Credential = Get-AutomationPSCredential -Name "SqlCredential";
    $User = $Credential.GetNetworkCredential().UserName;
    $Password = $Credential.GetNetworkCredential().Password;
};
At this point, we could write code to connect to an Azure SQL database using the user name and password in our connection string. There are many types of shared resources that we can explore in the future. However, let us focus on how to make our existing ETL script work with this Azure service.
The Runbook Design Process
There is an actual process to follow when crafting a PowerShell runbook for the Azure Automation Account (service). Please see table below. Executing steps 1 to 4 creates a runbook from an existing PowerShell script. However, it is not guaranteed to produce the results that you want during the first modular test. Therefore, steps 2 to 4 are repeated until a published and tested runbook exists.
| Step | Task |
|---|---|
| 1 | Create or import a new runbook. |
| 2 | Edit new runbook. |
| 3 | Publish new runbook. |
| 4 | Test published runbook. |
| 5 | Schedule tested runbook. |
The image below shows the sample runbooks that are installed automatically when you deploy the service. We will be using only a PowerShell workflow. To clean up this space, go to the runbooks blade under process automation. Double click each book to manage runbook blade. Click the delete button and confirm that you want to remove the sample code. Repeat this process for all runbooks.

At the end of this task, the runbooks blade should be empty as seen below.

Creating a Runbook
Our first step in the design process it to either create a runbook from scratch by typing it into the Azure web editor or import the runbook from an existing file. I like developing locally on a client laptop either using the PowerShell ISE environment or Visual Studio 2017. The debugging tools and context sensitive editors are superior for these environments.
Thus, choose the latter option. Import the enclosed script as a PowerShell Workflow. Click the create button to finish the process.

What is the difference between a PowerShell script and a PowerShell workflow? A workflow uses Windows Workflow Foundation to add process control features which support parallelizable, interruptible, stoppable, and restartable scripts. The workflows can be suspended and resumed; they can also continue after an unexpected interruption, such as a network outage or computer restart.
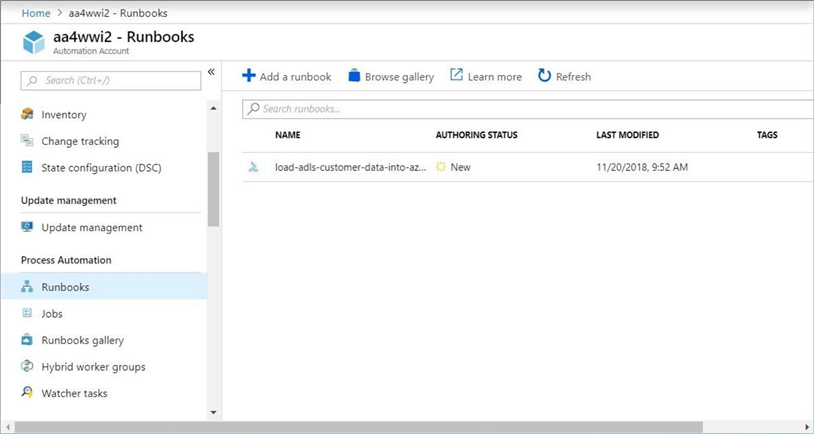
The above screen shot shows our runbook in a new authoring status. Only published jobs can be executed. How can we change the status of this job?
Publishing a Runbook
To publish our runbook, we need to edit the runbook. Just find the edit button which has a pencil icon on the runbook blade. Click the button to open the edit blade.

All the share assets can be referenced from the PowerShell script. We can see that the credential named SqlCredential is available for reference in the editor window.

Every good program deserves a code header. In the header, you want to store information such as the program name, the author of the script, the date the script was created and the purpose of the script. For more complex scripts, I might even put in the pseudo code of the algorithm that was used in the design.
Since we have not made any changes to make to the program, click first the save and then the publish buttons in order to complete our task. See image below for details.

Now that we have a published runbook, how do we test our code?
Executing a Runbook
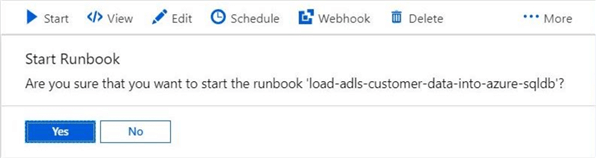
To execute a runbook, find the start button which is next to the play VCR icon. Clicking the button will start the execution of the runbook. Please say “yes” so that we can test our runbook.
Well, we now have our first issue with the program. Is it a coding or environment issue?

It looks like the program does not understand the call to the Data Lake Store cmdlet. I tested this program locally on my client machine and it worked fine. Then again, I used the Install-Module cmdlet to load the PowerShell module for Azure Data Lake Storage a long time ago.
This must be a configuration issue. How can we configure the Automation Account to use the correct PowerShell module (library)?
Installing Modules
The shared resources section of the service allows the developer to configure the environment to their needs. This includes importing existing modules from the gallery, deploying third party modules or installing a user defined custom module.
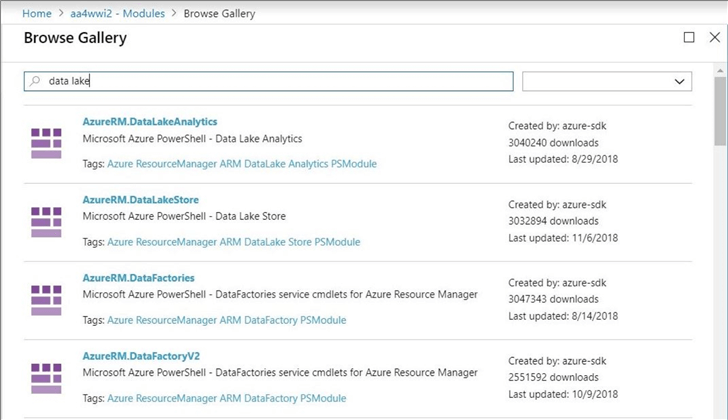
The image below shows all the modules that are part of the environment. Unfortunately, Azure Data Lake Storage is not among the list.
Since this module is from Microsoft, we can browse the PowerShell gallery using the key words “data lake”. The second item from the top is the module we are looking for.
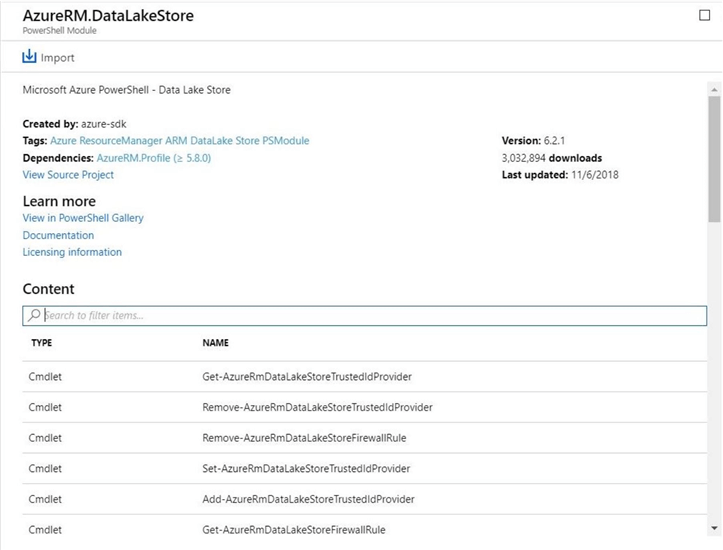
Clicking on the module brings up details about the package. We can see the version of the module is 6.2.1 which was last updated on 11.6.2018. We can optional search the content of the module for a particular cmdlet. Please see the image below. I am satisfied that this is the module that we want.
Click the Import button brings up another prompt. The Azure Profile module is a dependency for this module. Let’s install that module first. Then we will have no more reasons why this module can be added. See the image below for details on the Azure Data Lake Store module.
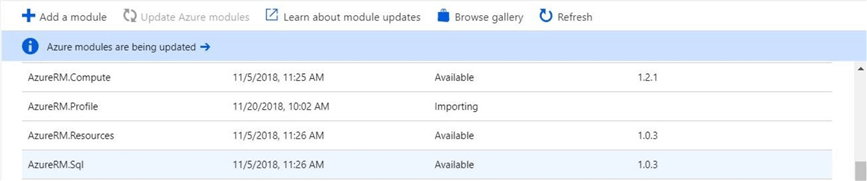
If you are curious, you can keep an eye on the module window during the import process. Sometimes, adding a module might require an update of dependent modules.
Now that we have our environment up to date, we can re-test the PowerShell workflow that implements an ETL process.
Retesting our runbook
Have you ever seen a cooking program in which they put a new chicken in one oven and pull out a completed old chicken from another oven to reduce the show time? Yes, cooking the chicken takes time.
The same adage can be said about software development. It is a software design life cycle that is represented by a circle. You only get off the cycle when you think the software is good enough. Life is not perfect and so is software.
In short, there were some changes that needed to be made so that the PowerShell script can execute on a laptop using the PowerShell ISE and in Azure Automation as a runbook. I will cut to the key points I discovered during the process.
I already talked about how we need to use the “run as account” to connect to the Azure Subscription. Also, we need to grab the user name and password from the shared credential.
There are a couple of things I did not talk about. First, we need to use a fully qualified domain name for the cloud. See the code snippet below that was added to support this fact. Second, we need to only call our custom logging cmdlet when the program is executing on a client machine. Third, we need to have a call at the bottom of the PowerShell workflow that calls the workflow. This one line of script is required for client execution but it is not necessary for the automation service.
#
# Must use FQDN for cloud
#
# cloud service
if ($compute -eq "automation")
  { $store = "adls4wwi2.azuredatalakestore.net" };
# local computer
if ($compute -eq "client")
  { $store = "adls4wwi2"; };
Last but not least, the automation service does support the use of a c:\temp directory. Somewhere in Azure, our PowerShell program is executing on a shared computing resource governed by the automation service. It is more than likely that this computing resource is running a version of the Windows operating system. I would not depend on the file being available between executions (jobs). But we can use local storage as a staging area for downloading and uploading Azure files for Blob Storage or the Data Lake.
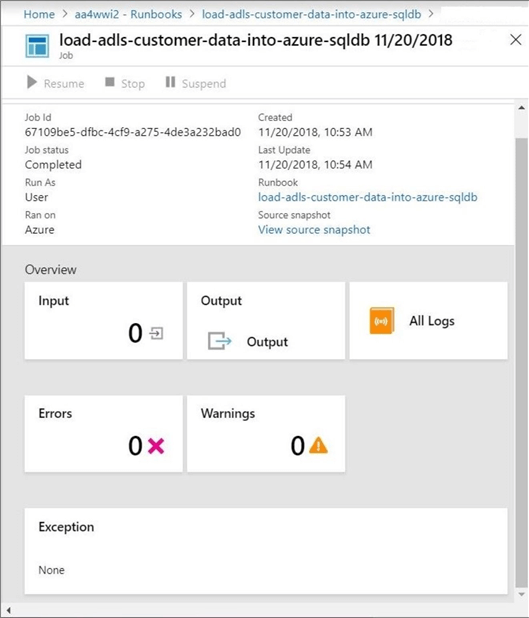
If we restart our runbook it will run to completion without any errors. See screen shot below which depicts a successful job execution without any errors.
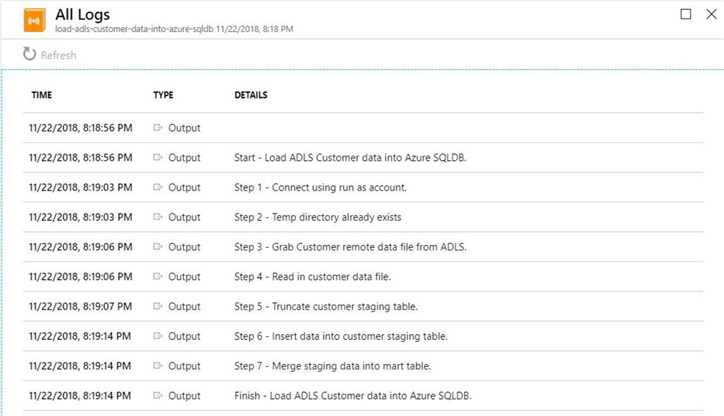
Here is a tip when developing an Azure Automation runbook. Use the Write-Output cmdlet to direct messages to the output and all logs windows. If we go into the all logs section, we can see the output of the program in the image below.
I like to see the start and stop messages of my program in the log output. Also, I like to list out each of the completed tasks or items in my algorithm. When debugging this program in the future, I know exactly between what two tasks did the bug occur. This narrows down the search area and minimize the time to fix a production issue.
Scheduling our runbook
We now have an automated business solution. This task satisfies the first part of our business requirement. How can we execute the PowerShell workflow on a periodic basis?
That is where a schedule comes in. Schedules can be associated to one or more runbooks. The design is up to you. However, I like to have a one-to-one relationship between my runbooks and schedules.
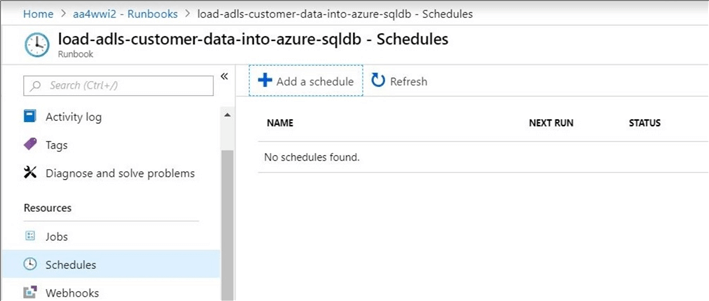
Open the runbook blade for the “load-adls-customer-data-into-sqldb” PowerShell workflow. Click the schedule button which is next to the clock icon. This will bring up the schedule blade already associated with the runbook. The below image shows no schedule associated with the runbook.
Click the add schedule button to create a new schedule. We want to create a schedule so that the runbook book executes every day at 6 am.
The image below shows the filled in schedule. The name, starts and recur every fields are required information. The description, time zone and expiration date are optional fields. Click the create button to save the schedule.
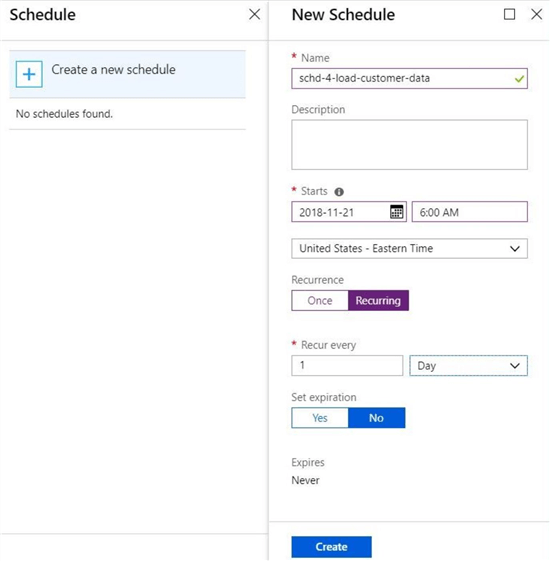
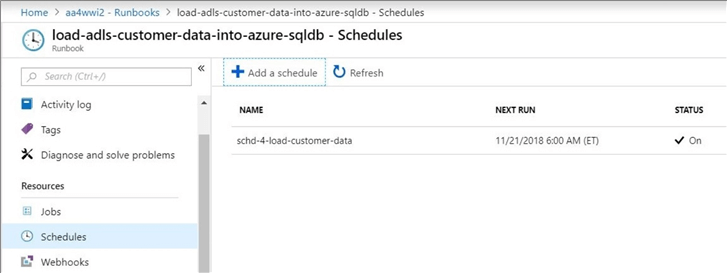
Looking at the saved schedules under the resources section, we can see that a schedule named “schd-4-load-customer-data” exists and is enabled.
While there are other aspects of the Azure Automation service, today we covered the key components needed to create and deploy a runbook.
Summary
Today, I showed how to deploy the Azure Automation service using the portal. This service allows a developer to design and deploy PowerShell workflows to solve business problems. The ETL script I developed in the last article loads data from Azure Data Lake Service into a Azure SQL Database. We automated and scheduled this script to run on a daily basis. Manipulating data in the cloud is the second step in creating a Modern Data Platform (MDP).
The Azure Automation service has two key sections related to design runbooks. The first section named “shared resources” is where you can configure static information such as credentials, connections, certificates and variables. In addition, you can install modules and configure schedules.
The second section named “process automation” is where you can manage runbooks and examine the output of jobs. Like any software development life cycle, the crafting of a runbook involves creating the script, publishing the script, testing the script and repeating the process. The on premises integrated development tools are superior to the web since they contain debugging tools and context sensitive editors. I like creating a runbook that can execute both on a client machine or using the cloud service. Therefore, I have flexibility of where I can deploy the script.
In summary, I have been talking about how to use PowerShell to automate deployment of Azure resources for a while. We now can use that knowledge to write automation runbooks to perform all sorts of tasks. For instance, we can dynamically create a temporary Azure SQL database, harvest data from dozens of ADLS files into that database, aggregate the data and store the information in a static data mart, and finally drop the temporary database and remove the ADLS files. In short, your imagination and budget are the only limits.
Stay tuned for more articles related to the Modern Data Platform (Warehouse).
Next Steps
- Creating a service principle using PowerShell
- Importing Raw Data into ADLS with PowerShell
- Converting raw data into enriched data with ADLA
- Using Azure Data Factory to orchestrate data processing
